
Popular categories
Looking for a yarn?


Comments / Questions (20)
![]() Murielle wrote:
Murielle wrote:
Pourquoi le nombre de motifs sur l'image du bonnet n'est pas le même que le résultat du tricot? Faut-il rajouter une partie du diagramme ?
27.12.2025 - 11:57DROPS Design answered:
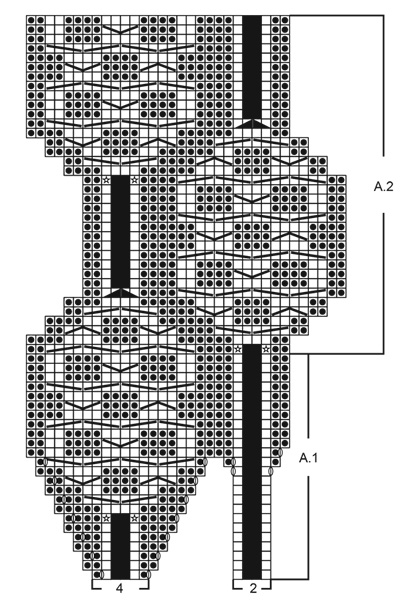
Bonjour Murielle, notez que dans le diagramme, on doit avoir 2 torsades en largeur, tricotées en quinconce, ainsi, on a bien 14 torsades tout le tour avec 7 fois le diagramme A.1. Bon tricot!
02.01.2026 - 12:38
![]() Linda wrote:
Linda wrote:
I have worked out my issue with the pattern. I enlarged the diagram and could then see the increase stitches. Can't wait to see my finished hat.
23.06.2024 - 11:10
![]() Linda wrote:
Linda wrote:
I am struggling with Vadelma hat pattern. Just can't work out what to do after round 5. Where do I do the YO to make the extra stitches? Thanks
23.06.2024 - 09:38DROPS Design answered:
Dear Linda, please, look closely at the A.1 pattern, and see the symbol for yarnover after the first two stitch (the black squares after the first stitch are no stitches, you skip them), and then there is the symbole for yarnover. Happy Knitting!
23.06.2024 - 15:15
![]() Eva Linde wrote:
Eva Linde wrote:
På andra varvet på mönstret ska man göra en avig maska! Gör man en ny då? Det har jag provat men mönstret går inte jämt ut! Det gäller mössan! MVH Eva
04.11.2020 - 20:28DROPS Design answered:
Hej Eva. På varv 1 i diagram A.1 ökar du 2 maskor genom att göra omslag på 2 ställen (den symbolen som ser ut som en oval ring). Det är dessa omslag som gör att det blir fler maskor på varv 2 i diagrammet. Mvh DROPS Design
05.11.2020 - 08:56
![]() Eva Linde wrote:
Eva Linde wrote:
Förstår inte mönstret från början på mönstret! Ska den extra maskan som ska var avig inte räknar in i mönstret på andra varvet?
04.11.2020 - 20:17
![]() SUSANNA GOLOMER wrote:
SUSANNA GOLOMER wrote:
Hello, why is the tension in this pattern different for the neck warmer and the gloves (24 stitches vs 26), please? Is that intentional? Thank you.
20.12.2019 - 11:45DROPS Design answered:
Dear Mrs Golomer, yes, gloves are worked with smaller needles (= size 2,5 mm), so that they are more tight/warm. Happy knitting!
20.12.2019 - 16:20
![]() Petra Stammkötter wrote:
Petra Stammkötter wrote:
Hallo, erstmal danke für die super schnelle Antwort. Ich glaube, ich habe das falsch ausgedrückt. In Reihe 26 (Reihe 2 von A2) sollen die 2 M heraus gestrickt werden. Aus welcher Masche werden diese heraus gestrickt? Wenn ich die aus den beiden rechten M heraus stricke, komme ich auf 4 statt wie in R 3 von A2 8 rechte M. An der Stelle hakt es irgendwie. Nochmal vielen Dank. Petra Stammkötter
17.12.2018 - 17:53DROPS Design answered:
Liebe Frau Stammkötter, es war etwas nicht richtig im Diagram, eine neues Diagram werden wir bald hochladen, Danke für den Hinweis. Viel Spaß beim stricken!
18.12.2018 - 14:44
![]() Petra Stammkötter wrote:
Petra Stammkötter wrote:
Hallo, ich verstehe bei der Mütze den Wechsel von A1 auf A2 nicht. In welchen Maschen werden die Maschen zugenommen? Die ersten Maschen sind 2 linke, dann folgen 2 rechte. Nach meinem Verständnis fehlen dort 2 Maschen, der Wechsel kommt nicht hin. Können Sie mir das freundlicherweise erklären? Ich finde die Mütze sehr schön und würde diese gerne zu Ende stricken, komme an der Stelle aber nicht weiter. Vielen Dank und viele Grüße Petra Stammkötter
17.12.2018 - 09:37DROPS Design answered:
Liebe Frau Stammkötter, diese 2 Maschen sind sicher die 2 Sternchen in der 2. Reihe in A.2 (am Anfang), die Sie dann zunehmen. Viel Spaß beim stricken!
17.12.2018 - 10:25
![]() Christel wrote:
Christel wrote:
Suite à mon commentaires précédent,l’erreur semble se trouver à la ligne 2 de A2.Il ya deux mailles endroits qui n’exiStaient pas dans le rang précédent
12.12.2017 - 18:35DROPS Design answered:
Bonjour Christel, tout à fait, on doit augmenter 2 m, 1 m à chaque étoile au rang 2 de A.2, on a ainsi 28 m pour le rang suivant. Bon tricot!
13.12.2017 - 10:16
![]() Chrytye wrote:
Chrytye wrote:
Bonjour.j’ai un souci avec la transition entre A1 et A2.le nombre de mailles ne correspond pas. Merci pour votre aide
12.12.2017 - 18:09DROPS Design answered:
Bonjour Mme Chrytye, au dernier rang de A.1 tout comme au 1er rang de A.2 vous avez 26 m. Au 2ème rang de A.2, on augmente 2 m (cf étoile), on a ainsi 28 m à ce niveau, le 3ème rang de A.2 se tricote ensuite sur 28 m. Bon tricot!
13.12.2017 - 10:12
|
|||||||||||||||||||||||||||||||||||||||||||
Vadelma#vadelmaset |
|||||||||||||||||||||||||||||||||||||||||||
 |
 |
||||||||||||||||||||||||||||||||||||||||||
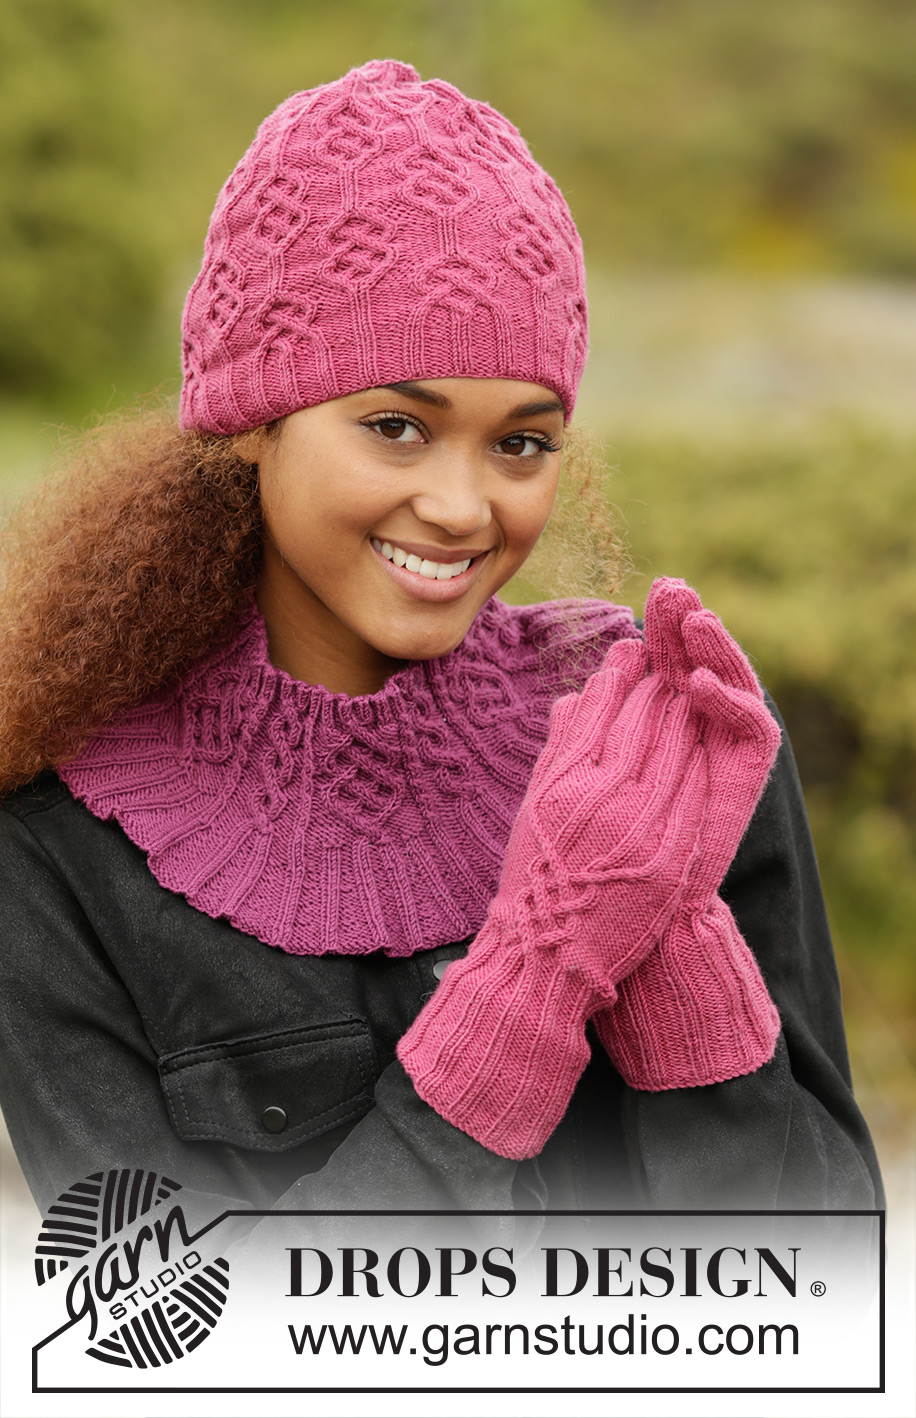
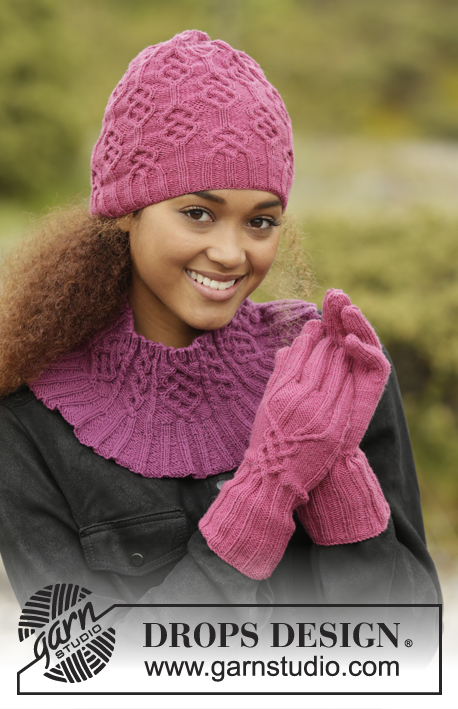
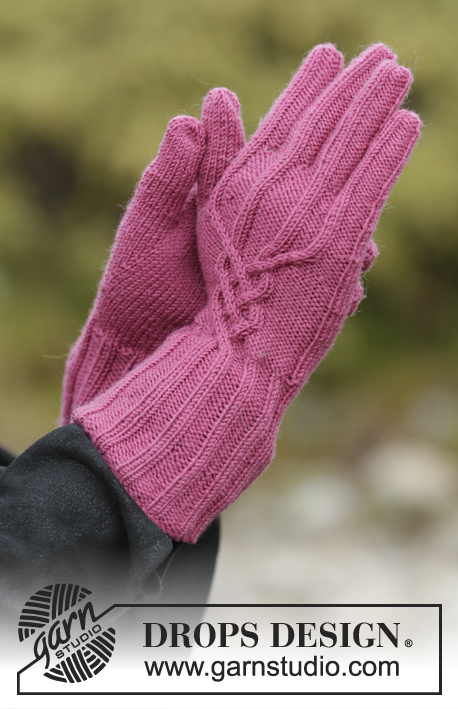
Set consists of: Knitted DROPS hat, neck warmer and gloves with cables in "BabyMerino".
DROPS 172-44 |
|||||||||||||||||||||||||||||||||||||||||||
|
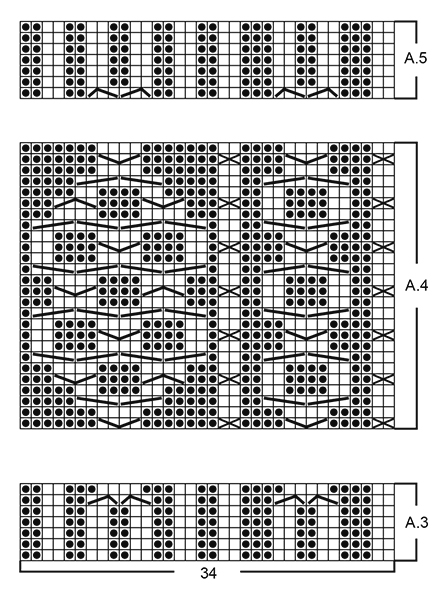
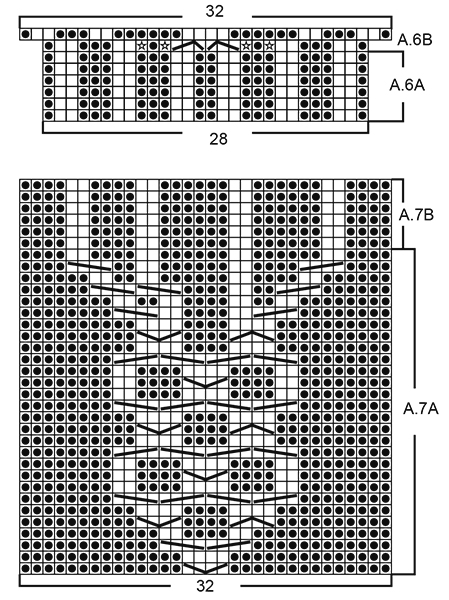
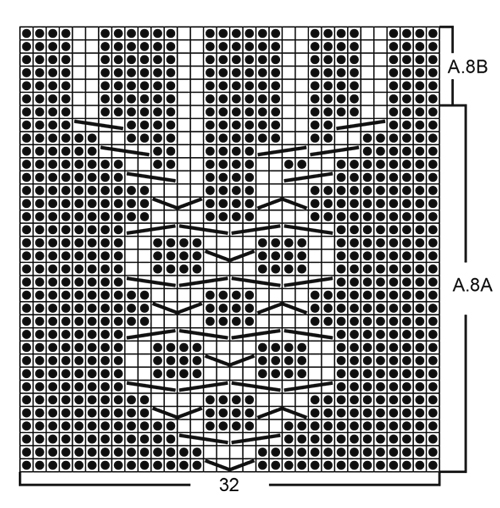
HAT: PATTERN: See diagrams A.1 and A.2. ---------------------------------------------------------- HAT: Worked in the round on double pointed needles, work top down and switch to circular needle when needed. Cast on 14-16 sts on double pointed needles size 3 mm with plum and work as follows: ROUND 1: K and inc 14-16 sts by making 1 YO after every st = 28-32 sts. ROUND 2: K all sts (always work YOs twisted to avoid holes). ROUND 3: K and inc 14-17 sts evenly (inc with YOs) = 42-49 sts. ROUND 4: * K 2, P 1, K 2, P 1-2 *, repeat from *-* 7 times in total (work YOs twisted to avoid holes). Then work pattern in the round as follows: * A.1 (= 6 sts), P 0-1 *, repeat from *-* the entire round (= 7 repetitions with A.1 and P 0-1 between every repetition). When A.1 has been worked, there are 182-189 sts on needle. Continue in the round according to diagram A.2 the same way with P 0-1 between every repetition. REMEMBER THE KNITTING TENSION When A.2 has been worked 1 time vertically, hat measures approx. 20 cm from the top. Now dec 1 st in every P section (dec 1 st by working the last two sts in every P section P tog), work in addition the 4 K sts in the middle cable in every repetition twisted tog 2 by 2 = 140-147 sts remain on needle. Switch to circular needle size 2.5 mm and rib in the round with K over K and P over P until hat measures approx. 23-24 cm from the top. Then loosely cast off with K over K and P over P. ASSEMBLY: Baste a strand up and down through sts at the top of hat, tighten tog and fasten. ---------------------------------------------------------- NECK WARMER: PATTERN: See diagrams A.3 to A.5. INCREASE TIP: Inc 1 st by making 1 YO, on next round P YO twisted to avoid holes - NOTE: To make the inc less visible inc at the end of every P section. ---------------------------------------------------------- NECK WARMER: Worked in the round on circular needle, top down. Cast on 170-204 sts on circular needle size 2.5 mm with heather. K 1 round. Then work according to diagram A.3 (= 5-6 repetitions of 34 sts). When A.3 has been worked, switch to circular needle size 3 mm. Then continue pattern in the round according to diagram A.4. REMEMBER THE KNITTING TENSION When A.4 has been worked, switch back to circular needle size 2.5 mm. Insert 1 marker, NOW MEASURE PIECE FROM HERE! Work in the round according to diagram A.5, when A.5 has been worked 1 time in height continue with K over K and P over P. When piece measures 2 cm from marker, inc 1 st in every P-section - READ INCREASE TIP = 210-252 sts. Inc like this every 4th round a total of 4 times = 330-396 sts. When rib measures 6-7 cm from marker, loosely cast off with K over K and P over P. Neck warmer measures approx. 16-17 cm from top and down. ---------------------------------------------------------- GLOVES: PATTERN: See diagrams A.6 to A.8. INCREASE TIP (applies to thumb gusset): Inc 1 st by making 1 YO. On next round K YO twisted to avoid holes. ---------------------------------------------------------- LEFT GLOVE: Worked in the round on double pointed needles. Cast on 56 sts on double pointed needles size 2.5 mm with plum. K 1 round. Work next round as follows: Work A.6A 2 times in total (= 2 repetitions of 28 sts). Continue rib like this. When piece measures 10 cm, work A.6B over the first 28 sts and A.6A over the last 28 sts. When A.6B has been worked 1 time vertically, there are 60 sts on needle. NOW MEASURE PIECE FROM HERE! Work next round as follows: Work A.7A over the first 32 sts (= on top of hand), P 1, 26 sts in stocking st and P 1 (= 28 sts inside hand). REMEMBER THE KNITTING TENSION Insert 1 marker in the next to last st in stocking st inside hand (i.e. in third last st on round) = thumb st. When piece measures 1.5 cm from rib beg inc for thumb gusset and inc as follows: Inc 1 st in each side of st with marker - READ INCREASE TIP. Inc like this every 3rd round 7 times in total = 15 sts thumb gusset (there will be 2 sts more between YO on every inc). When piece measures 7 cm, slip the 15 thumb sts on 1 stitch holder. On next round, cast on 1 new st behind thumb sts = 60 sts on needle. Continue with pattern and stocking st as before until A.7A has been worked - piece measures approx. 8 cm. Then work A.7B over the 32 sts on top of hand, continue the remaining 28 sts inside hand as before. When piece measures 9 cm, slip the first 25 sts on 1 stitch holder (= on top of hand), keep the next 15 sts on needle and slip the remaining 20 sts on 1 stitch holder (= inside the hand). PINKIE: = 15 sts, in addition cast on 1 new st towards the hand = 16 sts. Work in the round as follows: Work P over P and K over K over the first 8 sts, work in stocking st over the next 6 sts and P the last 2 sts. When finger measures 6 cm, K all sts tog 2 by 2 = 8 sts. Cut the yarn and pull it through the remaining sts, tighten tog and fasten. HAND: Slip sts from stitch holders back on the needles, pick in addition up 2 sts towards the little finger = 47 sts. Work K over K and P over P for 2 rounds - NOTE: P the one new st which is closest to top of hand and K the second new st which is closest inside of hand. Keep the 2 sts that were picked up towards the little finger + 9 sts on top of hand and 5 sts inside the hand on the needle. Slip the remaining 31 sts back on the stitch holders. RING FINGER: = 16 sts, in addition cast on 2 new sts towards stitch holders = 18 sts. Work in the round with P over P and K over K over the 9 sts on top of hand, P 1 towards pinkie on top of hand and work the remaining 8 sts in stocking st. When finger measures 7.5 cm, K all sts tog 2 by 2 = 9 sts. Cut the yarn and pull it through the remaining sts, tighten tog and fasten. MIDDLE FINGER: Slip 8 sts from stitch holder on top of hand and 7 sts inside the hand back on needles, pick in addition up 3 sts towards the ring finger and cast on 2 new st towards sts on stitch holder = 20 sts. Work in the round with P over P and K over K over the 8 sts mid on top of finger, P 1 towards ring finger on top of hand and work the remaining 11 sts in stocking st. When finger measures 8 cm, K all sts tog 2 by 2 = 10 sts. Cut the yarn and pull it through the remaining sts, tighten tog and fasten. INDEX FINGER: Slip the remaining 16 sts from stitch holders back on the needles, pick in addition up 4 sts towards the middle finger = 20 sts. Work in the round with P over P and K over K over the 8 sts mid on top of finger, P 2 towards middle finger on top of hand and work the remaining 10 sts in stocking st. When finger measures 7 cm, K all sts tog 2 by 2 = 10 sts. Cut the yarn and pull it through the remaining sts, tighten tog and fasten. THUMB: Slip the sts over thumb gusset back on the needles and knit in addition up 3 sts along the edge behind the thumb sts = 18 sts. Work in stocking st in the round. When thumb measures 6 cm, K all sts tog 2 by 2 = 9 sts. Cut the yarn and pull it through the remaining sts, tighten tog and fasten. RIGHT GLOVE: Work as left glove but reversed – i.e. work pattern according to diagram A.8A/A.8B (instead of A.7A/A.7B) and inc for thumb gusset on each side of third st at beg (instead of in third to last st on round). |
|||||||||||||||||||||||||||||||||||||||||||
Diagram explanations |
|||||||||||||||||||||||||||||||||||||||||||
|
|||||||||||||||||||||||||||||||||||||||||||
 |
|||||||||||||||||||||||||||||||||||||||||||
 |
|||||||||||||||||||||||||||||||||||||||||||
 |
|||||||||||||||||||||||||||||||||||||||||||
 |
|||||||||||||||||||||||||||||||||||||||||||
Have you finished this pattern?Tag your pictures with #dropspattern #vadelmaset or submit them to the #dropsfan gallery. Do you need help with this pattern?You'll find 25 tutorial videos, a Comments/Questions area and more by visiting the pattern on garnstudio.com. © 1982-2026 DROPS Design A/S. We reserve all rights. This document, including all its sub-sections, has copyrights. Read more about what you can do with our patterns at the bottom of each pattern on our site. |
|||||||||||||||||||||||||||||||||||||||||||


With over 40 years in knitting and crochet design, DROPS Design offers one of the most extensive collections of free patterns on the internet - translated to 17 languages. As of today we count 324 catalogues and 12290 patterns translated into English (UK/cm). 12290
We work hard to bring you the best knitting and crochet have to offer, inspiration and advice as well as great quality yarns at incredible prices! Would you like to use our patterns for other than personal use? You can read what you are allowed to do in the Copyright text at the bottom of all our patterns. Happy crafting!
Post a comment to pattern DROPS 172-44
We would love to hear what you have to say about this pattern!
If you want to leave a question, please make sure you select the correct category in the form below, to speed up the answering process. Required fields are marked *.