
Popular categories
Looking for a yarn?


Comments / Questions (70)
![]() Maureen wrote:
Maureen wrote:
GUten Tag Wie kommen Sie auf 260 Machen? und wie Berechne ich die verteilung der Maschen?Genrell verstehe ich den Absatz nicht. Liebe grüsse
24.11.2016 - 15:38DROPS Design answered:
Liebe Maureen, ich kann leider keine 260 M. in dieser Anleitung finden, können Sie bitte sagen, wo Sie genau angekommen sind, und welche Größe Sie stricken.
24.11.2016 - 16:12
![]() Susanne Madsen wrote:
Susanne Madsen wrote:
Jeg vil gerne vide når i skriver at det er alle pinde set fra retsiden om i mener at det også er vrangpindene der er vist. Altså om f.eks mønster 8 går over 24 pinde eller det dobbelte
08.11.2016 - 09:55DROPS Design answered:
Hej Susanne. Ja, alle pinde er vist. Mönstret vises fra retsiden, men baade ret og vrangpinden er talt med. Laes her hvordan du laeser vores diagrammer.
08.11.2016 - 11:32
![]() Barbara wrote:
Barbara wrote:
Sorry, was wichtiges habe ich vergessen, ich stricke die kleinste Größe.
22.10.2016 - 23:04
![]() Barbara wrote:
Barbara wrote:
Hallo, ich bin beim Stricken gerade da angekommen, wo man die Arbeit aufteilt für Rücken- und Vorderteile. Ich habe aber viel mehr als 150 Maschen und 38+66+38 sind auch nicht 150. Habe ich etwas übersehen? Mit freundlichen Grüßen Barbara
22.10.2016 - 23:01DROPS Design answered:
Liebe Barbara, Sie hatten 182 M. Dann müssen Sie 1 M in jedem Linksbereich aus 8 M li abnehmen (= 4 Abnahmen) und je 1 M beidseitig jedes glatt-re-Bereichs abnehmen (= 4 Abnahmen), dh 8 M. werden abegnommen - diese Abnahmen 6 M insgesamt wiederholen = 48 M. werden insg. abegnommen. 182-48=134M. Dann sollen Sie zunhemen: 1 M in jedem Linksbereich aus 4 M li (= 4 Zunahmen) und je 1 M beidseitig jedes glatt-re-Bereichs (= 4 Zunahmen), insg. 2 Mal diese Zunahmen wiederholen = 134 + [(4+4) x2 = 16] = 150 M.
24.10.2016 - 10:12
![]() Annie wrote:
Annie wrote:
En kan ik het aantal bollen dan door de helft delen.
18.10.2016 - 11:05DROPS Design answered:
Hoi. Zie mijn antwoord hieronder.
18.10.2016 - 12:15
![]() Annie wrote:
Annie wrote:
Als ik het vest in brushed alpaca silk wil maken kan ik dan 1 draad gebruiken?
18.10.2016 - 10:01DROPS Design answered:
Hoi Annie. Je kan 1 draad Alaska vervangen door 1 draad Brushed Alpaca Silk (beide zijn van categorie C). Lees hier hoe je de juiste hoeveelheid kunt berekenen
18.10.2016 - 12:15
![]() Broux wrote:
Broux wrote:
"À 34 cm de hauteur totale, augmenter 1 m dans toutes les sections env avec une diminution......." je ne comprends pas ce passage des explications
16.09.2016 - 10:06DROPS Design answered:
Bonjour Mme Broux, vous avez auparavant diminué 1 m dans certaines sections envers (elles avaient 8 m env au début). Vous augmentez maintenant dans ces sections en m env où vous avez diminué avant. Bon tricot!
16.09.2016 - 11:04
![]() Anja Hautamäki wrote:
Anja Hautamäki wrote:
How do I do the decreases, 12 stiches at regular intervals. What kind of intervals?
11.09.2016 - 09:07DROPS Design answered:
Dear Mrs Hautamäki, read more here how to calculate where to inc. Happy knittting!
12.09.2016 - 09:13
![]() Magda wrote:
Magda wrote:
Witam :) Mam pytanie odnośnie fragmentu dotyczącego rzędów skróconych. W opisie mam informację: "RZĘDY SKRÓCONE NA OBSZYCIACH PRZODÓW: Co 20 rz. przer. następująco: przer. 16-17-18-19-20-21 (...)" Te 20 rzędów, to tylko rzędy pełne, czy rzędy skrócone też w to wliczać? Dziękuję z góry za odpowiedź.
09.09.2016 - 22:26DROPS Design answered:
Witaj Magdo. Chodzi tylko o pełne rzędy. Nie było by błędem również to, gdybyś wliczyła i rząd skrócony. Chodzi po prostu o to, aby ściągacz nie ściągał całej robótki i nie "ciągnął" brzegów na dole swetra do góry. MIŁEJ PRACY!
11.09.2016 - 20:35
![]() Emma wrote:
Emma wrote:
Bonjour Faut-il faire des rangs raccourcis tout le long des bordures devant ou seulement dans les 8 premiers cm ? Merci
03.09.2016 - 11:37DROPS Design answered:
Bonjour Emma, les rangs raccourcis sur les bordures des devants se tricotent tous les 20 rangs jusqu'à la fin. Bon tricot!
05.09.2016 - 08:47
|
||||||||||||||||||||||||||||
Arrowhead#arrowheadcardigan |
||||||||||||||||||||||||||||
 |
 |
|||||||||||||||||||||||||||
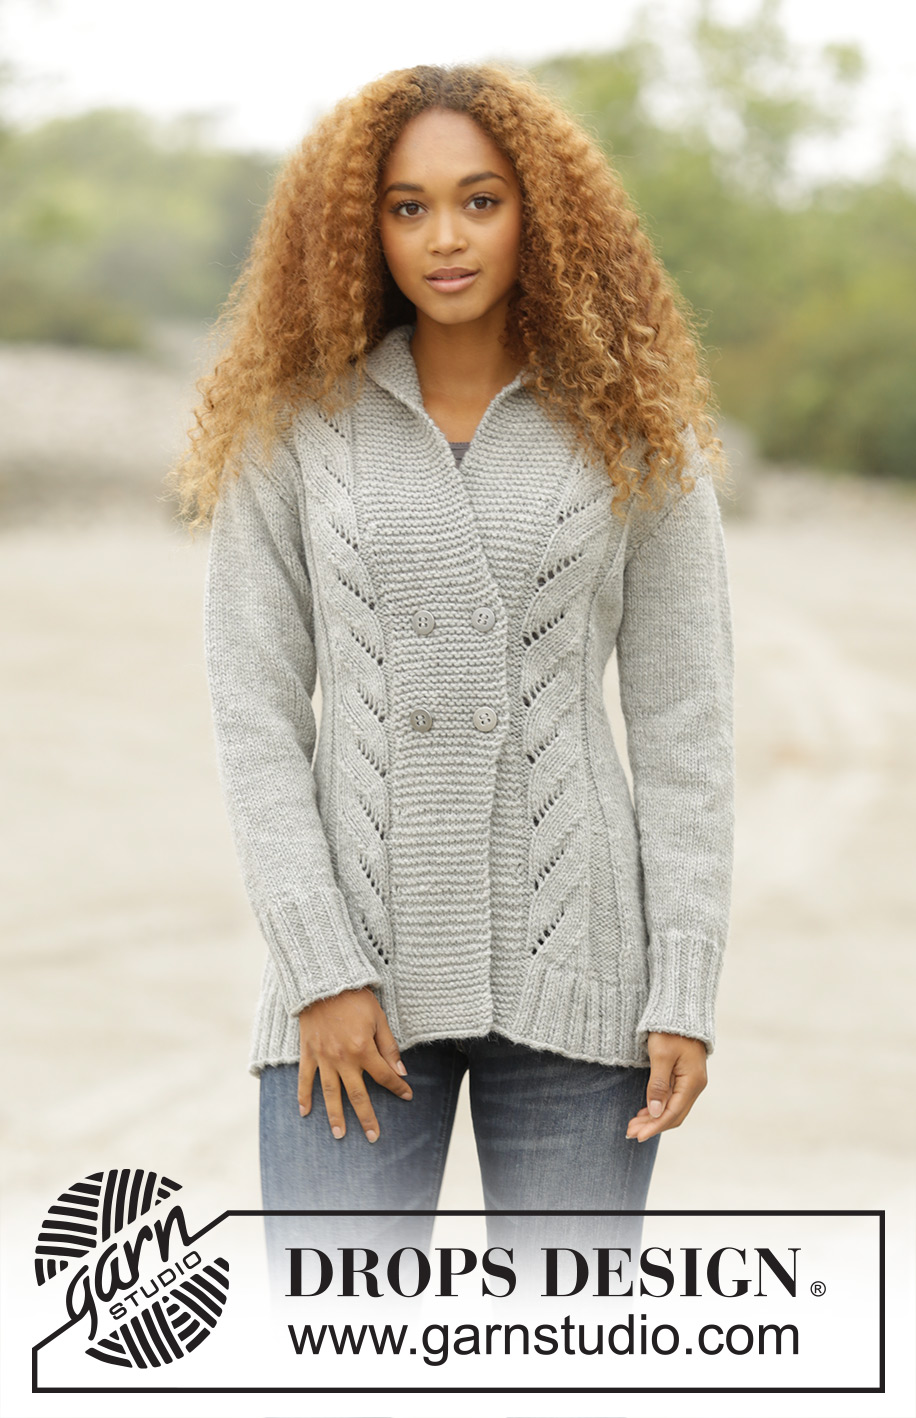
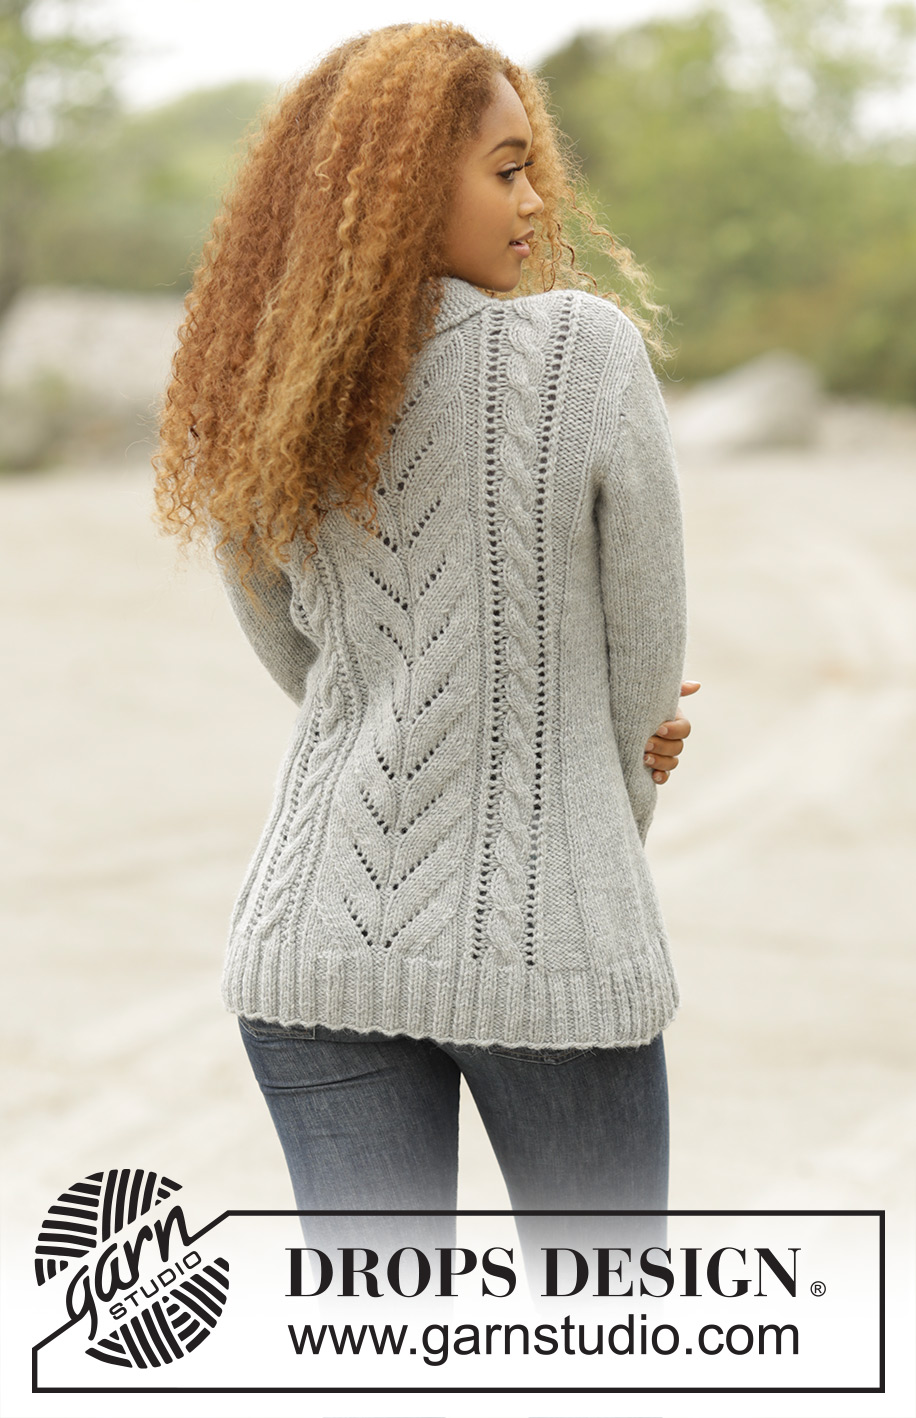
Knitted DROPS jacket with cables and shawl collar in ”Alaska”. Size: S - XXXL.
DROPS 173-22 |
||||||||||||||||||||||||||||
|
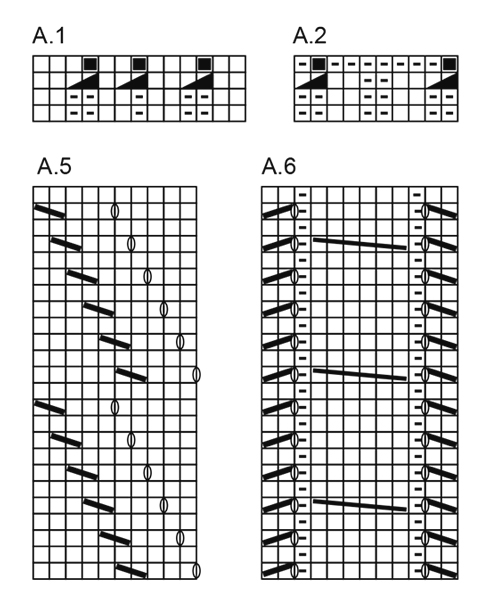
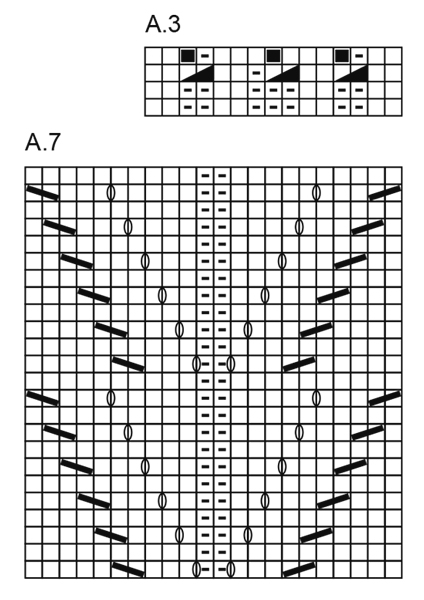
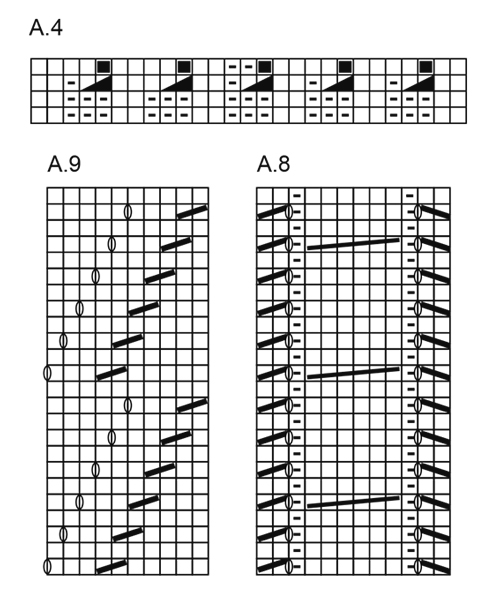
GARTER ST (back and forth): K all rows. 1 ridge = 2 rows K. PATTERN: See diagrams A.1 to A.9. The diagrams show all rows in pattern seen from RS. SHORT ROWS BAND: For every 20 rows worked, work as follows: Work over the first 16-17-18-19-20-21 sts from RS, turn and work back over these sts, work 1 row from RS (with pattern and garter st as before) over all sts. Work over the first 16-17-18-19-20-21 sts from WS, turn and work back over these sts, work 1 row from WS (with pattern and garter st as before) over all sts. DECREASE TIP: Dec 1 st in each side of section in stocking st as follows: K 1, slip next st as if to K, K 1, psso, work until 3 sts remain, K 2 tog, K 1. INCREASE TIP: Inc with 1 YO inside first and last st in stocking st, P the inc sts twisted on next row to avoid holes. BUTTONHOLES: Dec for 4 buttonholes on right front piece (from RS): Work 3 sts, K 2 tog, 1 YO, work 6-7-8-9-10-11 sts, K 2 tog, 1 YO = 2 buttonholes on same row (3 sts remain on band). Dec for buttonholes when piece measures: SIZE S: 28 and 36 cm SIZE M: 29 and 37cm Size L: 30 and 38 cm SIZE XL: 31 and 39 cm Size XXL: 32 and 40 cm SIZE XXXL: 33 and 41 cm. ---------------------------------------------------------- JACKET: Worked back and forth on circular needle from mid front. BODY: Cast on 215-233-243-269-295-313 sts on circular needle size 4.5 mm with Alaska. P 1 row from WS, then work as follows - from RS: 16-17-18-19-20-21 sts in garter st (= band), P 2, A.1 (= 13 sts), A.2 (= 10 sts), rib K 2/P 2 over the next 24-32-36-48-60-68 sts, K 2, A.2, A.3 (= 15 sts), P 2, A.4 (= 27 sts), P 2, A.3, A.2, rib K 2/P 2 over the next 24-32-36-48-60-68 sts, K 2, A.2, A.1, P 2, 16-17-18-19-20-21 sts in garter st (= band). Work SHORT ROWS over sts in band – see explanation above. REMEMBER THE KNITTING TENSION Repeat the first 2 row in A.1 - A.4 until piece measures 8 cm, AT THE SAME TIME adjust so that next row is worked from RS, then work the last 2 row in A.1 - A.4, AT THE SAME TIME dec 4-5-6-9-12-11 sts evenly over the 26-34-38-50-62-70 sts rib in each side = 182-198-206-226-246-266 sts. Switch to circular needle size 5 mm. Then work as follows from RS: 16-17-18-19-20-21 sts in garter st, P 2, A.5 (= 10 sts), P 8, K 22-29-32-41-50-59, P 8, A.6 (= 12 sts), P 2, A.7 (= 22 sts), P 2, A.8 (= 12 sts), P 8, K 22-29-32-41-50-59, P 8, A.9 (= 10 sts), P 2, 16-17-18-19-20-21 sts in garter st. When piece measures 10 cm, dec 1 st in every P section with P 8 and dec 1 st in each side of section in stocking st - READ DECREASE TIP (= 8 sts dec), dec the same way every 4 cm, 6 times in total, dec alternately on right and left side of P sections = 134-150-158-178-198-218 sts. Dec for BUTTONHOLES on right band - see explanation above. When piece measures 34 cm, inc 1 st in every P section with a dec, and 1 st in each side of every section in stocking st (= 8 sts inc) - READ INCREASE TIP, repeat inc when piece measures 46-47-48-49-50-51 cm = 150-166-174-194-214-234 sts. When piece measures 50-51-52-53-54-55 cm, work as follows from RS: Work the first 38-41-43-48-53-58 sts as before, cast off the next 4-6-6-6-6-6 sts, work the next 66-72-76-86-96-106 sts as before, cast off the next 4-6-6-6-6-6 sts and work the last 38-41-43-48-53-58 sts as before. Now finish each part separately. BACK PIECE: = 66-72-76-86-96-106 sts. Continue pattern as before, AT THE SAME TIME continue cast off in each side for armholes on every other row: Dec 2 sts 0-1-1-2-3-4 times and 1 st 0-0-1-3-5-7 times = 66-68-70-72-74-76 sts. Continue the pattern as before. When piece measures 66-68-70-72-74-76 cm, cast off the middle 20-22-24-26-28-30 sts for neck and finish each shoulder separately. On next row cast off 1 st towards the neck = 22 sts remain on each shoulder. Cast off when piece measures 68-70-72-74-76-78 cm. RIGHT FRONT PIECE: = 38-41-43-48-53-58 sts. Continue pattern as before, AT THE SAME TIME continue cast off for armhole in the side as on back piece = 38-39-40-41-42-43 sts. When piece measures 68-70-72-74-76-78 cm, cast off the first 22 sts from WS = 16-17-18-19-20-21 sts remain on needle (= band). Work the rest of row. Then work short rows over the 16-17-18-19-20-21 sts as follows - beg from RS: * Work 2 rows back and forth over the first 8-8-9-9-10-10 sts, work 2 rows back and forth over all sts *, repeat from *-* until neck edge measures 9-9-10-10-11-11 cm at the shortest. Cast off. LEFT FRONT PIECE: Work as right but reversed. Cast off for shoulder from RS and beg short rows from WS. SLEEVE: Worked in the round on double pointed needles. Cast on 45-45-50-50-50-50 sts on double pointed needle size 4.5 mm with Alaska. K 1 round, then work rib = K 2/P 3. When rib measures 10 cm, K 1 round while dec 11-9-12-10-10-8 sts evenly = 34-36-38-40-40-42 sts. Switch to double pointed needles size 5 mm and continue in stocking st. Insert 1 marker at the beg of round. When piece measures 11 cm, inc 1 st on each side of marker, inc every 4-3½-3-2½-2-1½ cm a total of 9-10-11-13-15-17 times = 52-56-60-66-70-76 sts. When piece measures 47-47-47-46-45-44 cm (NOTE! Shorter measurements in the larger sizes because of broader shoulders), cast off 6 sts mid under sleeve (= 3 sts on each side of marker), now finish piece back and forth on needle. Cast off for sleeve cap at beg of every row in each side as follows: 2 sts 3 times and 1 st 0-1-1-2-3-5 times, cast off 2 sts in each side of piece until piece measures 53-53-54-54-54-55 cm, cast off 3 sts in each side and cast off the remaining sts. Piece measures 54-54-55-55-55-56 cm in total. ASSEMBLY: Sew shoulder seams and sew in sleeves. Sew the collar tog mid back and sew it to neck line. Sew the buttons on to the left band. |
||||||||||||||||||||||||||||
Diagram explanations |
||||||||||||||||||||||||||||
|
||||||||||||||||||||||||||||
 |
||||||||||||||||||||||||||||
 |
||||||||||||||||||||||||||||
 |
||||||||||||||||||||||||||||
 |
||||||||||||||||||||||||||||
Have you finished this pattern?Tag your pictures with #dropspattern #arrowheadcardigan or submit them to the #dropsfan gallery. Do you need help with this pattern?You'll find 27 tutorial videos, a Comments/Questions area and more by visiting the pattern on garnstudio.com. © 1982-2026 DROPS Design A/S. We reserve all rights. This document, including all its sub-sections, has copyrights. Read more about what you can do with our patterns at the bottom of each pattern on our site. |
||||||||||||||||||||||||||||


With over 40 years in knitting and crochet design, DROPS Design offers one of the most extensive collections of free patterns on the internet - translated to 17 languages. As of today we count 324 catalogues and 12290 patterns translated into English (UK/cm). 12290
We work hard to bring you the best knitting and crochet have to offer, inspiration and advice as well as great quality yarns at incredible prices! Would you like to use our patterns for other than personal use? You can read what you are allowed to do in the Copyright text at the bottom of all our patterns. Happy crafting!
Post a comment to pattern DROPS 173-22
We would love to hear what you have to say about this pattern!
If you want to leave a question, please make sure you select the correct category in the form below, to speed up the answering process. Required fields are marked *.