
Popular categories
Looking for a yarn?


Comments / Questions (70)
![]() Chantal wrote:
Chantal wrote:
J'aimerais que vous m'expliquer comment diminuer les deux dernier rang de A1aA4
06.05.2017 - 05:04DROPS Design answered:
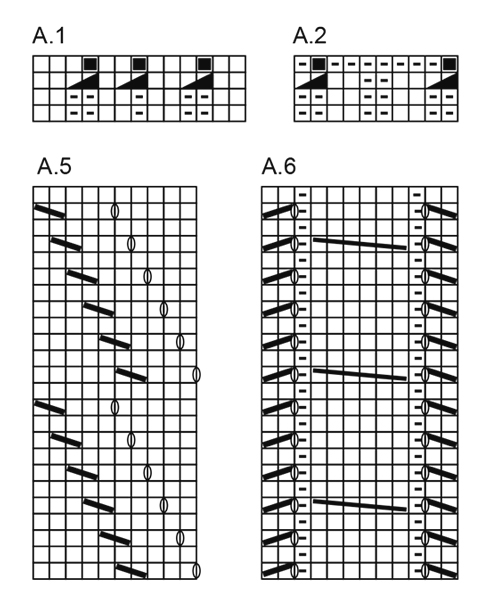
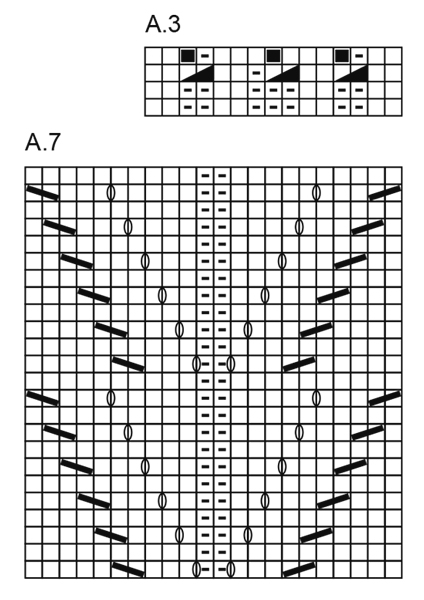
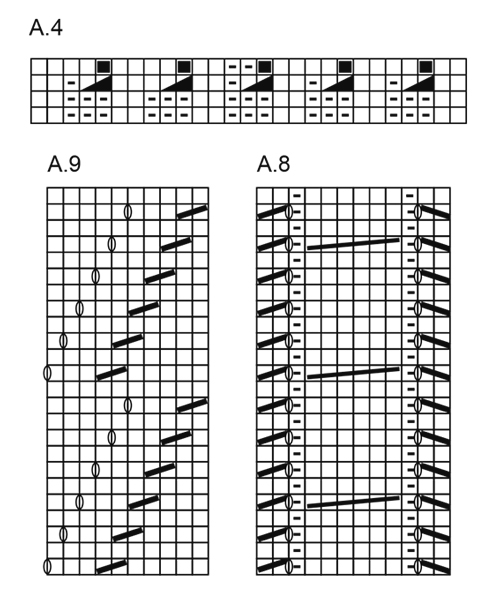
Bonjour Chantal, à l'avant-dernier rang de A.1, on tricote: 2 m end, 2 m ens à l'env, 2 m end, 2 m ens à l'env, 1 m end, 2 m ens à l'env, 2 m end (= il reste 10 m que l'on tricote à l'env sur l'env au dernier rang). De même dans A.2, A.3 et A.4: on tricote 2 m ens à l'env (= triangle noir) et au rang suivant sur l'envers, on tricote les mailles restantes comme indiqué (carré noir = maille qui a été diminuée). Bon tricot!
08.05.2017 - 10:08
![]() Annie wrote:
Annie wrote:
Is het mogelijk dit patroon aan te passen zodat het achterpand en de voorpanden apart gebreid kunnen worden?
25.03.2017 - 12:02DROPS Design answered:
Hallo Annie, Jazeker, dat kan heel goed bij dit patroon. We hebben een instructie voor het aanpassen van een patroon van de rondbreinaald naar naalden met knop: Zie hier voor instructie
27.03.2017 - 12:31
![]() Hélène wrote:
Hélène wrote:
Bonjour, pour le modèle en taille XXXL, après les deuxièmes augmentations (à 51cm de hauteur totale), combien y-a-t' il de mailles dans les sections envers et dans les sections en jersey ?
22.03.2017 - 10:55DROPS Design answered:
Bonjour Hélène, vous aviez 8 m env et avez diminué 6 fois= il reste 2 m env que vous augmentez 2 x = 4 m env dans les sections qui en avaient 8 au début. Vous aviez 59 m jersey et avez diminué un total de 12 m puis vous augmentez 2 x 2 m = 51 m jersey. Bon tricot!
22.03.2017 - 11:29
![]() Anetatinos wrote:
Anetatinos wrote:
How many stitches are left to bind off on the sleeve?
24.02.2017 - 15:32DROPS Design answered:
Dear Mrs Anetatinos, number of sts remaining will depend on how many rows you will need to reach 53-55 cm (see size). Cast off as described for your size, ie: 2 sts 3 times, 1 st 0-1-1-2-3-5 times, then cast off 2 sts in each side of piece until sleeve measures 53-53-54-54-54-55 cm, cast off 3 sts in each side and cast off the remaining sts. Happy knitting!
24.02.2017 - 17:07Annette Cameron wrote:
I am making the Arrowhead jacket 173-22. I hsve reached 8cm. The decrease says dec 5 sts (medium size) on each side if the rib but this would reduce the stitches to 223. The pattern says 198 sts would be left, i.e. a decrease of 35 sts, 17.5 on each side. Also, should I knit 8cm and then 2 row of decreases? Can you advise? Many thanks, Annette
04.02.2017 - 11:12DROPS Design answered:
Dear Mrs Cameron, you are working 8 cm following the rib pattern + first 2 rows in diagrams A.1-A.4 - then work the last 2 rows in A.1-A.4 (= dec as shown in diagrams) + dec evenly over the 26 sts in rib on each side = 198 sts. Happy knitting!
06.02.2017 - 09:15
![]() Hélène wrote:
Hélène wrote:
Bonjour Après le montage des mailles, est-ce que je tricote le premier rang à l'endroit ou à l'envers ?
17.01.2017 - 10:48DROPS Design answered:
Bonjour Hélène, le 1er rang après avoir monté les mailles se tricote sur l'envers et se tricote tout en mailles envers. Bon tricot!
17.01.2017 - 11:01
![]() Cecillia wrote:
Cecillia wrote:
After working 8cm in A.1-A.4 do you start decrease after working an addition 10 cm or 2cm to total 10cm.
16.01.2017 - 01:58DROPS Design answered:
Dear Cecilia, dec starts when piece measures a total of 10 cm from cast on edge, ie 2 cm after the 8 cm in A.1-A.4. Happy knitting!
16.01.2017 - 10:42
![]() Ildiko wrote:
Ildiko wrote:
Do the diagrams really show every other rows? Thanks!
02.01.2017 - 19:50DROPS Design answered:
Hi. The diagrams show all rows in pattern seen from RS. Happy knitting!
02.01.2017 - 19:59Heather wrote:
I guess I am not used to your vocabulary. I thought K2P2 was ribbing, and A1to A4 looks like it has decreases in it. I'm confused!
15.12.2016 - 17:21DROPS Design answered:
Dear Heather, at the very beg you will work different kind of rib, K2/P2 on the stated sts and rib following the first 2 rows in diagram, ie seen from RS: A.1 = 13 sts = K2, P2, K2, P1, K2, P2, K2 - A.2 = 10 sts = P2, K2, P2, K2, P2 - A.3 = 15 sts = K2,P2,K2,P3,K2,P2,K2 - A.4 = 27 sts =K2,P3, K2,P3, K2,P3, K2,P3, K2,P3, K2. Happy knitting!
16.12.2016 - 09:49Heather wrote:
From reading the instructions it seems that I am to begin the lace pattern at the bottom, but the pictures show starting with ribbing only and then starting the lace when the ribbing is done. Is this an error in the pattern?( I prefer to start with ribbing only)
15.12.2016 - 14:24DROPS Design answered:
Dear Heather, you are first working the first 2 rows in A.1-A.4 (= ribbing) until piece measures 8 cm, then work the last 2 rows in diagrams dec evenly as explained. Lace pattern will then come after these rows. Happy knitting!
15.12.2016 - 14:55
|
||||||||||||||||||||||||||||
Arrowhead#arrowheadcardigan |
||||||||||||||||||||||||||||
 |
 |
|||||||||||||||||||||||||||
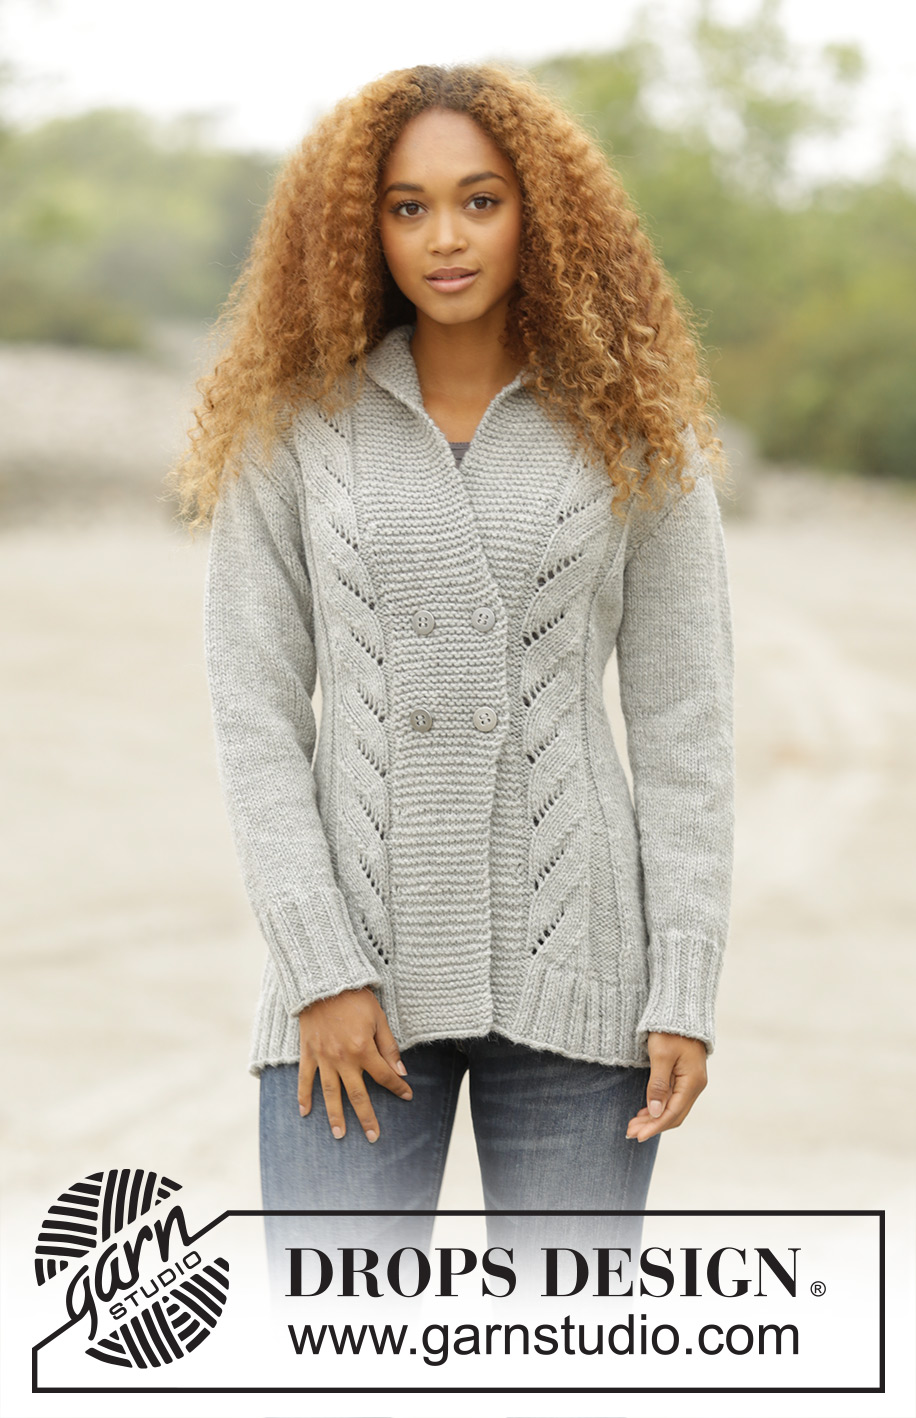
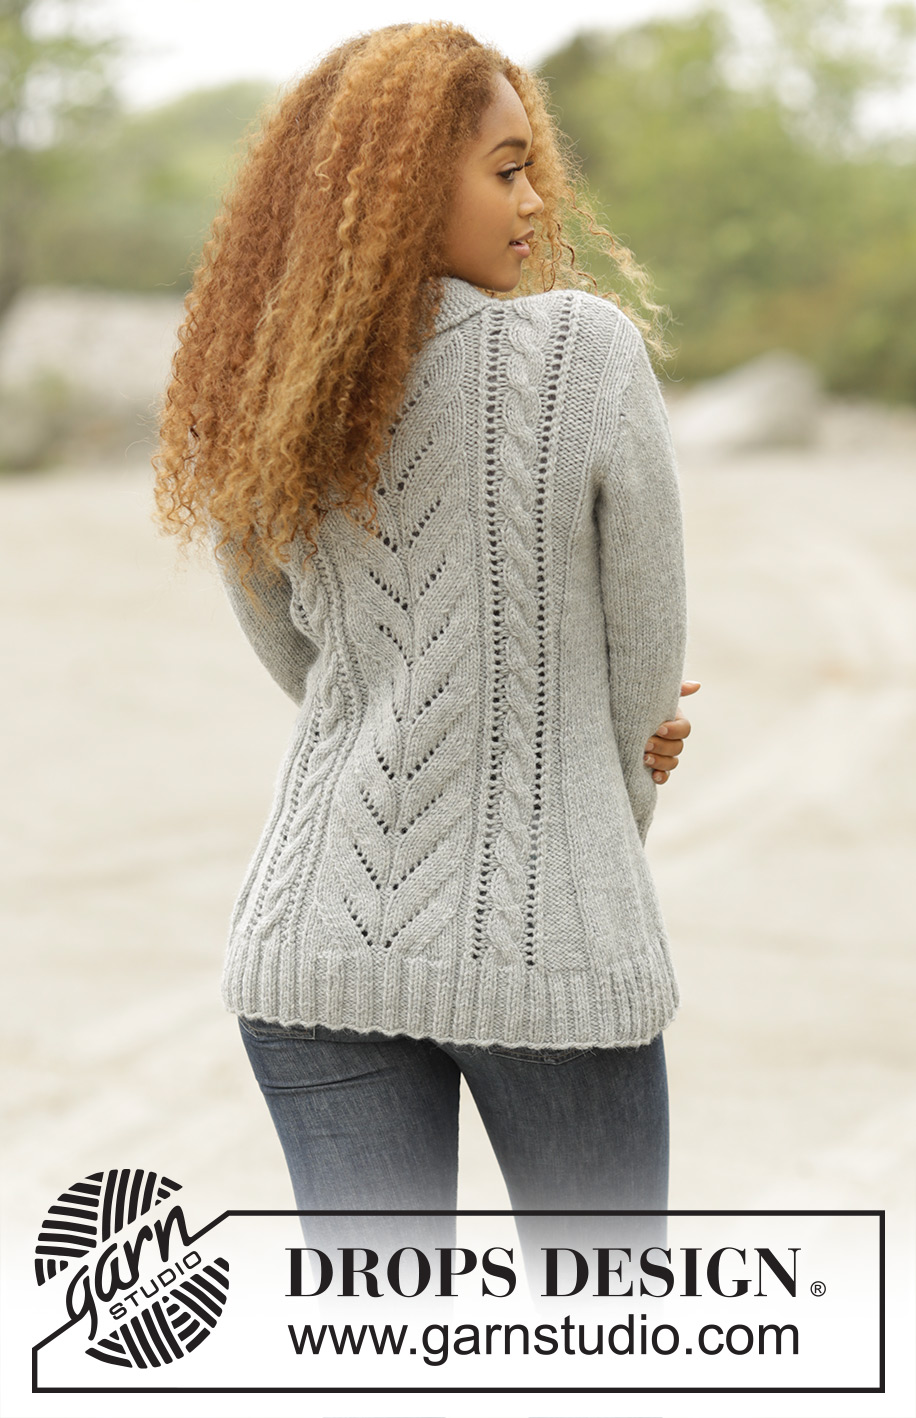
Knitted DROPS jacket with cables and shawl collar in ”Alaska”. Size: S - XXXL.
DROPS 173-22 |
||||||||||||||||||||||||||||
|
GARTER ST (back and forth): K all rows. 1 ridge = 2 rows K. PATTERN: See diagrams A.1 to A.9. The diagrams show all rows in pattern seen from RS. SHORT ROWS BAND: For every 20 rows worked, work as follows: Work over the first 16-17-18-19-20-21 sts from RS, turn and work back over these sts, work 1 row from RS (with pattern and garter st as before) over all sts. Work over the first 16-17-18-19-20-21 sts from WS, turn and work back over these sts, work 1 row from WS (with pattern and garter st as before) over all sts. DECREASE TIP: Dec 1 st in each side of section in stocking st as follows: K 1, slip next st as if to K, K 1, psso, work until 3 sts remain, K 2 tog, K 1. INCREASE TIP: Inc with 1 YO inside first and last st in stocking st, P the inc sts twisted on next row to avoid holes. BUTTONHOLES: Dec for 4 buttonholes on right front piece (from RS): Work 3 sts, K 2 tog, 1 YO, work 6-7-8-9-10-11 sts, K 2 tog, 1 YO = 2 buttonholes on same row (3 sts remain on band). Dec for buttonholes when piece measures: SIZE S: 28 and 36 cm SIZE M: 29 and 37cm Size L: 30 and 38 cm SIZE XL: 31 and 39 cm Size XXL: 32 and 40 cm SIZE XXXL: 33 and 41 cm. ---------------------------------------------------------- JACKET: Worked back and forth on circular needle from mid front. BODY: Cast on 215-233-243-269-295-313 sts on circular needle size 4.5 mm with Alaska. P 1 row from WS, then work as follows - from RS: 16-17-18-19-20-21 sts in garter st (= band), P 2, A.1 (= 13 sts), A.2 (= 10 sts), rib K 2/P 2 over the next 24-32-36-48-60-68 sts, K 2, A.2, A.3 (= 15 sts), P 2, A.4 (= 27 sts), P 2, A.3, A.2, rib K 2/P 2 over the next 24-32-36-48-60-68 sts, K 2, A.2, A.1, P 2, 16-17-18-19-20-21 sts in garter st (= band). Work SHORT ROWS over sts in band – see explanation above. REMEMBER THE KNITTING TENSION Repeat the first 2 row in A.1 - A.4 until piece measures 8 cm, AT THE SAME TIME adjust so that next row is worked from RS, then work the last 2 row in A.1 - A.4, AT THE SAME TIME dec 4-5-6-9-12-11 sts evenly over the 26-34-38-50-62-70 sts rib in each side = 182-198-206-226-246-266 sts. Switch to circular needle size 5 mm. Then work as follows from RS: 16-17-18-19-20-21 sts in garter st, P 2, A.5 (= 10 sts), P 8, K 22-29-32-41-50-59, P 8, A.6 (= 12 sts), P 2, A.7 (= 22 sts), P 2, A.8 (= 12 sts), P 8, K 22-29-32-41-50-59, P 8, A.9 (= 10 sts), P 2, 16-17-18-19-20-21 sts in garter st. When piece measures 10 cm, dec 1 st in every P section with P 8 and dec 1 st in each side of section in stocking st - READ DECREASE TIP (= 8 sts dec), dec the same way every 4 cm, 6 times in total, dec alternately on right and left side of P sections = 134-150-158-178-198-218 sts. Dec for BUTTONHOLES on right band - see explanation above. When piece measures 34 cm, inc 1 st in every P section with a dec, and 1 st in each side of every section in stocking st (= 8 sts inc) - READ INCREASE TIP, repeat inc when piece measures 46-47-48-49-50-51 cm = 150-166-174-194-214-234 sts. When piece measures 50-51-52-53-54-55 cm, work as follows from RS: Work the first 38-41-43-48-53-58 sts as before, cast off the next 4-6-6-6-6-6 sts, work the next 66-72-76-86-96-106 sts as before, cast off the next 4-6-6-6-6-6 sts and work the last 38-41-43-48-53-58 sts as before. Now finish each part separately. BACK PIECE: = 66-72-76-86-96-106 sts. Continue pattern as before, AT THE SAME TIME continue cast off in each side for armholes on every other row: Dec 2 sts 0-1-1-2-3-4 times and 1 st 0-0-1-3-5-7 times = 66-68-70-72-74-76 sts. Continue the pattern as before. When piece measures 66-68-70-72-74-76 cm, cast off the middle 20-22-24-26-28-30 sts for neck and finish each shoulder separately. On next row cast off 1 st towards the neck = 22 sts remain on each shoulder. Cast off when piece measures 68-70-72-74-76-78 cm. RIGHT FRONT PIECE: = 38-41-43-48-53-58 sts. Continue pattern as before, AT THE SAME TIME continue cast off for armhole in the side as on back piece = 38-39-40-41-42-43 sts. When piece measures 68-70-72-74-76-78 cm, cast off the first 22 sts from WS = 16-17-18-19-20-21 sts remain on needle (= band). Work the rest of row. Then work short rows over the 16-17-18-19-20-21 sts as follows - beg from RS: * Work 2 rows back and forth over the first 8-8-9-9-10-10 sts, work 2 rows back and forth over all sts *, repeat from *-* until neck edge measures 9-9-10-10-11-11 cm at the shortest. Cast off. LEFT FRONT PIECE: Work as right but reversed. Cast off for shoulder from RS and beg short rows from WS. SLEEVE: Worked in the round on double pointed needles. Cast on 45-45-50-50-50-50 sts on double pointed needle size 4.5 mm with Alaska. K 1 round, then work rib = K 2/P 3. When rib measures 10 cm, K 1 round while dec 11-9-12-10-10-8 sts evenly = 34-36-38-40-40-42 sts. Switch to double pointed needles size 5 mm and continue in stocking st. Insert 1 marker at the beg of round. When piece measures 11 cm, inc 1 st on each side of marker, inc every 4-3½-3-2½-2-1½ cm a total of 9-10-11-13-15-17 times = 52-56-60-66-70-76 sts. When piece measures 47-47-47-46-45-44 cm (NOTE! Shorter measurements in the larger sizes because of broader shoulders), cast off 6 sts mid under sleeve (= 3 sts on each side of marker), now finish piece back and forth on needle. Cast off for sleeve cap at beg of every row in each side as follows: 2 sts 3 times and 1 st 0-1-1-2-3-5 times, cast off 2 sts in each side of piece until piece measures 53-53-54-54-54-55 cm, cast off 3 sts in each side and cast off the remaining sts. Piece measures 54-54-55-55-55-56 cm in total. ASSEMBLY: Sew shoulder seams and sew in sleeves. Sew the collar tog mid back and sew it to neck line. Sew the buttons on to the left band. |
||||||||||||||||||||||||||||
Diagram explanations |
||||||||||||||||||||||||||||
|
||||||||||||||||||||||||||||
 |
||||||||||||||||||||||||||||
 |
||||||||||||||||||||||||||||
 |
||||||||||||||||||||||||||||
 |
||||||||||||||||||||||||||||
Have you finished this pattern?Tag your pictures with #dropspattern #arrowheadcardigan or submit them to the #dropsfan gallery. Do you need help with this pattern?You'll find 27 tutorial videos, a Comments/Questions area and more by visiting the pattern on garnstudio.com. © 1982-2026 DROPS Design A/S. We reserve all rights. This document, including all its sub-sections, has copyrights. Read more about what you can do with our patterns at the bottom of each pattern on our site. |
||||||||||||||||||||||||||||


With over 40 years in knitting and crochet design, DROPS Design offers one of the most extensive collections of free patterns on the internet - translated to 17 languages. As of today we count 324 catalogues and 12290 patterns translated into English (UK/cm). 12290
We work hard to bring you the best knitting and crochet have to offer, inspiration and advice as well as great quality yarns at incredible prices! Would you like to use our patterns for other than personal use? You can read what you are allowed to do in the Copyright text at the bottom of all our patterns. Happy crafting!
Post a comment to pattern DROPS 173-22
We would love to hear what you have to say about this pattern!
If you want to leave a question, please make sure you select the correct category in the form below, to speed up the answering process. Required fields are marked *.