
Popular categories
Looking for a yarn?


Comments / Questions (88)
![]() Anke wrote:
Anke wrote:
Hallo,kann es sein,dass die Anleitung zum Muster A1 nicht ganz stimmt? Denn wenn ich den Überzug mache,bekomme ich in der Mitte keine gerade Linie hin,da müsste in der Theorie vor der Abnahme noch eine rechte Masche mehr sein,damit es gerade wird. Und kommt dann das Muster noch hin? Das ist so schade. Es ist ja nicht das erste Mal,daß ich solche Muster stricke,ich kenne mich also damit aus,aber hier kommt es nicht hin. Mit frdl. Gruß Anke
10.03.2026 - 11:41DROPS Design answered:
Liebe Anke, die Diagramme sollen übereinander gestrickt werden, dh die Abnahmen in der Mitte von A.2 kommen dann später in der Mitte von A.3, die kommen auch dann in der Mitte von A.4 - setzen Sie vielleicht Markierer zwischen jedem Diagram in der Runde, so können Sie jeweils die Maschenanzahl prüfen. Viel Spaß beim Stricken!
10.03.2026 - 15:05
![]() Manu wrote:
Manu wrote:
Oops, eben gesehen, dass die Gesamtlänge 52 cm beträgt. Sorry und Gruß
04.01.2026 - 19:19
![]() Manu wrote:
Manu wrote:
Kann es sein, dass die Angabe der Länge des Rumpfteils bis zum Armausschnitt nicht stimmt? In der Anleitung sind es 38 cm bis zur Abnahme, in der Grafik aber 52 cm.
03.01.2026 - 07:14DROPS Design answered:
Liebe Manu, die 52 cm sind die Gesamtlänge, also von unten bis nach oben bis zur Schulter. Viel Spaß beim Weiterstricken!
07.01.2026 - 10:33
![]() Annelie wrote:
Annelie wrote:
Hallo, ich habe dieses Modell mit anderer Wolle gestrickt. Sehr schön, nur leider ist der kurze Ärmel zu kurz und kneift unter den Achseln. Ich habe die Maschenzahl für Größe L genommen. Statt einer Höhe von 14 cm habe ich 12 cm. Nun habe ich einen kleinen Achselausschnitt gearbeitet und den Ärmelrand darüber gestrickt. Das sieht aber nicht gut aus. Gibt es eine andere Lösung? Vielen Dank dafür
17.10.2025 - 18:39DROPS Design answered:
Liebe Annelie, das ist leider ein sehr individuelles Problem und kann, ohne Ihr Strickstück vor Augen zu haben, schlecht gelöst werden. Ihre Idee war jedenfalls gar nicht schlecht, um den Armausschnitt zu weiten - vielleicht kriegen Sie das noch so hin, dass es Ihnen gefällt? Wichtig ist bei zukünftigen Projekten, dass Sie die Maschenprobe sowohl in der Breite als auch in der Höhe einhalten. Hoffentlich finden Sie eine ansehnliche Lösung!
22.10.2025 - 20:46
![]() TittaO wrote:
TittaO wrote:
Hei Onko tämä väri lopetettu, kun en löydä sitä mistään?
10.09.2025 - 13:59DROPS Design answered:
Hei, valitettavasti tämä väri on poistunut valikoimasta. Voit kuitenkin valita jonkun muun mieluisan värin DROPS Muskat-langan värikartasta.
10.09.2025 - 18:14
![]() Fia wrote:
Fia wrote:
Om jag ska undvika att det blir ett mellanrum när jag stickar runt ska jag lyfta sista rm över första rm, innebär det att jag måste göra en extra uppläggningsmaska:
24.07.2025 - 19:18
![]() Helena Ylimaula wrote:
Helena Ylimaula wrote:
Vedän takaisin kysymykseni Call it spring-neuleesta. En heti oivaltanut, että silmukat vähenivät ensimmäisellä kuviokierroksella.
16.03.2025 - 07:23
![]() Helena Ylimaula wrote:
Helena Ylimaula wrote:
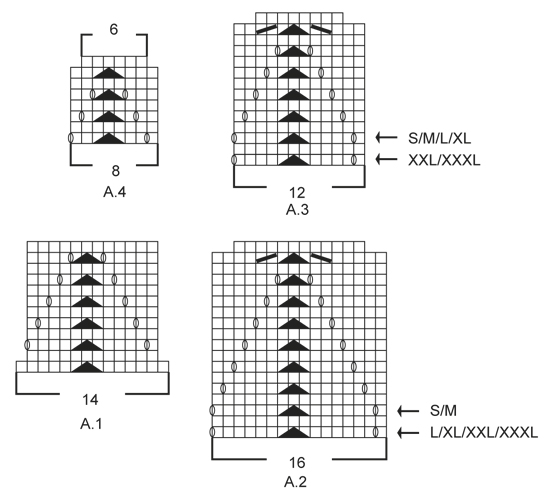
Jäi nimi pois edellisestä kysymyksestä. Yritän päästä alkuun Call it spring-neuleen kanssa. Kuvan A1 mukaan kuvio pienenee 14:sta 12:een. Miten teen kavennukset? Sitä ei neuvota mallissa.
16.03.2025 - 07:07
![]() Helena Ylimaula wrote:
Helena Ylimaula wrote:
Yritän aloittaa Call it spring-neuletta. En ymmärrä, miten kavennan ensimmäisen kuvioneuleen jälkeen. Kuvion A1 mukaan työssä kavennetaan molemmissa reunoissa eli kuvio vähenee 14:sta 12:een. Miten se tehdään, ettei kuvio kärsi?
16.03.2025 - 07:04DROPS Design answered:
Hei, kavennukset tehdään piirroksen ensimmäisellä kerroksella näin (piirroksen mukaan): Nosta 1 silmukka neulomatta, neulo 2 silmukkaa oikein yhteen ja vedä sitten nostettu silmukka kavennuksen yli. Mallikerrasta kapenee 2 silmukkaa, koska tällä kerroksella ei tehdä langankiertoja.
17.03.2025 - 18:00
![]() Ele wrote:
Ele wrote:
For the pattern call it spring 159-4 the Top portion it mentions the piece measures 7 cm, then decrease every 4 cm for my size and repeat 3 more times so that would add 16 cm to the 7 which would ret insult in the peace being 19cm. but the it states when the piece measures 24cm to begin the increases. How does the piece go from 19cm to 24cm????? thx.
28.05.2024 - 22:03DROPS Design answered:
Dear Ele, Assuming we are talking about the decreases and increases for the waist shaping, after you done the last decrease you should knit straight (without decrease of increase) until you reach the point where you start the increases. Happy Knitting!
28.05.2024 - 22:40
|
|||||||||||||||||||
Call It Spring#callitspringtop |
|||||||||||||||||||
 |
 |
||||||||||||||||||
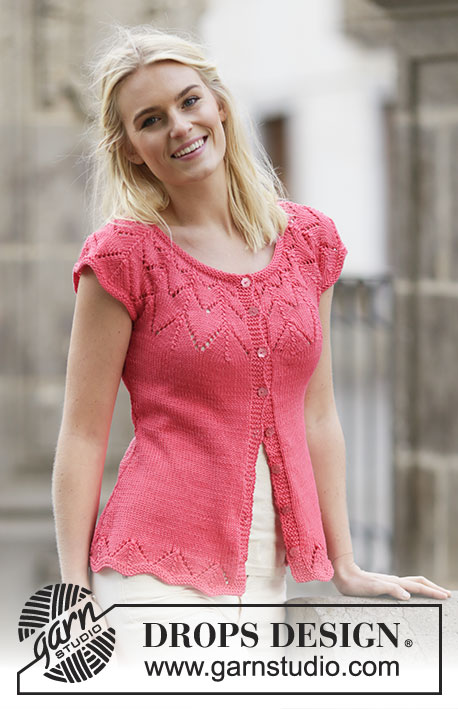
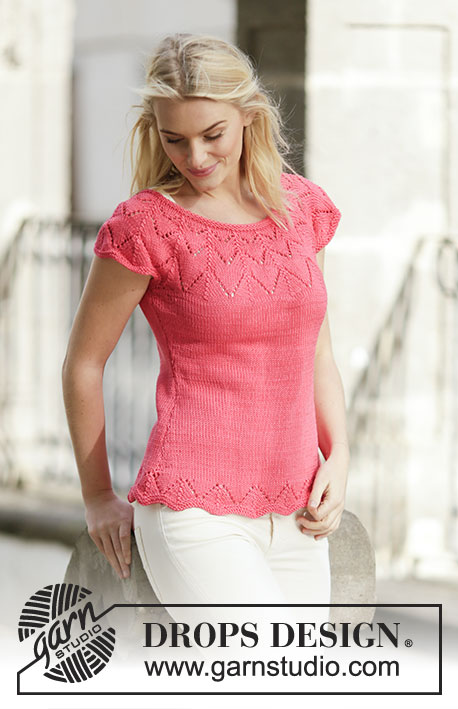
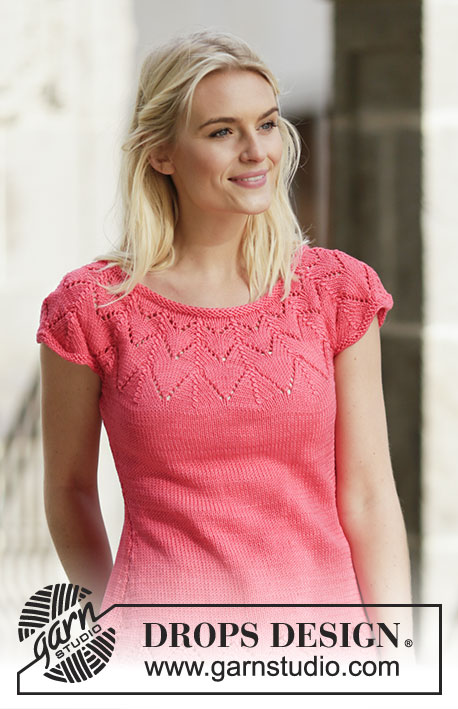
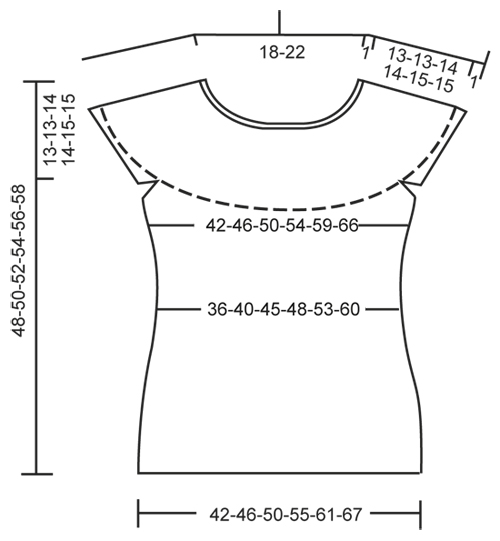
Knitted DROPS top in stocking st with lace pattern and round yoke in ”Muskat”. Size: S - XXXL.
DROPS 159-4 |
|||||||||||||||||||
|
GARTER ST (back and forth): K all rows. 1 ridge = 2 rows K. GARTER ST (worked in the round): 1 ridge = 2 rounds. * K 1 round and P 1 round *, repeat from *-*. PATTERN: See diagrams A.1 to A.4. The diagrams show all rounds in pattern seen from RS. DECREASE TIP: Dec as follows before marker: Work until 2 sts before marker: K 2 tog. Dec as follows after marker: Slip 1 st as if to K, K 1, psso. INCREASE TIP: Inc 1 st by making 1 YO, on next round K YO twisted (i.e. work in back loop of st instead front) to avoid holes. ---------------------------------------------------------- TOP: Worked in the round on circular needle. Cast on 210-224-238-266-294-322 sts on circular needle size 4 mm with Muskat. Work 2 ridges in GARTER ST in the round - see explanation above. Then work PATTERN A.1 (= 14 sts on 1st round) from mid back (= beg of round) = 180-192-204-228-252-276 sts. REMEMBER THE KNITTING TENSION When entire A.1 has been worked vertically, insert a marker in each side as follows: Work the first 45-48-51-57-63-69 sts, insert a marker, work the next 90-96-102-114-126-138 sts, insert a marker and work the remaining 45-48-51-57-63-69 sts on round. Then continue in stocking st. When piece measures 7 cm, dec 1 st on each side of each marker - READ DECREASE TIP. Repeat dec every 2-2½-4-2½-2-2½ cm 6-5-3-5-5-5 more times = 152-168-188-204-228-252 sts. When piece measures 24 cm, inc 1 st on each side of the 2 markers - READ INCREASE TIP! Repeat inc every 1-1-1½-2-2-2 cm 7-6-5-4-6-6 more times = 184-196-212-224-256-280 sts. When piece measures 35-37-38-40-41-43 cm, cast off sts for armhole as follows on next round: Work the first 42-45-49-51-59-65 sts, cast off the next 8-8-8-10-10-10 sts for armhole, work the next 84-90-98-102-118-130 sts, cast off the next 8-8-8-10-10-10 sts for armhole, work the remaining 42-45-49-51-59-65 sts = 168-180-196-204-236-260 sts. Put piece aside and knit the sleeve edges. SLEEVE EDGE: Worked back and forth on circular needle. Cast on 62-64-65-71-72-76 sts on circular needle size 4 mm with Muskat. K 3 rows back and forth (1st row = WS). Work next row as follows: Cast off the first 4-4-4-5-5-5 sts, K the next 54-56-57-61-64-66 sts while AT THE SAME TIME inc 6-6-5-5-4-4 sts evenly (inc by working 2 sts in 1 st), cast off the last 4-4-4-5-5-5 sts, cut the yarn = 60-62-62-66-66-70 sts. Put piece aside and knit another sleeve edge. YOKE: Slip sleeve edges on to same circular needle as body where armholes were cast off = 288-304-320-336-368-400 sts. Then work and dec according to A.2 (= 18-19-20-21-23-25 repetitions). NOTE: See arrow in diagram A.2 and A.3 for correct size. When A.2 has been worked vertically, continue with A.3. When A.3 has been worked vertically, continue with A.4. There are now 108-114-120-126-138-150 sts on round. Work 1 ridge while AT THE SAME TIME dec 6-4-2-0-4-8 sts evenly = 102-110-118-126-134-142 sts. Work 1 more ridge and loosely cast off. ASSEMBLY: Sew sleeve seams tog edge to edge in front loop of outermost sts. Sew the openings under the sleeves. |
|||||||||||||||||||
Diagram explanations |
|||||||||||||||||||
|
|||||||||||||||||||
 |
|||||||||||||||||||
 |
|||||||||||||||||||
Have you finished this pattern?Tag your pictures with #dropspattern #callitspringtop or submit them to the #dropsfan gallery. Do you need help with this pattern?You'll find 24 tutorial videos, a Comments/Questions area and more by visiting the pattern on garnstudio.com. © 1982-2026 DROPS Design A/S. We reserve all rights. This document, including all its sub-sections, has copyrights. Read more about what you can do with our patterns at the bottom of each pattern on our site. |
|||||||||||||||||||


With over 40 years in knitting and crochet design, DROPS Design offers one of the most extensive collections of free patterns on the internet - translated to 17 languages. As of today we count 324 catalogues and 12290 patterns translated into English (UK/cm). 12290
We work hard to bring you the best knitting and crochet have to offer, inspiration and advice as well as great quality yarns at incredible prices! Would you like to use our patterns for other than personal use? You can read what you are allowed to do in the Copyright text at the bottom of all our patterns. Happy crafting!
Post a comment to pattern DROPS 159-4
We would love to hear what you have to say about this pattern!
If you want to leave a question, please make sure you select the correct category in the form below, to speed up the answering process. Required fields are marked *.