
Popular categories
Looking for a yarn?


Comments / Questions (27)
![]() Adelieke wrote:
Adelieke wrote:
Ik ben begonnen met dit patroon, maat 9/10. Gestart bij het pijltje van 9/10 Ik heb totaal 76 steken, het patroon is 18 steken deze herhaal ik, Dan kom het toch niet uit? 76 steken : 18 steken is 4,22 herhaling Wat doe ik verkeerd?
11.04.2025 - 14:23DROPS Design answered:
Dag Adelieke,
Dat klopt. Met 76 steken kun je het patroon 4 keer in de breedte herhalen. Je houdt dan 4 steken over. Hierover haak je de eerste 4 steken van het telpatroon.
13.04.2025 - 08:58
![]() Viviane ANTONELLI wrote:
Viviane ANTONELLI wrote:
Bonjour, je ne comprends pas le diagramme pour 7/8 ans . Merci
05.04.2020 - 17:26DROPS Design answered:
Bonjour Mme Antonelli, vous commencez le diagramme A.1 par le repère indiqué pour votre taille, en le crochetant de droite à gauche (à partir du repère jusqu'à la fin du diagramme), puis vous répétez A.1 jusqu'à la fin du rang.; en fin de rang, crochetez les premières mailles de A.1 jusqu'à la fin du rang si besoin. Notez bien la dernière maille crochetée, sur l'envers, vous lirez le diagramme à partir de cette maille mais de droite à gauche en terminant par les dernières mailles de gauche du diagramme jusqu'au repère. cf comment lire un diagramme/. Bon crochet!
09.04.2020 - 13:56
![]() Annette wrote:
Annette wrote:
Goedemiddag, ik wil de bolero maken patroon 24-13 voor kinderen. Nu maak ik de maat 7/8 jarig dan begin ik bij het pijltje hoeveel stokjes heb ik dan voordat er een opening komt.
19.02.2019 - 16:55DROPS Design answered:
Dag Annette,
Helaas begrijp ik je vraag niet helemaal. Bedoel je het aantal stokjes in de hoogte? Je plaatst bij een hoogte van 21 cm 1 markeerdraad welke aangeeft waar de mouwnaad begint, dus tot waar de opening is. Als 13 toeren 10 cm hoog is dan zal je ongeveer op 26 a 27 toeren zitten.
21.02.2019 - 11:15
![]() Silvia wrote:
Silvia wrote:
Buongiorno sono alla quarta riga del diagramma e sto cominciando con le diminuzioni.ho lavorato la prima maglia alta poi due maglie alte chiuse insieme per fare la prima diminuzione e ora come proseguo? Nel diagramma ci sono 7 maglie alte, due catenelle ecc. Contando le 2 maglie alte chiuse insieme come fosse 1 e quindi devo fare altre 5 maglie alte e poi le due catenelle? Grazie
13.09.2018 - 16:20DROPS Design answered:
Buongiorno Silvia. All'inizio della riga, deve: lavorare 3 cat (sostituiscono la prima maglia alta), lavora la seconda e la terza maglia alta insieme, 4 maglie alte e 2 cat. Verifichi sempre che il motivo prosegue correttamente. Per diminuire alla fine della riga, lavora insieme la terzultima e la penultima maglia alta. Buon lavoro!
13.09.2018 - 16:34
![]() Silvia wrote:
Silvia wrote:
Buongiorno... sto facendo questo Bolero non capisco quando bisogna cominciare a fare le diminuzioni dopo 17 cm di lavorato dite di fare una diminuzione ogni due righe vuol dire che faccio una diminuzione per la prima riga all'inizio e alla fine riga e quella successiva la lavoro così com'è e la terza riga di nuovo faccio la diminuzione? quindi una riga si una riga no? Per un totale di 7 volte? Grazie
12.09.2018 - 15:11DROPS Design answered:
Buongiorno Silvia. Sì esatto. Diminuisce una riga sì e una no in tutto 7 volte. Buon lavoro!
12.09.2018 - 17:10
![]() Pomme wrote:
Pomme wrote:
Bonjour, arrivé a 17cm faut il réduire 6 fois par rang ou faire 6 rangs avec une réduction au début et une autre à la fin jusqu'à 30 cm de hauteur ? Si jamais il fayt faire 6 réduction, de combien de maille doit on les espacer ? Je ne comprend pas bien cette partie sur la réduction.
13.04.2017 - 10:42DROPS Design answered:
Bonjour Pomme, à 17 cm, vous diminuez 1 B de chaque côté 7 fois au total tous les rangs: en début de rang, crochetez la 2ème et la 3ème B ensemble et en fin de rang, écoulez ensemble les 2 avant-dernières B ensemble, c'est-à-dire que vous diminuez à 1 m du bord de chaque côté. Bon crochet!
18.04.2017 - 08:33
![]() Valentina wrote:
Valentina wrote:
Salve,sto seguendo le indicazioni per la taglia 9/10 anni e ho 76 punti. Iniziando il diagramma quindi da destra verso sinistra dopo 4 ripetizioni rimangono 4 punti..sbaglio qualcosa?grazie in anticipo
21.03.2017 - 22:00DROPS Design answered:
Buongiorno Valentina. E' corretto. Lavora le 4 maglie che le rimangono come indicato per le prime 4 maglie del diagramma. In questo modo, il motivo è simmetrico rispetto all'apertura del bolero. Buon lavoro!
21.03.2017 - 23:31
![]() Helen Bottom wrote:
Helen Bottom wrote:
I've downloaded the pattern and started at the section for third size but i am unsure where the repeat begins for the rest of the row do I go to the beginning of the chart or what? ( thanks for the pattern)
16.04.2016 - 21:31DROPS Design answered:
Dear Mrs Bottom, start at the arrow for 3rd size and work from the right towards the left from RS, then work next repeat from 1st to last st in repeat, repeat diagram on the next sts and mark the last st worked. On next row from WS, start with the st you have just marked and read from the left towards the right. Happy crocheting!
18.04.2016 - 10:34
![]() Alessia wrote:
Alessia wrote:
Salve, sto facendo questo bolerino, ma non è chiaro il suggerimento che date. Dove è scritto che le diminuzioni vanno fatte sulle m che non possono essere lavorate. Cosa significa? Come faccio a diminuire e nello stesso tempo a far portare il grafico ? Grazie
30.04.2015 - 18:48DROPS Design answered:
Buongiorno Alessia. Quando diminuisce, continua a lavorare il diagramma. Se deve diminuire, p.es, le due m che nel diagramma sono 2 cat, al posto delle cat lavora 2 m.a insieme. Buon lavoro!
01.05.2015 - 11:01
![]() Chantal Galarneau wrote:
Chantal Galarneau wrote:
Pourquoi faire une chainette de 69 ml et ensuite réduire le nombre de ms a 58? quand vient le temps de faire l'autre moitié, il est indiquer de relever seulement 58 m sur le premier rang, comment faire? merci
24.04.2015 - 22:16DROPS Design answered:
Bonjour Mme Galarneau, la chaînette de base est bien souvent plus serrée que le 1er rang de ms réalisé ensuite, pour pallier cette différence, on monte davantage de ml que l'on aura de ms au 1er rang. Pour le 2ème côté, on crochète de l'autre côté de la chaînette de base, 1 ms dans chacune des ms du 1er côté. Bon crochet!
25.04.2015 - 10:10
|
|||||||||||||
Abby#abbybolero |
|||||||||||||
 |
 |
||||||||||||
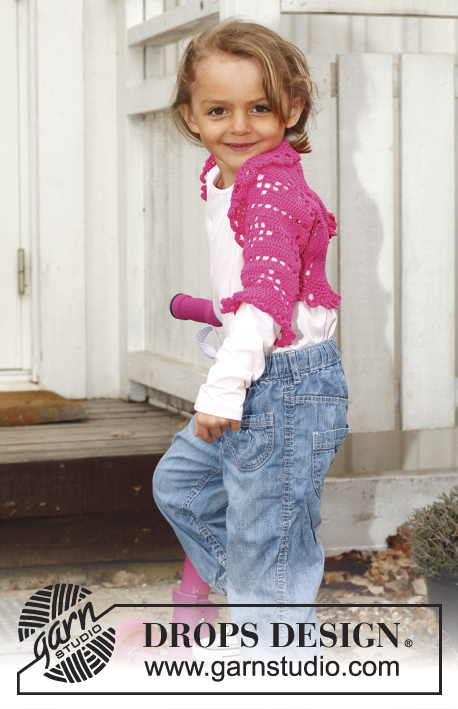
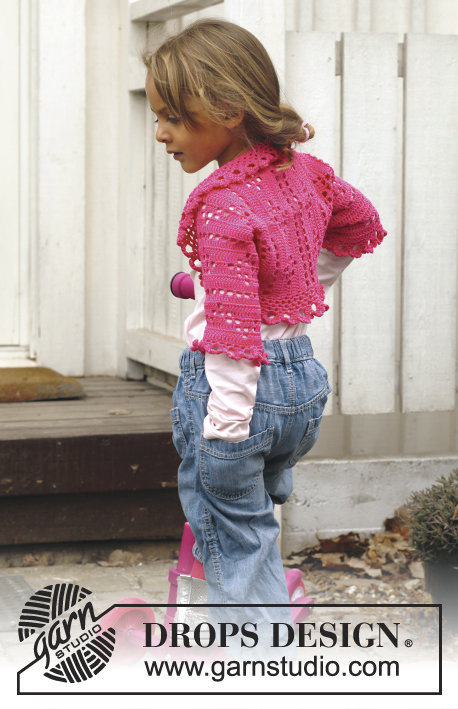
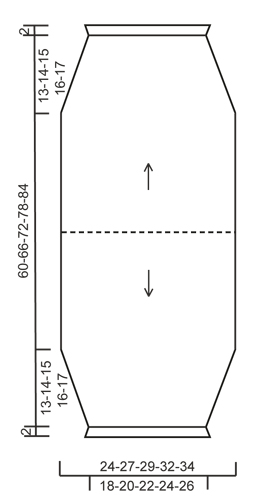
Crochet bolero with lace pattern in DROPS Safran. Size children 3 - 12 years.
DROPS Children 24-13 |
|||||||||||||
|
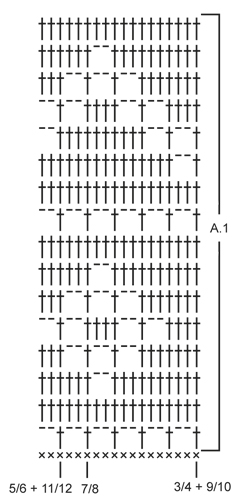
CROCHET INFO: Replace first tr on every row with 3 ch. PATTERN: See diagram A.1. NOTE: The first dc row in diagram is not a part of repetition and is not repeated when working. DECREASE TIP: Work 2 tr tog as follows: Work 1 tr in first st but wait with last pull through, work 1 tr in next st but on last pull through, pull thread through all 3 loops on hook. -------------------------------------------------------- BOLERO: Worked from mid back. Work first one side and down to beg of sleeve, then work the other side and down to beg of other sleeve. Then sew sleeve seams and work a flounce around the entire opening. FIRST SIDE: Work 69-77-84-91-98 ch with Safran on hook size 3 mm. Turn and work 1 dc in 2nd ch from hook, continue with 1 dc in each of the next 7-3-4-5-6 ch, * skip 1 ch, 1 dc in each of the next 5 ch *, repeat from *-* the entire row = 58-64-70-76-82 dc (first ch on row does NOT count as 1 dc). Continue with diagram A.1 - beg with 2nd row in diagram at the line for the size you are working so that the pattern is the same in both sides – READ CROCHET TIP! Repeat pattern until finished measurements. At the same time when piece measures 17-19-21-23-25 cm, insert 1 marker in the side (marks how far the sleeve seam is worked afterwards). On next row dec 1 tr in each side by working the second and third tr and the 2 next to last tr tog – SEE DECREASE TIP! Repeat dec every other row 6-7-8-8-9 more times = 44-48-52-58-62 sts remain - NOTE: When dec work only tr over the sts that do not fit the pattern. Work pattern until piece measures approx. 30-33-36-39-42 cm in total, finish after a row with only tr, fasten off. OTHER SIDE: Work 1 dc in each of the 58-64-70-76-82 dc worked on 1st row on first side (i.e. mid back). Then work pattern as on first side. Make sure to finish on same row in diagram at the bottom of sleeve in both sides. ASSEMBLY: Fold the bolero double alongside, and sew tog from bottom of each sleeve and up to where marker was is inserted in each side - sew edge to edge to avoid a chunky seam. FLOUNCE AROUND OPENING: Work around the entire opening as follows (start mid back): ROUND 1: 1 sl st in first st, * 3 ch, 1 dc in next tr *, repeat from *-* the entire round, finish with 3 ch and 1 sl st in first sl st at beg of round - NOTE: Adjust so that there are an even number of ch-spaces in total otherwise round 5 will not fit. ROUND 2: Work 1 sl st and 1 dc in first ch-space, * 3 ch, 1 dc in next ch-space *, repeat from *-* the entire round and finish with 1 sl st in first dc from beg of round. ROUND 3 and 4: Work as 2nd round. ROUND 5: Work 1 sl st and 1 dc in first ch-space, * 8 ch, 1 dc in next ch-space, 1 ch, 1 dc in next ch-space *, repeat from *-* the entire round and finish with 1 sl st in first dc from beg of round. ROUND 6: 1 ch, 1 dc in first large ch-space, [* 4 ch, 1 tr in first ch worked (= 1 picot), 1 dc in same ch-space *, repeat from *-* 2 more times (i.e. there are 3 picots in the large ch-space), 1 dc in the little ch-space (the one with only 1 ch which is between the large ch-spaces), 1 dc in next large ch-space], repeat from [-] the entire round, instead of last dc work 1 sl st in first dc on round. Fasten off. FLOUNCE AT THE BOTTOM OF SLEEVES: At the bottom around the sleeves work a somewhat shorter edge, here work only 1st, 5th, and 6th round of flounce worked around the opening - NOTE: On 1st round skip 1 tr between every ch-space. |
|||||||||||||
Diagram explanations |
|||||||||||||
|
|||||||||||||
 |
|||||||||||||
 |
|||||||||||||
Have you finished this pattern?Tag your pictures with #dropspattern #abbybolero or submit them to the #dropsfan gallery. Do you need help with this pattern?You'll find 7 tutorial videos, a Comments/Questions area and more by visiting the pattern on garnstudio.com. © 1982-2026 DROPS Design A/S. We reserve all rights. This document, including all its sub-sections, has copyrights. Read more about what you can do with our patterns at the bottom of each pattern on our site. |
|||||||||||||


With over 40 years in knitting and crochet design, DROPS Design offers one of the most extensive collections of free patterns on the internet - translated to 17 languages. As of today we count 324 catalogues and 12290 patterns translated into English (UK/cm). 12290
We work hard to bring you the best knitting and crochet have to offer, inspiration and advice as well as great quality yarns at incredible prices! Would you like to use our patterns for other than personal use? You can read what you are allowed to do in the Copyright text at the bottom of all our patterns. Happy crafting!
Post a comment to pattern DROPS Children 24-13
We would love to hear what you have to say about this pattern!
If you want to leave a question, please make sure you select the correct category in the form below, to speed up the answering process. Required fields are marked *.