
Popular categories
Looking for a yarn?


Comments / Questions (132)
![]() Ami wrote:
Ami wrote:
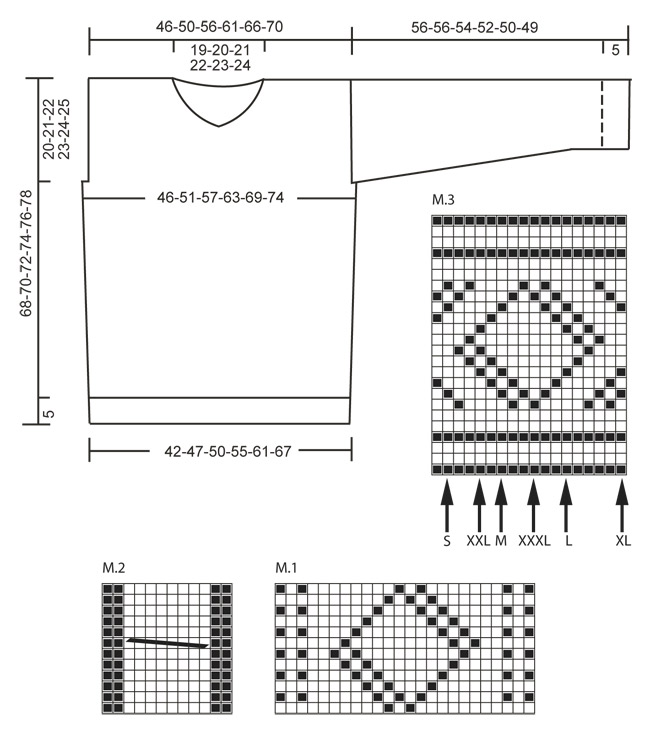
Hi, I've just started knitting size XXL of this pattern and am a bit confused as to how to read diagram for this size. So, for RS to knit 12 sts of diagram M.1 I am starting in the 13th st from the right side in diagram, knit M2, M1, M2, M1, M2, M1, M2 and 12 sts of diagram M.1 – start in first st in diagram. But what is happening at WS? Where should I start counting first 12 sts of M1? In the 13th st from the left side? and the second 12 sts of M1? Thank you!
28.10.2020 - 09:31DROPS Design answered:
Dear Ami, diagrams are worked from RS from the right towards the left and then from the left towards the right from WS (1st row = RS). This means that the last stitch worked in M.1 from RS will be the first stitch worked in M.1 from WS. This lesson might help you. Happy knitting!
28.10.2020 - 16:10
![]() Kerstin Dahlgren wrote:
Kerstin Dahlgren wrote:
Stickar bakstycket till "Sir Lancelot" Modell nr U-645 i storlek L dvs lagt upp 134 maskor som sedan minskas till 122 efter resåren (ovanligt att minska?) Sen avmaskas för ärmhålen 1-2-2-3-4-5 = 17 maskor i var sida = 34 maskor. Då står det att det ska vara 118 maskor kvar. MEN 34 maskor från 122 blir 88! Hjälp mig med detta för nu kommer jag inte vidare. Stämmer det att man ska avmaska 40 mittersta för halsringningen? Bästa hälsningar Kerstin
18.07.2020 - 11:06DROPS Design answered:
Hej Kerstin, du avmaskar bara 2 maskor i din storlek (S1-M2-L2-XL3-XXL4-XXXL5 m) i varje sida för ärmhål (dvs att det avm i början på de 2 nästa v) = 96-106-118-128-138-148 m. Lycka till :)
27.07.2020 - 15:46
![]() Eva-Britt wrote:
Eva-Britt wrote:
Hej! Börjat på M3 bakstycket..får inte till det. Börjat från rätsidan och efter kantmaska börjat vid pilen (M) Hur fortsätter jag sen? Får inte ihop mönstret? Stämmer inte nästa varv avigan? Tacksam för hjälp
06.07.2020 - 20:27DROPS Design answered:
Hej Eva-Britt, du börjar från rätsidan vid pilen-M, stickar de 7m mot vänster, börjar från höger i diagrammet, upprepar varvet ut. Börja nu med samma maska du slutade med fast på varv 2 och sticka mot höger i diagrammet. Lycka till :)
07.07.2020 - 14:01
![]() Wirth wrote:
Wirth wrote:
Pour la taille L je rencontre des difficultés pour réaliser le motif M3. du dos. Premier rang démarre à partir de la flèche L et nous lisons le schéma de droite vers la gauche. Est ce que le rang à l\'envers se tricote depuis la première case à gauche vers la droite? le rendu de mon tricot ne rend pas bien ca ne donne pas du tout le résultat qui est sur la photo.
15.02.2020 - 09:14DROPS Design answered:
Bonjour Mme Wirth, notez bien la dernière maille du diagramme que vous tricotez sur l'endroit, au rang suivant sur l'envers, ce sera la première maille à tricoter et vous lirez alors le diagramme de gauche à droite en terminant le dernier motif commencé avant la m lis, puis vous répéterez le diagramme en le lisant de gauche à droite et vous terminerez par le dernier demi-motif toujours de gauche à droite. Bon tricot!
17.02.2020 - 08:20
![]() Maria Cristina 3 wrote:
Maria Cristina 3 wrote:
Buon pomeriggio, mi scuso perché sto scrivendo di nuovo, ma non ho ricevuto risposta, ho pensato che non abbiate visto la mia domanda del 28 gennaio. Sto facendo questo modello, la taglia S ma non riesco a capire lo schema M3, da dove devo iniziare. Grazie
31.01.2020 - 16:09DROPS Design answered:
Buongiorno Maria Cristina. Inizia il diagramma M.3 dalla freccia che corrisponde alla sua taglia. Quindi, per la taglia S, Inizia dalla penultima maglia del diagramma. Buon lavoro!
31.01.2020 - 21:33
![]() Maria Cristina Rucci wrote:
Maria Cristina Rucci wrote:
Buona sera, sono ancora io, scrivo sempre per avere spiegazioni su questa maglia. Non capisco come devo lavorare per il diagramma M3, sto eseguendo la taglia S, ma non so se devo iniziare a contare le maglie dalla destra del disegno, per arrivare fino alla freccia S oppure è il contrario. Grazie
28.01.2020 - 17:12
![]() Miranda Baptist wrote:
Miranda Baptist wrote:
The rib looks like it is knit 3, purl 1 from the right side when looking at the photo, but instructions state the reverse i.e. right side knit 1, purl 3 can you confirm please
29.12.2019 - 09:42DROPS Design answered:
Dear Mrs Baptist, ribbing are K1/P3 as explained in the pattern - you can see it at best at the neck line and at the bottom, at the waist. Happy knitting!
02.01.2020 - 13:16
![]() Monique Anchelin Flageul wrote:
Monique Anchelin Flageul wrote:
Bonjour, j'ai tricoté le dos de ce modèle avec une laine légèrement plus grosse et des aiguilles du 4 et demi, mais de toute façon je n'ai obtenu que 6 noeuds de torsade en hauteur avec les diagrammes M1 et M2, alors que sur la photo on apprécie au moins 14 torsades ce qui est improbable si on fait des torsades chaque 12 rangs du diagamme M1 lesquelles correspondent a 24 rangs (endroit envers)... Avez-vous une explication? Merci
06.12.2019 - 15:25DROPS Design answered:
Bonjour Mme Anchelin Flageul, ce modèle se tricote avec une tension de 28 rangs = 10 cm, si votre nombre de rangs en hauteur est inférieur, vous n'aurez automatiquement pas le même nombre de torsades que sur le modèle photographié - notez bien que tous les rangs figurent dans les diagrammes, soit 1 torsade de M.2 = 12 rangs et non 24. Bon tricot!
06.12.2019 - 16:05
![]() Rucci Maria Cristina wrote:
Rucci Maria Cristina wrote:
Buon giorno, sto iniziando questo modello, non capisco se nello schema M1 e M2 i giri devono essere 24 visto che i quadratini in altezza sono 12, cioè il diagramma mi fa vedere solo i giri del diritto del lavoro e il rovescio non è indicato? Grazie per l'attenzione.
23.11.2019 - 12:59DROPS Design answered:
Buongiorno Maria Cristina. Nei diagrammi trova tutti i ferri del motivo, sia quelli sul diritto che quelli sul rovescio del lavoro. Quindi in tutto 12 ferri. Buon lavoro!
23.11.2019 - 21:56
![]() Andrea wrote:
Andrea wrote:
Liebes Drops Team, erstmal ein großes Lob für die vielen tollen Strickanleitungen. Jetzt zu meinem Problem, ich stricke den Pullover in Größe M und habe Probleme mit M3 bei dem Vorderteil. Wie beginne ich mit M3 ? Ich stricke die rechte Schulter beim tragen. Wahrscheinlich wieder ein denk Fehler , aber ich stehe auf dem Schlauch !!! Vielen Dank für die Antwort.
24.08.2019 - 21:14DROPS Design answered:
Liebe Andrea, die erste Masche beim rechten Schulter am Rückenteil muß beim rechten Schulter am Vorderteil jetzt die letzte Masche sein. Kalkulieren Sie dann je nach der Maschenanzahl mit welcher Masche im M.3 Sie jetzt anfangen sollen. Viel Spaß beim stricken!
26.08.2019 - 08:58
|
||||||||||
Sir Lancelot#sirlancelotsweater |
||||||||||
|
|
||||||||||
Men's knitted jumper with textured pattern and v-neck, in DROPS Karisma. Sizes S to XXXL
DROPS 135-36 |
||||||||||
|
GARTER ST (back and forth on needle): K all rows. PATTERN: See diagrams M.1 to M.3 – diagrams show pattern from RS. M.1 = 24 sts in width, M.2 = 12 sts in width and M.3 = 18 sts in width. -------------------------------------------------------- BACK PIECE: Worked back and forth on needle. Cast on 110-122-134-146-158-170 sts (incl 1 edge st in each side) on needle size 3 mm with Karisma. Work rib as follows (seen from from RS): 1 edge st in GARTER ST - see explanation above, * K 1, P 3 *, repeat from *-*, finish with 1 edge st in garter st. When rib measures approx. 5 cm (adjust so that next row is worked from WS), switch to needle size 4 mm. P 1 row from WS while at the same time dec 12 sts evenly = 98-110-122-134-146-158 sts. Work next row as follows (from RS): SIZE S: 1 edge st in garter st, diagram M.1, M.2, M.1, M.2, M.1 and 1 edge st in garter st. SIZE M: 1 edge st in garter st, 6 sts in stocking st, diagram M.1, M.2, M.1, M.2, M.1, 6 sts in stocking st and 1 edge st in garter st. SIZE L: 1 edge st in garter st, diagram M.2, M.1, M.2, M.1, M.2, M.1, M.2 and 1 edge st in garter st. SIZE XL: 1 edge st in garter st, 6 sts in stocking st, diagram M.2, M.1, M.2, M.1, M.2, M.1, M.2, 6 sts in stocking st and 1 edge st in garter st. SIZE XXL: 1 edge st in garter st, 12 sts of diagram M.1 – start in the 13th st from the right side in diagram, diagram M.2, M.1, M.2, M.1, M.2, M.1, M.2 and 12 sts of diagram M.1 – start in first st in diagram - and 1 edge st in garter st. SIZE XXXL: 1 edge st in garter st, 18 sts of diagram M.1 – start in the 7th st from the right side in diagram, diagram M.2, M.1, M.2, M.1, M.2, M.1, M.2 and 18 sts of diagram M.1 – start in first st in diagram - and 1 edge st in garter st. ALL SIZES: Continue to work the same way until piece measures 48-49-50-51-52-53 cm. REMEMBER THE KNITTING TENSION! Now cast off 1-2-2-3-4-5 sts in each side for armholes (i.e. cast off at the beg of the next 2 rows) = 96-106-118-128-138-148 sts. Continue the pattern as before with 1 edge st in garter st in each side. When piece measures approx. 58-60-62-64-66-68 cm (adjust after 1 half repetition or 1 whole repetition of diagram M.1 and M.2 vertically), work 2 rows in stocking st, then continue with diagram M.3 over all sts (except edge st) – see arrow for your size; this marks where to beg in the diagram. AT THE SAME TIME when 4 rows remain of diagram M.3, cast off the middle 36-38-40-42-44-46 sts for neck and finish each shoulder separately. Continue to cast off 2 sts on next row from neck = 28-32-37-41-45-49 sts remain on the shoulder. When diagram M.3 has been worked, work approx. 1 cm in stocking st, then cast off. Piece measures approx. 68-70-72-74-76-78 cm. FRONT PIECE: Cast on and work as back piece. Cast off for armhole as on back piece and continue until piece measures approx. 58-60-62-64-66-68 cm. Then work 2 rows in stocking st - while at the same time on 1st row casting off the middle 4 sts for neck and finish each shoulder separately. Work pattern as on back piece (make sure that diagram M.3 is worked the same way on each side of neck) – AT THE SAME TIME cast off on every row from neck: 2 sts 5-6-7-8-9-10 times and then 1 st 8-7-6-5-4-3 times = 28-32-37-41-45-49 sts remain on shoulder. Cast off when same no of rows has been worked as on back piece. SLEEVE: Worked back and forth on needle. Cast on 62 sts for all sizes (incl 1 edge st in each side) on needle size 3 mm with Karisma. Work rib as follows (seen from from RS): 1 edge st in garter st, * K 1, P 3 *, repeat from *-*, finish with 1 edge st in garter st. When piece measures approx. 5 cm (adjust so that next row is worked from WS), switch to needle size 4 mm. P 1 row from WS. Work next row as follows: 1 edge st in garter st, diagram M.1, M.2, M.1 and 1 edge st in garter st, continue like this. When piece measures 9 cm, inc 1 st in each side. Repeat inc every 9th-8th-6th-5th-4th-4th row a total of 12-14-16-18-20-21 times - work the inc sts in stocking st = 86-90-94-98-102-104 sts. When piece measures approx. 46-46-44-42-40-39 cm (adjust after 1 half or 1 whole repetition of diagram M.1 and M.2 vertically, inc should be finished), work 2 rows in stocking st, then continue with diagram M.3 – start in first st on right side of diagram (the pattern will not fit at the end of row). After diagram M.3 work (if there is room) in stocking st until piece measures 56-56-54-52-50-49 cm (shorter measurements in the larger sizes because of broader shoulder width), cast off. ASSEMBLY: Sew the shoulder seams. NECK: Knit up approx. 119 to 139 sts (divisible by 4 + 3) around the neck on circular needle size 3 mm with Karisma – beg mid front. Then the piece is worked back and forth from mid front. First row from WS is worked as follows: 1 edge st in garter st, * P 1, K 3 *, repeat from *-* and finish with P 1 and 1 edge st in garter st. Continue with K over K and P over P and edge st in garter st until neck edge measures approx. 6 cm. Cast off with K over K and P over P. Place the neck on top of each other mid front, left side over right, fasten with stitches from both WS and RS. Sew the sleeves inside 1 edge st. Sew sleeve and side seams in one inside 1 edge st. |
||||||||||
Diagram explanations |
||||||||||
|
||||||||||
 |
||||||||||
Have you finished this pattern?Tag your pictures with #dropspattern #sirlancelotsweater or submit them to the #dropsfan gallery. Do you need help with this pattern?You'll find 19 tutorial videos, a Comments/Questions area and more by visiting the pattern on garnstudio.com. © 1982-2026 DROPS Design A/S. We reserve all rights. This document, including all its sub-sections, has copyrights. Read more about what you can do with our patterns at the bottom of each pattern on our site. |
||||||||||


With over 40 years in knitting and crochet design, DROPS Design offers one of the most extensive collections of free patterns on the internet - translated to 17 languages. As of today we count 324 catalogues and 12290 patterns translated into English (UK/cm). 12290
We work hard to bring you the best knitting and crochet have to offer, inspiration and advice as well as great quality yarns at incredible prices! Would you like to use our patterns for other than personal use? You can read what you are allowed to do in the Copyright text at the bottom of all our patterns. Happy crafting!
Post a comment to pattern DROPS 135-36
We would love to hear what you have to say about this pattern!
If you want to leave a question, please make sure you select the correct category in the form below, to speed up the answering process. Required fields are marked *.