
Popular categories
Looking for a yarn?


Comments / Questions (216)
![]() Moinet wrote:
Moinet wrote:
Bonjour, je ne comprends pas au niveau des emmanchures, je dois monter 32 mailles au dessus de chaque emmanchures faut il ensuite mettre les marqueurs sur ses mailles et augmenter en alternant ? Ou les tricoter sans augmentation ? Merci Cordialement
17.08.2024 - 11:39DROPS Design answered:
Bonjour Mme Moinet, placez vos marqueurs dans les nouvelles mailles pour qu'ils correspondent à l'endroit où ils étaient auparavant et continuez à augmenter exactement comme avant. Bon tricot!
19.08.2024 - 07:56
![]() Bernice Nicholl wrote:
Bernice Nicholl wrote:
I need a little help understanding how to knit the sleeves. Small sleeves: Knit 6rows of 45. Do I knit or purl the next row (row7)? Sorry still a beginner.
26.05.2024 - 00:10DROPS Design answered:
Dear Bernice, you continue as indicated. "Continue as follows (first row, which is the 7th row = WS): 1 edge st, 19-20-21-22 sts in reverse stocking st , M.3, 19-20-21-22 sts in reverse stocking st and 1 edge st. The edge stitches are knitted and the sts in reverse stocking st are purled from the RS and knitted from the WS; M.3 is the chart below. Happy knitting!
27.05.2024 - 01:08
![]() Katarzyna wrote:
Katarzyna wrote:
Ile motków potrzeba tylko na rekawy w rozmiarze XL/XXL ?
13.05.2021 - 01:55DROPS Design answered:
Witaj Kasiu, niestety nie potrafię odpowiedzieć na twoje pytanie. Czy chcesz zrobić kamizelkę? W takim razie możesz wyszukać wzory na kamizelki dla tej włóczki i tak porównać ilość potrzebnej włóczki? Pozdrawiamy!
13.05.2021 - 12:58
![]() Regina wrote:
Regina wrote:
Hallo, erst einmal vielen Dank für die bisherige Hilfe. Die Ärmel sind ganz schnell fertig geworden und nun habe ich auch schon das Muster (5 Blätter) vom Vorder und Rückenteil fertig. Jetzt wird ja in Krausrippe (1 Runde re, 1 Runde li,) weitergestrickt. Die Aufnahme bei den 10 markierten Maschen ist die immer rechts und links der markierten Masche. Oder nur auf der rechten Seite und nach 4 Runden dann auf der linke Seite? So immer im Wechsel?
24.07.2019 - 09:48DROPS Design answered:
Liebe Regina, letzteres ist zutreffend - Sie nehmen pro Zunahmerunde 10 Maschen zu, d.h. 1 Masche an jedem Markierer (es sind ja 10 Markierer vorhanden). In der ersten Zunahmerunde erfolgt die Zunahme auf der rechten Seite jedes Markierers, in der nächsten Zunahmerunde auf der linken Seite jedes Markierers usw. Viel Spaß beim Weiterstricken!
24.07.2019 - 17:11
![]() Regina wrote:
Regina wrote:
Versuche seit über 2 Jahren diese herrliche Jacke zu stricken, aber leider ohne Erfolg. Dachte fang mit den Ärmeln an, die sehen einfach aus, aber nichts war. Um Ihren Hinweis von 06.02.2017 noch einmal aufzugreifen. Ich beginne mit der Rückreihe rechts gestrickt) von links nach rechts und dann die Hinreihe (links gestrickt) von rechts nach links. Wenn ich M3 fertig habe sieht es aber nicht so aus wie auf dem Bild, wo das Muster auf der Vorderseite rechts gestrickt aussieht. Was ist falsch?
25.06.2019 - 18:21DROPS Design answered:
Liebe Regina, für die Ärmel stricken Sie zuerst 6 Reihen rechts (= 3 Krausrippen), dann stricken Sie glatt lilnks mit M.3 in der Mitte, das Blatt in M.3 (= die leere Kästchen) sind glatt rechts gestrickt, nur die 2 (1. Mitte vom Blatt) dann die 1 ersten und letzten Maschen sind glatt links - gestrickt. hier lesen Sie mehr über Diagramme. Viel Spaß beim stricken!
26.06.2019 - 06:22
![]() Ann Kristin Aaker wrote:
Ann Kristin Aaker wrote:
Kan jeg få et bilde av hvordan mønsteret M3 på armen blir i fht resten?
20.06.2018 - 19:10Orsi wrote:
I am finished with the body piece, and starting with the sleeves. I have a question regarding M3... The first row of M3 is 5 stitches. Row nr.2 ends up 5 stitches again with decreasing 2 and 2 YO. Yet, the third row is 7 stitches. Should I include stitches from the reverse stocking on the sides? Or is there something I'm missing?
10.06.2018 - 13:31DROPS Design answered:
Dear Mrs Orsi, that's because you will work always more sts in the pattern, ie on row 3 in 1st size for example you will work: 1 edge st, P 18, M.3 (= P2,K3, P2), P18, 1 edge st. Happy knitting!
11.06.2018 - 09:39
![]() Samantha wrote:
Samantha wrote:
I’ve finished the M1 & M2 sections and now am working in garter to the sleeves. I have 10 markets in my round. When it says ‘increase by all markers’ does that mean increase ONE by each marker or ONE each side of markers? (Ex: increase 10 each increase round or 20?)
14.02.2018 - 20:37DROPS Design answered:
Hi Samantha, It means increase 1 stitch by each marker by making 1 YO. Alternate each increase by making the YO first before and then after the markers. Work into the back loop of the YOs on the next round to avoid holes. Happy knitting!
15.02.2018 - 06:28
![]() Gisela wrote:
Gisela wrote:
Hallo, habe die Jacke nun fertig gestrickt. Sieht gut aus! Nur mit den Maßangeben für die Knöpfe komme ich leider nicht zurecht. Mit den 5 cm nach unten ist klar - nur wieviel cm im rechten Winkel? Kann ich ggf. auch noch nachträglich für einen schönen Abschluss eine Knopfleiste anbringen? Wenn ja, wie sind da ca. die Maße? Vielen Dank für die Hilfe.
21.11.2017 - 00:00DROPS Design answered:
Liebe Gisela, messen Sie 5 cm unter den Armloch, dann 10 cm links (am linken Vorderteil) messen - siehe auch Stern in der Maßskizze. Als Knopfleiste wird dann ein Schlaufe gehäkelt, siehe SCHLAUFEN. Viel Spaß beim fertigstellen!
21.11.2017 - 08:38
![]() Carole Stevenson wrote:
Carole Stevenson wrote:
Hi, I'm finishing up the sleeves but I need to reduce the length of the sleeves as the adult is under 5 ft (60cm would be far too long). Can you tell me approx how many sts I should be left with to cast off? I.e. When reducing from 61sts in the 8cm from 52cm to 60cm? Thanks, Carole
31.08.2017 - 19:55DROPS Design answered:
Dear Carole, we unfortunately are not able to adjust every pattern to each individual request. For any further personnal assistance you are welcome to contact the store where you bought your yarn. Happy knitting!
01.09.2017 - 09:07
|
|||||||||||||||||||||||||
Fleur du Népal#fleurdunepaljacket |
|||||||||||||||||||||||||
 |
 |
||||||||||||||||||||||||
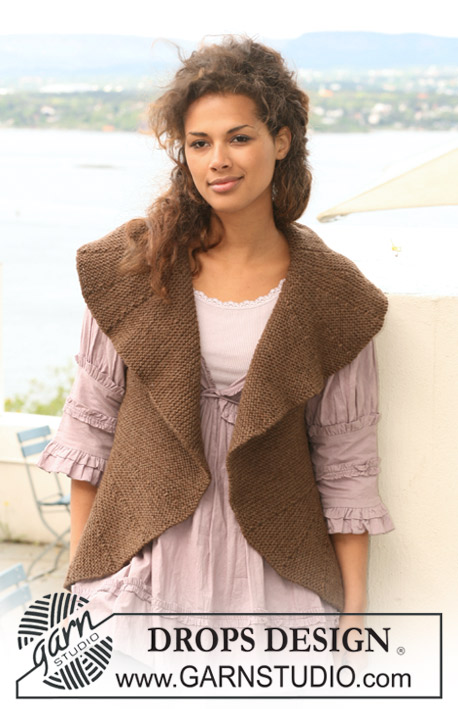
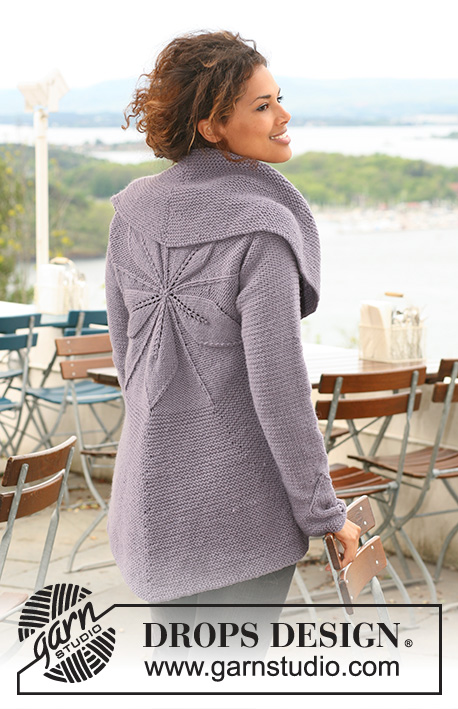
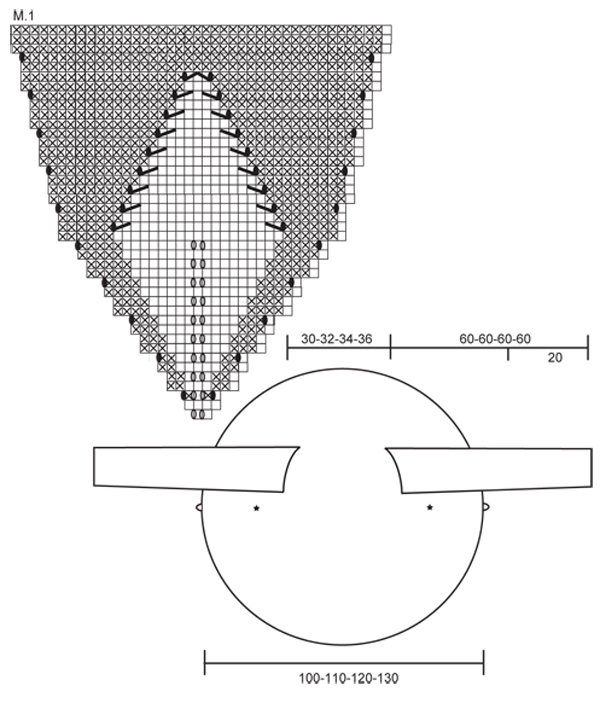
DROPS jacket knitted in a circle in ”Nepal” with leaf pattern. Size S to XXXL
DROPS 126-1 |
|||||||||||||||||||||||||
|
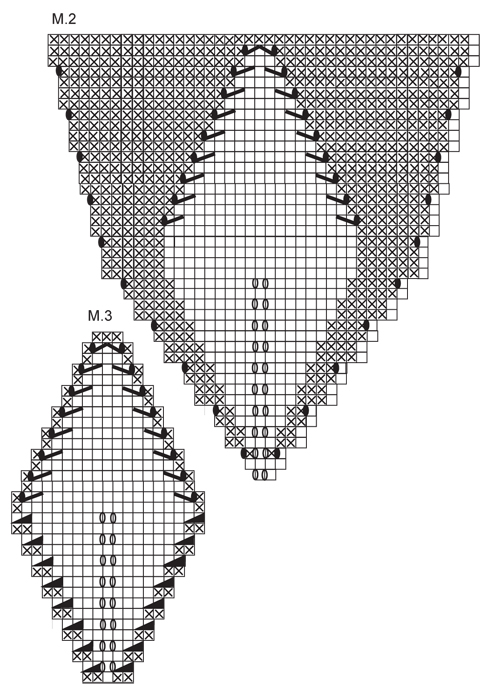
PATTERN: See diagram M.1, M.2 and M.3 - diagrams show 1 pattern repeat from RS. GARTER ST (in the round): K 1 round, P 1 round. INCREASING TIP (applies to after M.1 and M.2): Inc 1 st by each marker per inc (i.e. inc 10 sts per round) – inc alternately to the left and to the right of all markers by making 1 YO – on next round work YO into back of loop to avoid a hole. -------------------------------------------------------- BODY PIECE: Worked in the round as a circle from mid back. Cast on 10 sts with Nepal and distribute them on 4 double pointed needles size 5 mm. Insert a marker at beg of round = mid piece towards the neck. Continue as follows in the round: M.1, M.2, M.2, M.2 and M.1 (= a total of 5 repeats across the round). Change to circular needle as you inc sts. REMEMBER THE KNITTING TENSION! When M.1/M.2 is complete piece measures approx 19 cm from the middle and there are 210 sts on needle. Now insert a marker in each of the 5 stocking sts in the middle of pattern repeat (the inc were made each side of this st), and a marker in st mid between the first 5 markers (= a total of 10 markers). READ ALL OF THE FOLLOWING SECTION BEFORE CONTINUING! PATTERN: Continue in GARTER ST – see above – at the same time on first round after M.1/M.2 inc by all markers - SEE INCREASING TIP - and repeat the inc on every 4th round as you go along. ARMHOLE: At the same time after 2-6-10-14 rows garter st (= 220-230-240-250 sts on needle) work next round as follows (this is a round without inc): Work 25-27-29-31 sts, cast off 32-34-37-40 sts (= armhole), work 106-108-108-108 sts, cast off 32-34-37-40 sts (= armhole) and work 25-27-29-31 sts. On next round cast on 32-34-37-40 new sts over each armhole. Continue and inc as before until there is a total of 480-520-560-600 sts on needle – piece now measures approx 50-55-60-65 cm from the middle, finish after a P round and cast off LOOSELY with K sts. SLEEVE: Worked back and forth on needle. Cast on 45-47-49-51 sts (includes 1 edge st each side) on needle size 5 mm with Nepal, K 6 rows (first row = WS). Continue as follows (first row = WS): 1 edge st, 19-20-21-22 sts in reverse stocking st , M.3, 19-20-21-22 sts in reverse stocking st and 1 edge st. Continue in pattern like this. After M.3 continue in reverse stocking st on all sts. AT THE SAME TIME when piece measures 20 cm inc 1 st each side, repeat the inc on every 4-3.5-3-2.5 cm a total of 8-9-11-13 times = 61-65-71-77 sts. When piece measures 52 cm for all sizes cast off for sleeve cap at beg at beg of every row each side: 4 sts 1 time, then 2 sts each side until piece measures approx 60 cm. Cast off remaining sts. ASSEMBLY: Sew sleeve seams inside 1 edge st. Set in sleeves placing the middle of sleeve cap where the distance between armholes is shortest (i.e. where the first st was cast off on the first armhole and the last st was cast off on the other sleeve) and with the sleeve seams where the distance between the armholes is longest (i.e. the opposite side). BUTTONS: Place the jacket as shown in chart with RS facing up. Measure approx 5 cm down from the bottom of armhole on the left side of piece and then 10 cm out in a 90 degree angle and sew 1 button on here from RS – see the marking. Sew on the other button on the other side in the same position, but sew it on from WS. BUTTONHOLE LOOPS: Crochet 1 buttonhole loop with crochet hook size 4 mm in cast off row each side to fit the buttons (see chart). 1 LOOP = 1 dc in cast off row on jacket, 5 ch, skip approx 1 cm and fasten with 1 dc in cast off row. |
|||||||||||||||||||||||||
Diagram explanations |
|||||||||||||||||||||||||
|
|||||||||||||||||||||||||
 |
|||||||||||||||||||||||||
 |
|||||||||||||||||||||||||
Have you finished this pattern?Tag your pictures with #dropspattern #fleurdunepaljacket or submit them to the #dropsfan gallery. Do you need help with this pattern?You'll find 27 tutorial videos, a Comments/Questions area and more by visiting the pattern on garnstudio.com. © 1982-2026 DROPS Design A/S. We reserve all rights. This document, including all its sub-sections, has copyrights. Read more about what you can do with our patterns at the bottom of each pattern on our site. |
|||||||||||||||||||||||||


With over 40 years in knitting and crochet design, DROPS Design offers one of the most extensive collections of free patterns on the internet - translated to 17 languages. As of today we count 324 catalogues and 12290 patterns translated into English (UK/cm). 12290
We work hard to bring you the best knitting and crochet have to offer, inspiration and advice as well as great quality yarns at incredible prices! Would you like to use our patterns for other than personal use? You can read what you are allowed to do in the Copyright text at the bottom of all our patterns. Happy crafting!
Post a comment to pattern DROPS 126-1
We would love to hear what you have to say about this pattern!
If you want to leave a question, please make sure you select the correct category in the form below, to speed up the answering process. Required fields are marked *.