
Popular categories
Looking for a yarn?


Comments / Questions (92)
![]() Anette wrote:
Anette wrote:
Ich verstehe den Anfang vom Pullunder nicht. Was soll das heißen: *2 re. In jede der 2 nächsten M. ??? Bitte erklären🙏
02.11.2025 - 09:43DROPS Design answered:
Liebe Anette, das soll heißen, dass Sie die beiden Maschen verdoppeln, d.h. Sie stricken 2 Maschen in eine Masche (und nicht nur eine Masche in eine Masche). Hier der Rapport zwischen den Sternchen etwas anders ausgedrückt: * 2 Maschen rechts in 1 Masche stricken, 2 Maschen rechts in 1 Masche stricken, 4 Maschen links. * Viel Spaß beim Stricken!
04.11.2025 - 21:55
![]() Sandra wrote:
Sandra wrote:
Bonjour, J'ai un doute concernant le nombre de mailles du dos après les emmanchures. En effet, pour le devant nous avons fait des augmentations à la base de chaque torsade, mais rien n'est indiqué pour le dos. Ensuite nous devons faire le même nombre de diminutions que pour le devant (-8 mailles). Mais alors le nombre de mailles entre le devant et le dos sera différent ?
01.10.2025 - 22:10DROPS Design answered:
Bonjour Sandra, on augmente après les côtes pour le devant car on a des torsades et on doit compenser le nombre de mailles pour éviter que les torsades ne resserrent l'ouvrage, mais le dos se tricote en jersey, envers on n'a donc pas besoin du même nombre de mailles que pour le devant. Bon tricot!
02.10.2025 - 08:42
![]() Diane Brown wrote:
Diane Brown wrote:
Front piece says cast on 70stitches Fifth row says k2 in each of the next 2sts if I repeat this as many times as it says I end up with 90st and I’m only supposed to have 80 Am I reading this wrong k2 in a stitch means k in front and back making 2 st
12.09.2025 - 03:29DROPS Design answered:
Hi Diane, Work next row as follows from RS: 1 edge st, P 11-14-17 (21-24), * K2 in each of the next 2 sts, P4 *, repeat from *-* 4 times (+8 stitches), K2 in each of the next 2 sts (+2 stitches), P 11-14-17 (21-24), 1 edge st = 80 sts. Happy knitting!
12.09.2025 - 07:53
![]() Gitte wrote:
Gitte wrote:
Vest str 12/18 måneder Forstykke de udtagninger der strikkes giver ikke 72 men 76 m 1 kant m 17 vr *2 r i hver 2 m 4 vr* giver 76 m??
14.05.2025 - 17:01
![]() De Romanet Alice wrote:
De Romanet Alice wrote:
Bonjour, J'ai une question : Que signifie "M1" à la deuxième ligne après le point mousse sur le devant du gilet ? Merci pour votre réponse, bonne journée !
08.05.2025 - 22:01DROPS Design answered:
Bonjour Mme De Romanet, M.1 correspond au diagramme de la torsade que vous trouverez à droite du schéma des mesures - cf. POINT FANTAISIE au début des explications et retrouvez plus d'infos sur les diagrammes ici. Bon tricot!
09.05.2025 - 07:51
![]() Rosier wrote:
Rosier wrote:
Pour les emmznchures vous dites de rabattre m de chaque côtés puis 5 m 1 rg sur 2 = 64 m En partant de 70 - 3x2- 5x1 =54??
20.02.2025 - 16:55DROPS Design answered:
Bonjour Mme Rosier, vous tricotez la taille 2 ans? Vous avez monté 70 mailles mais vous devez augmenter après les côtes et vous avez ainsi 80 mailles avant de commencer les torsades, vous rabattez ensuite 3 m de chaque côté et diminuez 5 x 1 m de chaque côté soit 80- (2x3) - (5x1x2) = 64 mailles. Bon tricot!
21.02.2025 - 09:48
![]() Marie Violaine Monier wrote:
Marie Violaine Monier wrote:
Bonjour, lorsqu'on commence les diminutions des emmanchures il est indiqué de diminuer 3 mailles après le point mousse à 3 mailles du bord. Qu'en est-il de la maille lisière ? est-ce qu'elle est toujours là et non comptabilisée dans les explications ?
17.04.2024 - 09:24DROPS Design answered:
Bonjour Mme Monier, on a rabattu les mailles des emmanchures et on continue avec 3 mailles point mousse de chaque côté, il n'y a pas de maille lisière supplémentaire, autrement dit, diminuez après les 3 premières mailles du rang (tricotées au point mousse) et avant les 3 dernières mailles du rang (tricotées également au point mousse) comme indiqué sous DIMINUTIONS. Bon tricot!
17.04.2024 - 11:15
![]() Sylwia wrote:
Sylwia wrote:
Wydaje mi się, że w opisie wykończenia dekoltu tyłu kamizelki jest błąd. Podane jest by nabrać oczka, przerobić 3 rzędy i zakończyć. Żeby ładnie nabrać oczka trzeba by to zrobić z prawej strony robótki, potem więc przerobiłbym 3 rzędy i zakańczałabym z prawej strony robótki. Ale w takim wypadku wzór dekoltu inaczej wychodzi niż z przodu. Tam przerabia się tylko 2 rzędy i zakańcza - z lewej strony robótki.
05.11.2023 - 19:59
![]() Anna wrote:
Anna wrote:
Całkiem wygodnie mi się korzystało z tego wzoru, aż dotarłam do fragmentu: "przer. 4 rz. ściegiem francuskim ponad 6 o. z każdej strony". Zupełnie go nie rozumiem. Czy to oznacza, że przez następne 4 rzędy przerabiam 6 o. z każdej strony (łącznie 12 o. w rzędzie) ściegiem francuskim? A co oznacza "ponad"? Będę uprzejmie wdzięczna za podpowiedź!
24.09.2023 - 23:27DROPS Design answered:
Witaj Aniu, 6 pierwszych i ostatnich oczek w rzędzie przerabiasz na prawo w 4 kolejnych rzędach. Pozostałe oczka przerabiasz jak wcześniej. Pozdrawiamy!
25.09.2023 - 07:56
![]() Dorthe Steenholdt wrote:
Dorthe Steenholdt wrote:
Hvor er knaphullerne i denne opskrift?
21.05.2023 - 16:59DROPS Design answered:
Hei Dorthe De er beskrevet under VENSTRE SKULDER. Du strikker 2 rett sammen, 1 kast. Kastet strikkes rett på neste pinne = knappehull. mvh DROPS Design
22.05.2023 - 14:16
|
|||||||
Little Gent#littlegentslipover |
|||||||
 |
 |
||||||
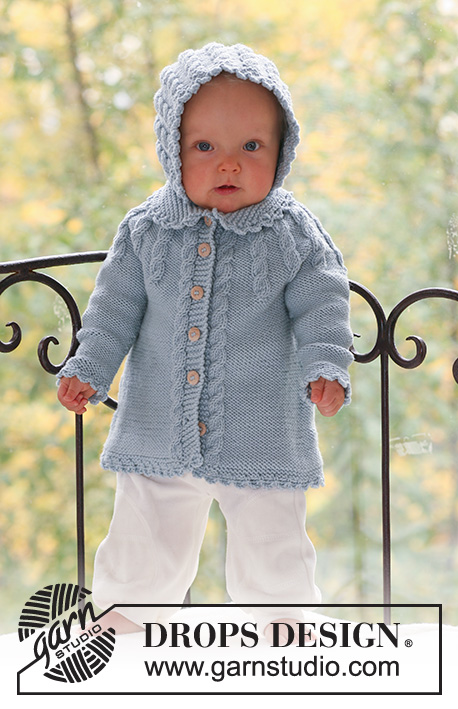
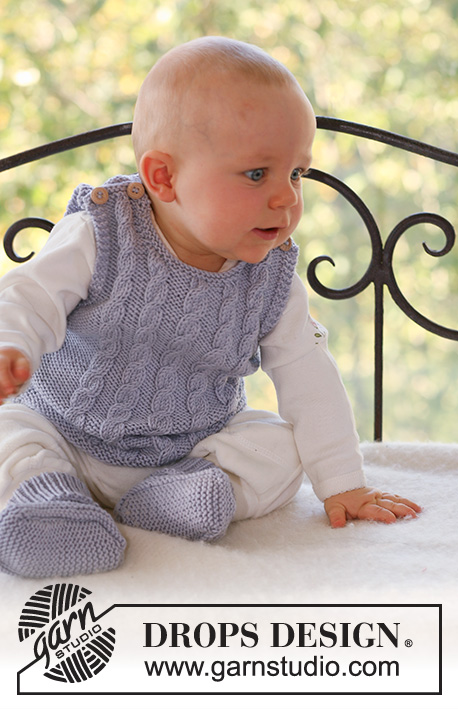
Set of knitted vest and socks with cables for baby and children in DROPS Merino Extra Fine
DROPS Baby 17-9 |
|||||||
|
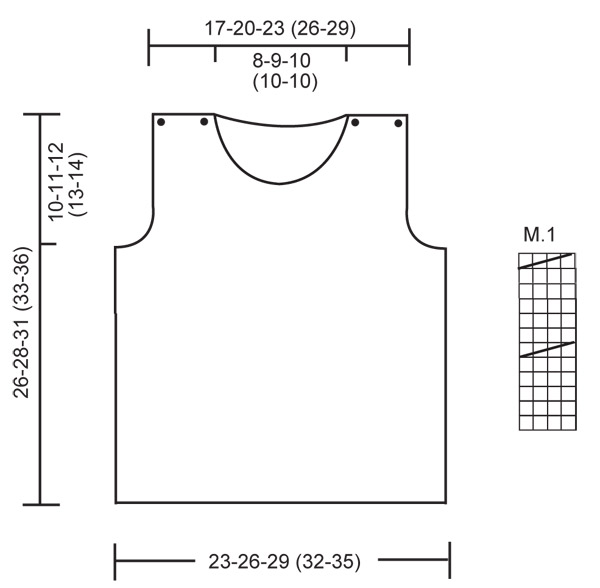
PATTERN: See diagram M.1. The diagram is seen from the RS. GARTER ST (back and forth on needle): K all rows. GARTER ST (in the round): K 1 round, P 1 round. DECREASING TIP (applies to armhole on top): Dec from RS inside 3 garter sts by P2 tog. ---------------------------------------------------------- SLEEVELESS TOP: FRONT PIECE: Worked back and forth on needle. Cast on 50-56-62 (70-76) sts (includes 1 edge st each side, worked in garter st throughout) on needle size 4 mm with Merino Extra Fine. Work 4 rows garter st – SEE ABOVE. Work next row as follows from RS: 1 edge st, P 11-14-17 (21-24), * K2 in each of the next 2 sts, P4 *, repeat from *-* 4 times, K2 in each of the next 2 sts, P 11-14-17 (21-24), 1 edge st = 60-66-72 (80-86) sts. Work next row as follows from WS: 1 edge st, K 11-14-17 (21-24), * M.1, K 4 *, repeat from *-* 4 times, M.1, K 11-14-17 (21-24), 1 edge st. Work next row as follows from RS: 1 edge st, P 11-14-17 (21-24), * M.1, P 4 *, repeat from *-* 4 times, M.1, P 11-14-17 (21-24), 1 edge st. Continue in pattern like this. REMEMBER THE KNITTING TENSION! When piece measures 15-16-18 (19-21) cm work 4 rows garter st on 6 sts each side (work remaining sts as before), AT THE SAME TIME on last row cast off 3 sts at beg of row, work remaining sts on row as before, and cast off 3 sts at beg of next row, work remaining sts on row as before. Continue with 3 garter sts each side, AT THE SAME TIME cast off to shape the armhole each side – SEE DECREASING TIP: 1 st on every other row 4-4-4 (5-5) times = 46-52-58 (64-70) sts. When piece measures 22-23-26 (28-31) cm slip the middle 12-12-14 (14-14) sts on a stitch holder for neck and complete each side separately. Cast off to shape the neckline at the beg of every row from mid front: 2 sts 1 time and 1 st 3-4-4 (4-4) times = 12-14-16 (19-22) sts left on shoulder. When piece measures 26-28-31 (33-36) cm work the 4 sts over cable tog 2 by 2 = 10-12-14 (17-20) sts left on shoulder. Slip shoulder sts on a stitch holder. NECKLINE: Pick up approx 30 to 40 sts round neckline (includes sts on stitch holder) on needle size 4 mm with Merino Extra Fine. K 1 row from WS, AT THE SAME TIME adjust no of sts to 26-28-30 (32-34). K 2 rows and cast off. LEFT SHOULDER: Work sts from stitch holder back on needle and pick up 2 sts on neckline = 12-14-16 (19-22) sts. K 1 row from WS and work next row as follows: K 1-1-1 (2-2), K2 tog, 1 YO, K 5-7-9 (10-13), K2 tog, 1 YO, K 2-2-2 (3-3). K 1 row and cast off on next row. RIGHT SHOULDER: Pick up 2 sts on neckline and work sts from stitch holder back on needle = 12-14-16 (19-22) sts. Work like left shoulder. BACK PIECE: Worked back and forth on needle. Cast on 50-56-62 (70-76) sts (includes 1 edge st each side, worked in garter st throughout) on needle size 4 mm with Merino Extra Fine. Work 4 rows garter st and continue in reverse stocking st. Cast off for armhole each side as described for front piece and continue until piece measures 24-26-29 (31-34) cm. Now cast off the middle 14-16-18 (18-18) sts for neck and complete each side separately. Cast off 1 st on neckline on next row = 10-12-14 (17-20) sts left on shoulder. When piece measures 26-28-31 (33-36) cm slip shoulder sts on a stitch holder. NECKLINE: Pick up approx 18 til 26 sts round neckline on needle size 4 mm with Merino Extra Fine. K 3 rows and cast off. LEFT SHOULDER: Work sts from stitch holder back on needle and pick up 2 sts on neckline = 12-14-16 (19-22) sts. K 3 rows and cast off. RIGHT SHOULDER: Like left shoulder. ASSEMBLY: Sew side seams inside 1 edge st and sew on buttons on shoulders. ---------------------------------------------------------- BOOTIES: Worked in the round on double pointed needles. Cast on 48-52-52 (56-56) sts on double pointed needles size 2.5 mm with Merino Extra Fine. Work rib, K1/P1 – round beg mid back. When piece measures 4-5-5 (5-6) cm K 3 tog (= K1. P1, K1) mid back, work 4 rounds and then K3 tog again (= P1, K1, P1) mid back = 44-48-48 (52-52) sts. When piece measures 10-11-12 (13-14) cm change to double pointed needles size 3.5 mm. K 1 round, AT THE SAME TIME dec 6-6-6 (6-6) sts evenly = 38-42-42 (46-46) sts. REMEMBER THE KNITTING TENSION! Slip the first 14-15-15 (16-16) sts on a stitch holder, keep the next 10-12-12 (14-14) sts on needle (= upper foot), and slip remaining 14-15-15 (16-16) sts on a stitch holder. Work sts on upper foot back and forth on needle as follows: 2-3-3 (4-4) garter sts – SEE ABOVE, 1 st in reverse stocking st, M.1 (beg on row 4 in diagram), 1 st in reverse stocking st, and 2-3-3 (4-4) garter sts. When piece on upper foot measures 3½-4-5 (6½-7½) cm pick up 8-9-11 (14-16) sts on both sides and slip sts from stitch holders back on needle = 54-60-64 (74-78) sts. Continue in garter st on all sts for 1½-2-2½ (3-3½) cm, now P 1 round and cast off all sts except the 10-12-12 (14-14) sts mid front. Work 9-10-11 (13-15) cm garter sts on these sts for sole and cast off. Sew sole to bootie, edge to edge to avoid a chunky seam. Knit the other bootie in the same way. |
|||||||
Diagram explanations |
|||||||
|
|||||||
 |
|||||||
Have you finished this pattern?Tag your pictures with #dropspattern #littlegentslipover or submit them to the #dropsfan gallery. Do you need help with this pattern?You'll find 13 tutorial videos, a Comments/Questions area and more by visiting the pattern on garnstudio.com. © 1982-2026 DROPS Design A/S. We reserve all rights. This document, including all its sub-sections, has copyrights. Read more about what you can do with our patterns at the bottom of each pattern on our site. |
|||||||


With over 40 years in knitting and crochet design, DROPS Design offers one of the most extensive collections of free patterns on the internet - translated to 17 languages. As of today we count 324 catalogues and 12290 patterns translated into English (UK/cm). 12290
We work hard to bring you the best knitting and crochet have to offer, inspiration and advice as well as great quality yarns at incredible prices! Would you like to use our patterns for other than personal use? You can read what you are allowed to do in the Copyright text at the bottom of all our patterns. Happy crafting!
Post a comment to pattern DROPS Baby 17-9
We would love to hear what you have to say about this pattern!
If you want to leave a question, please make sure you select the correct category in the form below, to speed up the answering process. Required fields are marked *.