
Popular categories
Looking for a yarn?


Comments / Questions (48)
![]() Laperriere wrote:
Laperriere wrote:
Comment peut on faire pour ne pas qu il y est des trous en montant que 7 mailles chaque côté de l encolure pour monte faire le capuchon? Merci de votre réponse c est toujours très apprécier.
24.02.2016 - 03:11DROPS Design answered:
Bonjour Mme Laperriere, je suis désolée, je ne vois pas ce que vous voulez dire, pouvez-vous préciser votre question? Pour la capuche, on relève les mailles le long des devants et on reprend les mailles de l'empiècement (= 68-88 m selon la taille) et on tricote au point mousse.
24.02.2016 - 10:29
![]() Laperrière wrote:
Laperrière wrote:
J'ai eu votre réponse merci.Mais ça ne m'aide pas car je ne dois pas enlever autant de maille que l'exemple donner.Serais t il possible de m'aidé a nouveau,j'ai réellement besoin d'aide pour terminé ce qui est commencer.Merci.
01.02.2016 - 17:21DROPS Design answered:
Bonjour Mme Laperrière, la façon de faire va rester la même: au dos et au devant, vous avez rabattu 8 m sur les côtés pour les emmanchures. Aux manches, vous rabattez 8 m au milieu sous la manche. Pour l'empiècement, reprenez toutes les mailles sur la même aiguille circulaire, en plaçant les manches au-dessus des 8 m rabattues (ces 8 m rabattues manches + dos/devant) seront ensuite assemblées entre elles à la fin. Bon tricot!
02.02.2016 - 09:37
![]() Anette B wrote:
Anette B wrote:
Når jeg skal tage ind efter 8. Cm. I vr-partierne, og jeg skal skifte med at tage ind i højre og venstre side på hver 10. Pind. 1. Indt= tag 1 m. Ind i højre side strik 10 cm. 2. Indt= 1. M. Ind i venstre side. 3. Indt.=1. M. Ind i højre side af vrangpartierne??
01.04.2015 - 13:53DROPS Design answered:
Hej Anette. Ja, det er rigtigt.
29.04.2015 - 14:44
![]() Marie wrote:
Marie wrote:
Je fais la grandeur medium et j'en suis a l'encolure. J'ai 174m je dois diminuer 8x 4m, 11x4m a 61cm je mets 10m en attente je dois diminuer 1x2m et 3x1m lorsque j'ai fini j'ai 78m restante au lieu de 56m indiquer ou est mon erreur svp? merci
28.03.2015 - 19:56DROPS Design answered:
Bonjour Marie, en taille M, on commence avec 228 m, on diminue pour le raglan 15 x 8 m (13x8 m tous les 4 rangs + 2x8 m tous les 2 rangs = 120 m), puis pour l'encolure de chaque côté 1x10 m, 3x2m et 5x1 m soit 21 m x 2 côtés = 42 m. Soit 228 m - 120 m du raglan - 42 m pour l'encolure = 66 m. Bon tricot!
30.03.2015 - 15:20
![]() Line Østergaard wrote:
Line Østergaard wrote:
Har nå strikket til genseren er 63 cm i Large hvor jeg skal slippe de 5 masker på hver side av splitten, men mangler å felle av 4 ganger på raglan for å komme opp på de 12 gangene. Har jeg gjort noe feil? Eller skal jeg slippe de 5 masker og fortsatte med felling av raglan og hals?
28.01.2015 - 22:35DROPS Design answered:
Hej Line, Ja du fortsætter med at felle til raglan og hals ifølge opskriften. God fornøjelse!
02.02.2015 - 14:21
![]() Heike wrote:
Heike wrote:
Hat sich erledigt. Eine Tasse Kaffee zusätzlich hat geholfen :)
24.01.2015 - 10:57
![]() Heike wrote:
Heike wrote:
Guten Tag, ich beginne gerade mit der Kapuze und stolpere über die Anweisung, dass man diese zum Fertigstellen "oben" zusammennähen soll. Wo genau trennt man die beiden Hälften der Kapuze?
24.01.2015 - 10:45DROPS Design answered:
Die Kapuze wird in einem Stück als Rechteck gestrickt, mit ein paar Zunahmen in der Mitte für die Formgebung. Sie haben oben dann eine normale gerade Abkettkante, falten die Kapuze dann zur Hälfte, d.h. Sie legen sie doppelt, und nähen die beiden Hälften der Abkettkante zusammen.
27.01.2015 - 23:33
![]() Allison wrote:
Allison wrote:
I'm having a problem with the smaller gauge swatch...I have knitted on it on 5.0mm needles and I'm at 4" but only 19 rows...I find it hard to believe that I have to go down almost 2 needle sizes to get this gauge...I just finished another sweater on here with different yarn and the gauge swatch came out fine on that one...I'm usually a true to needle gauge knitter..so is there something wrong here?
20.07.2014 - 01:32DROPS Design answered:
Dear Allison, gauge with smaller needle should be 28 rows in garter st, ie 14 ridges = 4". Happy knitting!
21.07.2014 - 10:26
![]() Lisa wrote:
Lisa wrote:
Sehr schön! Wie fällt der denn aus? Trage 42 aber bin schwanger und sehr unsicher ob ich nun L oder lieber XL nehmen soll.... Liebe Grüße
15.06.2014 - 11:13DROPS Design answered:
Liebe Lisa, die Maße finden Sie ganz unten in der Maßskizze. Wählen Sie die Maße aus, die Ihnen oder einem gut sitzenden Pulli am besten entsprechen und stricken Sie die zugehörige Größe (die Zahlen stehen wie folgt für die Größen: S-M-L-XL-XXL-XXXL).
15.06.2014 - 14:01
![]() Bea Wunderlich wrote:
Bea Wunderlich wrote:
Schade noch keine antwort auf meine frage
21.03.2014 - 14:56
|
|||||||||||||
Korrigan |
|||||||||||||
|
|
|||||||||||||
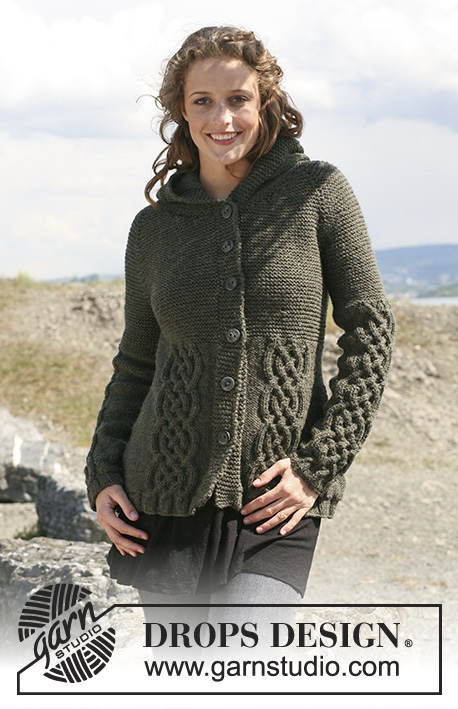
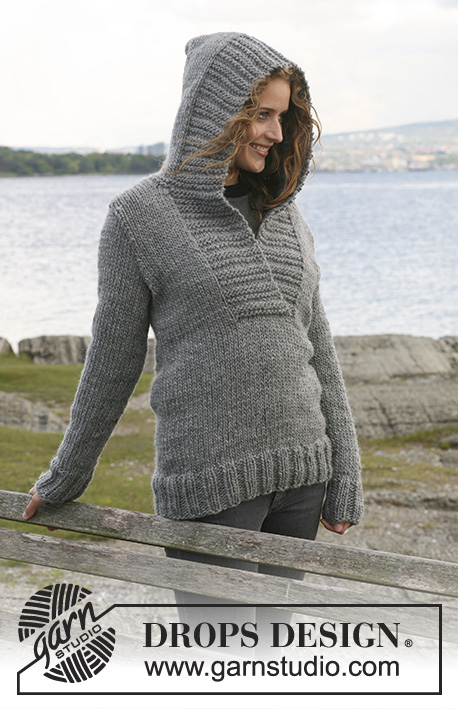
Knitted DROPS jumper in ”Alaska” with cables and raglan sleeve. Size S - XXXL.
DROPS 109-2 |
|||||||||||||
|
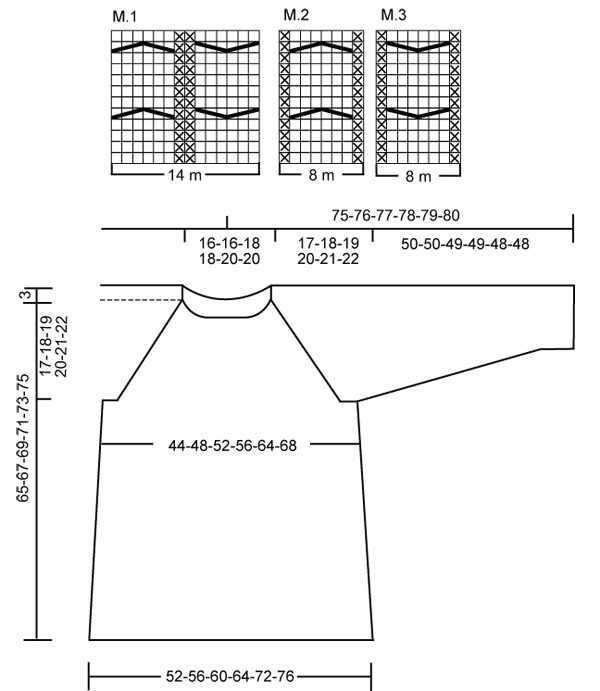
Garter st back and forth on needle: K all rows. Garter st in the round: K 1 round, P 1 round. Pattern: See diagram M.1, M.2 and M.3. Diagram shows the pattern from the RS. Knitting tip: If your knitting tension doesn’t fir, i.e. is too tight, the raglan will be too short and the armhole too small. You may compensate for this by working 1 extra row without dec in between dec. Decreasing tip, applies to raglan: Make all dec from the RS: Beg 2 sts before MT: K2 tog, MT, slip 1 st as if to K, K1, psso. Body piee: Worked in the round. Cast on 156-168-180-192-216-228 sts on circular needle size 5.5 mm with Alaska. Work 6 rounds garter st – see above, at the same time inc 24 sts evenly on the last round = 180-192-204-216-240-252 sts. Insert 1 Marking Thread (MT) at beg of round and 1 MT after 90-96-102-108-120-126 sts (= to mark the sides). On next round change to needle size 6 mm and continue as follows: P 8-9-10-11-13-14 sts, * M.1 (= 14 sts), P 16-18-20-22-26-28 sts *, repeat from *-* a total of 5 times, and finish with M.1 and P 8-9-10-11-13-14 sts. Remember the knitting tension! When piece measures 8 cm dec 1 st in each P-section (= 6 dec per round) on every 10 cm a total of 4 times = 156-168-180-192-216-228 sts. Dec by P 2 tog on the right and on the left side alternately of each P-section. When piece measures 42 cm K 1 row, at the same time dec 20 sts evenly – make sure to dec 10 sts on front piece and 10 sts on back piece, 5 sts before the middle cable and 5 sts after the middle cable = 136-148-160-172-196-208sts. Change to needle size 5.5 mm and work 8 rounds garter st. Now cut the thread and complete piece back and forth on needle. Beg working row 34-37-40-43-49-52 sts after the MT at beg of round – = mid front – as follows (from RS): 5 garter sts, M.2 (= 8 sts), 110-122-134-146-170-182 garter sts, and finish with M.3 (= 8 sts) and 5 garter sts. When piece measures 48-49-50-51-52-53 cm cast off 8 sts each side (i.e. 4 sts on each side of both MT) = 120-132-144-156-180-192 sts. Put piece aside and knit the sleeves. Sleeve: Worked in the round on double pointed needles. Cast on 34-36-38-40-42-42 sts on needle size 5.5 mm with Alaska. Work 6 rounds garter st, at the same time inc 8 sts evenly on the last round = 42-44-46-48-50-50 sts. Insert 1 MT at beg of round. On next round change to needle size 6 mm and continue as follows: P 4-5-5-6-6-6 sts, M.1 (= 14 sts), P 6-6-8-8-10-10 sts, M.1 and finish with P 4-5-5-6-6-6 sts. When piece measures 8 cm inc 1 st on each side of MT on every 4.5-4-4-3.5-3.5-3 cm a total of 9-10-10-11-11-13 times – P the inc sts. At the same time when piece measures 44-43-41-40-38-37 cm change to needle size 5.5 mm, K 1 round, dec 8 sts evenly and now continue in garter st on all sts. When all dec and inc are complete there are 52-56-58-62-64-68 sts on needles. When piece measures 50-50-49-49-48-48 cm – less on the larger sizes because of longer sleeve cap and wider shoulders – cast off 8 sts mid under arm = 44-48-50-54-56-60 sts. Put piece aside and knit the other sleeve. Yoke: See Knitting tip! Slip sleeves in on the same circular needle size 5.5 mm as body piece where cast off for armholes = 208-228-244-264-292-312 sts. Insert a MT in all transitions between sleeves and body piece = 4 MT. Work garter st back and forth on needle with M.2/M.3 and 5 garter sts towards mid front as before, at the same time dec for raglan – see Decreasing tip. Dec on every 4th row 8-8-8-8-8-8 times and on every other row 9-11-12-14-15-17 times. At the same time when piece measures 59-61-63-64-66-68 cm slip 5-5-5-6-8-8 sts each side towards mid front on a stitch holder for neck. Dec to shape the neckline each side at the beg of every row: 2 sts 1-1-2-2-3-3 times and 1 st 2-3-3-3-4-5 times. When all dec are complete there are 54-56-60-62-72-74 sts on needle. K 1 row, dec 6-6-8-8-12-14 sts evenly = 48-50-52-54-60-60 sts. Hood: Pick up 10-10-12-12-14-14 sts on each front piece (incl sts from stitch holders) = 68-70-76-78-88-88 sts. Work 4 rows garter st on needle size 5.5 mm, at the same time inc 12 sts evenly on first row = 80-82-88-90-100-100 sts. Insert 1 MT mid back (after 40-41-44-45-50-50 sts). Change to needle size 6 mm and continue in reverse stocking st with 5 garter sts each side. At the same time inc 1 st on each side on MT on every 8th row a total of 4 times = 88-90-96-98-108-108 sts. Cast off when hood measures 38-38-39-39-40-40 cm. Assembly: Sew openings under arms. Fold hood double and sew tog at the top from the RS. |
|||||||||||||
Diagram explanations |
|||||||||||||
|
|||||||||||||
 |
|||||||||||||
Have you finished this pattern?Tag your pictures with #dropspattern or submit them to the #dropsfan gallery. Do you need help with this pattern?You'll find 30 tutorial videos, a Comments/Questions area and more by visiting the pattern on garnstudio.com. © 1982-2026 DROPS Design A/S. We reserve all rights. This document, including all its sub-sections, has copyrights. Read more about what you can do with our patterns at the bottom of each pattern on our site. |
|||||||||||||


With over 40 years in knitting and crochet design, DROPS Design offers one of the most extensive collections of free patterns on the internet - translated to 17 languages. As of today we count 325 catalogues and 12298 patterns translated into English (UK/cm). 12298
We work hard to bring you the best knitting and crochet have to offer, inspiration and advice as well as great quality yarns at incredible prices! Would you like to use our patterns for other than personal use? You can read what you are allowed to do in the Copyright text at the bottom of all our patterns. Happy crafting!
Post a comment to pattern DROPS 109-2
We would love to hear what you have to say about this pattern!
If you want to leave a question, please make sure you select the correct category in the form below, to speed up the answering process. Required fields are marked *.