
Popular categories
Looking for a yarn?


Comments / Questions (16)
![]() Lene wrote:
Lene wrote:
Jeg har nu samlet til skulder og forstykke. I opskriften står der jeg skal strikke 14 cm nu fra mærket, men fra hvilket mærke, der er kun sat et mærke ved start af skulder som man allerede har strikket 14 cm til. Så hvor langt skal jeg strikke før jeg starter på bærestykket?
22.05.2026 - 09:35DROPS Design answered:
Hej Lene, de 14 cm på forstykket er ca mål, det som er vigtigt er at sidste pind i A.2 er strikket når du klipper tråden (hvilket de burde være efter ca 14,5 cm i den største størrelse - ifølge strikkefastheden)
25.05.2026 - 11:16
![]() Brook wrote:
Brook wrote:
When you're working the rows beyond what is listed in the charts, will they end in the correct place when you're making a M or L? I noticed after you do the first 8 rows, it continues again at the first row with the arrow for the other sizes. Or do you just make sure you're in the 6-1-4-1 pattern until you hit 32 rows total and it'll be correct?
27.04.2026 - 22:34DROPS Design answered:
Dear Brook, just work the new stitches into the pattern even if the pattern is not complete on each side after the 32 rows, when you work body in the round afterwards, pattern will fit in the round. Happy knitting!
28.04.2026 - 08:40
![]() John wrote:
John wrote:
I’m still a bit confused about working a3 for the back piece. If I’m understanding correctly you would work row 1 right to left, then 2 right to left, and then repeat the first 7 stitches of row 1? And then repeat for each subsequent set of rows but just moving up? Or do you always go back to the first 7 stitches of a2? Should you only then have two cables on the back piece? (When I do that I only have two)
25.04.2026 - 04:03DROPS Design answered:
Dear John, from RS (read diagrams from the right towards the left) work A.1 then repeat A.2 and finish with A.3 - from WS start with A.3 (reading diagrams from the left towards the right), then work A.2 = K over K and P over P and finish with A.1. You can insert markers between markers so that you will be sure when A.1 and A.3 starts and stops. You should increase in A.1 and A.3 every row just as shown in diagram.If you work 2 repeats of A.2 on back piece you will get 2 cables to start with. There will be more cables afterwards (when there are enough stitches in the K6 sections to work a cable). Happy knitting!
27.04.2026 - 08:09
![]() Anna wrote:
Anna wrote:
Jag förstår inte hur ni tänker man ska följa diagrammen till bakstycket. Står att A.2 ska stickas över 31 maskor (A.2 x 2 + 7 första maskorna i A.2). Men A.2 måste väl öka i antal repetioner ju fler ökningar som görs? När sker detta? Ni har bara skrivit att varv 1 ska upprepas, det står inget om ökningar. Det är ett otydligt mönster. Jag ser nu var jag behöver göra om, men det är av egen erfarenhet, mönstret är inte till hjälp.
22.04.2026 - 17:24
![]() John wrote:
John wrote:
The videos also don’t seem to match this pattern? Are the back piece videos even applicable to this pattern?
19.04.2026 - 02:46DROPS Design answered:
Hi John, this video shows the technique. To make the model 262-3, you have to watch the video first, and then make the back of your sweater following the instructions for this particular pattern. Happy knitting!
20.04.2026 - 09:52
![]() John wrote:
John wrote:
I’m finding this pattern confusing. For Row 2, the a.3 chart isn’t divisible by 31, so how are you supposed to work that? For the repeat instructions, are you only doing rows 1 and 2 or are you doing each whole chart to the end, and repeating 4 times total? How are you supposed to increase row 1 of each chart when you’ve got more stitches than what is listed? Unfortunately the pattern could be a little more clear on that.
19.04.2026 - 02:33DROPS Design answered:
Dear John, when you have to work A.2 over 31 stitches, you repeat A.2 a total of 2 times in width then work the first 7 sts A.2 so that you get (12 sts x 2) + 7 = 31 sts. You then work diagrams as shown and at the same time increase as explained on row 1 and 2 (but you should not only work row 1 and 2 diagrams, work at the same time diagram one time in height, then repeat all rows in diagram until you are done with the increases). Can this help? Happy knitting!
20.04.2026 - 10:11
![]() Anke wrote:
Anke wrote:
Toch snap ik het nog niet helemaal. Als je aan de goede kant een meerdering naar links maakt en je draait het werk om naar de achterkant dan valt deze meerdering van daaruit gezien toch naar rechts? Moet ik dan aan de averechte kant dan boven de linker meerdering aan de goede kant dan geen meerdering naar rechts maken?
01.03.2026 - 15:46DROPS Design answered:
Dag Anke
Als je de steek aan de ene kant rechtsom draait, zit hij aan de andere kant ook rechtsom, dus rechtsom blijft rechtsom als je het werk omkeert en linksom blijft linksom als je het werk aan de andere kant bekijkt.
04.03.2026 - 14:50
![]() Anke wrote:
Anke wrote:
Vraag over patroon DA-045 Walnut Dreams Vraag over A1 en A3: is het de bedoeling dat je de meerderingen aan de verkeerde kant andersom breit dan aan de voorkant? Dus wanneer aan de voorkant meerder naar links staat, moet ik dan aan de achterkant op die plek meerder naar rechts doen of ook meerder naar links.
01.03.2026 - 10:19DROPS Design answered:
Dag Anke,
Goede vraag! Als de steek naar rechts moet draaien volg je de instructies zoals bovenaan beschreven om de steek naar rechts te laten draaien, dit geldt zowel voor de goed als de verkeerde kant. Dus als er aan de voorkant meerder naar links staat, dan meerder je aan de achterkant ook naar links volgens de instructie (als het goed is draait dan zowel aan de goede als de verkeerde kant de steek naar links).
01.03.2026 - 11:08
![]() Yolande wrote:
Yolande wrote:
Bonjour je voudrais faire ce pull en aiguilles 4,5 taille M mais je ne comprends pas vos explications. Pourriez-vous svp me faire un calcul pour me dire combien de mailles pour un dos, un devant et les manches. cordialement Yolande
26.01.2026 - 17:06DROPS Design answered:
Bonjour Yolande, nous ne sommes malheureusement pas en mesure de pouvoir adapter chacun de nos modèles à chaque demande; vous pouvez vous inspirer d'un modèle analogue avec la tension souhaitée pour recalculer les indications pour votre taille. Merci pour votre compréhension. Bon tricot!
27.01.2026 - 08:52
![]() Elyne wrote:
Elyne wrote:
Bonjour, je tricote la taille xs. Je viens de finir les augmentations avant la séparation des manches et du corps. Quand je calcule le nombre d\'augmentation des 2 diagrams A4 et A5 je n\'arrive pas au nombre donné pour chaque partie : pour le dos et devant : 2+25+90+25+2=144 au total au lieu de 138 Pour les manches : 25+42+25=92 au lieu de 86. Est ce que vous pouvez m\'éclairer ?
19.12.2025 - 12:27DROPS Design answered:
Bonjour Elyne, lorsque vous avez tricoté 36 tours vous n'avez augmenté que 21 mailles, soit: A.4 (22 m), A.2 (42 m), A.5(22 m) = 86 m pour les manches et 2 m jersey + A.4 (22 m) + A.2 (90 m) + A.5 (22 m) + 2 m jersey = 138 m pour le devant/le dos. Bon tricot!
22.12.2025 - 17:18
|
|||||||||||||||||||
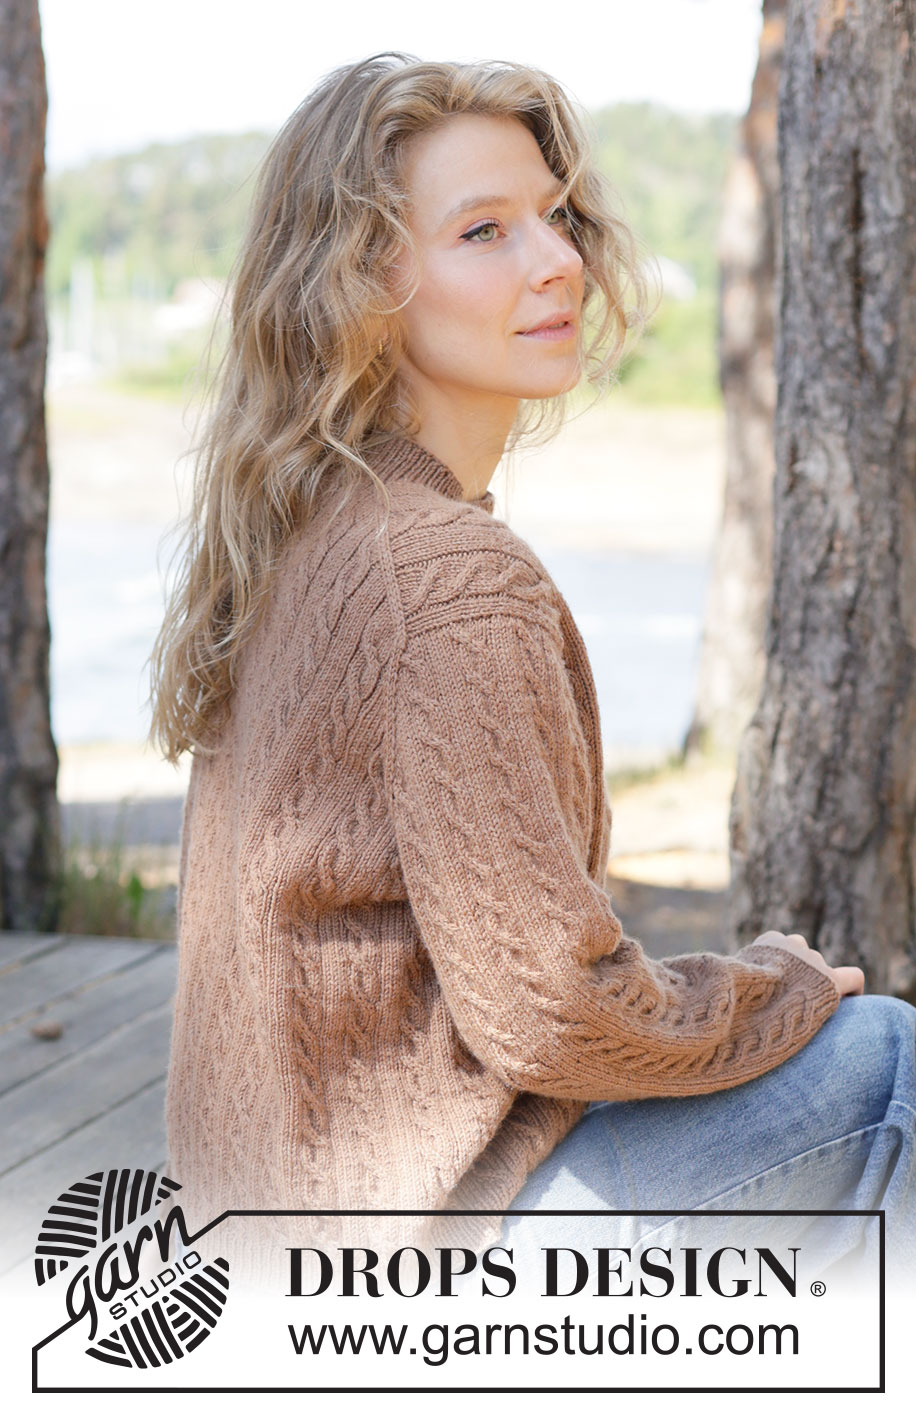
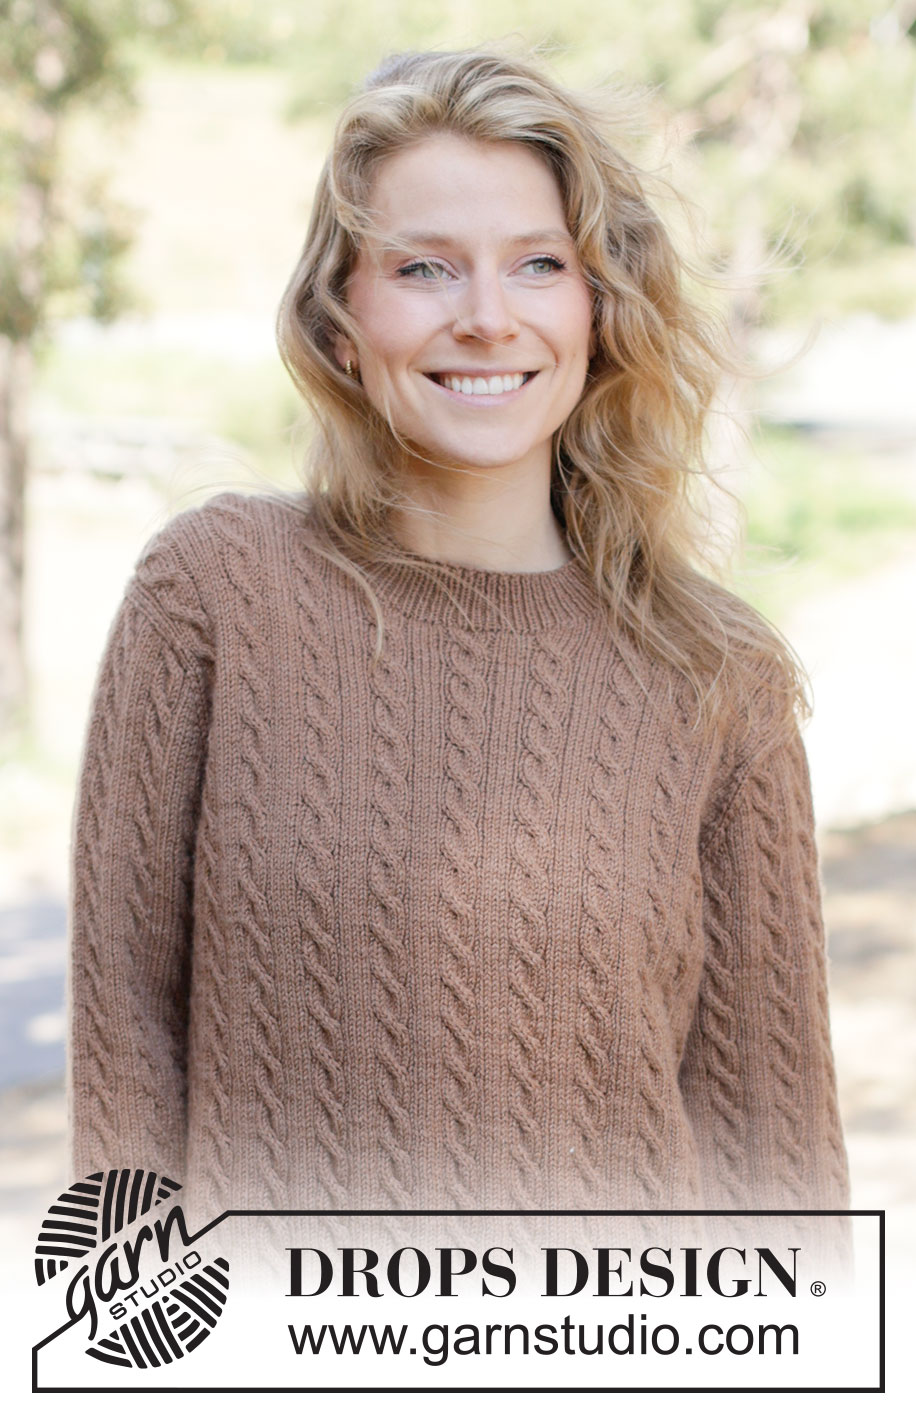
Walnut Dreams Sweater#walnutdreamssweater |
|||||||||||||||||||
 |
 |
||||||||||||||||||
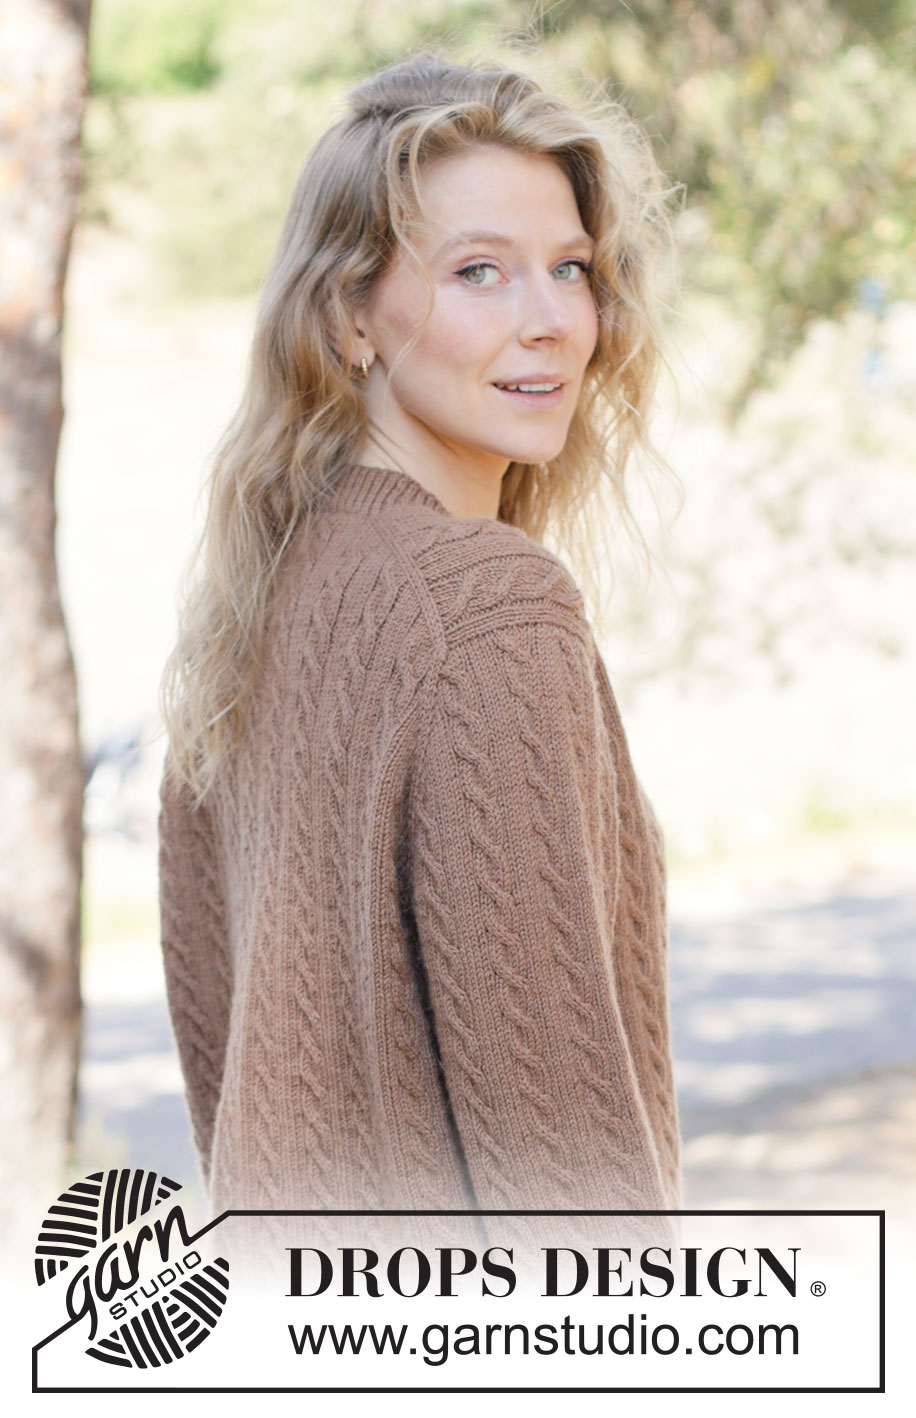
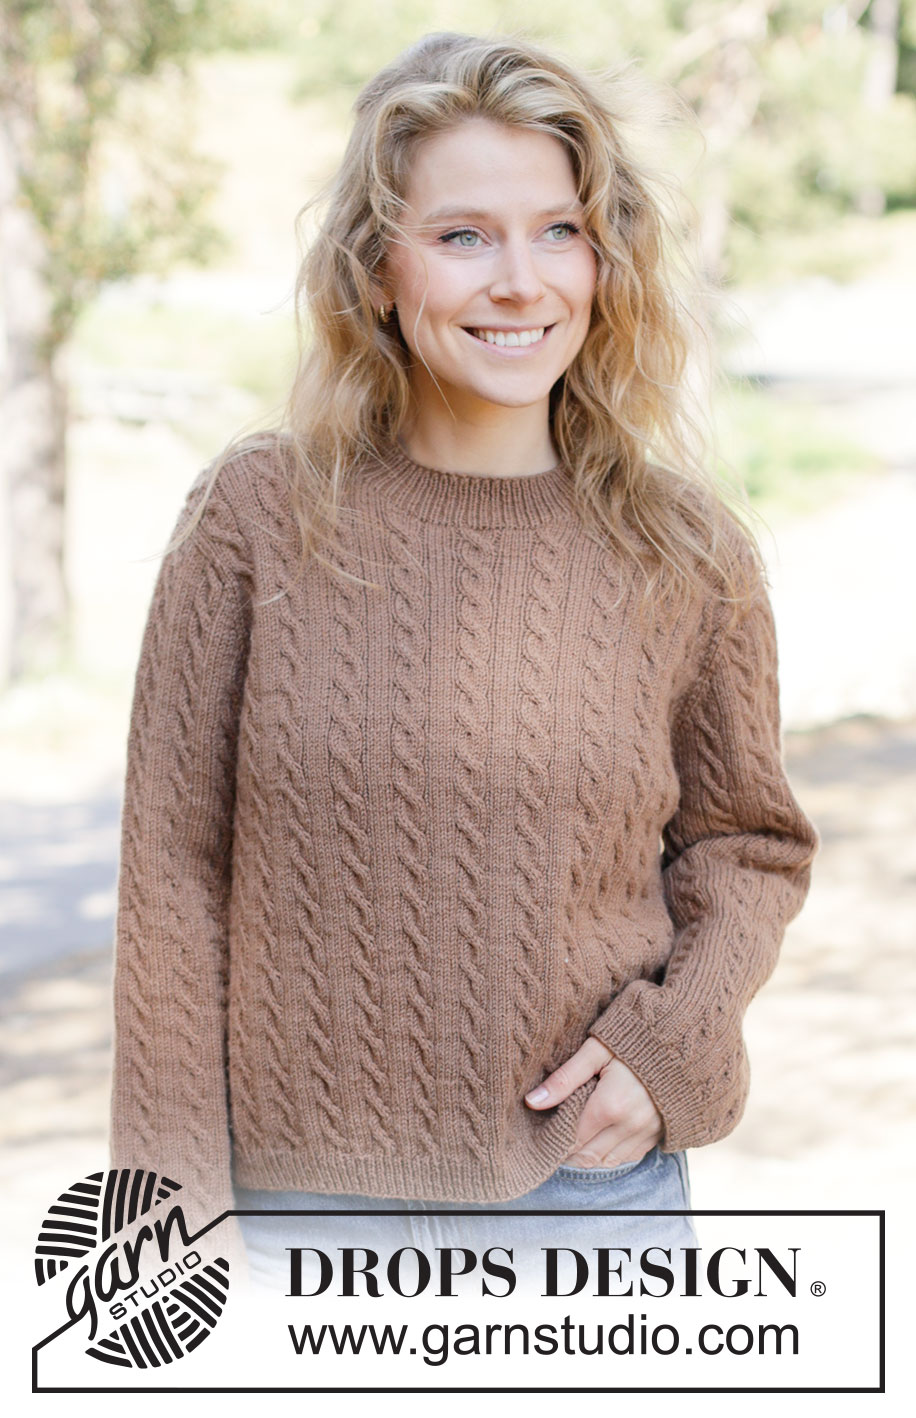
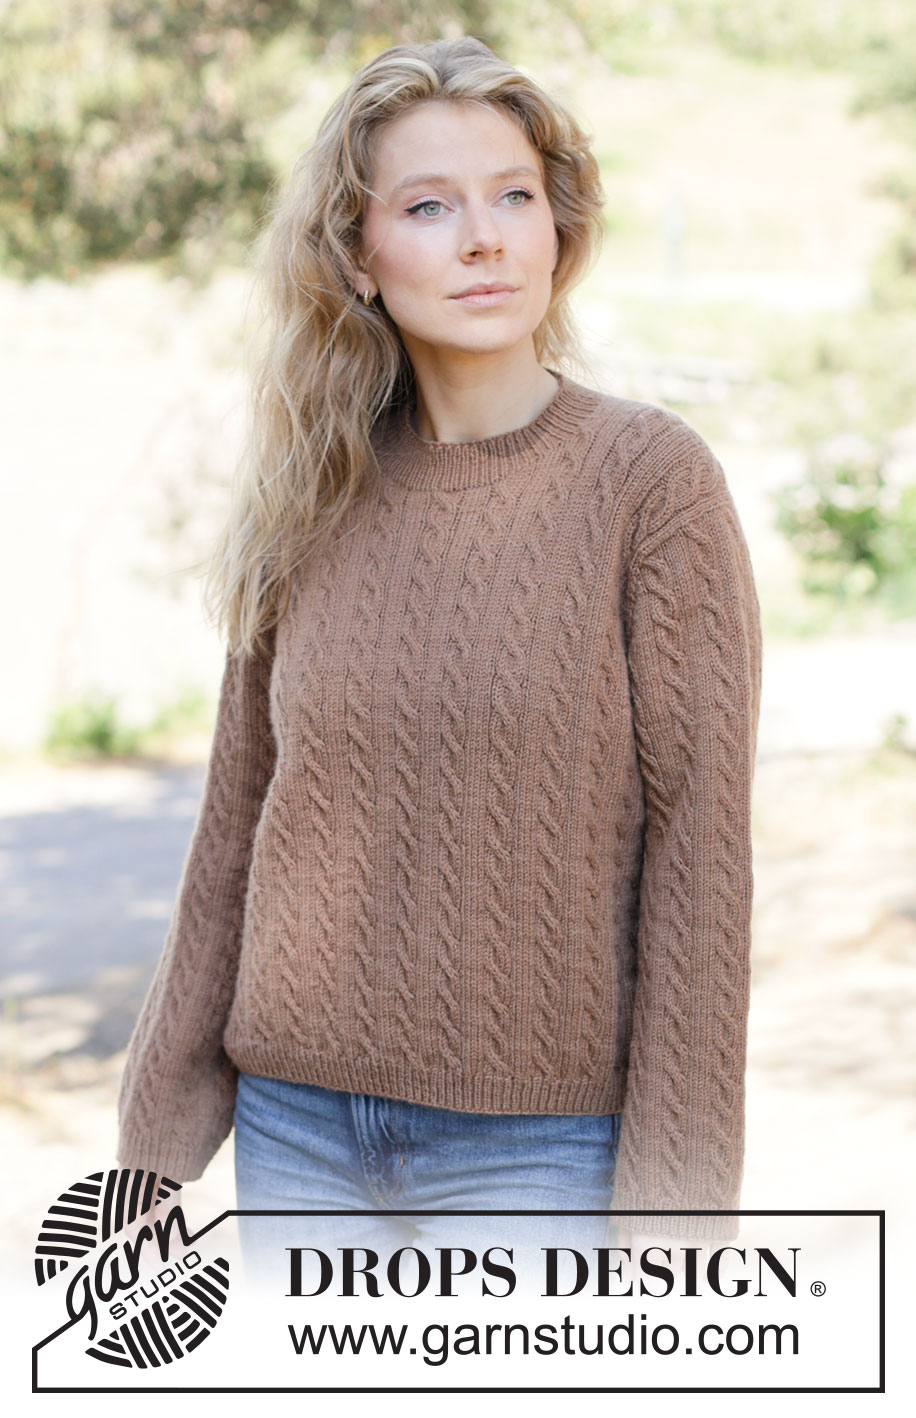
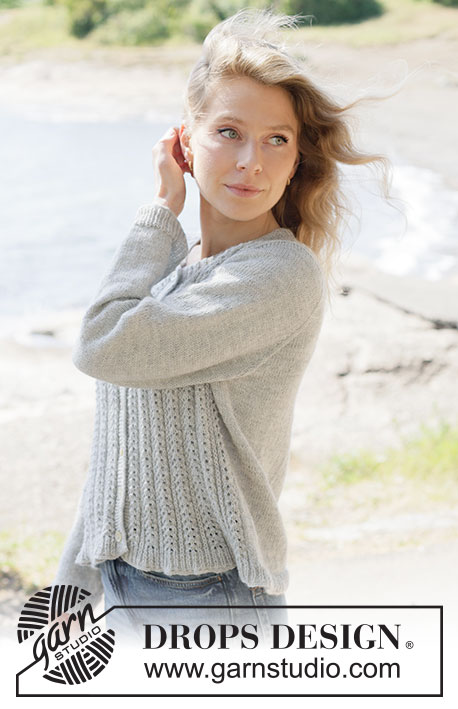
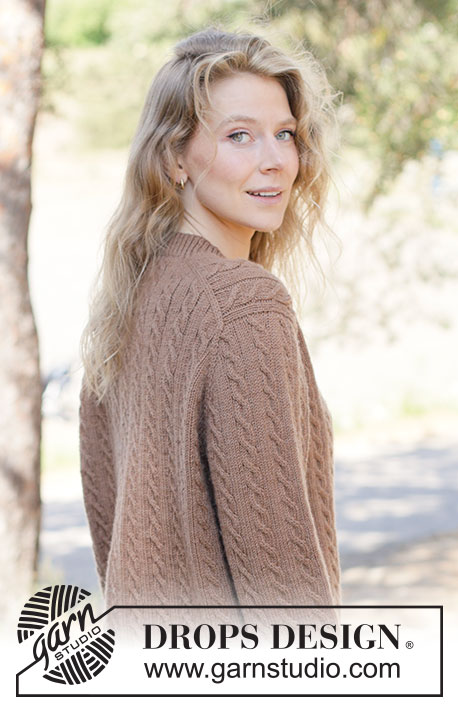
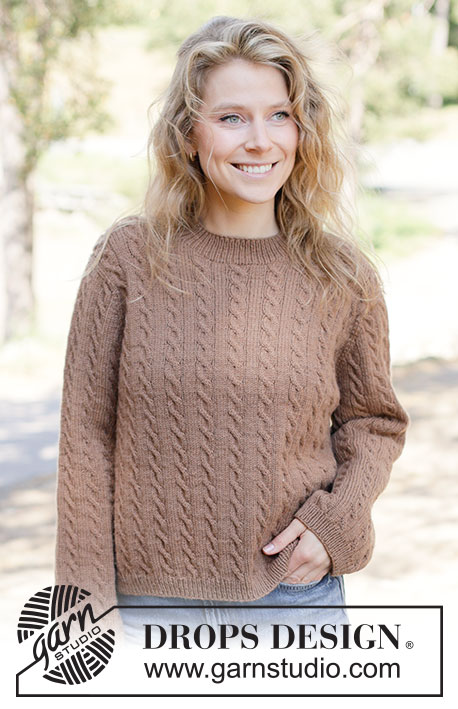
Knitted jumper in DROPS Daisy or DROPS Karisma. The piece is worked top down with European yoke and cables. Sizes XS - XXXL.
DROPS 262-3 |
|||||||||||||||||||
|
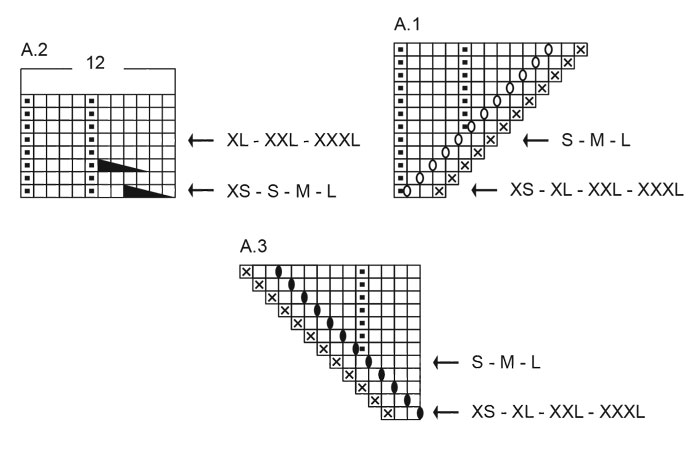
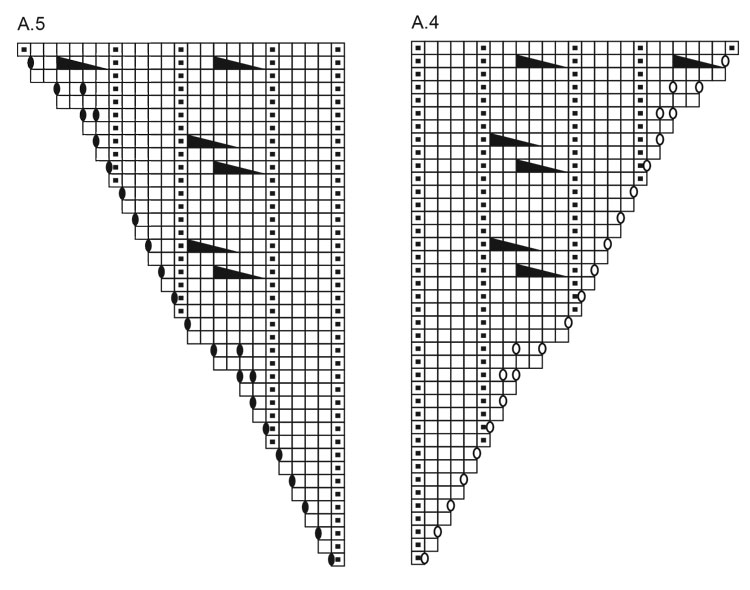
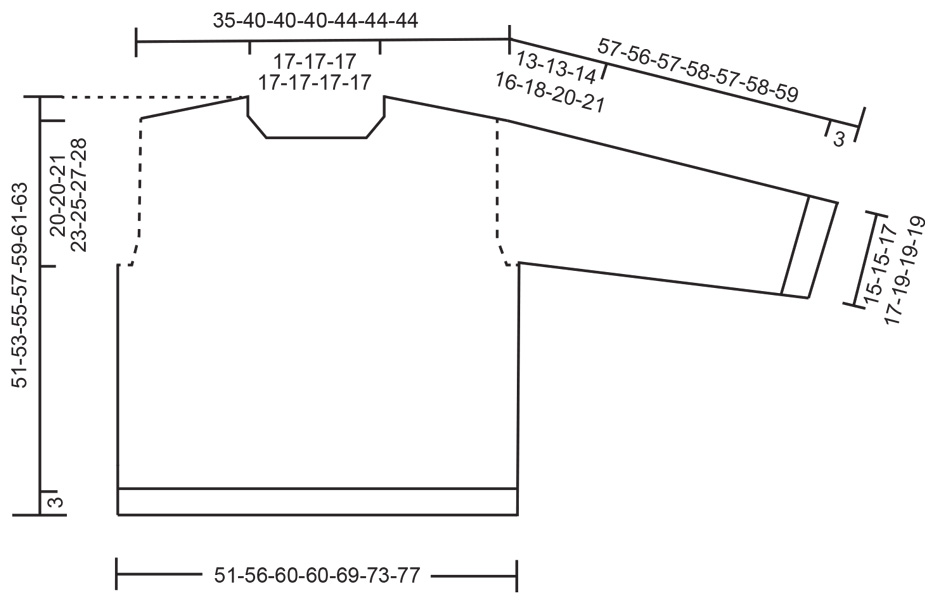
------------------------------------------------------- EXPLANATIONS FOR THE PATTERN: ------------------------------------------------------- PATTERN: See diagrams A.1 to A.5. Start at arrow for your size (applies to A.1, A.2 and A.3). If there are too few stitches to cable, work the stitches in stocking stitch. The diagrams show the pattern from the right side. INCREASE TIP-1: INCREASE 1 STITCH TOWARDS THE LEFT - from RIGHT SIDE: Use left needle to pick up yarn between 2 stitches from row below, pick up yarn from the front and knit in the stitch loop that is on the back of the needle. INCREASE 1 STITCH TOWARDS THE RIGHT - from RIGHT SIDE: Use left needle to pick up yarn between 2 stitches from row below, pick up yarn from the back and knit in the stitch loop that is on the front side of the needle. Work the new stitches in pattern. . INCREASE TIP-2: INCREASE 1 STITCH TOWARDS THE RIGHT - from WRONG SIDE: Use left needle to pick up yarn between 2 stitches from row below, pick up yarn from the back and purl in the stitch loop that is on the front side of the needle. INCREASE 1 STITCH TOWARDS THE LEFT - from WRONG SIDE: Use left needle to pick up yarn between 2 stitches from row below, pick up yarn from the front and purl in the stitch loop that is on the back side of the needle. Work the new stitches in pattern. SLEEVE TIP: When knitting up stitches under the sleeve, you can get a small hole in the transition between stitches on the body and sleeve. This hole can be closed by picking up the strand between 2 stitches and working this strand twisted together with the first stitch between body and sleeve. DECREASE TIP: Decrease 1 stitch on each side of the marker thread as follows: Work until there are 3 stitches left before the marker thread, knit 2 together, knit 2 (marker thread sits between these 2 stitches) slip 1 stitch knit-wise, knit 1 and pass the slipped stitch over the knitted stitch (= 2 stitches decreased). The decreases will after a while affect the pattern. Make sure the 2 stitches mid-under the sleeve (the first and last stitch on the round) are always knitted. ------------------------------------------------------- START THE PIECE HERE: ------------------------------------------------------- JUMPER – SHORT OVERVIEW OF THE PIECE. The pattern uses both long and short needles; start with the length which fits the number of stitches and change when necessary. If there is a «0» in your chosen size, skip the information and go straight to the next instruction. Work according to points 1 – 5. 1 BACK PIECE: Cast on stitches for the back of the neck. Work the back piece back and forth, increasing stitches on each side until the shoulder stitch count has been achieved. The back piece has slightly diagonal shoulder. 2 FRONT PIECE: Is worked in 2 sections (each side of neck). Start by knitting up stitches along the back shoulder, working downwards and increasing for the neckline. Repeat on the other shoulder. Then stitches are cast on for the front neckline and the 2 shoulders are joined. The front piece is worked back and forth to the correct measurement. 3 YOKE: Place the front and back pieces on the same needle, working first the front piece, knitting up stitches for one sleeve along the side of the front piece, then working the back piece and knitting up stitches for the second sleeve along the other side of the front piece. Continue in the round. 4 INCREASE FOR BODY AND SLEEVES: While working the yoke, increase stitches first for the sleeves and later for both the body and sleeves. 5 BODY AND SLEEVES: When the yoke is finished, it is divided and the body is continued in the round while the sleeves wait. Then the sleeves are worked top down. Stitches are knitted up around the neckline and the neck is worked to finish. BACK PIECE: The piece is worked back and forth. Cast on 38-37-37-37-38-38-38 stitches with circular needle size 4 mm and DROPS Daisy or DROPS Karisma. Purl 1 row from the wrong side and increase 12-9-9-9-12-12-12 stitches evenly on this row = 50-46-46-46-50-50-50 stitches. Now increase at both ends of each row, inside 1 edge stitch and 2 stocking stitches, as follows (the new stitches are then worked into the pattern as shown in the diagram). NOTE: Start at the arrow in row 1 – applies to A.1 (= 4-8-8-8-4-4-4 stitches), work A.2 (= 12 stitches) then A.3 (= 3-7-7-7-3-3-3 stitches): ROW 1 (right side): Read INCREASE TIP-1. Work A.1, then A.2 across the next 43-31-31-31-43-43-43 stitches (i.e., A.2 is worked 3-2-2-2-3-3-3 times, then the first 7 stitches in A.2), work A.3 (2 increased stitches). ROW 2 (wrong side): Read INCREASE TIP-2. Work A.3, then knit above knit and purl above purl across the next 43-31-31-31-43-43-43 stitches , work A.1 (2 increased stitches). Work ROWS 1 and 2 a total of 12-16-16-16-18-18-18 times (24-32-32-32-36-36-36 rows worked and 48-64-64-64-72-72-72 increased stitches – A.2 has been worked 3-4-4-4-4½-4½-4½ times in height) = 98-110-110-110-122-122-122 stitches. The pattern is now established on the back piece, with 2 stocking stitches and 1 edge stitch on each side. Cut the strand and place the stitches on a stitch holder/thread. The pattern to be established on the front piece and sleeves is worked independently of the pattern on the back piece. When the pieces are joined and the body worked in the round, the pattern will fit across all stitches. The whole garment is worked in rib (knit 4, purl 1, knit 6, purl 1 seen from the right side), cabling in each stocking stitch section of 6 stitches. RIGHT SHOULDER: Find the right back shoulder as follows: Lay the back piece flat, right side up, with the stitch holder/thread towards you; right side of piece = right shoulder. Start from the right side on the right back shoulder and knit up 1 stitch in the outermost stitch by the armhole (= edge stitch), then knit up 1 stitch in each row worked (inside the outermost stitch) as far as the neck (24-32-32-32-36-36-36 stitches) = 25-33-33-33-37-37-37 shoulder-stitches. Insert 1 marker by the neck. All length-measurements on the front piece are taken from here. ROW 1 (wrong side): Purl 2-0-0-0-2-2-2, knit 1-0-0-0-1-1-1, purl 6-5-5-5-6-6-6, knit 1, work rib (purl 4, knit 1, purl 6, knit 1) until there are 3 stitches left, purl 2, purl 1 (= edge stitch) – this pattern matches the back piece. ROW 2 (right side): Knit 1 edge stitch, knit 2, purl 1, work A.2 to end of row. ROW 3 (wrong side): Knit above knit and purl above purl. Repeat ROWS 2 and 3 until the piece measures 5-5-6-6-7-7-8 cm, with the last row from the wrong side. Note down the last row worked in A.2 so you begin the neckline-increases on the left front piece on the same row in the diagrams. Continue ROWS 2 and 3. AT THE SAME TIME cast on stitches for the neckline at the end of each row from the right side as follows: Cast on 1 stitch 4 times, then 2 stitches 4 times (16 rows worked). The increased stitches are worked into A.2 = 37-45-45-45-49-49-49 stitches. When all the increases are finished, work the last row from the right side without increasing. The piece measures approx. 11-11-12-12-13-13-14 cm from the marker. Some of the neckline will lie on the back piece. Neckline-length in front = 9-10-11-11-12-12-13 cm. Neckline-length at back = 2-1-1-1-1-1-1 cm. Cut the strand and place the stitches on a stitch holder/thread and work the left shoulder along the left back shoulder as follows. LEFT SHOULDER: Start from the right side on the left back shoulder aby the neck and knit up 1 stitch in each row worked, inside the outermost stitch, as far as the armhole (24-32-32-32-36-36-36 stitches), then knit up 1 stitch outermost by the armhole (= edge stitch) = 25-33-33-33-37-37-37 shoulder-stitches. Insert 1 marker by the neck. All length-measurements on the front piece are taken from here. ROW 1 (wrong side): Purl 1 (= edge stitch), purl 2, work rib (knit 1, purl 6, knit 1, purl 4) to end of row (finishing with purl 2-5-5-5-2-2-2) - this pattern matches the back piece. ROW 2 (right side): Work A.2 until there are 3 stitches left (adjust the pattern so you cable across the 6 stocking stitches), knit 2 and knit 1 edge stitch. ROW 3 (wrong side): Knit above knit and purl above purl. Repeat ROWS 2 and 3 until the piece measures 5-5-6-6-7-7-8 cm, with the last row from the wrong side, finishing on the same row as on the right shoulder before beginning to increase for the neckline. Continue ROWS 2 and 3. AT THE SAME TIME cast on stitches for the neckline at the end of each row from the wrong side as follows: Cast on 1 stitch 4 times, then 2 stitches 4 times (16 rows worked). The increased stitches are worked into A.2, counting out from the shoulder to continue the pattern as before = 37-45-45-45-49-49-49 stitches. When all the increases are finished, work the last row from the right side making sure it is the same row as on the right shoulder; the cables then continue on the same row across the front piece. Do not cut the strand. Join the 2 shoulders for the front piece as follows. FRONT PIECE: From the wrong side, knit above knit and purl above purl across the stitches on the left shoulder (37-45-45-45-49-49-49 stitches), cast on 24-20-20-20-24-24-24 stitches, knit above knit and purl above purl across the stitches on the right shoulder (37-45-45-45-49-49-49 stitches) = 98-110-110-110-122-122-122 stitches. Continue the pattern as follows (do not cable across the cast-on stitches on the first row but otherwise cable as before across the whole front piece): ROW 1 (right side): Knit 1 edge stitch, knit 2, purl 1, work A.2 until there are 3 stitches left (finishing the row with the first 7 stitches in A.2), knit 2 and work 1 edge stitch. ROW 2 (wrong side): Knit above knit and purl above purl. Work this pattern back and forth until the piece measures 14 cm from the marker, adjusting so the last row is the last row in A.2. Cut the strand and place the stitches on a stitch holder/thread. The front and back pieces are now joined and stitches are knitted up for the sleeves as follows. YOKE: From the right side, knit together the first 2 stitches on the back piece (1 edge stitch decreased), continue A.2 until there are 2 stitches left on the back piece, slip 1 stitch, knit 1 and pass the slipped stitch over (= 1 edge stitch decreased), insert 1 marker, knit up 42 stitches along the right side of the front piece (= sleeve-stitches, knitted up inside the outermost stitch), insert 1 marker, knit together the first 2 stitches on the front piece (= 1 edge stitch decreased), continue A.2 until there are 2 stitches left on the front piece, slip 1 stitch, knit 1 and pass the slipped stitch over (= 1 edge stitch decreased), insert 1 marker, knit up 42 stitches along the left side of the front piece (= sleeve-stitches, knitted up inside the outermost stitch), insert 1 marker = 276-300-300-300-324-324-324 stitches. The round starts between the left sleeve and the back piece. When continuing in the round, work the cables on the same round on both the sleeves and body. On the first round the pattern is established on the sleeves, while continuing the pattern on the body. ROUND 1.: Continue the pattern across the back piece, move the marker onto the right needle, increase 1 stitch towards the left, work rib across the sleeve (knit 6, purl 1, knit 4, purl 1) until there are 6 stitches left before the next marker, knit 6, increase 1 stitch towards the right (= 44 sleeve-stitches), move the marker onto the right needle, continue the pattern across the front piece, move the marker onto the right needle, increase 1 stitch towards the left, work rib across the sleeve (knit 6, purl 1, knit 4, purl 1) until there are 6 stitches left before the next marker, knit 6, increase 1 stitch towards the right (= 44 sleeve-stitches), move the marker onto the right needle = 280-304-304-304-328-328-328 stitches. Now increase on both the body and sleeves as shown in the diagram, increasing on each side of 2 stocking stitches as follows: Work pattern in the round as follows: * Work 2 stocking stitches, work A.4, then continue A.2 across the next 90-102-102-102-114-114-114 stitches, work A.5, 2 stocking stitches, move the marker onto the right needle, work A.4, continue A.2 across the next 42 stitches, work A.5 (= sleeve-stitches), move the marker onto the right needle, * work from *-* 1 more time. Work this pattern in the round for 36-36-40-44-50-56-60 rounds - when A.4 and A.5 are finished in height, the increases are finished in sizes XS, S and M. Continue the pattern and increase by continuing the diagrams in the 4 larger sizes (168-168-192-208-232-264-288 increased stitches) = 448-472-496-512-560-592-616 stitches: 86-86-92-96-102-110-116 sleeve-stitches and 138-150-156-160-178-186-192 stitches on the front and back pieces. The sleeve measures approx. 13-13-14-16-18-20-21 cm. When the jumper is folded double at the shoulder it measures approx. 20-20-21-23-25-27-28 cm from outermost on the shoulder and down the armhole. If the piece is shorter than this continue working, without further increases, to the correct length. Now divide for the body and sleeves. DIVIDE FOR BODY AND SLEEVES: Work the first 138-150-156-160-178-186-192 stitches as before (= back piece), place the next 86-86-92-96-102-110-116 stitches on a thread for the sleeve, cast on 6-6-12-8-14-18-24 stitches (mid-under the sleeve), work the next 138-150-156-160-178-186-192 stitches as before (= front piece), place the next 86-86-92-96-102-110-116 stitches on a thread for the sleeve, cast on 6-6-12-8-14-18-24 stitches (mid-under the sleeve). The body and sleeves are finished separately. BODY: = 288-312-336-336-384-408-432 stitches. Continue A.2 in the round for a further 24-24-25-25-24-24-25 cm. The new stitches under each sleeve fit into the pattern (= 24-26-28-28-32-34-36 repeats). Change to circular needle size 3 mm. Work rib (knit 1, purl 1), AT THE SAME TIME decrease 30-28-32-32-34-38-42 stitches evenly on the first round = 258-284-304-304-350-370-390 stitches. When the rib measures 3 cm, cast off with rib. The jumper measures approx. 51-53-55-57-59-61-63 cm from the top of the shoulder. SLEEVES: Place the 86-86-92-96-102-110-116 sleeve-stitches from one thread on circular needle size 4 mm and knit up 1 stitch in each of the 6-6-12-8-14-18-24 stitches cast on under the sleeve – read SLEEVE TIP = 92-92-104-104-116-128-140 stitches. Insert a marker-thread in the middle of the 6-6-12-8-14-18-24 stitches under the sleeve- the round starts by the marker-thread. Continue the established pattern in the round, the new stitches under the sleeve are worked in stocking stitch. When the sleeve measures 3 cm from the division, decrease mid-under the sleeve – read DECREASE TIP as follows: Decrease 2 stitches every 10-10-10-10-10-3-2 cm a total of 4-4-4-4-4-10-16 times = 84-84-96-96-108-108-108 stitches. Continue working until the sleeve measures 41-40-40-39-36-35-35 cm from the division. Change to double pointed needles size 3 mm. Work rib (knit 1, purl 1), AT THE SAME TIME decrease 8-8-10-10-10-10-10 stitches evenly on the first round = 76-76-86-86-98-98-98 stitches. When the rib measures 3 cm, cast off with rib. The sleeve measures approx. 44-43-43-42-39-38-38 cm from the division. NECK: Use circular needle size 3 mm. Start on one shoulder-line from the right side and knit up 108-108-112-112-114-114-116 stitches inside 1 stitch around the neckline. The stitch count should be divisible by 2. Work rib in the round (knit 1, purl 1) for 4-4-4-4-4½-4½-4½ cm. Cast off with rib. |
|||||||||||||||||||
Diagram explanations |
|||||||||||||||||||
|
|||||||||||||||||||
 |
|||||||||||||||||||
 |
|||||||||||||||||||
 |
|||||||||||||||||||
Have you finished this pattern?Tag your pictures with #dropspattern #walnutdreamssweater or submit them to the #dropsfan gallery. Do you need help with this pattern?You'll find 33 tutorial videos, a Comments/Questions area and more by visiting the pattern on garnstudio.com. © 1982-2026 DROPS Design A/S. We reserve all rights. This document, including all its sub-sections, has copyrights. Read more about what you can do with our patterns at the bottom of each pattern on our site. |
|||||||||||||||||||


With over 40 years in knitting and crochet design, DROPS Design offers one of the most extensive collections of free patterns on the internet - translated to 17 languages. As of today we count 325 catalogues and 12298 patterns translated into English (UK/cm). 12298
We work hard to bring you the best knitting and crochet have to offer, inspiration and advice as well as great quality yarns at incredible prices! Would you like to use our patterns for other than personal use? You can read what you are allowed to do in the Copyright text at the bottom of all our patterns. Happy crafting!
Post a comment to pattern DROPS 262-3
We would love to hear what you have to say about this pattern!
If you want to leave a question, please make sure you select the correct category in the form below, to speed up the answering process. Required fields are marked *.