
Popular categories
Looking for a yarn?


Comments / Questions (76)
![]() Freja wrote:
Freja wrote:
Hej Jeg er i begyndelsen af arbejde i str. s og har lavet de første 10 rækker af mønster A1A og A1B og A1C. Der står jeg skal lave 14 gentagelser af pind 2 og 3. Jeg har med udtagninger efter 10 rækker 51 masker hvilket vil sige 45 uden kanter. For at lave de næste 4 rækker kræver mønsteret at jeg har 47 masker til rådighed ? Der stå jo man skal stoppe med udtagninger på række 9? På pind 10-14 er der så bare fra bunden af monsteret af igen? Håber i kan hjælpe :)
17.01.2026 - 22:26
![]() Aase wrote:
Aase wrote:
Hej - er der nogen der kan hjælpe med Dandelion Field trøje str. S - første mønster række A1A - -A1C har jeg strikket med udtagninger er der 51 m - hvad gør jeg nu ? Mønsteret strikkes på hele trøjen men er det altid fra A1A - A1C der strikkes med udtagninger ? - svært at huske hvor jeg skal begynde i mønster rækken når jeg er på vrang siden - det ændre sig med udtagningerne hvor der stoppes i mønsteret - håber på hjælp så jeg kan komme videre . Hilsen Aase
29.10.2025 - 07:17DROPS Design answered:
Hei Aase. Se vårt svar på ditt forrige spørsmål. Håper det hjelper deg videre. mvh DROPS Design
03.11.2025 - 11:58
![]() San wrote:
San wrote:
Hallo, in A. 1A staat een sterretje (= laatste meerdering voor de schouders achter op deze naald). Ik begrijp dit niet goed, m.n. het woord ‘achter’ in deze zin is mij onduidelijk. Dank alvast.
28.10.2025 - 16:57DROPS Design answered:
Dag San,
Hiermee wordt de schouder op het achterpand bedoeld.
28.10.2025 - 21:26
![]() Aase wrote:
Aase wrote:
Dandelion Field trøje str. s - har strikket mønster A1A - A1C på første række med udtagninger- har 51m - skal fortsætte i mønster - er det kun A1A der skal fortsættes med? Tak for hjælpen Hilsen Aase
26.10.2025 - 17:40DROPS Design answered:
Hei Aase. Nei, du strikker A.1 A + A.1B + A.1C. Du øker masker i A.1A + A.1C og strikker A.1 B mellom disse 2. Når du har strikket A.1A + A.1B + A.1C (= A.1) 1 gang i høyden har du nok masker til å strikke A.1B 2 ganger. Så når du skal nå gjenta mønstret / diagrammet i høyden, strikker du A.1A + A.1B + A.1B + A.1B +A.1C. og så for hver gang A.1 =(A.1A + A.1B + A.1C) er strikket 1 gang i høyden er det plass til 2 rapporter mer med A.1B i bredden. mvh DROPS Design
03.11.2025 - 11:54
![]() Alena wrote:
Alena wrote:
Dobrý den, mám dotaz k rukávům. V návodu stojí, že 3 oka v podpaždí jsou pletena žlutou přízí. Znamená to, že tato tři oka pleteme žlutou přízí v celé délce rukávů? Tedy všechny řady? Děkuji
26.09.2025 - 09:09DROPS Design answered:
Dobrý den, Aleno, ano - tato oka pleteme žlutou přízí po celou dobu, v podpaží bude podobný pruh, jako kolem průramků. (Pokud se vám ale pruh nelíbí, můžete si samozřejmě návod přizpůsobit.) Hodně zdaru! Hana
14.10.2025 - 15:33
![]() Rosemary Savli wrote:
Rosemary Savli wrote:
Please can someone help with the dandelion field pattern. Right from the start for the back piece, do I read the whole chart of 10 rows or just rows 2 and 3 17 times and if I do this will the pattern be correct, I am so confused over this pattern even though I am a seasoned knitter, thank you hope I get an answer soon as I am eager to start
24.07.2025 - 21:37DROPS Design answered:
Dear Rosemary, you work the whole chart row by row, from the bottom up. The "Repeat rows 2 and 3" is only referrring to how to increase at the beginning and end of the rows, from the right side and the wrong side. Happy knitting!
27.07.2025 - 18:11
![]() Patricia wrote:
Patricia wrote:
Hello there, Well this is a challenge but one that I’m enjoying. I am a little confused though, I have attached the front left/right sections and I’m knitting back and forth as instructed. It states to continue till the piece measures 29 cm (m size) from the ‘knitted up row’. What row is this? I understand I need to finish on the same row as the back piece for continuation of the pattern, I just don’t understand what the ‘knitted row’ is. Thanks for your help.
11.05.2025 - 12:15DROPS Design answered:
Dear Patricia, the knitted up row is this row: "Start from the right side on the left back shoulder by the neck. Use colour goldenrod and knit up 1 stitch in each worked row, inside 1 stitch, along the shoulder to the armhole then knit up 1 stitch in the next row at the outermost towards the armhole (pick up inside the outermost stitch)= 31-35-35-35-41-45 stitches. All lengths on the front piece are measured from this knitted-up row." Happy knitting!
11.05.2025 - 23:53
![]() Francine wrote:
Francine wrote:
First line of the BODY “ work pattern as before across the 99 stitches. In the previous line, we reduce the stitches one on either end. Previous on the front pieces each end of the pattern consisted of “ 3 st in yarn A ( now 2j . My question is when starting the body do we keep the pattern but omit “ these yarn A stitches . Hope this question makes sense. Thanks for you help
20.04.2025 - 04:37DROPS Design answered:
Dear Francine, in this round you will work these stitches as before; the stitches in yarn A stay in the same colour and you work the pattern over the other stitches. Then, in the next round, after you cast on stitches under the sleeve, you will work the pattern over all stitches, so you will work these stitches in the pattern as well. Happy knitting!
21.04.2025 - 00:43
![]() Fran wrote:
Fran wrote:
For the front piece : after picking up the stitches on the right front……” cast on 19 stitches” question? Do I cast on in the pattern or do I cast on with yarn A. along the neckline.
16.04.2025 - 07:04DROPS Design answered:
Hi Fran, You can cast on in pattern so you carry both colours across the neckline. Happy Easter!
16.04.2025 - 12:01
![]() Fran wrote:
Fran wrote:
Is their any corrections to the pattern?
13.04.2025 - 05:02DROPS Design answered:
Hi Fran, There is a link to the corrections at the bottom of the pattern, written in red font. Happy Easter!
13.04.2025 - 17:52
|
|||||||||||||
Dandelion Field#dandelionfieldsweater |
|||||||||||||
 |
 |
||||||||||||
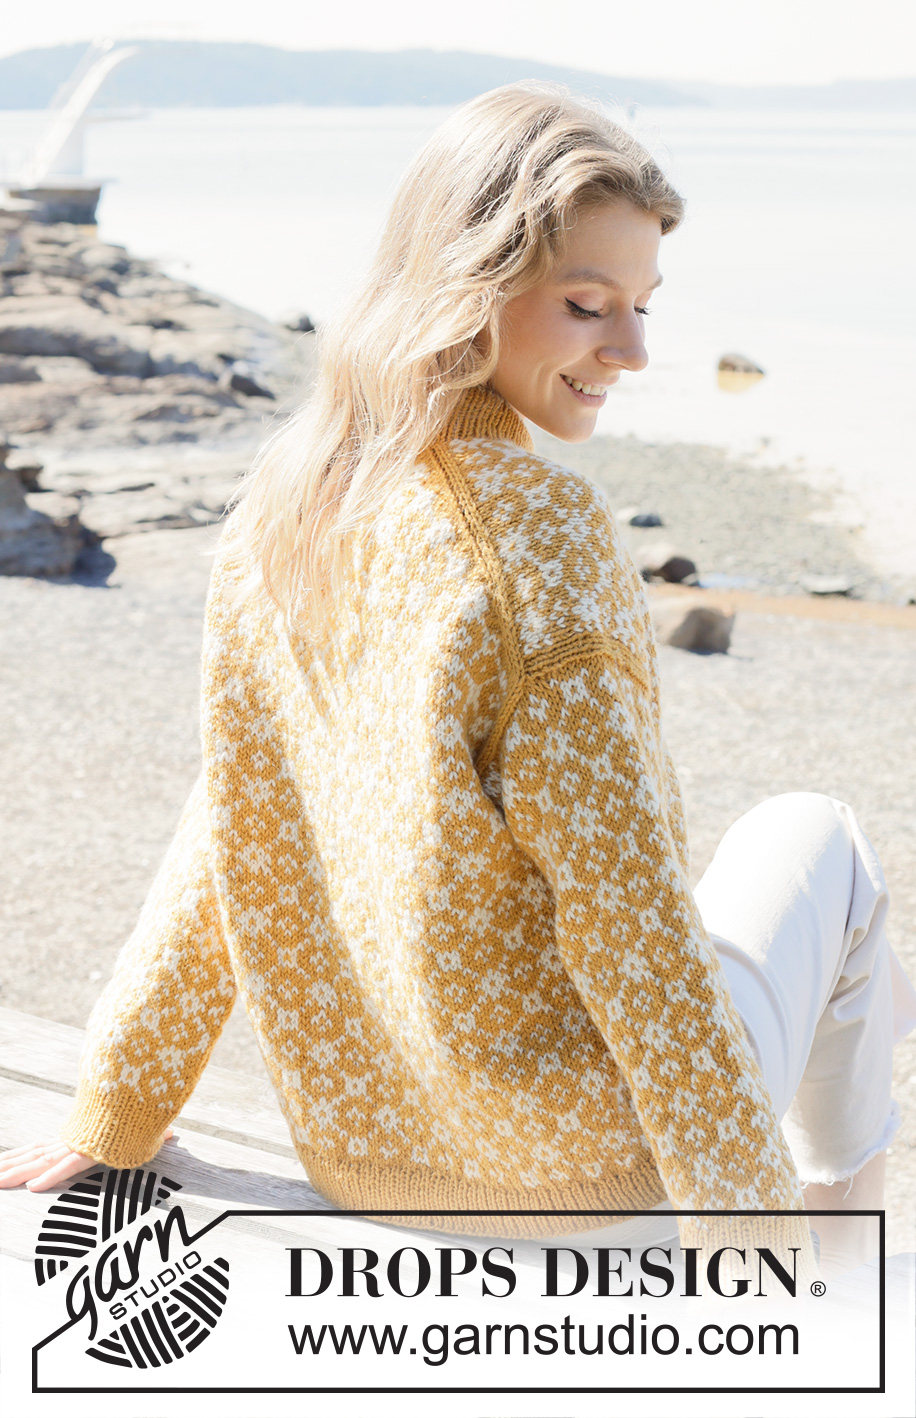
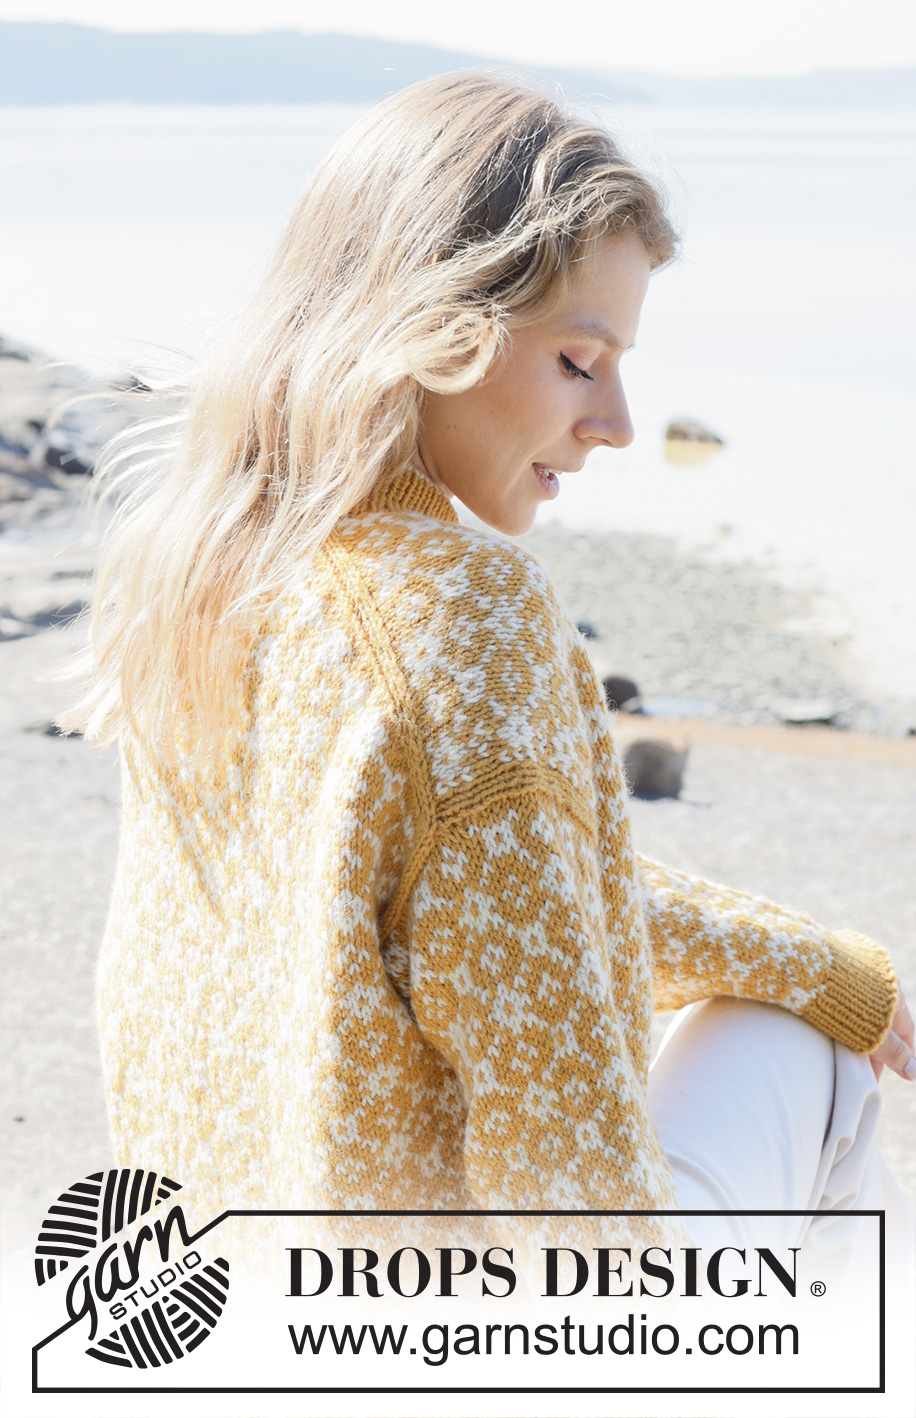
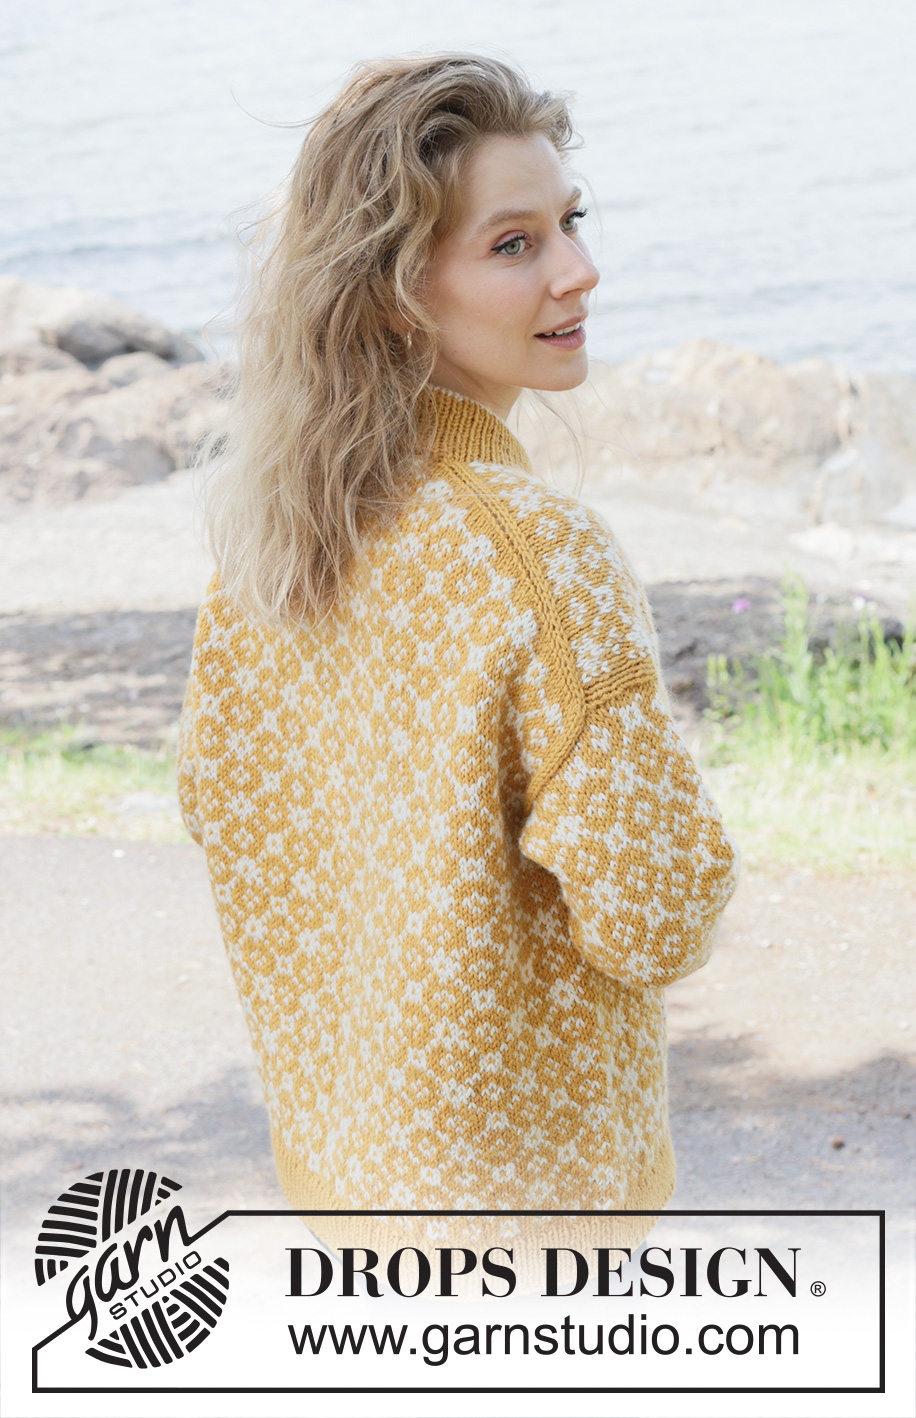
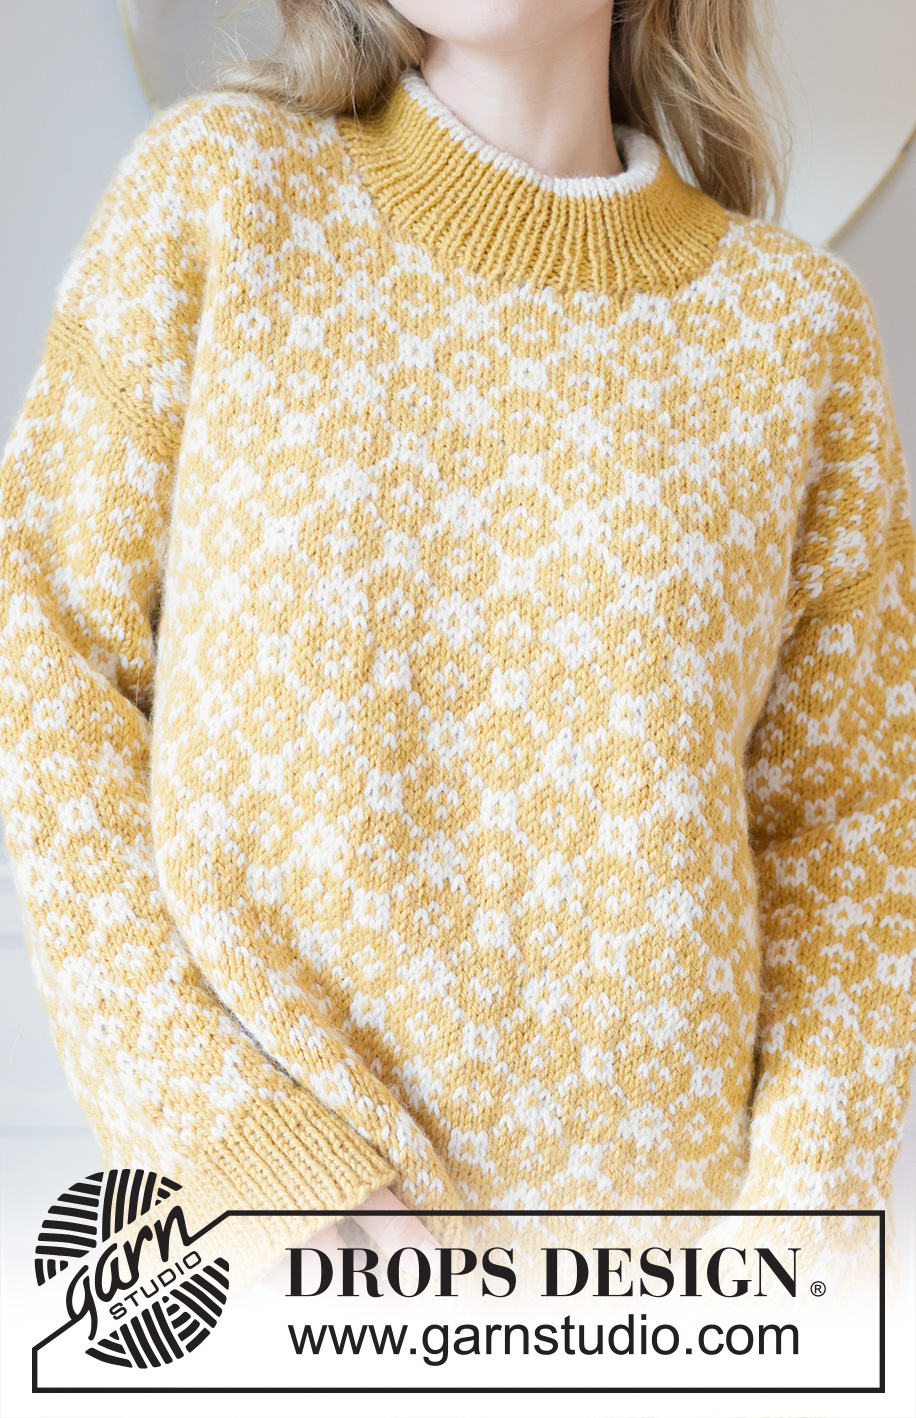
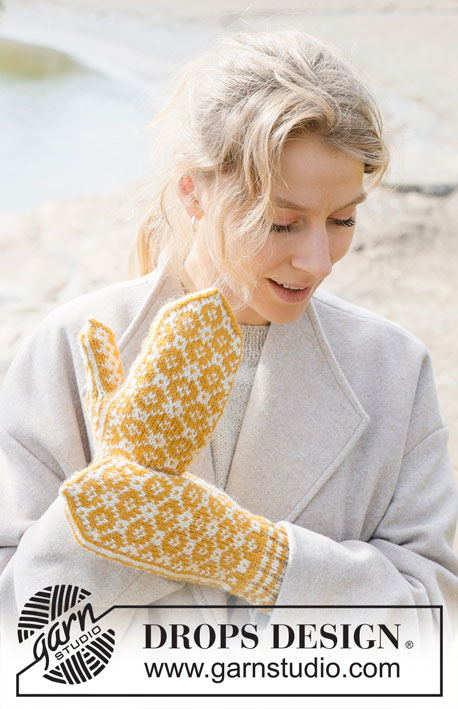
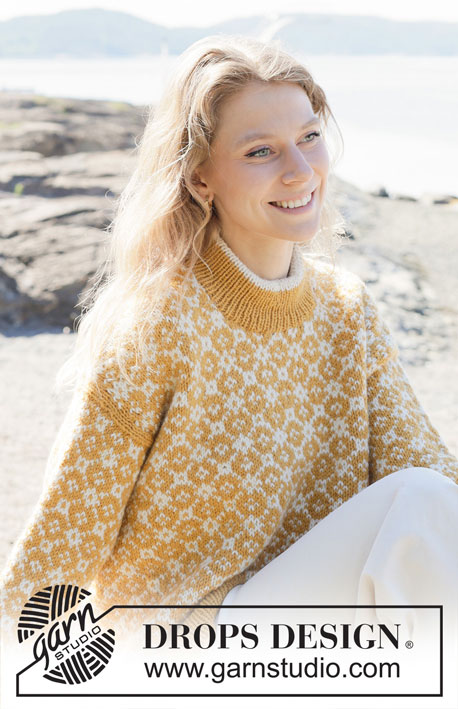
Knitted jumper in DROPS Nepal. The piece is worked top down with European/diagonal shoulders, Nordic pattern and double neck. Sizes S - XXXL.
DROPS 255-2 |
|||||||||||||
|
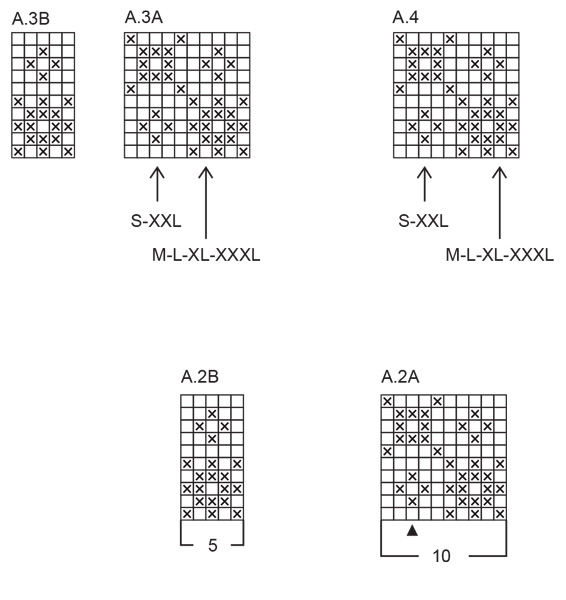
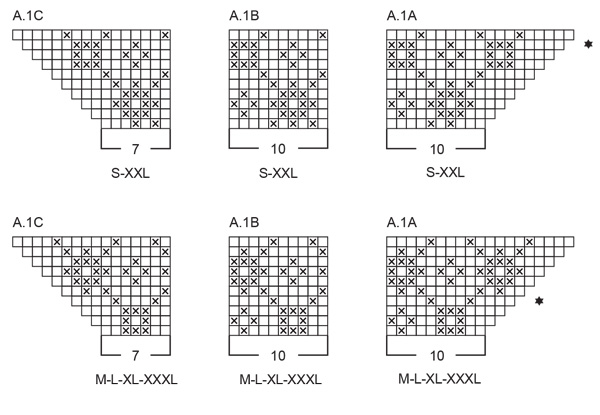
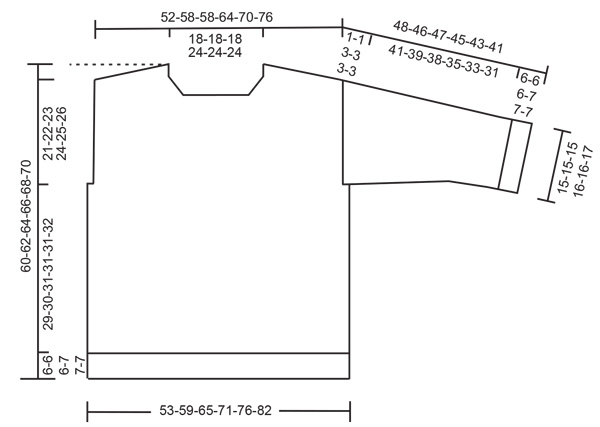
------------------------------------------------------- EXPLANATIONS FOR THE PATTERN: ------------------------------------------------------- GARTER STITCH (worked back and forth): Knit all rows, from both the right and wrong side. 1 ridge in height = knit 2 rows. PATTERN: See diagrams A.1 to A.4. The diagrams show the pattern from the right side. The pattern is worked in stocking stitch. Choose diagram for your size(applies to A.1). Start/finish at arrow for your size (applies to A.3 and A.4). INCREASE TIP-1: INCREASE 1 STITCH TOWARDS THE LEFT - from RIGHT SIDE: Use left needle to pick up yarn between 2 stitches from row below, pick up yarn from the front and knit in the stitch loop that is on the back of the needle. INCREASE 1 STITCH TOWARDS THE RIGHT - from RIGHT SIDE: Use left needle to pick up yarn between 2 stitches from row below, pick up yarn from the back and knit in the stitch loop that is on the front side of the needle. INCREASE TIP-2: INCREASE 1 STITCH TOWARDS THE RIGHT - from WRONG SIDE: Use left needle to pick up yarn between 2 stitches from row below, pick up yarn from the back and purl in the stitch loop that is on the front side of the needle. INCREASE 1 STITCH TOWARDS THE LEFT - from WRONG SIDE: Use left needle to pick up yarn between 2 stitches from row below, pick up yarn from the front and purl in the stitch loop that is on the back side of the needle. INCREASE TIP-3 (evenly spaced): To work out how to increase evenly, count the total number of stitches on the needle (e.g., 180 stitches) and divide by the number of increases to be made (e.g., 32) = 5.6. In this example, increase by making 1 yarn over after alternately each 5th and 6th stitch (approx.). On the next round work the yarn overs twisted to avoid holes. KNITTING TIP: Mark in the diagram the row the back piece finishes on. This makes it easier to match the front piece when working the armholes. DECREASE TIP: Decrease 1 stitch on each side of the marker as follows: Work until there are 2 stitches left before the marker-stitch under the sleeve, knit 2 together with colour goldenrod, knit 1 with colour goldenrod (marker-stitch), knit 2 twisted together with colour goldenrod (2 stitches decreased). ------------------------------------------------------- START THE PIECE HERE: ------------------------------------------------------- JUMPER – SHORT OVERVIEW OF THE PIECE: The pattern uses both long and short needles; start with the length which fits the number of stitches and change when necessary. The piece is started back and forth, casting on stitches at the back of the neck and working the back piece top down with pattern, while increasing stitches on each side for the shoulders, which become slightly diagonal. The back piece is worked as far as the armholes. The front piece is then worked in 2 sections, knitting up stitches along 1 back shoulder, working pattern and increasing for the neckline. This is repeated on the other shoulder. The 2 front sections are joined when the neckline is finished and then work until the armholes are finished. The front and back pieces are then joined and the body worked in the round. Stitches are knitted up around the armholes for the sleeves, which are worked in the round, top down. Stitches are knitted up around the neckline and the neck is worked in the round, then folded double to the inside. BACK PIECE: Cast on 33-33-33-43-43-43 stitches with circular needle size 5 mm and colour goldenrod DROPS Nepal. Work PATTERN – read description above, as follows: NOTE: The 3 outermost stitches in each side + increases are worked with colour goldenrod until the armholes are finished. ROW 1 (wrong side): Purl. ROW 2 (right side): Read INCREASE TIP-1. Knit 3, increase 1 stitch towards the left, work A.1A, then A.1B a total of 1-1-1-2-2-2 times, work A.1C, increase 1 stitch towards the right, knit 3. ROW 3 (wrong side): Read INCREASE TIP-2. Purl 3, increase 1 stitch towards the right, work A.1C, then A.1B as before, A.1A, increase 1 stitch towards the left, purl 3. Work ROWS 2 and 3 a total of 14-17-17-17-19-22 times (28-34-34-34-38-44 worked rows). NOTE: Each time A.1 is finished in height, there is room for 2 more repeats of A.1B in width. The increases for the diagonal shoulders are finished in sizes M, L, XL and XXXL. Continue as follows for sizes S and XXL. SIZES S and XXL: Work ROW 2 one more time, then ROW 3 one more time but without increasing (a total of 30-40 worked rows). ALL SIZES: After the last increase there are 91-101-101-111-121-131 stitches and the piece measures approx. 14-16-16-16-19-20 cm from the cast-on edge mid-back. Insert 1 marker outermost on one side. The piece is now measured from here! Work the next row as follows from the right side: 3 stocking stitches in colour goldenrod, work A.2A a total of 8-9-9-10-11-12 times (8 stitches left on row), work A.2B, 3 stocking stitches in colour goldenrod. Continue this pattern back and forth. Remember to maintain the knitting tension. Work until the piece measures 14-15-16-17-17-18 cm from the marker, measured along the armhole, and finishing with a row from the wrong side where you cast off 1 stitch on each side of the back piece = 89-99-99-109-119-129 stitches – read KNITTING TIP. Cut the strand, place the stitches on a stitch holder and work the left front piece along the left back shoulder. LEFT FRONT PIECE: Find the left back shoulder as follows: Lay the back piece flat, right side up, with the stitch holder towards you; left side of piece = left shoulder. Start from the right side on the left back shoulder by the neck. Use colour goldenrod and knit up 1 stitch in each worked row, inside 1 stitch, along the shoulder to the armhole then knit up 1 stitch in the next row at the outermost towards the armhole (pick up inside the outermost stitch)= 31-35-35-35-41-45 stitches. All lengths on the front piece are measured from this knitted-up row. Purl 1 row from the wrong side, then work as follows from the right side: Start at the arrow for your size in A.3A and work the last 3-7-7-7-3-7 stitches in A.3A, then repeat all of A.3A 2-2-2-2-3-3 times, work A.3B, finish with 3 stocking stitches in colour goldenrod. Continue this pattern back and forth until the piece measures 7-8-9-9-10-10 cm. Now increase for the neckline as follows (the increased stitches are worked into the pattern): ROW 1 (right side): Remember INCREASE TIP-1, knit 1 with colour goldenrod, increase 1 stitch towards the left (with colour goldenrod), continue A.3 as before, 3 stocking stitches with colour goldenrod. ROW 2 (wrong side): Purl 3 with colour goldenrod, work A.3 until there is 1 stitch left, purl 1 with colour goldenrod. Work ROWS 1 and 2 a total of 5 times (10 rows worked) = 36-40-40-40-46-50 stitches. Cut the strand, place the stitches on a stitch holder and work the right front piece along the right back shoulder. RIGHT FRONT PIECE: Start from the right side, 1 row before the last increase on the right back shoulder. Use colour goldenrod and knit up 1 stitch in each worked row, inside 1 stitch, from the armhole to the neckline = 31-35-35-35-41-45 stitches. All lengths on the front piece are measured from this knitted-up row. Purl 1 row from the wrong side, then work as follows from the right side: 3 stocking stitches with colour goldenrod, work A.4 a total of 2-3-3-3-3-4 times, then the first 8-2-2-2-8-2 stitches in A.4, finishing at the arrow for your size. Continue this pattern back and forth until the piece measures 7-8-9-9-10-10 cm. Now increase for the neckline as follows: ROW 1 (right side): Knit 3 with colour goldenrod, work A.4 until there is 1 stitch left, increase 1 stitch towards the right (with colour goldenrod), knit 1 with colour goldenrod – remember INCREASE TIP-1. ROW 2 (wrong side): Purl 1 with colour goldenrod, work A.4 until there are 3 stitches left, purl 3 with colour goldenrod. Work ROWS 1 and 2 a total of 5 times (10 rows worked) = 36-40-40-40-46-50 stitches. Now join the 2 front piece together. FRONT PIECE: Work as follows from the right side: Work the 36-40-40-40-46-50 stitches on the right front piece as before, cast on 19-21-21-31-29-31 stitches for the neckline, then work the 36-40-40-40-46-50 stitches on the left front piece as before = 91-101-101-111-121-131 stitches. Continue with stocking stitch and pattern as before, back and forth across all stitches (i.e., 3 stocking stitches in goldenrod at the beginning and end of the row and pattern otherwise). Work until the front piece measures 28-29-30-31-33-34 cm from the knitted-up row, finishing after the same row from the wrong side as on the back piece and casting off 1 stitch on each side on this last row = 89-99-99-109-119-129 stitches (to avoid cutting thread at the end of the row, the last 2 stitches can be purled together). The front and back pieces are joined for the body. The piece is now measured from here! BODY: Work pattern as before across the 89-99-99-109-119-129 stitches on the front piece, cast on 1-1-11-11-11-11 stitches (in side mid-under sleeve), work pattern as before across the 89-99-99-109-119-129 stitches from the back piece, cast on 1-1-11-11-11-11 stitches (in side mid-under sleeve) = 180-200-220-240-260-280 stitches. Continue the established pattern in the round, working across all stitches. The round starts in the middle of the cast-on stitches under one sleeve. Work until the body measures 28-29-30-30-30-31 cm from the join, finishing after row 5 or 9 in A.2 (the front piece measures approx. 56-58-60-61-63-65 cm from the knitted-up row). Work 2 rounds of stocking stitch with colour goldenrod. Change to circular needle size 3.5 mm. Work rib with colour goldenrod (knit 1, purl 1), AT THE SAME TIME increase 32-36-40-44-44-48 stitches evenly on round 1 – read INCREASE TIP-3 = 212-236-260-284-304-328 stitches. When the rib measures 6-6-6-7-7-7 cm, cast off a little loosely with rib. The front piece measures approx. 63-65-67-69-71-73 cm from the knitted-up row and is approx. 3 cm longer than the finished length, as the knitted-up row is not on top of shoulder but positioned slightly down the back piece. The jumper measures approx. 60-62-64-66-68-70 cm. SLEEVES: The sleeve is worked top down. Lay the piece flat and insert 1 marker mid-top of shoulder (NOTE! Mid-top of shoulder is not the knitted-up row on the front piece but approx. 7 to 8 cm down the front piece). Use circular needle size 3.5 mm and colour goldenrod. Start in the middle stitch of the cast-on stitches under the sleeve (insert 1 marker in this stitch) and knit up 72-76-90-92-96-100 stitches (inside 1 stitch) around the armhole, making sure you knit up 1 stitch in the marker-stitch under the sleeve and 1 stitch in the marker on top of the sleeve, and with equal numbers of stitches on each side of both marker-stitches. Count out from the marker-stitch on top of the shoulder to determine where to start the pattern – the marker-stitch should match the mid-stitch in A.2A. Change to circular needle size 5 mm. Work stocking stitch and A.2A in the round, but the middle 3 stitches under the sleeve are worked with colour goldenrod. When the sleeve measures 1 cm, decrease 1 stitch on each side of the marker-stitch under the sleeve - read DECREASE TIP. Decrease like this every 2nd round a total of 4-6-8-10-12-13 times, then every 5-4½-2½-2½-2-2 cm 7-7-11-9-8-8 times = 50-50-52-54-56-58 stitches. Continue the pattern with 3 stocking stitches in colour goldenrod under the sleeve, until the sleeve measures 42-40-41-38-36-34 cm from the shoulder-marker. Change to double pointed needles size 3.5 mm and work rib with colour goldenrod (knit 1, purl 1). AT THE SAME TIME increase 8-10-10-10-10-10 stitches evenly on round 1 = 58-60-62-64-66-68 stitches. When the rib measures 6-6-6-7-7-7 cm, cast off a little loosely with rib. The sleeve measures approx. 48-46-47-45-43-41 cm from top of shoulder. DOUBLE NECK: Use circular needle size 3.5 mm and colour goldenrod. Start from the right side on one shoulder-line and knit up 100-104-108-132-136-136 stitches, inside 1 stitch, around the neckline (if you knit up fewer stitches, this can be adjusted on the first round). The stitch count must be divisible by 2. Work rib in the round (knit 1, purl 1) for 4½-4½-5½-5½-6½-6½ cm (= approx. 12-12-15-15-18-18 rounds), change to colour off white and continue working until the rib measures 10-10-12-12-14-14 cm (= approx. 15-15-18-18-20-20 rounds with colour off white). Change to circular needle size 5 mm and cast off a little loosely with knit. Fold the neck double to the inside and sew down. There should be a visible stripe of colour off white at the top. To avoid the neck being tight and rolling outwards, it is important that the seam is elastic. |
|||||||||||||
Diagram explanations |
|||||||||||||
|
|||||||||||||
 |
|||||||||||||
 |
|||||||||||||
 |
|||||||||||||
Have you finished this pattern?Tag your pictures with #dropspattern #dandelionfieldsweater or submit them to the #dropsfan gallery. Do you need help with this pattern?You'll find 39 tutorial videos, a Comments/Questions area and more by visiting the pattern on garnstudio.com. © 1982-2026 DROPS Design A/S. We reserve all rights. This document, including all its sub-sections, has copyrights. Read more about what you can do with our patterns at the bottom of each pattern on our site. |
|||||||||||||


With over 40 years in knitting and crochet design, DROPS Design offers one of the most extensive collections of free patterns on the internet - translated to 17 languages. As of today we count 324 catalogues and 12290 patterns translated into English (UK/cm). 12290
We work hard to bring you the best knitting and crochet have to offer, inspiration and advice as well as great quality yarns at incredible prices! Would you like to use our patterns for other than personal use? You can read what you are allowed to do in the Copyright text at the bottom of all our patterns. Happy crafting!
Post a comment to pattern DROPS 255-2
We would love to hear what you have to say about this pattern!
If you want to leave a question, please make sure you select the correct category in the form below, to speed up the answering process. Required fields are marked *.