
Popular categories
Looking for a yarn?


Comments / Questions (70)
![]() Domini wrote:
Domini wrote:
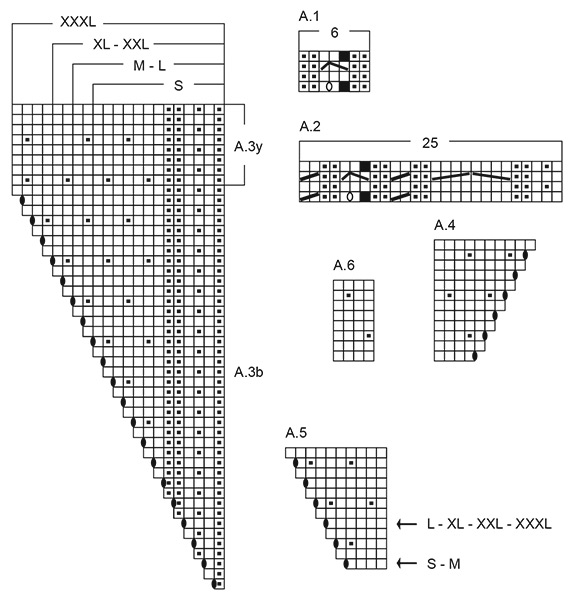
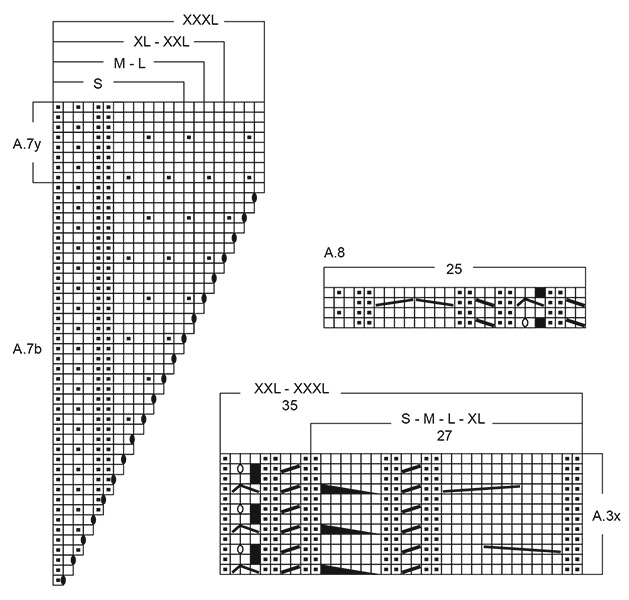
Your stitch counts for A2 and A8 are off. The full width is 26 stitches (which includes the increase stitch between the purls/cables). It would be helpful for those diagrams to be labeled 26 stitches (which is their true width) as this whole time when I do the initial increase from 19 to 25 stitches I've been counting the yarnover in the first row in that increase.
24.04.2026 - 20:02DROPS Design answered:
Dear Dominic, note that first row of A.2 and A.8 is worked over 25 stitches, on 1st row you will increase 1 stitch so that you get 26 sts but then on 3rd row you decrease 1 stitch so that there are 25 stitches again. Happy knitting!
27.04.2026 - 07:44
![]() Annie wrote:
Annie wrote:
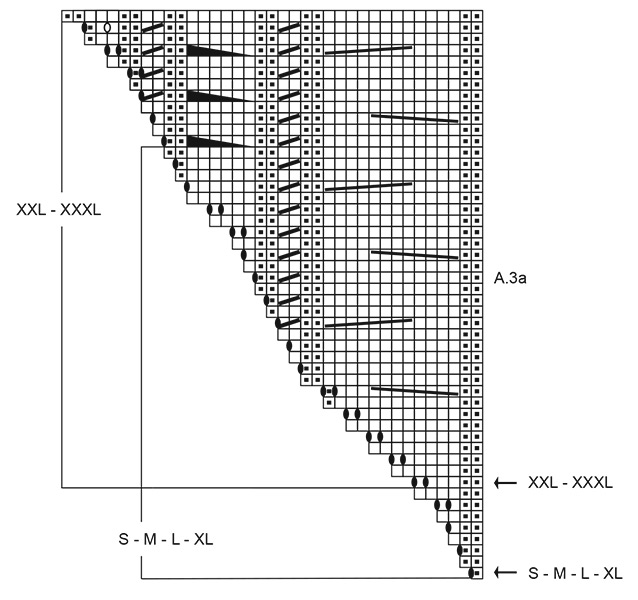
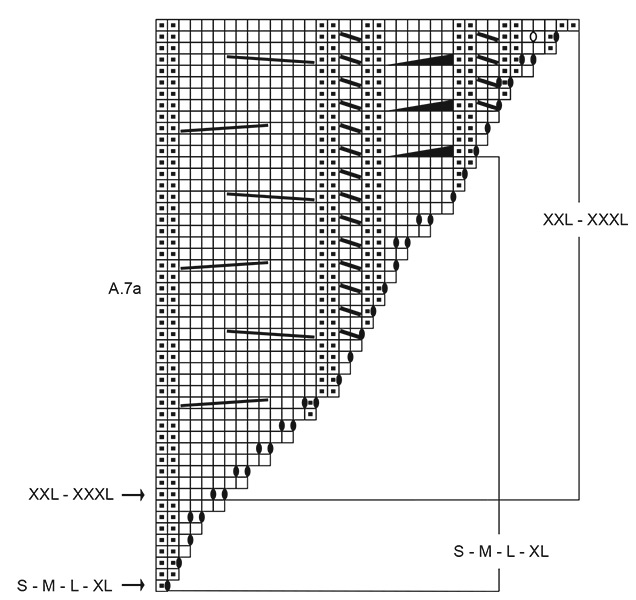
Bonjour, je tricote la taille L. Quand je termine A.3a ainsi queA.7a soit 27rgs d'augmentation et non 19 j'ai donc 28m alors que A.3x et A.7x font 27m. Où et quand commencer A.3b et A.7b ? Merci
10.03.2026 - 10:56DROPS Design answered:
Bonjour Annie, en taille L, vous ne devez tricoter que les 38 premiers rangs de A.3a et A.7a autrement dit vous tricotez 19 rangs d'augmentations (19 rangs sur l'endroit) - suivez bien l'encadré sur le côté gauche dans A.3a, on commence en taille L par le 1er rang pour terminer, comme en taille S, M et XL par le 38ème rang - de même pour A.7a, mais l'encadré se trouve à droite dans le diagramme. Vous tricotez ensuite les 27 premières mailles de A.3a comme indiqué dans A.3x et vous continuez à augmenter en suivant A.3b - pour A.7, augmentez au début comme indiqué dans A.7b et tricoter les 27 mailles suivantes comme dans A.7x - tricotez ainsi jusqu'à ce que vous ayez augmenté 29 fois au total tous les 2 rangs (= 58 rangs au total). Bon tricot!
10.03.2026 - 14:59
![]() Barbara wrote:
Barbara wrote:
Dans l’empiècement pour le dos, doit on faire une augmentation pour le raglan ou bien plusieurs comme pour les devants ? Merci
15.01.2026 - 17:41DROPS Design answered:
Bonjour Barbara, les augmentations dans les devants au 1er rang de l'empiècement sont faites pour compenser les torsade (il faut plus de mailles pour la même largeur pour des torsades que pour du jersey), comme on n'a pas de torsades dans le dos, on n'a pas besoin de faire d'augmentations à intervalles réguliers. Bon tricot!
16.01.2026 - 09:06
![]() Nelle wrote:
Nelle wrote:
Hi, I have a question for the size S. In the beginning of the raglan, it was stated to insert markers at 28-14-37-14-28 (121 stitches) but that total stitches at this point is 125 stitches, which is 4 stitches more. I kind of confused what to do next, please explain. Thanks!
23.12.2025 - 19:51DROPS Design answered:
Hi Nelle, you have 125 sts in your size: you work 28 sts and put one marker in next stitch (29th), and so on: 28+1 (stitch with marker)+14+1+37+1+14+1+28=125 sts. Happy knitting!
27.12.2025 - 10:59
![]() Corinne wrote:
Corinne wrote:
Bonjour, je voudrais savoir si après le diagramme A3a quand on arrive au raglan, il est indiqué de faire un jeté, parfois deux, , doit on faire aussi l’augmentation du raglan ? Merci.
15.12.2025 - 05:50DROPS Design answered:
Bonjour Corinne, quand A.3a et A.7a sont terminés (= 19-19-19-19-21-21 rangs d'augmentations), tricoter A.3x au-dessus de A.3a et A.7x au-dessus de A.7a, EN MÊME TEMPS augmenter dans A.3b et A.7b jusqu'à ce que toutes les augmentations du raglan soient faites. Bon tricot!
15.12.2025 - 08:09
![]() Cathy wrote:
Cathy wrote:
Bonjour Je commence ce cardigan et je ne comprends pas la mise en place du 1 er diagramme Après les mailles de bordure il est demandé de faire 6 augmentations sur les 19 mailles d’A2 mais du coup À 1 n’est pas inclus dans les 25 mailles notées sur A2 Merci de m’expliquer
15.10.2025 - 00:19
![]() Cathy wrote:
Cathy wrote:
Bonjour Je commence ce cardigan et je ne comprends pas la mise en place du 1 er diagramme Après les mailles de bordure il est demandé de faire 6 augmentations sur les 19 mailles d’A2 mais du coup À 1 n’est pas inclus dans les 25 mailles notées sur A2 Merci de m’expliquer
15.10.2025 - 00:17DROPS Design answered:
Bonjour Cathy, les 6 mailles de A.1 sont au milieu des manches = au milieu des 14 mailles entre le 1er et le 2ème marqueur et entre le 3ème et le 4ème marqueur, vous tricotez les 28 mailles du devant ainsi: 8 m de bordure devant, puis vous tricotez les 19 m suivantes en augmentant en même temps 6 mailles et vous tricotez ces 25 mailles comme indiqué dans le 1er rang de A.2, il reste 1 maille avant celle avec le marqueur, tricotez A.3a = 1 m, puis la maille du raglan à l'endroit. La manche = 4 m de A.4 + 6 m de A.1 + 4 m de A.6 (sans les jetés de chaque côté). Bon tricot!
15.10.2025 - 12:24
![]() Mo wrote:
Mo wrote:
Voorpand: 8 steken voorbies, 25 steken A21 steek A3a=34 steken exclusief omslag. Hoeveel steken heeft dan de omslag? Is de omslag soms de voorbies Als de omslag de voorbies is dan kom ik voor het voorpand op A2: 25 steken en A3a: 1 steek en raglan steek: 1= 26 steken. Hoe moet ik tot 34 steken komen?
05.10.2025 - 12:10DROPS Design answered:
Dag Mo,
Je breit 8 + 25 + 1 steek = 34 steken. De omslag naast A.2 telt niet mee (dit staat er ook bij in de beschrijving tussen haakjes).
22.10.2025 - 20:14
![]() Rollande wrote:
Rollande wrote:
Bonjour, je suis au niveau du col terminé. J'ai bien 125 mailles sur mon aiguille 4 mm. (28 m. + 1 marqueur + 14 m. + 1 marqueur +37 m. +1 marqueur + 14 m. + 1 marqueur + 28 m. J'ai bien placé mes marqueurs dans les mailles : 29, 44, 82 et 97. Je n'ai donc pas 19 mailles dans la première section , j'ai 20 mailles. Pour les augmentions, est-ce que je les faits en même temps que je tricote A.2 ? J'avoue être perdue, mais je voudrais tellement faire cette jolie veste. Merci d'avance!
26.09.2025 - 22:48DROPS Design answered:
Bonjour Rollande, tricotez les 28 m du devant ainsi: 8 m de bordure devant + 19 m de A.2 (vous allez augmenter 6 m au 1er rang), et 1 m de A.3a (soit: 8+19+1=28), puis vous tricotez la m du raglan à l'endroit, puis vous tricotez les 14 m de la manche ainsi: A.4 (4 m), A.1 (6 m) et A.5 (4 m) (+ 1 augm. pour le raglan dans A.4 et A.5), tricotez ensuite 1 m du raglan puis A.4 (4 m), A.6 (33 m) (37 m pour le dos), puis 1 m du raglan, tricotez la 2ème manche comme la 1ère et terminez par. 1m du raglan, A.1a (1 m), A.8 (19 m - vous augmentez 6 m au 1er rang) et 8 m de bordure devant (1+19+8=28 m pour le devant). Bon tricot!
08.10.2025 - 08:14
![]() JAMET wrote:
JAMET wrote:
Bonjour, Je ne tricote que de bas en haut, comment puis-je faire ? avez-vous les explications de bas en haut SVP ? Merci pour votre retour.
01.09.2025 - 13:01DROPS Design answered:
Bonjour Mme Jamet, retrouvez ici tous nos gilets & vestes tricotés de bas en haut, n'hésitez pas à ajouter des filtres si besoin. Bon tricot!
02.09.2025 - 17:09
|
||||||||||||||||||||||||||||||||||||||||||||||
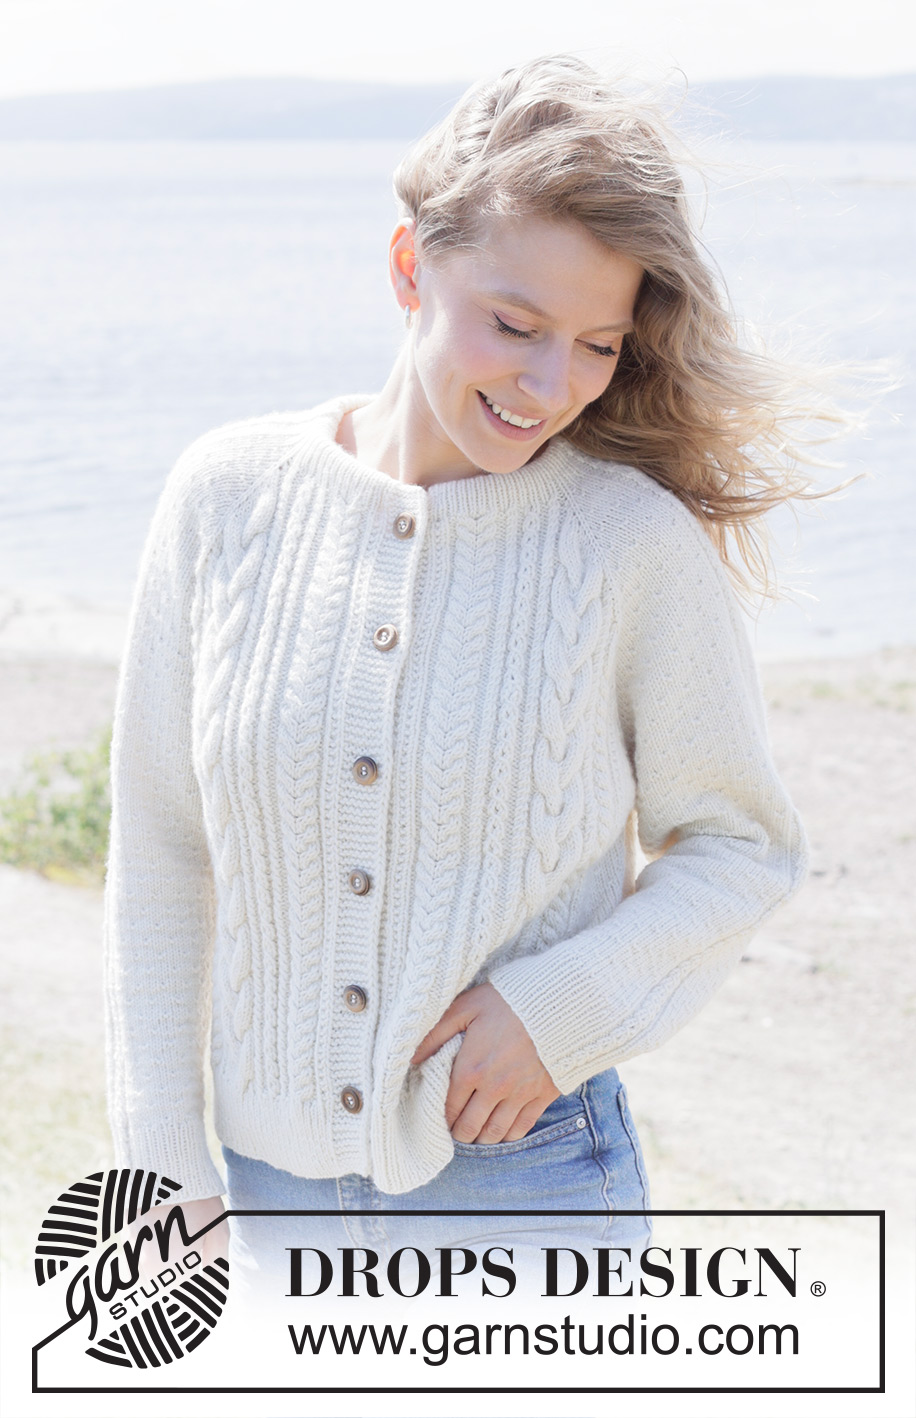
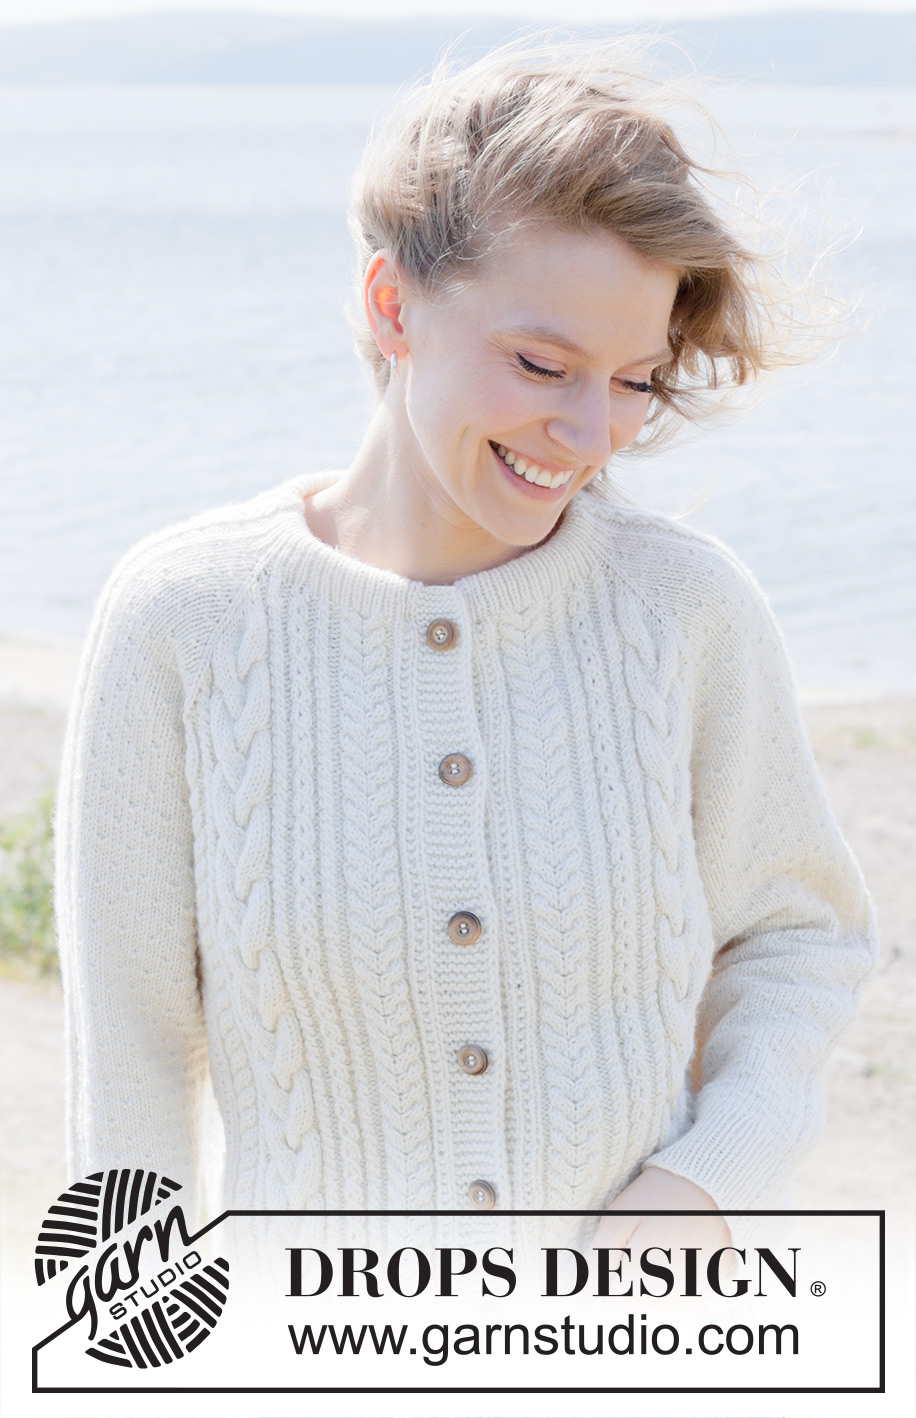
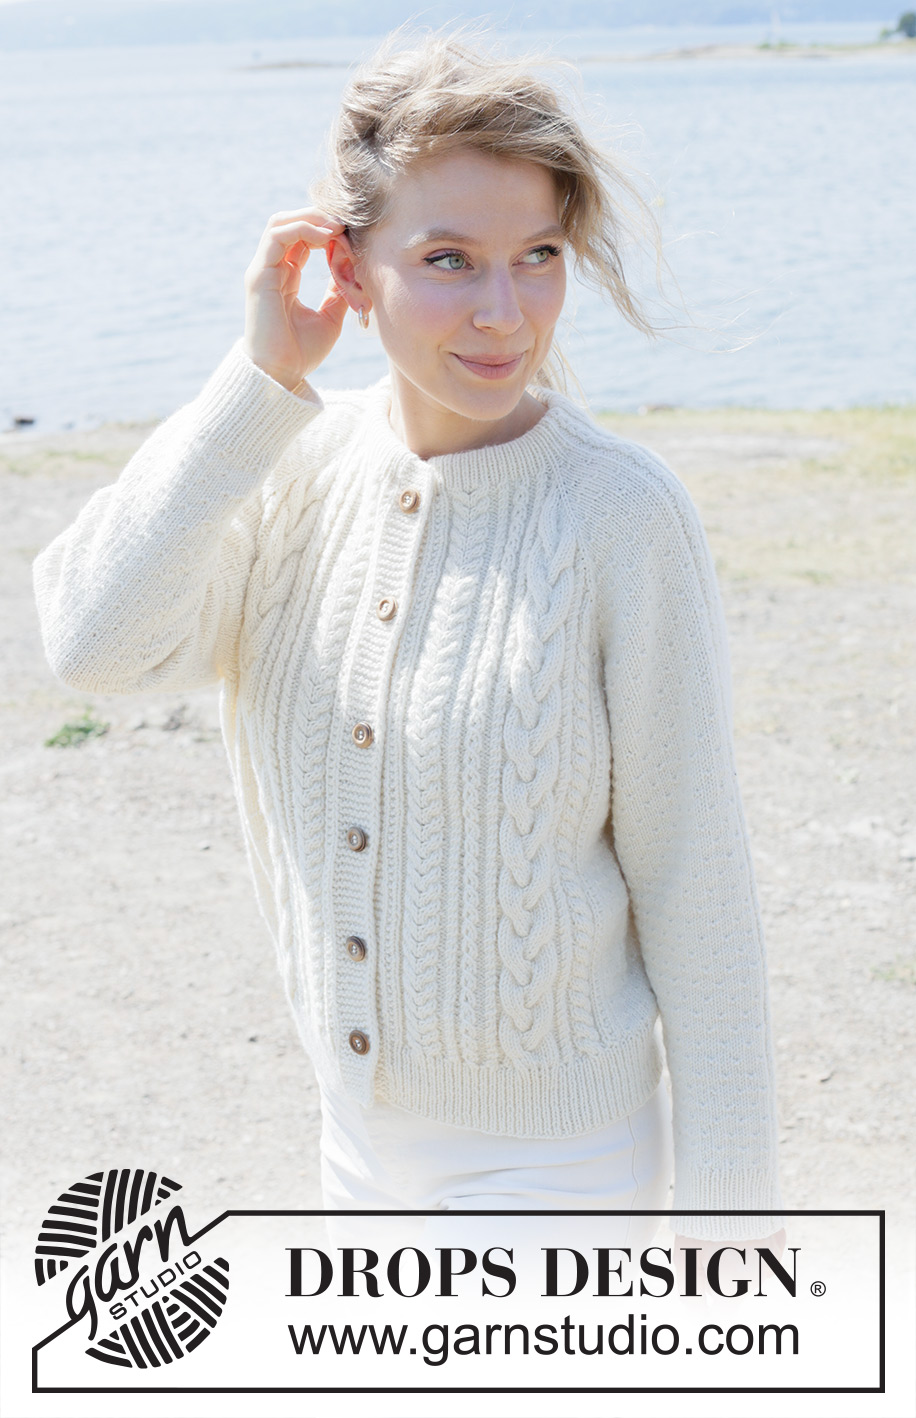
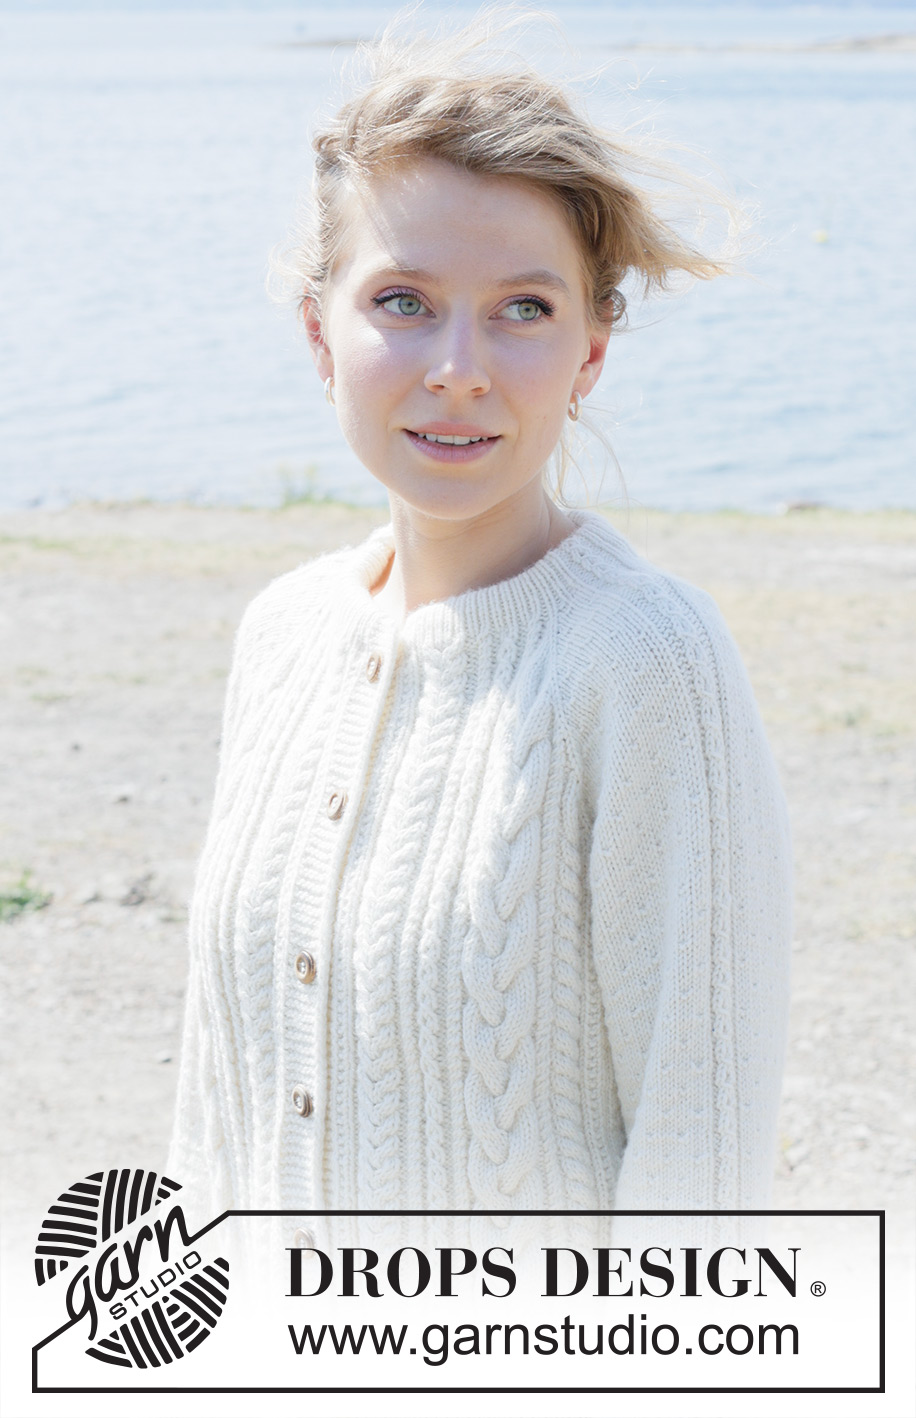
Winter Rain Cardigan#winterraincardigan |
||||||||||||||||||||||||||||||||||||||||||||||
 |
 |
|||||||||||||||||||||||||||||||||||||||||||||
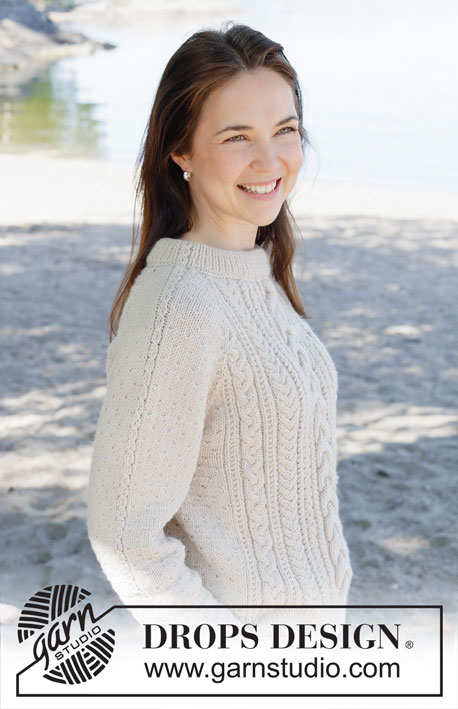
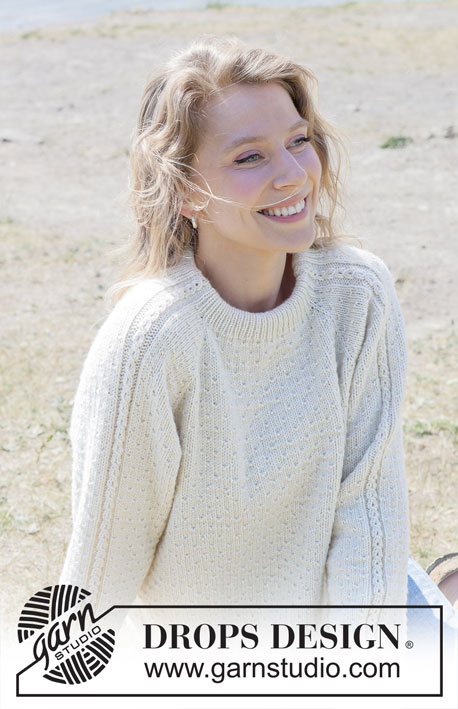
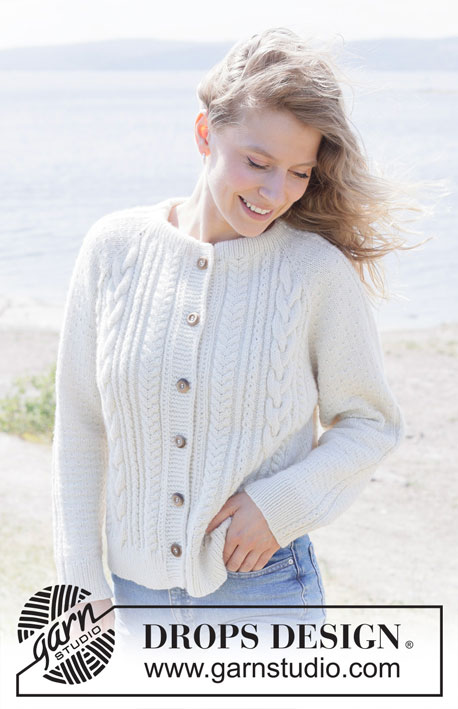
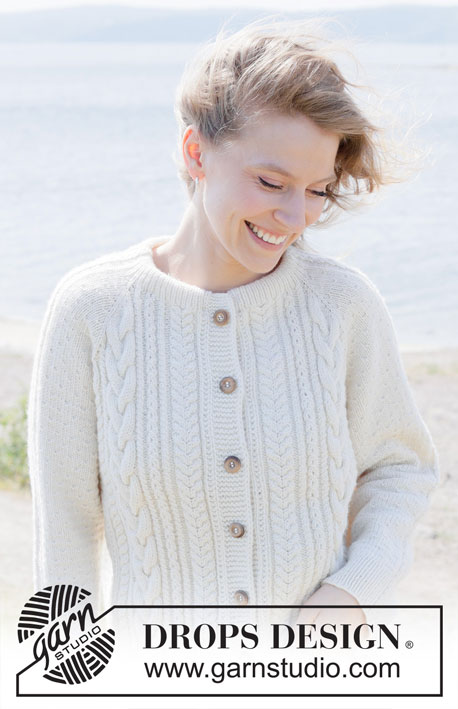
Knitted jacket in DROPS Daisy or DROPS Karisma. Piece is knitted top down with raglan, cables, relief pattern and double neck edge. Size: S - XXXL
DROPS 252-4 |
||||||||||||||||||||||||||||||||||||||||||||||
|
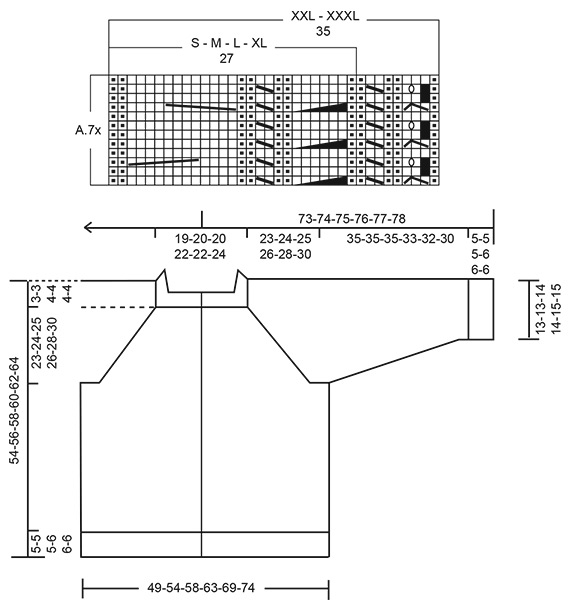
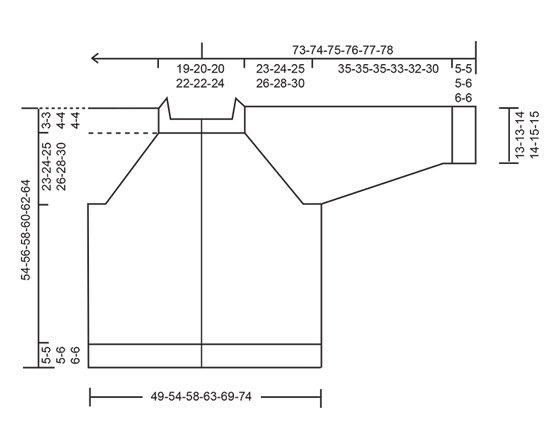
---------------------------------------------------------- EXPLANATION FOR THE PATTERN: ---------------------------------------------------------- GARTER STITCH: Knit on all rows, i.e. knit from right side and knit from wrong side. 1 ridge vertically = knit 2 rows. BAND WITH I-CORD: BEGINNING OF ROW: Work band as follows: Slip 1 stitch purlwise with strand in front of piece, knit 1 and work 6 stitches in garter stitch. END OF ROW: Work band as follows: Work until 8 stitches remain on row, work 6 stitches in garter stitch, slip 1 stitch purlwise with strand in front of piece, knit 1. Work the same way both from right side and wrong side. PATTERN: See diagrams A.1 to A.8. Number of stitches in A.1, A.2, A.3x, A.7x and A.8 will vary but is always counted without the yarn over that forms the lace in the cable. Find your size and begin at the specified arrow. RAGLAN: Increase 1 stitch by making 1 yarn over, on next row work yarns over as explained below: BEFORE RAGLAN STITCH: Purl yarn overs in back loop of stitches to avoid holes. Then work the new stitches in pattern. AFTER RAGLAN STITCH: Slip stitch off left needle and put it back on left needle but the opposite way (insert left needle in from behind when slipping it back on needle). Purl yarn overs in front loop of stitches to avoid holes. Then work the new stitches in pattern BUTTONHOLES: Decrease for buttonholes on right band (when garment is worn). Decrease from right side when 6 stitches remain on row as follows: ROW 1 (= right side): Make 1 yarn over, knit 2 together, knit 2, slip 1 stitch purlwise with strand in front of piece, knit 1. ROW 2 (= wrong side): Work band as before and knit yarn over to make a buttonhole. Decrease for first buttonhole on first row from right side after neck edge has been worked. Then decrease the next 5-5-5-6-6-6 buttonholes, approx. 9-9½-9½-8½-8½-9 cm apart. Place bottom buttonhole in the transition between stocking stitch and rib. DECREASE TIP: Decrease 1 stitch on each side of stitch with marker as follows: Work until 2 stitches remain before stitch with marker, knit 2 together, knit 1 (marker is in this stitch) slip 1 stitch knitwise, knit 1, pass slipped stitch over stitch worked (= 2 stitches decreased). ---------------------------------------------------------- START THE PIECE HERE: ---------------------------------------------------------- JACKET - SHORT OVERVIEW OF THE PIECE: In this pattern needles of different length have been used, begin with fitting length for number of stitches and switch as needed. Work neck edge and yoke back and forth on circular needle from mid front, work top down. When yoke is done, divide piece for body and sleeves. Work body downwards back and forth on circular needle while putting the sleeves aside. Then work sleeves downwards in the round on needle. Fold the neck edge double against the wrong side and fasten. If 0 is given for the chosen size, it means that you skip the information until next information. NECK EDGE: Cast on 111-115-123-127-135-139 stitches on circular needle size 4 mm with DROPS Daisy or DROPS Karisma. Switch to circular needle size 3 mm (cast on on a larger needle to get an elastic cast-on edge). Purl 1 row from wrong side. Work next row from right side as follows: Work 1 stitch in GARTER STITCH - read explanation above over, work rib (= knit 1/purl 1) over the first 25-25-27-27-31-31 stitches, work A.1, work rib (= knit 1/purl 1) over the next 47-51-55-59-59-63 stitches, work A.1, work rib (= knit 1/purl 1) over the next 25-25-27-27-31- 31 stitches, finish with 1 stitch in garter stitch. Continue rib like this until neck edge measures 3½-3½-3½-4-4-4 cm (= approx. height of neck edge when it is folded double). At the end of each of the next 2 rows cast on 7 stitches for band = 125-129-137-141-149-153 stitches on needle, work band stitches as BAND WITH I-CORD - read explanation above. Then work until neck edge measures 7-7-7-8-8-8 cm– adjust so that last row is last row in A.1. Insert 1 marker on the inside of band in one side of piece, measure piece from this marker. YOKE: Continue with circular needle size 4 mm. Insert 4 markers in piece without working the stitches, markers are inserted in 1 stitch and these are called raglan stitches and worked in stocking stitch. Count 28-28-28-28-32-32 stitches (= left front piece), insert 1 marker in next stitch, count 14-14-18-18-18-18 stitches - A.1 is in the middle of these stitches (= sleeve), insert 1 marker in next stitch, count 37-41-41-45-45-49 stitches (= back piece), insert 1 marker in next stitch, count 14-14-18-18-18-18 stitches - A.1 is in the middle of these stitches (= sleeve), insert 1 marker in next stitch. 28-28-28-28-32-32 stitches remain on row after last marker (= right front piece). Work PATTERN – read explanation above, with band as before, back and forth and increase for RAGLAN on each side of the 4 raglan stitches - read explanation above. Work first row as follows from right side: FRONT PIECE: Work band as before (= 8 stitches band), work A.2 over the next 19 stitches AT THE SAME TIME increase 6 stitches evenly over these, work A.3a over the next 1-1-1-1-5-5 stitches AT THE SAME TIME as increasing 0-0-0-0-1-1 stitch over these (= 34-34-34-34-39-39 stitches for front piece - not included yarn over), knit the raglan stitch. SLEEVE: Work A.4, work A.6 over the next 0-0-2-2-2-2 stitches, work A.1, work A.5 – begin at specified arrow (= 14-14-18-18-18-18 stitches for sleeve – not included yarn over). BACK PIECE: Knit the raglan stitch, work A.4, work A.6 over the next 33-37-37-41-41-45 stitches (pattern will not fit 4, but back piece will be symmetrical) (= 37-41-41-45-45-49 stitches for back piece), increase 1 stitch for raglan, knit the raglan stitch. SLEEVE: Work A.4, work A.6 over the next 0-0-2-2-2-2 stitches, work A.1, work A.5 – begin at specified arrow (= 14-14-18-18-18-18 stitches for sleeve – not included yarn over). FRONT PIECE: Knit the raglan stitch, work A.7a over the next 1-1-1-1-5-5 stitches AT THE SAME TIME increase 0-0-0-0-1-1 stitch over these, work A.8 over the next 19 stitches AT THE SAME TIME increase 6 stitches evenly over these, finish with band as before (= 8 stitches band), (= 34-34-34-34-39-39 stitches for front piece - not included yarn over) – remember BUTTONHOLE. Continue back and forth like this - remember to work the yarn overs in raglan increase as explained above. When A.4 and A.5 have been worked vertically, continue moss stitch and increases in the established pattern on sleeves and back piece, work the new stitch in pattern. When A.3a and A.7a (= 19-19-19-19-21-21 increase rows) have been worked vertically in the selected size, work A.3x over A.3a and A.7x over A.7a, AT THE SAME TIME increase with A.3b and A.7b until finish number of raglan increases vertically. Remember to follow the knitting tension! Increase for raglan on every other row 29 times in total = 72-72-76-76-76-76 stitches between raglan stitches for each sleeve, 71-71-71-71-77-77 stitches for front piece (not included yarn over), and 95-99-99-103-103-107 stitches for back piece + 4 raglan stitches = 385-389-397-401-413-417 stitches. Increases for sleeve are now done, but continue to increase for raglan on front piece and back piece on every other row 2-4-4-6-8-12 more times (i.e. 31-33-33-35-37-41 times vertically for front/back piece) = 393-405-413-425-445-465 stitches on needle(not included yarn overs). When correct number of increases has been achieved on front pieces and back pieces, continue with A.3y over A.3b and A.7y over A.7b - make sure that the pattern fits over the established pattern. Work pattern and band as before without increasing until piece measures 23-24-25-26-28-30 cm from marker mid front – adjust so that last row is last row in A.1. Now divide yoke for body and sleeves. DIVIDING FOR BODY AND SLEEVES: AT THE SAME TIME as next row is worked divide yoke for body and sleeves at raglan stitches as follows: Work 74-76-76-78-86-90 stitches as before - to and with raglan stitches (= front piece), slip the next 72-72-76-76-76-76 stitches on a stitch holder for sleeve, cast on 3-7-15-19-23-23 new stitches on row (= in the side mid under sleeve), work 101-109-109-117-121-133 stitches as before (= back piece), slip the next 72-72-76-76-76-76 stitches on a stitch holder for sleeve, cast on 3-7-15-19-23-23 new stitches on row (= in the side mid under sleeve) and work the last 74-76-76-78-86-90 stitches as before (= front piece). Finish body and sleeves separately. BODY: = 255-275-291-311-339-359 stitches (not included yarn overs). Work pattern and band as follows: Work band, work A.2, A.3x, A.3y, continue with moss stitch / A.6 from A.3y over raglan stitches and the new stitches under sleeve (pattern fits between front piece and back piece), work moss stitch until and with last raglan stitch, (moss stitch continues into A.7y), work A.7y, A.7x, A.8, finish with band. Work pattern and band as before until piece measures 46-48-49-50-52-54 cm from marker mid front. On next row from right side begin rib while AT THE SAME TIME increasing 10-14-18-24-30-32 stitches evenly over back piece = 265-289-309-335-365-391 stitches, work as follows: Switch to circular needle size 3 mm, work band as before, work rib (= knit 1/purl 1 - remember increase) until 9 stitches remain, knit 1 and band as before. When rib measures 5-5-5-6-6-6 cm, cast off with knit over knit and purl over purl. Jacket measures 51-53-54-56-58-60 cm from marker mid front and approx. 54-56-58-60-62-64 cm from the top of shoulder. SLEEVES: Slip 72-72-76-76-76-76 sleeve stitches from one thread on to circular needle size 4 mm and pick in addition up 1 stitch in each of the 3-7-15-19-23-23 stitches cast on under sleeve = 75-79-91-95-99-99 stitches. Insert 1 marker in the middle of the 3-7-15-19-23-23 new stitches under sleeve - round begins in this stitch and this stitch is always worked in stocking stitch. Adjust so that pattern A.6 and A.1 continue as before from yoke over sleeve - the pattern will not fit under sleeve but it is important that the pattern is symmetrical on each side of A.1. Work in the round with pattern as before on needle - AT THE SAME TIME when sleeve measures 2-2-4-2-2-2 cm from division, decrease mid under sleeve – read DECREASE TIP and decrease as follows: Decrease 2 stitches every 3-2½-1½-1½-1½-1½ cm 11-12-17-18-18-18 times in total = 53-55-57-59-63-63 stitches. Work until sleeve measures 35-35-35-33-32-30 cm from division. Work next round as follows: Knit 24-25-26-27-29-29 stitches while AT THE SAME TIME increasing 5-4-5-6-6-6 stitches evenly over these (= 29-29-31-33-35-35 stitches), work A.1 as before, knit 23-24-25-26-28-28 stitches while AT THE SAME TIME increasing 5-6-7-6-6-6 stitches evenly over these (= 28-30-32-32-34-34 stitches) = 63-65-69-71-75-75 stitches. Switch to double pointed needles size 3 mm and work rib (= knit 1/purl 1) over de first 29-29-31-33-35-35 stitches, work A.1, work rib (= knit 1/purl 1) over the last 28-30-32-32-34-34 stitches. Continue rib in the round like this until rib measures 5-5-5-6-6-6 cm– adjust so that last round is last round in A.1. Cast off stitches with knit over knit and purl over purl. Sleeve measures approx. 40-40-40-39-38-36 cm from division. ASSEMBLY: Fold rib at the top of neck down on inside of garment. Fasten rib to get a double neck edge. To avoid a tight neck edge that sticks out it is important to keep the seam elastic. Sew opening towards mid front together on bands with neat little stitches. Sew the buttons on to the left band. |
||||||||||||||||||||||||||||||||||||||||||||||
Diagram explanations |
||||||||||||||||||||||||||||||||||||||||||||||
|
||||||||||||||||||||||||||||||||||||||||||||||
 |
||||||||||||||||||||||||||||||||||||||||||||||
 |
||||||||||||||||||||||||||||||||||||||||||||||
 |
||||||||||||||||||||||||||||||||||||||||||||||
 |
||||||||||||||||||||||||||||||||||||||||||||||
 |
||||||||||||||||||||||||||||||||||||||||||||||
 |
||||||||||||||||||||||||||||||||||||||||||||||
Have you finished this pattern?Tag your pictures with #dropspattern #winterraincardigan or submit them to the #dropsfan gallery. Do you need help with this pattern?You'll find 39 tutorial videos, a Comments/Questions area and more by visiting the pattern on garnstudio.com. © 1982-2026 DROPS Design A/S. We reserve all rights. This document, including all its sub-sections, has copyrights. Read more about what you can do with our patterns at the bottom of each pattern on our site. |
||||||||||||||||||||||||||||||||||||||||||||||


With over 40 years in knitting and crochet design, DROPS Design offers one of the most extensive collections of free patterns on the internet - translated to 17 languages. As of today we count 324 catalogues and 12290 patterns translated into English (UK/cm). 12290
We work hard to bring you the best knitting and crochet have to offer, inspiration and advice as well as great quality yarns at incredible prices! Would you like to use our patterns for other than personal use? You can read what you are allowed to do in the Copyright text at the bottom of all our patterns. Happy crafting!
Post a comment to pattern DROPS 252-4
We would love to hear what you have to say about this pattern!
If you want to leave a question, please make sure you select the correct category in the form below, to speed up the answering process. Required fields are marked *.