
Popular categories
Looking for a yarn?


Comments / Questions (22)
![]() Lydia wrote:
Lydia wrote:
Warum die Schultermaschen still legen?
19.12.2025 - 11:33DROPS Design answered:
Liebe Lydia, das erfolgt, damit die Schulter eine leichte Schrägung erhält. Viel Spaß beim Weiterstricken!
19.12.2025 - 11:53
![]() Debbie McCall wrote:
Debbie McCall wrote:
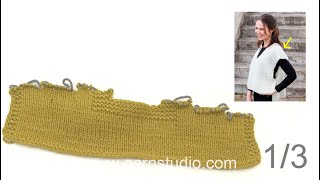
I’ve got to the diagonal shoulders and really cannot understand the instructions at all. I’m making the second size -medium. I have read Sallys comments and your response. Where do the slip 12 come from Each shoulder is 16+11=27 ie 54 for both sides and that leaves me with 34 in the middle. You also talk about decreasing x2 on each side. Where? This would still leave two stitches too many. This section if the pattern is very confusing and needs re-writing.
15.07.2025 - 08:08DROPS Design answered:
Hi Debbie, there is a mistake in there, I have already reported it and asked for a video. In size M we start from 88 st on the back. Decreasing for neckline: 88-28 (centre back)-4 (2 sts in each side of neckline)=56. Placing stitches on threads 2x[(4x4)+11]=54. 56-54=2 sts left. I think it should be 'Place 4 stitches 4 times, then the last 12 stitches by the neck'. Thank you for notifying it. Happy knitting!
15.07.2025 - 09:05
![]() Ursula wrote:
Ursula wrote:
Bonjour, 2 x 39 m à relever sur les manches et tricoter d'abord en aller/retour. Veuillez sur votre expl. cette phrase suivante pour éviter la confusion: "c'est-à-dire qu'aucune maille n'est reprise sur le bord inférieur horizontal de l'emmanchure" (les allemands l'on fait et on comprends mieux)
07.06.2025 - 09:49
![]() Sally wrote:
Sally wrote:
Hi, I am knitting a size L. When shaping the shoulders I have 88 stitches to start with. It says to put 4 stitches on a thread 4 times (=16) then 11 stitches near the neck edge (16+11=27). The neck should have 28 stitches. With both shoulders =54 stitches + 28 neck stitches =82 stitches. But there are 88 stitches when I start. What do I do with the extras 6 stitches? Is this an error in the pattern? Thanks for your help
12.04.2025 - 13:54DROPS Design answered:
Dear Sally, there seems to be a typo in the pattern; in the women's version of the pattern we slip 12 stitches near the neck edge on each shoulder. So you would have 56 stitches in each shoulder. Then, in the neck, we cast off 28 stitches and decrease 1 stitch 2 times on each shoulder, so we have: 56+28+4 = 88 stitches. Happy knitting!
14.04.2025 - 00:31
![]() Dianne Morton wrote:
Dianne Morton wrote:
This was the first Drops pattern I have hand knit..........and it will be the last. I have been knitting for over 60 years and never come across a pattern so confusingly written. I use your pattern schematics to knit on my machine but I will never use one again to hand knit.
14.02.2025 - 16:55
![]() Bengt Lanner wrote:
Bengt Lanner wrote:
Hej, Jag förstår inte när det står så här för BAKSTYCKE, SNED AXEL: "Sätt maskor på tråd från sidan så här: 4-4-4-5-5-6 maskor 4 gånger och sedan de sista 9-11-11-11-13-13 maskorna mot halsen." Görs det i början och slutet på 4 varv efter varandra? Sätts alla 16 maskorna mot sidan på en tråd och de 44 mot halsen på en tråd?
13.02.2025 - 19:40DROPS Design answered:
Hej Bengt, det er de yderste masker (dem som er nærmest skulderen) som sættes på en tråd efter at du har strikket dem. Når du har lukket de midterste masker af til hals, strikker du den ene side af skulderen klar, ved at sætte maskerne på en tråd i starten af den pind som som strikker fra skulderen :)
18.02.2025 - 10:08
![]() Linda wrote:
Linda wrote:
The pattern notes for the diagonal shoulders are not very clear. The video that's referenced doesn't really help. It's a similar technique, but it's for a different top. This sweater really should have it's own video.
17.11.2024 - 03:25
![]() Jeanet wrote:
Jeanet wrote:
Ik brei deze trui op twee naalden. Ik begrijp het minderen niet? Waarom na de boord minderen?
29.09.2024 - 19:19DROPS Design answered:
Dag Jeanet,
Dit minderen na de boord wordt gedaan om te voorkomen dat de boord het werk samen trekt.
19.10.2024 - 11:52
![]() Genest wrote:
Genest wrote:
Bonjour, je ne comprends pas les explications des emmanchures, pouvez-vous m'aider?
13.09.2024 - 14:35DROPS Design answered:
Bonjour Mme Genest, on va rabattre les mailles des emmanchures à la transition entre le dos et le devant en commençant 3-2-5-6-7-8 mailles avant la fin du tour: rabattez alors les 6-4-10-12-14-16 mailles suivantes (3-2-5-6-7-8 mailles de chaque côté du marqueur du début du tour), tricotez comme avant jusqu'à ce qu'il reste 3-2-5-6-7-8 mailles avant le marqueur de l'autre côté du pull, rabattez les 6-4-10-12-14-16 mailles suivantes (= 3-2-5-6-7-8 m de chaque côté du marqueur) et terminez le tour comme avant. Bon tricot!
13.09.2024 - 17:03
![]() Sally Woodhead wrote:
Sally Woodhead wrote:
I'm so sorry! I wrote my question on the wrong jumper. Please refer to the Variety jumper where I'll repost my question. Sally
28.05.2024 - 11:07
|
|||||||||||||
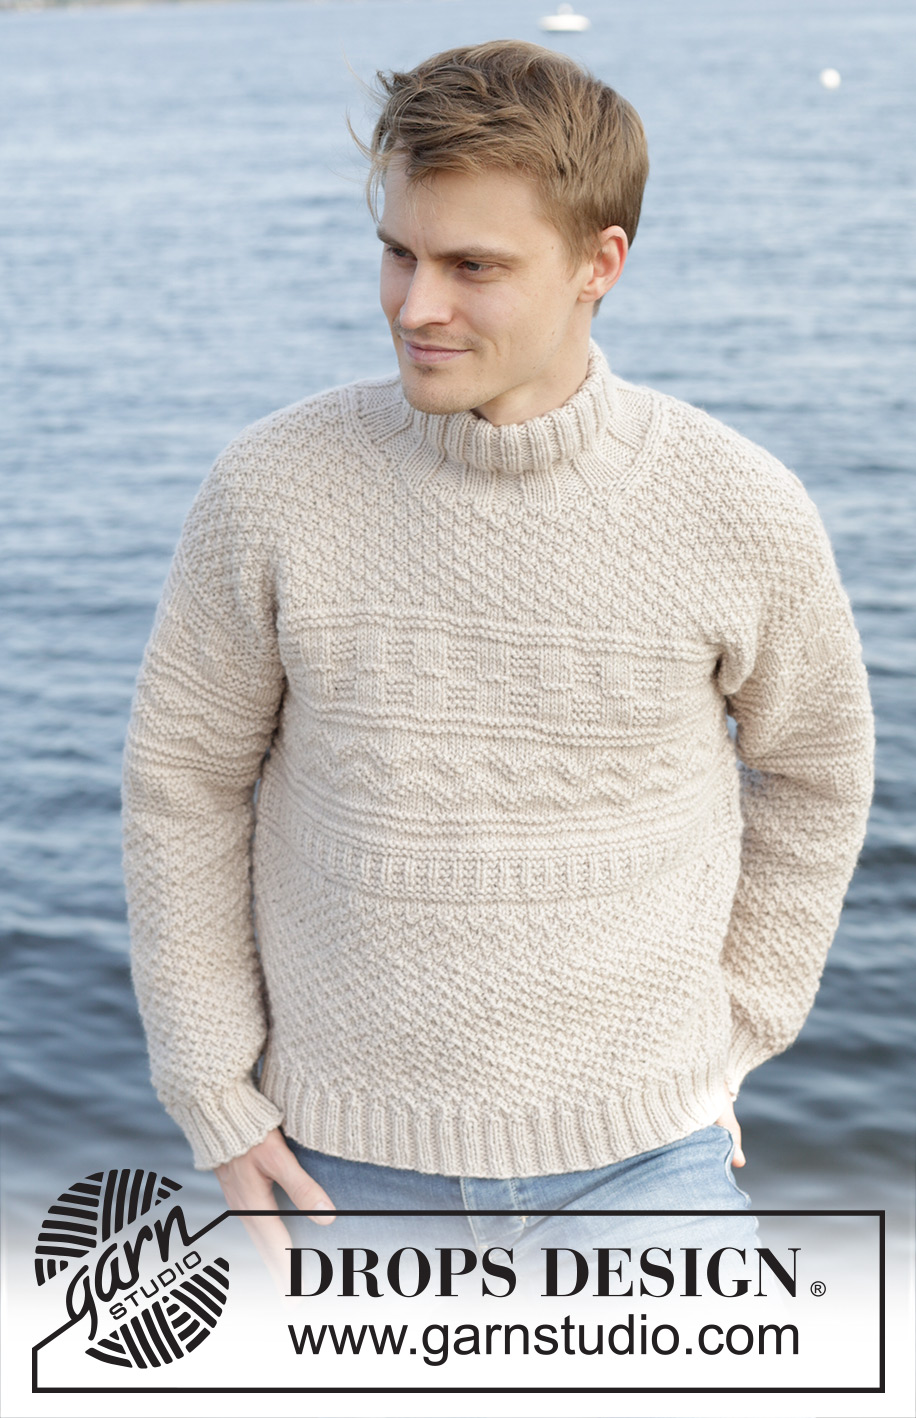
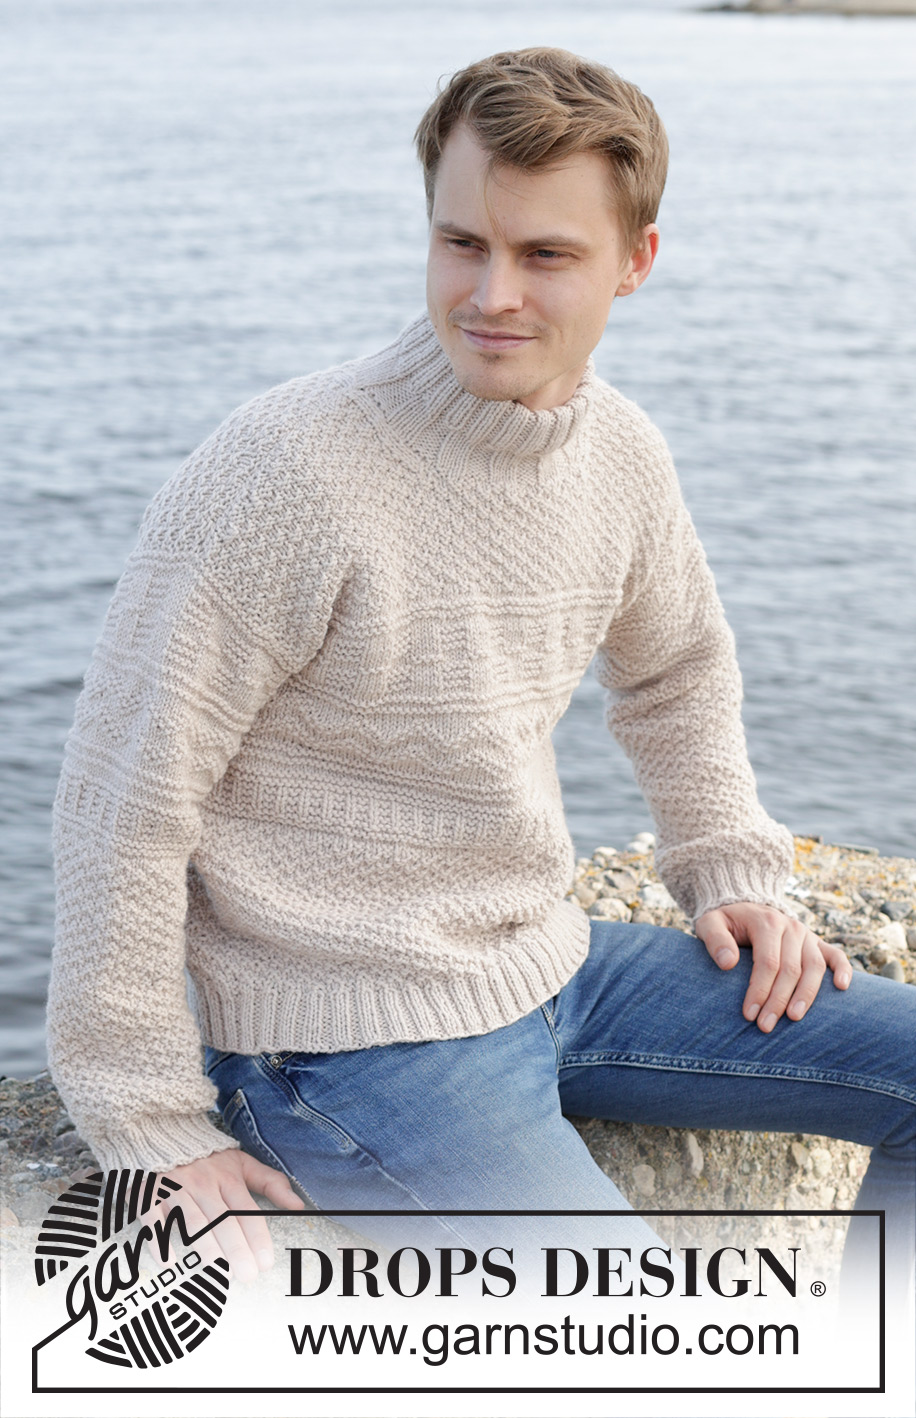
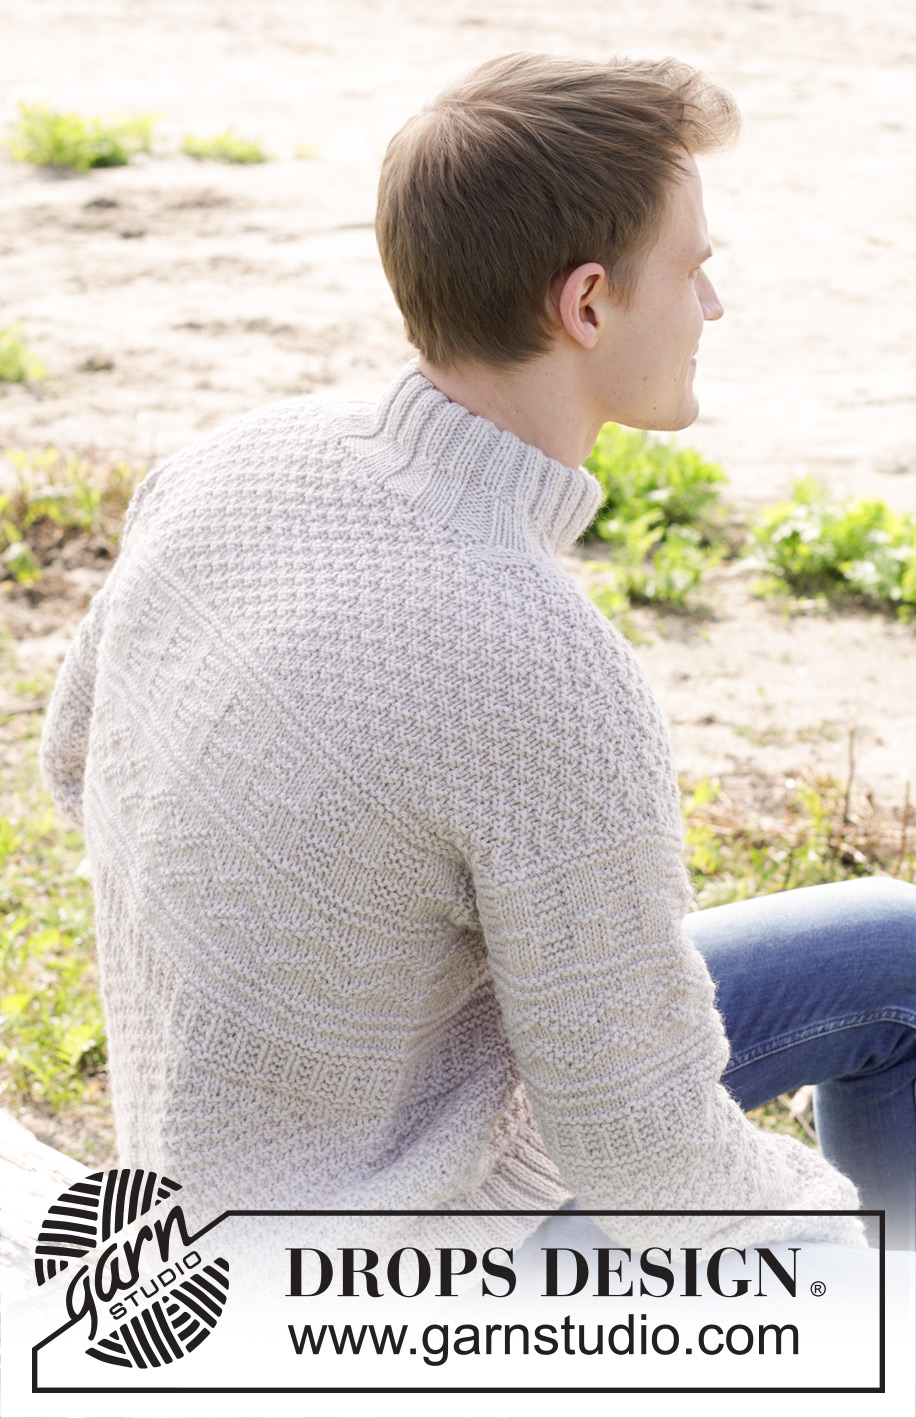
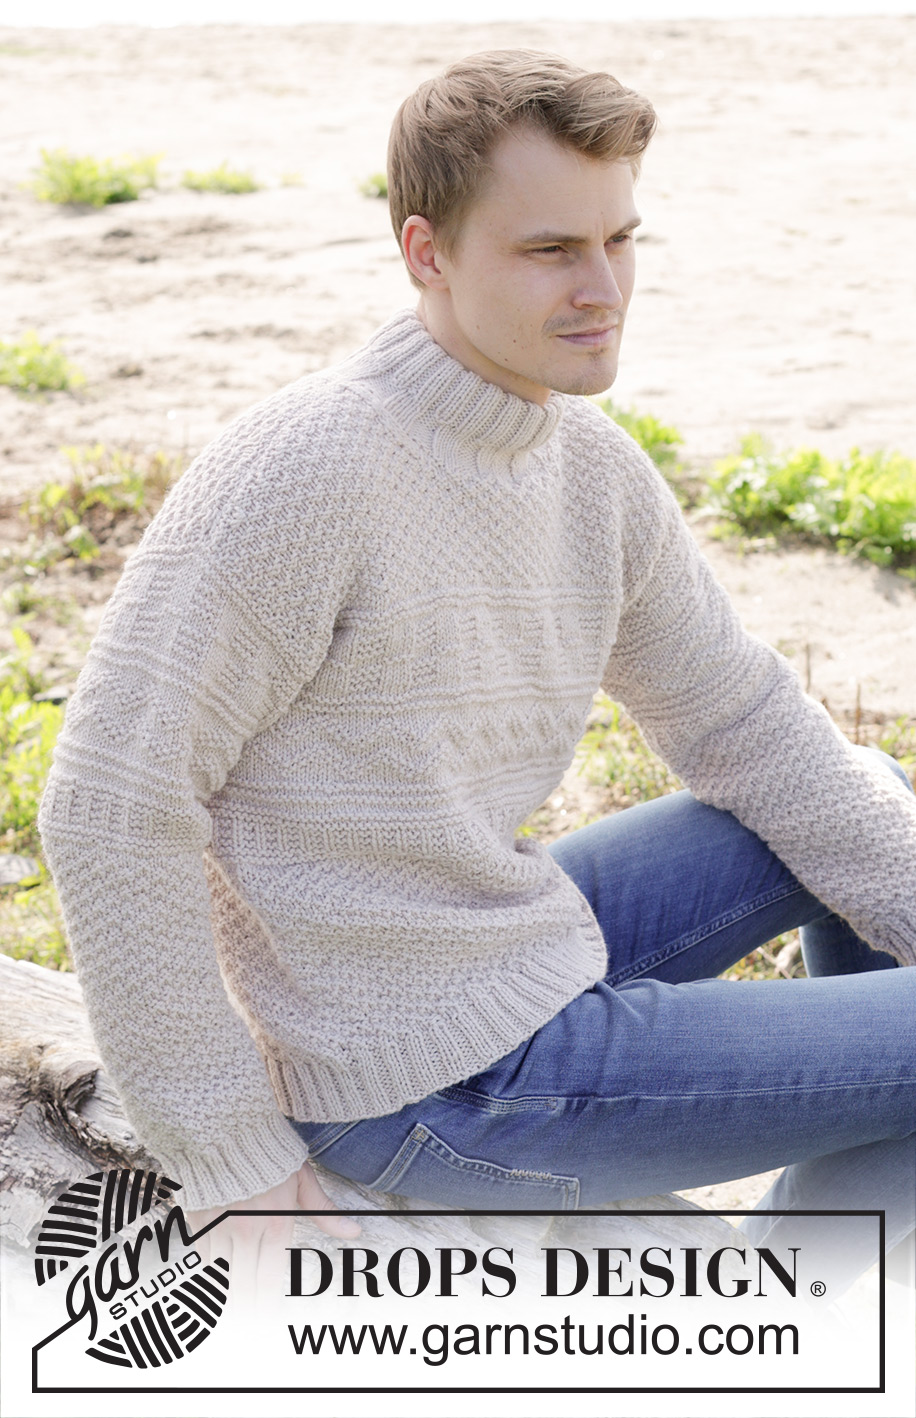
Lines in the Sand#linesinthesandsweater |
|||||||||||||
 |
 |
||||||||||||
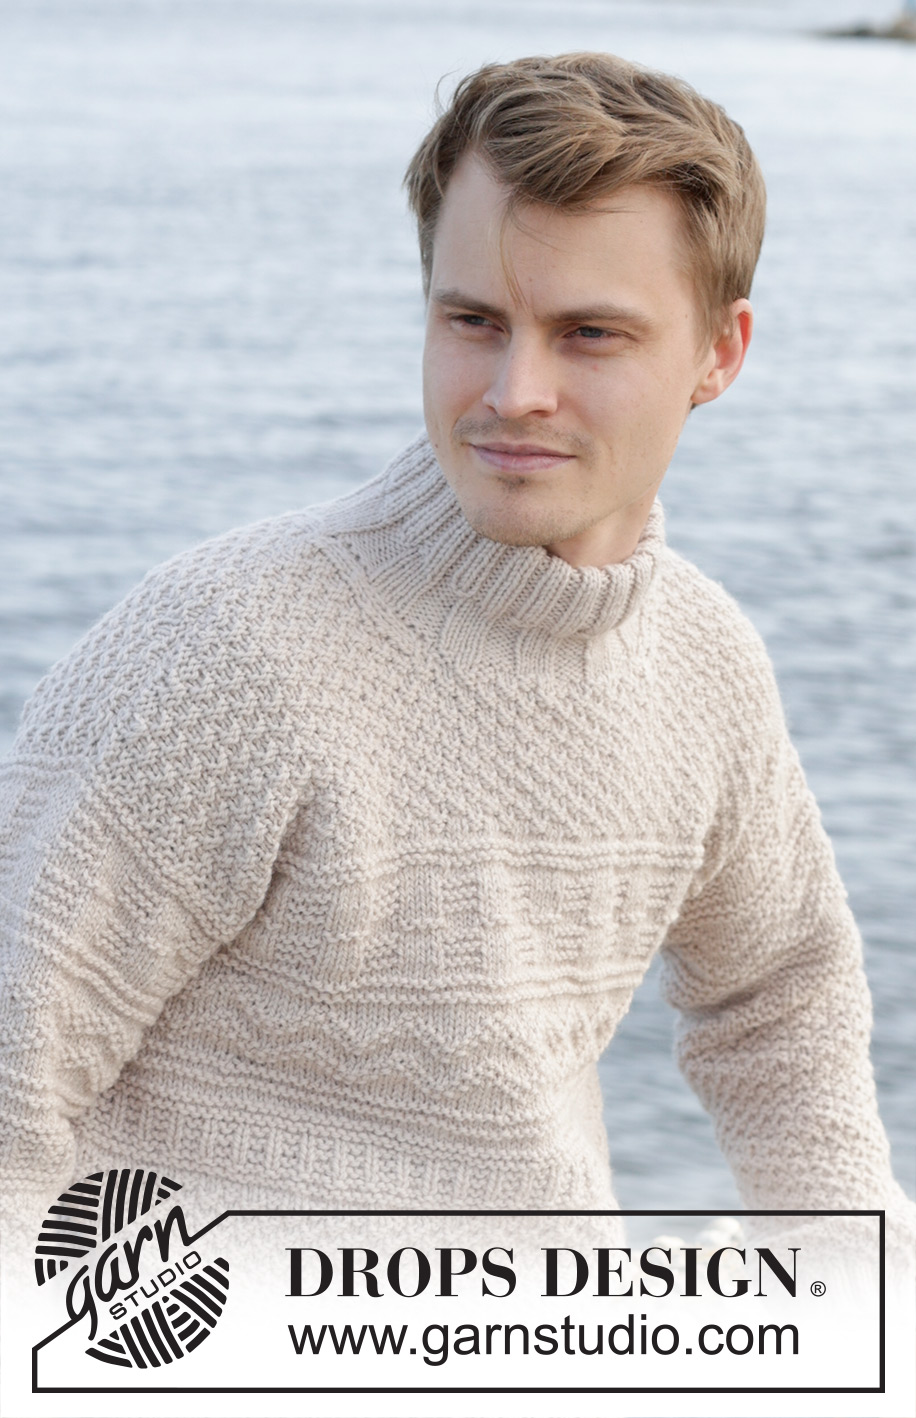
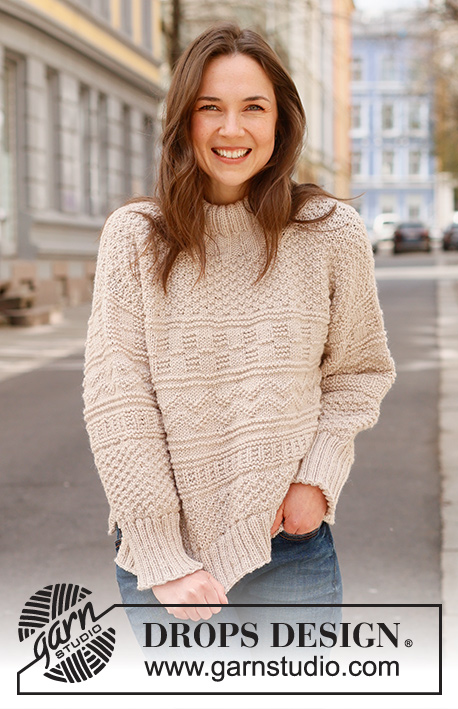
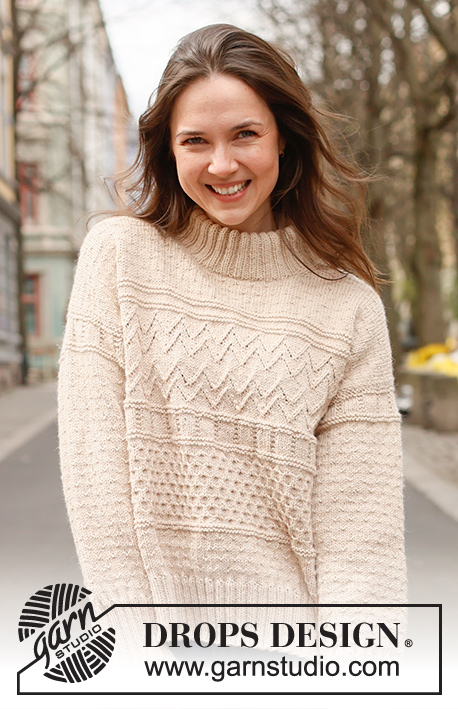
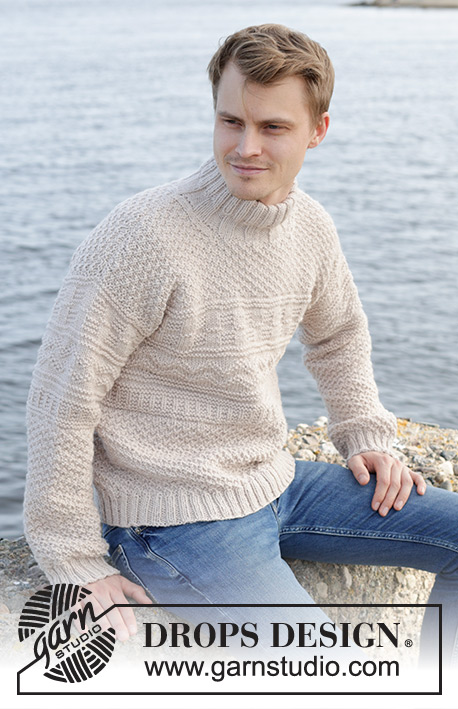
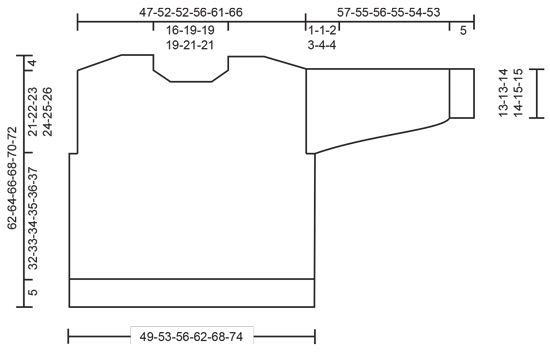
Knitted jumper for men in DROPS Alaska or DROPS Big Merino. The piece is worked bottom up with relief-pattern and double neck. Sizes S - XXXL.
DROPS 246-12 |
|||||||||||||
|
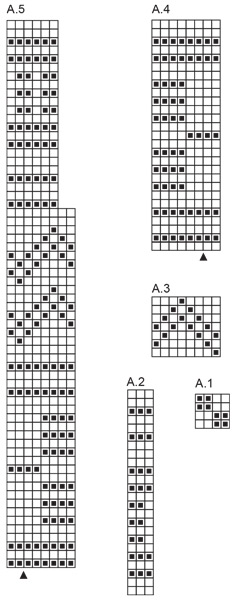
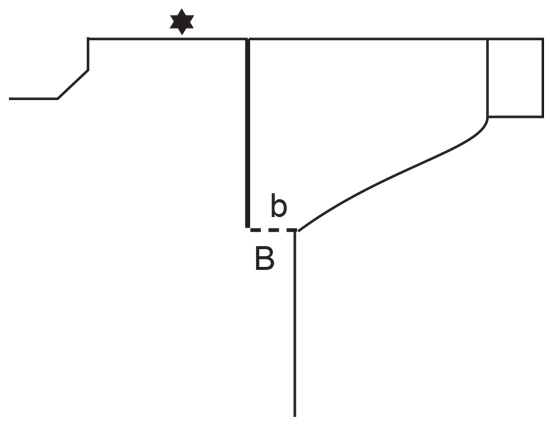
------------------------------------------------------- EXPLANATIONS FOR THE PATTERN: ------------------------------------------------------- GARTER STITCH (worked back and forth): Knit all rows. 1 ridge = knit 2 rows. PATTERN: See diagrams A.1 to A.5. The diagrams show all rows in the pattern from the right side. DECREASE TIP-1 (for neckline): All decreases are worked from the right side! AT BEGINNING OF ROW FROM RIGHT SIDE: Knit 2, slip 1 stitch knit-wise, knit 1, pass the slipped stitch over the knitted stitch (1 stitch decreased). AT END OF ROW FROM RIGHT SIDE: Work until there are 4 stitches left, knit 2 together, knit 2 (1 stitch decreased). DECREASE TIP-2 (for sleeves): Decrease 1 stitch on either side of the marker as follows: Work until there are 2 stitches left before the marker-thread, knit/purl 2 together depending on the pattern, knit 1, marker, knit 2 twisted together /purl 2 stitches twisted together, depending on the pattern (2 stitches decreased). ------------------------------------------------------- START THE PIECE HERE: ------------------------------------------------------- JUMPER – SHORT OVERVIEW OF THE PIECE: The body is worked in the round with the circular needle, bottom up as far as the armholes. Then the front and back pieces are finished separately back and forth with the circular needle. Stiches are knitted up around the armholes, the sleeve cap is worked back and forth with the circular needle before joining the sleeve and finishing in the round with the circular needle/the double pointed needles. The neck is worked to finish. BODY: Cast on 196-212-224-248-272-296 stitches with circular needle size 3.5 mm and DROPS Alaska or DROPS Big Merino. Knit 1 round. Work rib (knit 2, purl 2) for 5 cm. Knit 1 round and decrease 28-32-32-36-40-44 stitches evenly spaced = 168-180-192-212-232-252 stitches. Change to circular needle size 5 mm. Knit 1 round, then work A.1 over all stitches. REMEMBER THE KNITTING TENSION! When the piece measures 22-23-24-25-26-27 cm, work A.2 over all stitches – AT THE SAME TIME on the first round, adjust the stitch count to 168-180-192-213-231-252 stitches. On the last round in A.2 increase 0-4-0-3-1-4 stitches evenly spaced = 168-184-192-216-232-256 stitches. When A.2 is finished, the piece measures approx. 31-32-33-34-35-36 cm from the cast-on edge. If the piece is shorter than this, continue with stocking stitch to the correct length. Work A.3 over all stitches and two times in height. When A.3 is finished the piece measures approx. 36-37-38-39-40-41 cm from the cast-on edge. If the piece is shorter than this, continue with stocking stitch to the correct length. Knit 1 round and decrease 0-4-0-4-0-4 stitches evenly spaced = 168-180-192-212-232-252 stitches. Now insert a marker-thread mid-front and mid-back as well as a marker in each side as follows: Insert 1 marker at the beginning of the round, count 42-45-48-53-58-63 stitches, insert a marker-thread in the next stitch (mid-front), count 42-45-48-53-58-63 stitches, insert a marker before the next stitch, count 42-45-48-53-58-63 stitches, insert a marker-thread in the next stitch (mid-back). There are 42-45-48-53-58-63 stitches left after the last marker-thread. Work A.4 as follows: Count outwards from the symbol marking the middle of the diagram and the marker-thread mid-front to determine where to start the pattern in the side, work A.4 as far as it will go towards the other side (marker-stitch mid-front should match the symbol for the middle of A.4), then begin A.4 again in the same way on the back piece, working as far as the pattern will go towards the marker at the beginning of the round (marker-stitch mid-back should match the symbol for the middle of A.4). Continue this pattern and cast off for the armholes as described below. ARMHOLES: When the piece measures 37-38-39-40-41-42 cm, cast off as follows: Start 3-2-5-6-7-8 stitches before the marker at the beginning of the round, cast off 6-4-10-12-14-16 stitches, work until there are 3-2-5-6-7-8 stitches left before the marker in the other side, cast off 6-4-10-12-14-16 stitches, work to end of round. The front and back pieces are finished separately. BACK PIECE: = 78-86-86-94-102-110 stitches. Start from the wrong side and continue A.4 with 1 GARTER STITCH on each side – read description above. On the last row from the right side, increase 2 stitches evenly spaced = 80-88-88-96-104-112 stitches. When A.4 is finished, work A.1 with 1 garter stitch on each side. Repeat A.1 in height to finished length. Now work the diagonal shoulders and neckline. This is done simultaneously. Read both sections before continuing. DIAGONAL SHOULDERS: When the piece measures 58-60-62-64-66-68 cm, place stitches from the side on a thread for the diagonal shoulders, working them first to avoid cutting the strand as follows: Place 4-4-4-5-5-6 stitches 4 times, then the last 9-11-11-11-13-13 stitches by the neck. Place all stitches back on circular needle 5 mm. Work 1 row of stocking stitch (to avoid holes in the transitions between stitches, pick up the strand between 2 stitches and work it twisted together with the next stitch on the left needle). Cast off. NECKLINE: At the same time when the piece measures 59-61-63-65-67-69 cm, cast off the middle 24-28-28-28-32-32 stitches for the neckline and finish each shoulder separately. Continue A.1, placing stitches on the thread for the shoulder and working the outermost 3 stitches by the neck in stocking stitch. AT THE SAME TIME on the next row from the right side, decrease 1 stitch by the neck – read DECREASE TIP-1. Decrease like this 1 more time on the next row from the right side. When all the stitches are cast off the piece measures 62-64-66-68-70-72 cm from the top of the shoulder. Work the other shoulder in the same way. FRONT PIECE: = 78-86-86-94-102-110 stitches. Start from the wrong side and work pattern in the same way as on the back piece. In addition, work the neckline and diagonal shoulders as described below. NECKLINE: When the piece measures 56-57-59-60-62-63 cm, place the middle 20-24-24-24-26-26 stitches on a thread for the neckline and finish each shoulder separately. Continue A.1, with the 3 outermost stitches by the neck worked in stocking stitch. AT THE SAME TIME on the next row from the right side, decrease 1 stitch for the neckline – read DECREASE TIP-1. Decrease like this on each row from the right side a total of 4-4-4-4-5-5 times. DIAGONAL SHOULDERS: At the same time, when the piece measures 58-60-62-64-66-68 cm, place stitches on a thread for the diagonal shoulder in the same way as on the back, i.e., 4-4-4-5-5-6 stitches 4 times, then the last 9-11-11-11-13-13 stitches. When all the stitches are placed on the thread work 1 row of stocking stitch in the same way as on the back piece. Cast off. Work the other shoulder in the same way. ASSEMBLY: Sew the shoulder seams. SLEEVES: Use circular needle size 5 mm and DROPS Alaska or DROPS Big Merino. Knit up from the right side 36-37-39-41-43-44 stitches from the bottom of the armhole up to the shoulder and 36-37-39-41-43-44 stitches from the shoulder down to the bottom of the armhole on the other side = 72-74-78-82-86-88 stitches. Insert 1 marker in the middle of the row – the sleeve is measured from here and the marker is also used when positioning the pattern. Start from the wrong side and work A.5 as follows: Count outwards from the symbol marking the middle of the diagram and the marker on the sleeve to determine where to start the pattern and work A.5 back and forth with 1 garter stitch on each side. When the sleeve measures 1-1-2-3-4-4 cm from the marker, join the sleeve and finish working in the round, with short circular needle/double pointed needles size 5 mm. Insert 1 marker-thread at the beginning of the round (mid-under sleeve). Allow the thread to follow your work onwards. Start at the marker-thread and continue A.5 in the round (the symbol in the diagram and the marker on the sleeve should still match each other – the pattern will not fit under the sleeve). When the sleeve measures 5-3-4-5-6-8 cm from the marker, decrease 2 stitches under the sleeve – read DECREASE TIP-2. Decrease like this every 3-3-3-2½-2½-2½ cm a total of 14-15-15-17-17-18 times = 44-44-48-48-52-52 stitches. When A.5 is finished in height, work A.1 over all stitches. Work until the sleeve measures 52-50-51-50-49-48 cm from the marker (5 cm left, try the jumper on and work to desired length). Knit 1 round and increase 8 stitches evenly spaced = 52-52-56-56-60-60 stitches. Change to double pointed needles size 3.5 mm. Work rib (knit 2, purl 2) for 5 cm. Cast off a little loosely. The sleeve measures approx. 57-55-56-55-54-53 cm from the marker. Work the other sleeve in the same way. Sew together the openings under each sleeve – see sketch. DOUBLE NECK: Start on one shoulder, with short circular needle size 3.5 mm, and knit up 80-96-96-104-112-112 stitches around the neckline inside 1 edge stitch (including the stitches on the thread). Work rib in the round (knit 4, purl 4 – adjusting so you get purl 4 or knit 4 mid-front). Insert a marker when the neck measures 4 cm; this is used to measure from. Continue with knit 2, purl 2 for a further 9 cm. Change to 5 mm short circular needle. Cast off with knit over knit and purl over purl. Fold the second rib (knit 2, purl 2) to the inside and sew down. To avoid the neck being tight and rolling outwards, it is important that the seam is elastic. |
|||||||||||||
Diagram explanations |
|||||||||||||
|
|||||||||||||
 |
|||||||||||||
 |
|||||||||||||
 |
|||||||||||||
Have you finished this pattern?Tag your pictures with #dropspattern #linesinthesandsweater or submit them to the #dropsfan gallery. Do you need help with this pattern?You'll find 31 tutorial videos, a Comments/Questions area and more by visiting the pattern on garnstudio.com. © 1982-2026 DROPS Design A/S. We reserve all rights. This document, including all its sub-sections, has copyrights. Read more about what you can do with our patterns at the bottom of each pattern on our site. |
|||||||||||||


With over 40 years in knitting and crochet design, DROPS Design offers one of the most extensive collections of free patterns on the internet - translated to 17 languages. As of today we count 324 catalogues and 12290 patterns translated into English (UK/cm). 12290
We work hard to bring you the best knitting and crochet have to offer, inspiration and advice as well as great quality yarns at incredible prices! Would you like to use our patterns for other than personal use? You can read what you are allowed to do in the Copyright text at the bottom of all our patterns. Happy crafting!
Post a comment to pattern DROPS 246-12
We would love to hear what you have to say about this pattern!
If you want to leave a question, please make sure you select the correct category in the form below, to speed up the answering process. Required fields are marked *.