
Popular categories
Looking for a yarn?


Comments / Questions (50)
![]() Shah wrote:
Shah wrote:
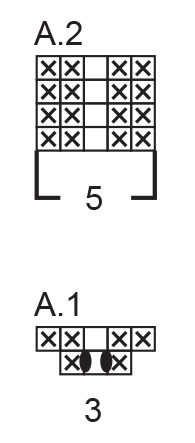
I am a bit confused with the short row section. "Start from the right side 2 stitches before marker-stitch-3 (front left neck when the garment is worn). Work stockinette stitch, A.1 and increase for RAGLAN – read description above, until you have worked 2 stitches past marker-stitch-2 (front right of neck and 8 stitches increased for raglan)." The pattern says it is a 8 stitch increase but would it not be two stitch increase based on chart A1?
22.04.2023 - 18:19DROPS Design answered:
Dear Shah, the 8 increases specified are not the ones according to chart A.1; they are worked additionally to the chart. You work 1 repeat of A.1 on each marker, so you should have 4 repeats of A.1. Each marker indicates the raglan line. As explained in RAGLAN above, you increase on both side of the marker/ A.1., so you should increase 8 stitches in the row. Since you have started before marker-3 and finish after marker-2, you should have worked 8 increases on the row. Happy knitting!
23.04.2023 - 20:10
![]() Ximena Merino (Chile) wrote:
Ximena Merino (Chile) wrote:
Tienen algún vídeo que muestre cómo empezar la “línea del escote”? Lo leo pero no lo puedo entender. Ese sector se teje de ida y vuelta y no en redondo? Tengo que poner una lana nueva? Gracias!!
15.04.2023 - 23:18DROPS Design answered:
Hola Ximena, después del cuello doble y cortar el hilo, añades un nuevo hilo y comienzas 2 puntos antes del marcapuntos-3 en el cuello. Ahora trabajas filas acortadas (de ida y vuelta) según se indica en el patrón; puedes ver cómo trabajar filas acortadas aquí: https://www.garnstudio.com/video.php?id=66&lang=es.
16.04.2023 - 18:34
![]() Manon wrote:
Manon wrote:
Ik zoek een Matentabel voor dit model.
31.03.2023 - 11:02
![]() Manon wrote:
Manon wrote:
Ik zou een patroon willen gebruiken maar vind nergens de Matentabel met de afmetingen. Waar kan ik dit vinden?
31.03.2023 - 11:01DROPS Design answered:
Dag Manon,
De maten komen overeen met de Amerikaanse maten S t/m XXXL. Om de maat te bepalen kan het ook handig zijn om een bestaand kledingstuk erbij te pakken en daarvan de maten te vergelijken met de maten in de tekening onderaan het patroon.
01.04.2023 - 19:14
![]() Christiane Doulet wrote:
Christiane Doulet wrote:
Est ce que je peux faire ce modèle pour une femme ? Merci
30.03.2023 - 22:03DROPS Design answered:
Bonjour Mme Doulet, tout à fait, retrouvez également la version femme ici. Bon tricot!
11.04.2023 - 09:52
![]() Elina wrote:
Elina wrote:
Onko ohjeessa virhe pääntien kohdassa? Lyhennetyt kerrokset aloitetaan tekemään (XXL) 108 silmukalla, ja lyhennettyjen kerrosten (+8s+4s+8s+4s) jälkeen työssä on 132s. Kaarroke alkaa kuitenkin 140 silmukalla? Missä kohdassa tulisi lisätä nuo puuttuvat 8s?
07.03.2023 - 22:15DROPS Design answered:
Hei, nämä 8 silmukkaa lisätään, kun jokaisen merkin kohdalla neulotaan piirroksen A.1 mallineuletta (eli jokaisen 4 merkin kohdalla lisätään 2 silmukkaa = yhteensä 8 lisättyä silmukkaa).
08.03.2023 - 16:52
![]() Daniela Faranda wrote:
Daniela Faranda wrote:
Questo maglione è lavorato con ferri circolari Vorrei questo modello con uno schema ai ferri lineari
02.03.2023 - 14:51DROPS Design answered:
Buonasera Daniela, purtroppo in questa sede non ci è possibile riadattare i modelli alle singole esigenze. Le ricordiamo che per un'assistenza più personalizzata può rivolgersi al suo rivenditore DROPS di fiducia. Buon lavoro!
02.03.2023 - 18:49
![]() Evelien wrote:
Evelien wrote:
Dear Mr, Mrs, It seems there is a counting error for (at least) size XL upon division for the yoke: 100 stitches need to be divided into 15+21+29+21+14 instead of 14+21+27+21+13. Kind regards Evelien
27.02.2023 - 19:14DROPS Design answered:
Dear Evelien, please note that the markers should be inserted in one stitch and not between stitches, so that you should have: 15+1+21+1+29+1+21+1+14=104 sts (including increases). Happy knitting!
28.02.2023 - 11:22
![]() Heather wrote:
Heather wrote:
Hello, I am knitting size XL having completed double neck I have my 104 sts. Following directions for neckline having completed the rows R.S=8inc, W.S=4, R.S=8inc, W.S=4 the number of increases total=24st. This added to my 104 would only add up to 128 st however the pattern states the yoke should be 136 sts for XL. I must be missing something?
21.02.2023 - 23:11DROPS Design answered:
Dear Heather, please note that you will increase 2 stitches in each A.1 when working the first row (P1, YO, K1, YO, P1) so that you will have 104 + 8 sts increased in A.1 + 8 sts increased for raglan = 120 sts after 1st row + 4 sts increased from WS = 124 + 8 sts increased on 3rd row = 132 sts + 4 sts increased on 4th row = 136 sts. Happy knitting!
22.02.2023 - 08:43
![]() Suzanne wrote:
Suzanne wrote:
Hej…halskant…ska man sticka förkorta varv på framsidan och på baksidan… Lite otydligt när man är nybörjare.. Man måste väll öka på framsidan och baksidan men inte på ärmana? Så förkorta varv på fram och baksida halsen? . ? .
21.02.2023 - 06:42DROPS Design answered:
Hei Suzanne. Når halskanten er ferdig strikker skal tråden klippes og du starter nå 2 masker før masken med 3. merke, så strikkes det forkortete pinner over noen få masker på forstykket, over 1 raglanlinje, over ett erme, over neste raglanlinje, over bakstykket, over neste raglanlinje, over det andre ermet og over siste raglanlinje og noen få masker over forstykket, snu og fortsett med forkortete pinner som forklart i oppskriften. Det strikkes ikke forkortete pinner midt foran. Husk økningene til raglan. Når de forkortete pinnene er ferdig strikket, klippes tråden og man starter midt bak. mvh DROPS Design
06.03.2023 - 09:25
|
||||||||||
Spice Market#spicemarketsweater |
||||||||||
 |
 |
|||||||||
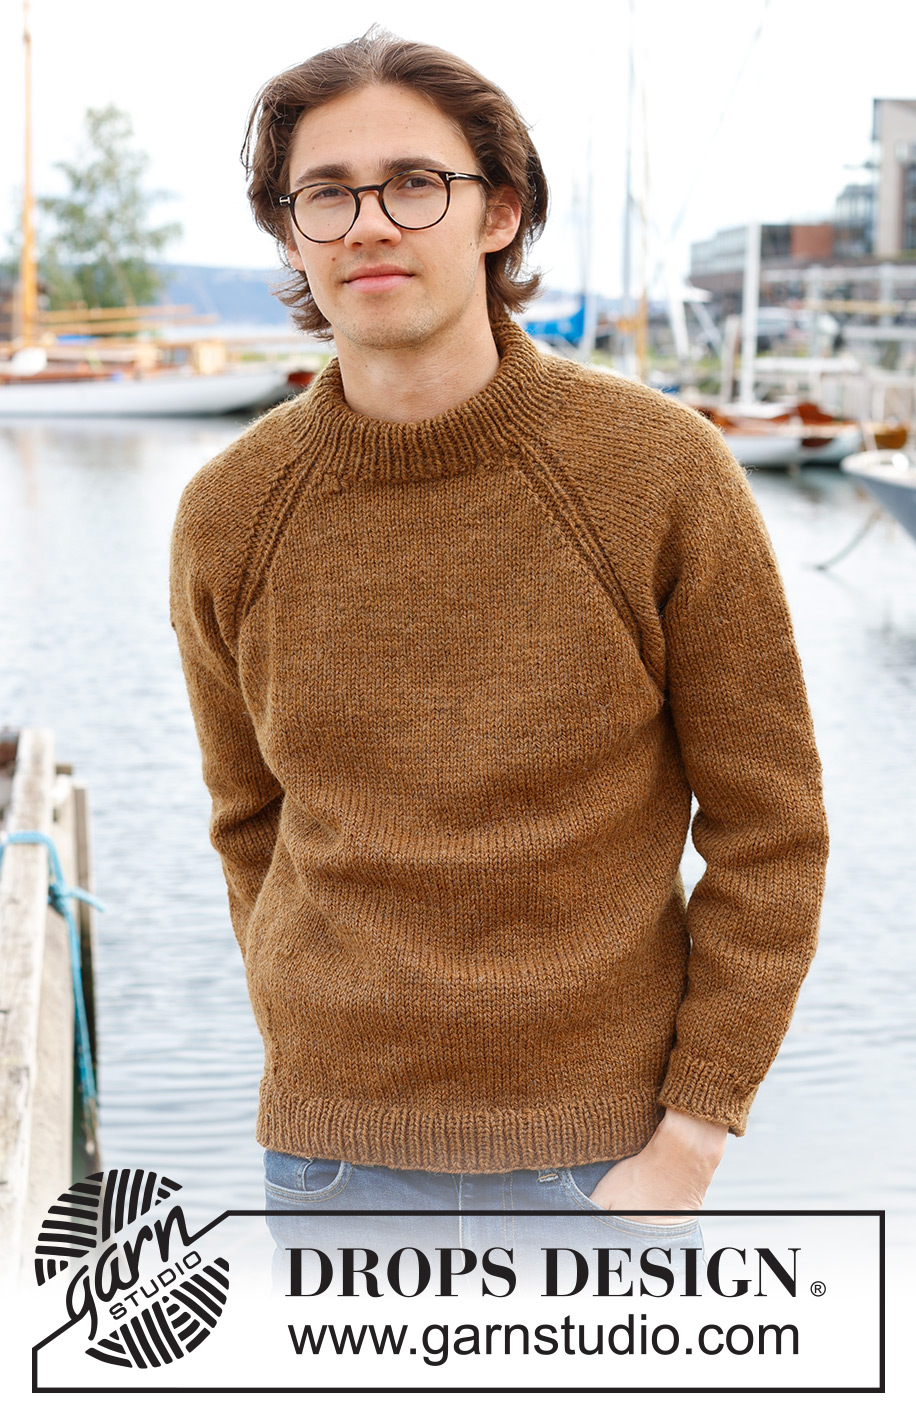
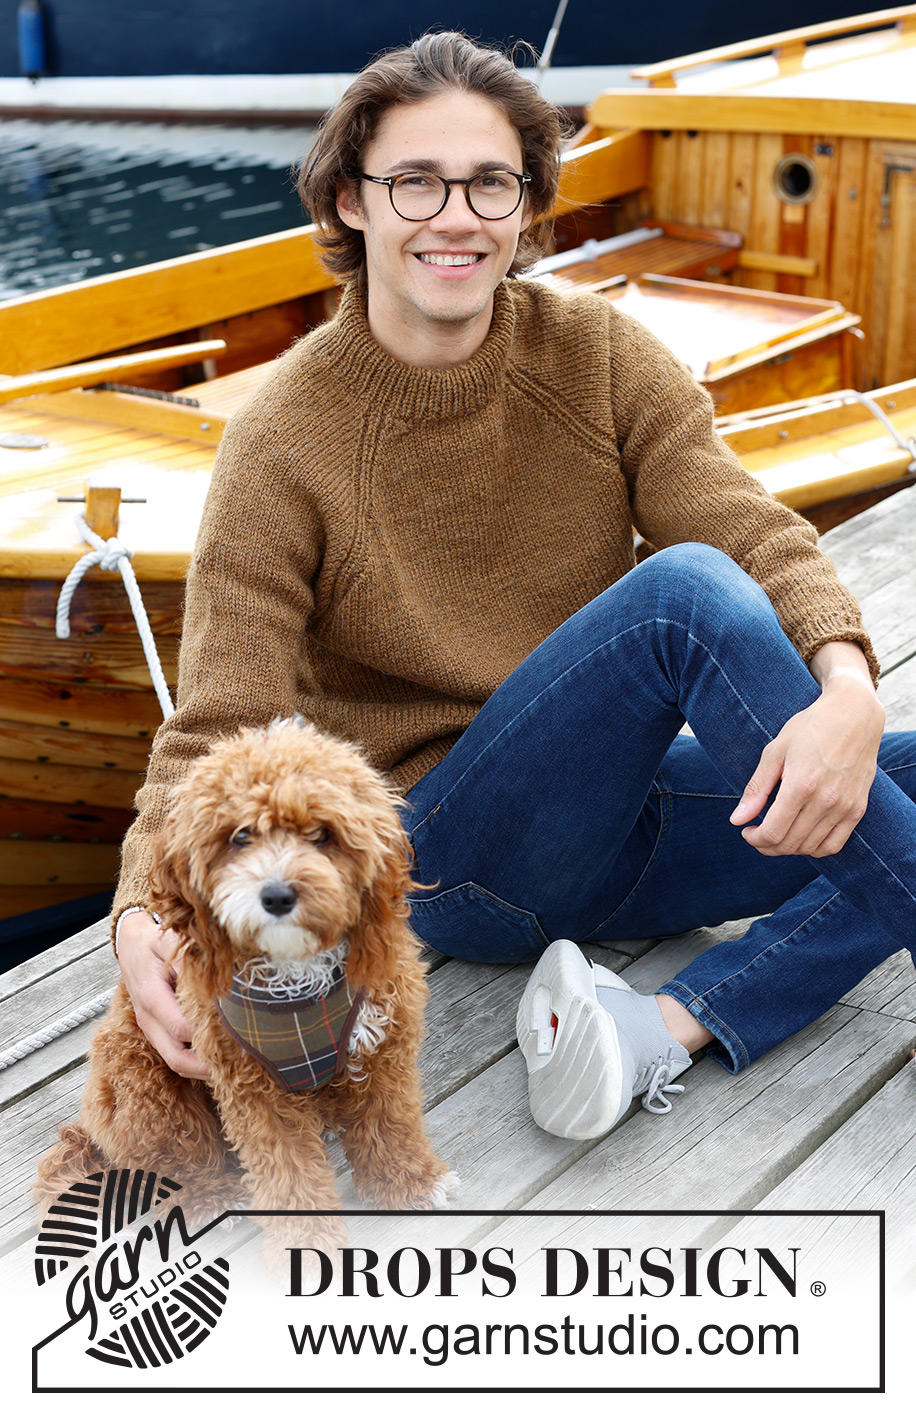
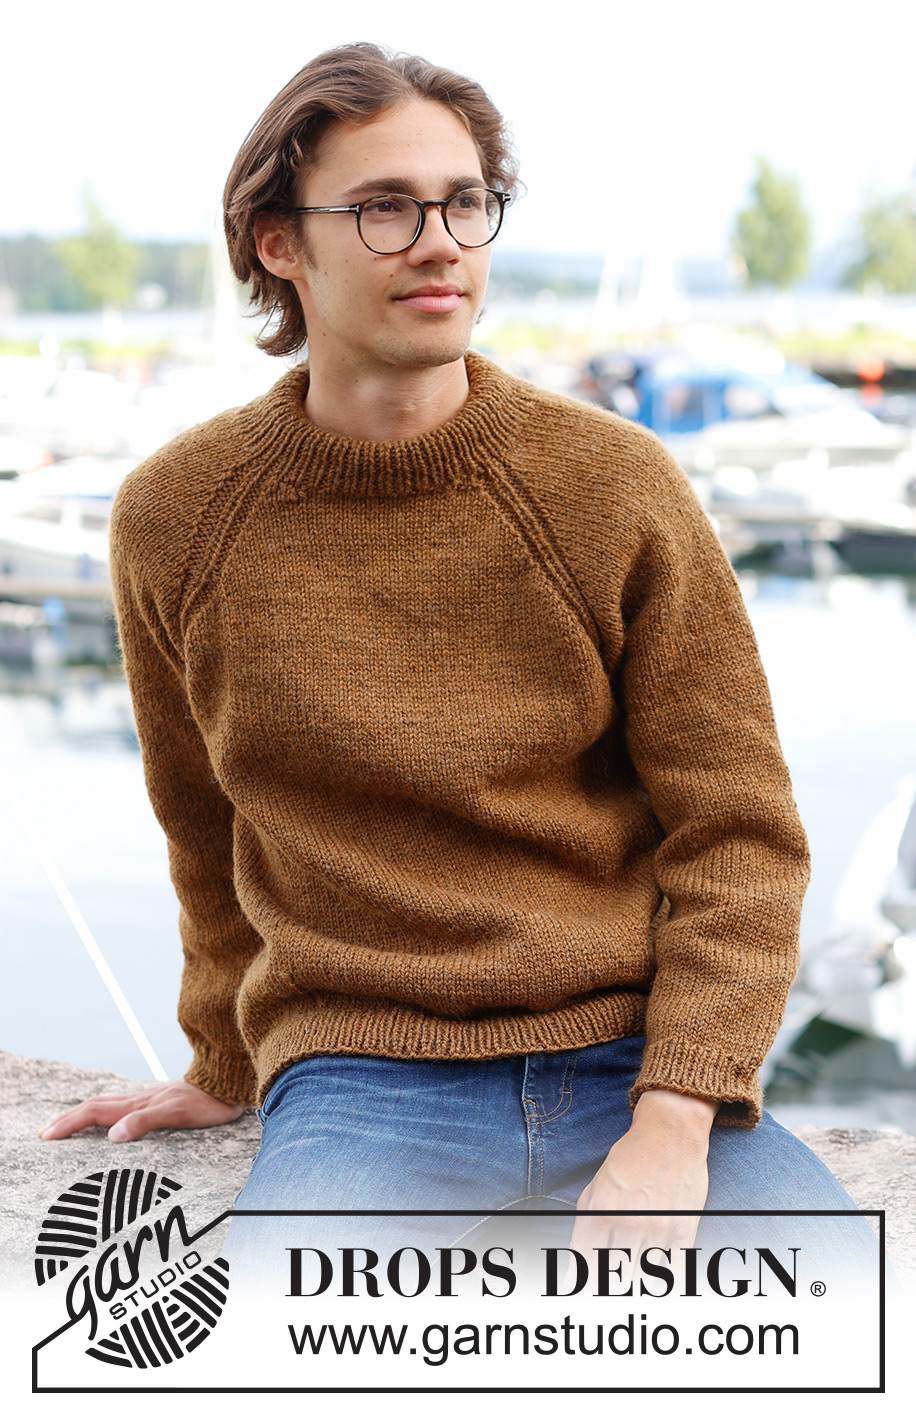
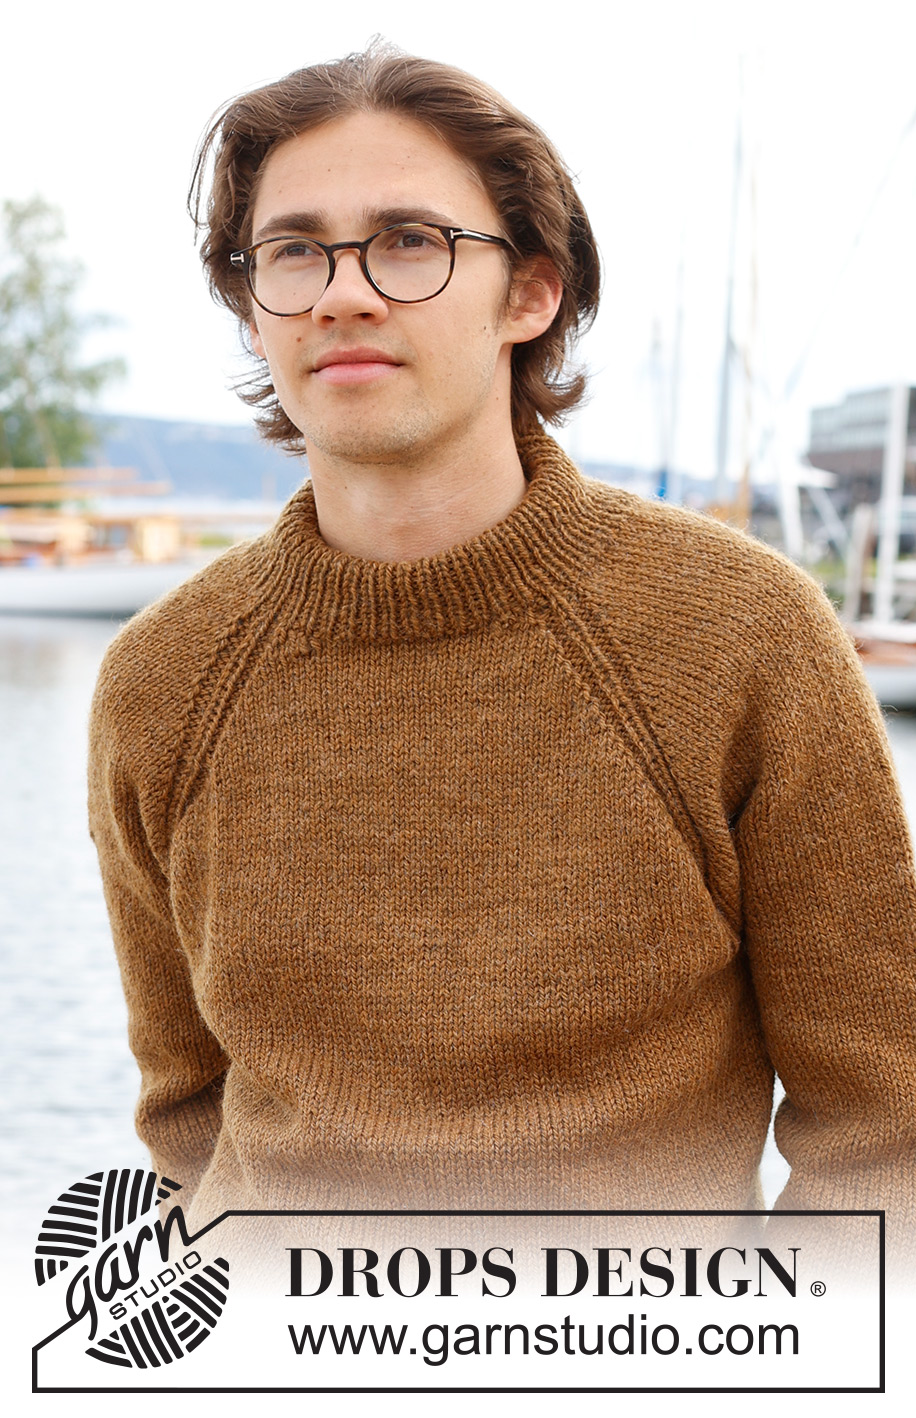
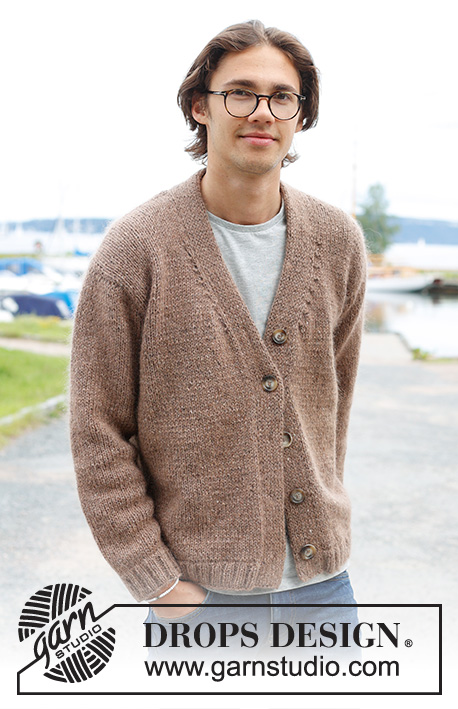
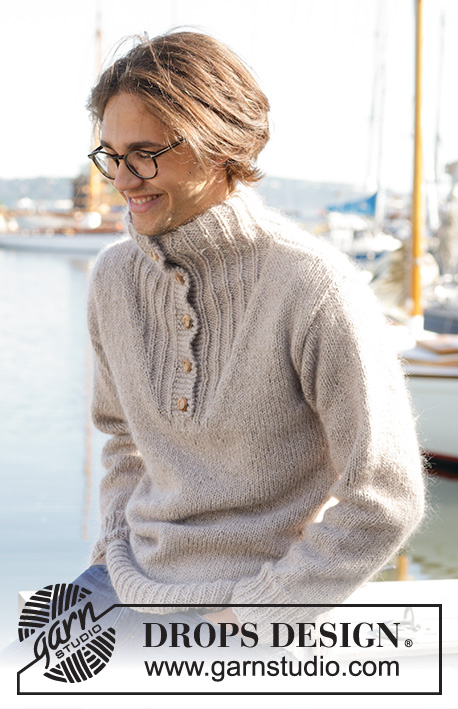
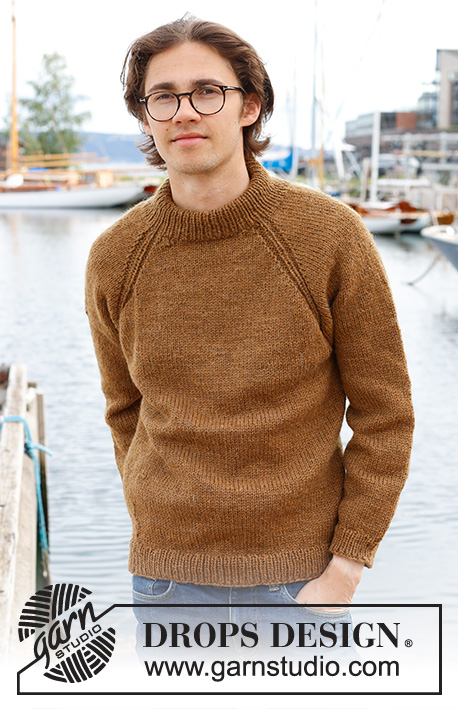
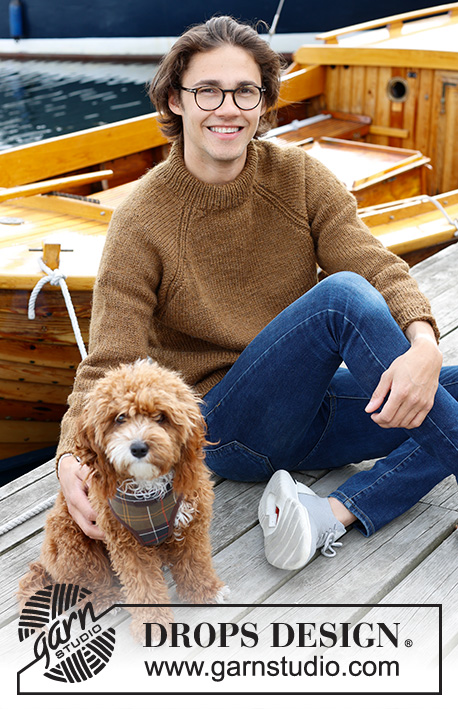
Knitted jumper for men in DROPS Alaska. The piece is worked top down with stocking stitch, double neck and raglan. Sizes S - XXXL.
DROPS 233-10 |
||||||||||
|
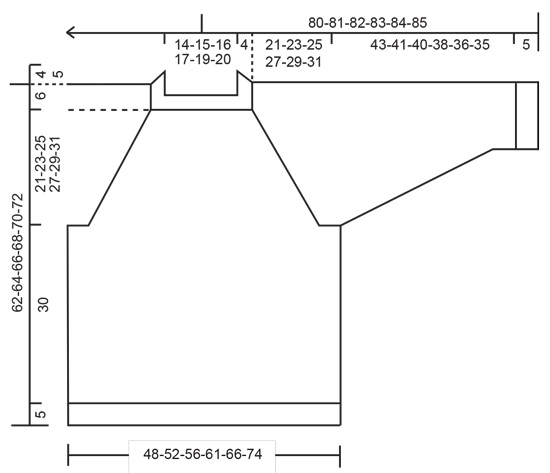
------------------------------------------------------- EXPLANATIONS FOR THE PATTERN: ------------------------------------------------------- PATTERN: See diagrams A.1 and A.2. The diagrams show all rows in the pattern from the right side. RAGLAN: Increases vary on the body and sleeves and in the different sizes. Increase before/after A.1/A.2 (the marker-stitch is the middle stitch in A.1/A.2). Increase for the body before markers 1 and 3 and after markers 2 and 4 when working from the right side, after markers 1 and 3 and before markers 2 and 4 when working from the wrong side. Increase for the sleeves after markers 1 and 3 and before markers 2 and 4. Always increase from the right side on the sleeves. Increase by making 1 yarn over. When working back and forth work the yarn overs from the wrong side as follows: BEFORE A.1/A.2: Purl the back loop. No hole. AFTER A.1/A.2: Slip the yarn over off the needle and replace it twisted (insert the left needle from the back when replacing it). Purl the front loop. No hole. When working back and forth work the yarn overs from the right side as follows (also applies when working in the round): BEFORE A.1/A.2: Slip the yarn over off the needle and replace it twisted (insert the left needle from the back when replacing it). Knit the front loop (the stitch twists to the right. No hole. AFTER A.1/A.2 Knit the back loop (the stitch twists to the left). No hole. DECREASE TIP (for sleeves): Start 3 stitches before the marker, knit 2 together, knit 2 (marker sits between these 2 stitches), slip 1 stitch as if to knit, knit 1 and pass the slipped stitch over the knitted stitch. ------------------------------------------------------- START THE PIECE HERE: ------------------------------------------------------- JUMPER – SHORT OVERVIEW OF THE PIECE: The neck and yoke are worked in the round with circular needle, from mid back and top down. The yoke is divided for body and sleeves and the body is continued in the round with circular needle. The sleeves are worked with short circular needle/double pointed needles. DOUBLE NECK: Cast on 88-92-96-100-104-108 stitches with short circular needle size 5 mm and DROPS Alaska. Change to circular needle size 4 mm and work rib in the round (knit 1, purl 1) for 9-9-9-11-11-11 cm. On the next round insert 4 markers and increase 4 stitches as described below. The markers are used when increasing for raglan (each marker is inserted in a knitted stitch from the rib): Knit 10-12-12-14-14-16 and increase 1 stitch (half back piece), insert marker-1 in the next stitch, knit 21 (sleeve), insert marker-2 in the next stitch, knit 21-23-25-27-29-31 and increase 2 stitches evenly spaced (front piece), insert marker-3 in the next stitch, knit 21 (sleeve), insert marker-4 in the next stitch, knit the last 11-11-13-13-15-15 stitches and increase 1 stitch (half back piece) = 92-96-100-104-108-112 stitches. Cut the strand. NECKLINE: Change to circular needle size 5 mm and work a neckline with short rows, AT THE SAME TIME increase for raglan as described below. In addition work A.1 at each marker (the marker-stitches are the middle stitches in each A.1). Start from the right side 2 stitches before marker-stitch-3 (front left neck when the garment is worn). Work stocking stitch, A.1 and increase for RAGLAN – read description above, until you have worked 2 stitches past marker-stitch-2 (front right of neck and 8 stitches increased for raglan). Turn, tighten the strand and work from the wrong side (increasing for raglan on the body only) to 2 stitches past where the short rows began by marker-3 (4 increased stitches). Turn and work from the right side, increasing for raglan and working A.2 over A.1, to 2 stitches past where you turned last time by marker-2. Turn, tighten the strand and work from the wrong side (increasing for raglan on the body only) to 2 stitches past marker-3. Cut the strand. YOKE: = 124-128-132-136-140-144 stitches. Work in the round over all stitches as follows: SIZES S, M, L and XL: Start mid-back, work stocking stitch and A.2 and increase for raglan on the body and sleeves every 2nd round 2-8-10-11 times = 140-192-212-224 stitches. Continue working and increasing, but every 2nd increase is only on the body (4 stitches increased); i.e. increase on the body every 2nd round and on the sleeves every 4th round. Increase like this 18-15-14-16 times on the body (9-7-7-8 times on the sleeves). A total of 24-27-28-31 times on the body and 13-17-19-21 times on the sleeves. After the last increase there are 248-280-296-320 stitches. Go to ALL SIZES. SIZES XXL and XXXL: Start mid-back, work stocking stitch and A.2, continuing to increase for raglan on the body on every round 2-6 more times and every other round on the sleeves1-3 more time = 152-180 stitches. Then increase on the body and sleeves every 2nd round 10-7 times = 232-236 stitches. Continue working and increasing, but every 2nd increase is only on the body (4 stitches increased); i.e. increase on the body every 2nd round and on the sleeves every 4th round. Increase like this 18-22 times on the body (9-11 times on the sleeves). A total of 34-39 times on the body and 22-23 times on the sleeves. After the last increase there are 340-368 stitches. Go to ALL SIZES. ALL SIZES. = 248-280-296-320-340-368 stitches. Continue with stocking stitch and A.2 without further increases until the piece measures 21-23-25-27-29-31 cm mid-front – measured from the neck. Now divide for the body and sleeves as follows: Work 37-42-43-48-51-58 stitches (half back piece), place the next 49-57-61-65-67-69 stitches on a thread for the sleeve, cast on 6-6-8-8-10-10 stitches (in side under sleeve), work 75-83-87-95-103-115 stitches (front piece), place the next 49-57-61-65-67-69 stitches on a thread for the sleeve, cast on 6-6-8-8-10-10 stitches (in side under sleeve), work the last 38-41-44-47-52-57 stitches (half back piece). Finish the body and sleeves separately. The piece is now measured from here! BODY: = 162-178-190-206-226-250 stitches. Work stocking stitch in the round until the body measures 30 cm from the division. Knit 1 round and increase 20-20-22-26-26-32 stitches evenly spaced = 182-198-212-232-252-282 stitches. Change to circular needle size 4 mm and work rib (knit 1, purl 1) for 5 cm. Cast off a little loosely with knit over knit and purl over purl. The jumper measures approx. 62-64-66-68-70-72 cm from the shoulder down. SLEEVES: Place the 49-57-61-65-67-69 stitches from the thread on the one side of the piece on short circular needle/double pointed needles size 5 mm and knit up 1 stitch in each of the 6-6-8-8-10-10 stitches cast on under the sleeve = 55-63-69-73-77-79 stitches. Insert a marker in the middle of the new stitches under the sleeve. Allow the marker to follow your work onwards; it is used when decreasing under the sleeve. Work stocking stitch in the round. When the sleeve measures 4 cm decrease 2 stitches on each side of the marker – read DECREASE TIP. Decrease like this every 6-3½-3-2½-2-2 cm a total of 7-10-12-13-15-15 times = 41-43-45-47-47-49 stitches. Continue working until the sleeve measures 43-41-40-38-36-35 cm from the division (or to desired length; there is approx. 5 cm left). Knit 1 round and increase 5-5-5-5-7-7 stitches evenly spaced = 46-48-50-52-54-56 stitches. Change to double pointed needles size 4 mm and work rib (knit 1, purl 1) for 5 cm. Cast off a little loosely with knit over knit and purl over purl. The sleeve measures approx. 48-46-45-43-41-40 cm from the division. Work the other sleeve in the same way. ASSEMBLY: Fold the neck double to the inside and fasten with a stitch in each raglan-line. |
||||||||||
Diagram explanations |
||||||||||
|
||||||||||
 |
||||||||||
 |
||||||||||
Have you finished this pattern?Tag your pictures with #dropspattern #spicemarketsweater or submit them to the #dropsfan gallery. Do you need help with this pattern?You'll find 32 tutorial videos, a Comments/Questions area and more by visiting the pattern on garnstudio.com. © 1982-2026 DROPS Design A/S. We reserve all rights. This document, including all its sub-sections, has copyrights. Read more about what you can do with our patterns at the bottom of each pattern on our site. |
||||||||||


With over 40 years in knitting and crochet design, DROPS Design offers one of the most extensive collections of free patterns on the internet - translated to 17 languages. As of today we count 324 catalogues and 12290 patterns translated into English (UK/cm). 12290
We work hard to bring you the best knitting and crochet have to offer, inspiration and advice as well as great quality yarns at incredible prices! Would you like to use our patterns for other than personal use? You can read what you are allowed to do in the Copyright text at the bottom of all our patterns. Happy crafting!
Post a comment to pattern DROPS 233-10
We would love to hear what you have to say about this pattern!
If you want to leave a question, please make sure you select the correct category in the form below, to speed up the answering process. Required fields are marked *.