
Popular categories
Looking for a yarn?


Comments / Questions (21)
![]() Josée Laberge wrote:
Josée Laberge wrote:
Hello! the armhole decreases are not quite clear for me. when it says: "at the beginning of each rank, on each side". Does it mean that I have to decrease at the beginning and the end of every rank (front and back), or only at the beginning of each rank (front and back)? Thank you! Josée
19.01.2023 - 15:53DROPS Design answered:
Dear Mrs Laberge, you have to cast off the stitches at the beginning of the rows from right side as well as from wrong side so that you cast off the same number of stitches on each side of the sleeve and then the armhole cast off is symmetrical. Happy knitting!
19.01.2023 - 18:45
![]() Yvonne wrote:
Yvonne wrote:
Als de minderingen voor de V-hals klaar zijn, is er nog een klein stukje voorpand te breien tot de schouder. Brei je dan nog steeds de 4e st vanaf de halsrand averechts (zoals in A2/A3)? Dit staat volgens mij niet met zoveel woorden in het patroon vermeld, maar het lijkt logisch om dit ook het laatste stukje zo te blijven doen? Alvast bedankt!
03.06.2022 - 00:03DROPS Design answered:
Dag Yvonne,
Ja, dat klopt. De 4e steek brei je dan nog steeds averecht, anders verbreek je de rand.
05.06.2022 - 21:16
![]() Mieke wrote:
Mieke wrote:
Hartstikke fijn 👍
26.02.2022 - 16:11
![]() Sandra Van Der Veen wrote:
Sandra Van Der Veen wrote:
Kan je het patroon river hill ook breien met gewoone breinaalden en niet met rondbreinaalden.
28.10.2021 - 09:16DROPS Design answered:
Dag Sandra,
Ja, dat kan wel met dit patroon.
Om een patroon aan te passen om op rechte naalden te breien hebben we een instructie gemaakt. Deze vind je hier.
29.10.2021 - 12:55
![]() Anna Paola Majer wrote:
Anna Paola Majer wrote:
Buongiorno, sto facendo la parte dietro: intrecciando le maglie per gli scalfi, diminuisco solo sui ferri a diritto, o anche a rovescio ( in tutti i ferri) ? Grazie!
27.10.2021 - 06:53DROPS Design answered:
Buonasera Anna, deve intrecciare le maglie all'inizio di ogni ferro, quindi anche dal rovescio del lavoro. Buon lavoro!
29.10.2021 - 21:17
![]() Tricia wrote:
Tricia wrote:
The perfect V-neck! I wish you made it in hot pink Melody :)
10.09.2021 - 01:31
![]() Alessandra wrote:
Alessandra wrote:
Versatile, caldo e leggerissimo. Il più bel filato della collezione
16.08.2021 - 04:31
![]() Mona-Lill Hanssen wrote:
Mona-Lill Hanssen wrote:
Smyg
05.08.2021 - 11:45
![]() Julia wrote:
Julia wrote:
Simple
04.08.2021 - 21:21
![]() Mary Pahlke wrote:
Mary Pahlke wrote:
"V" for Versatile
04.08.2021 - 14:27
|
||||||||||
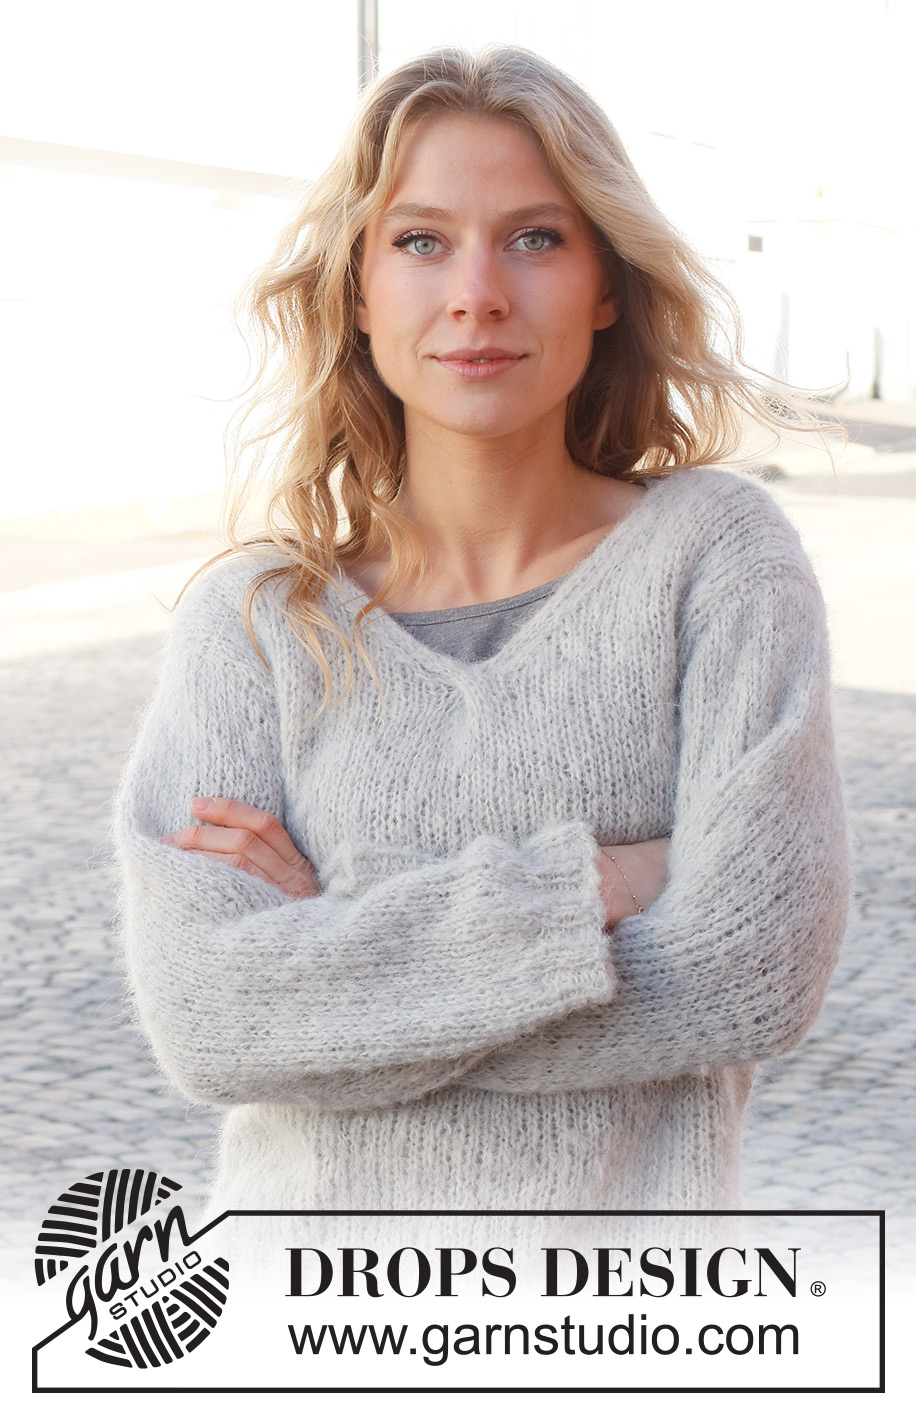
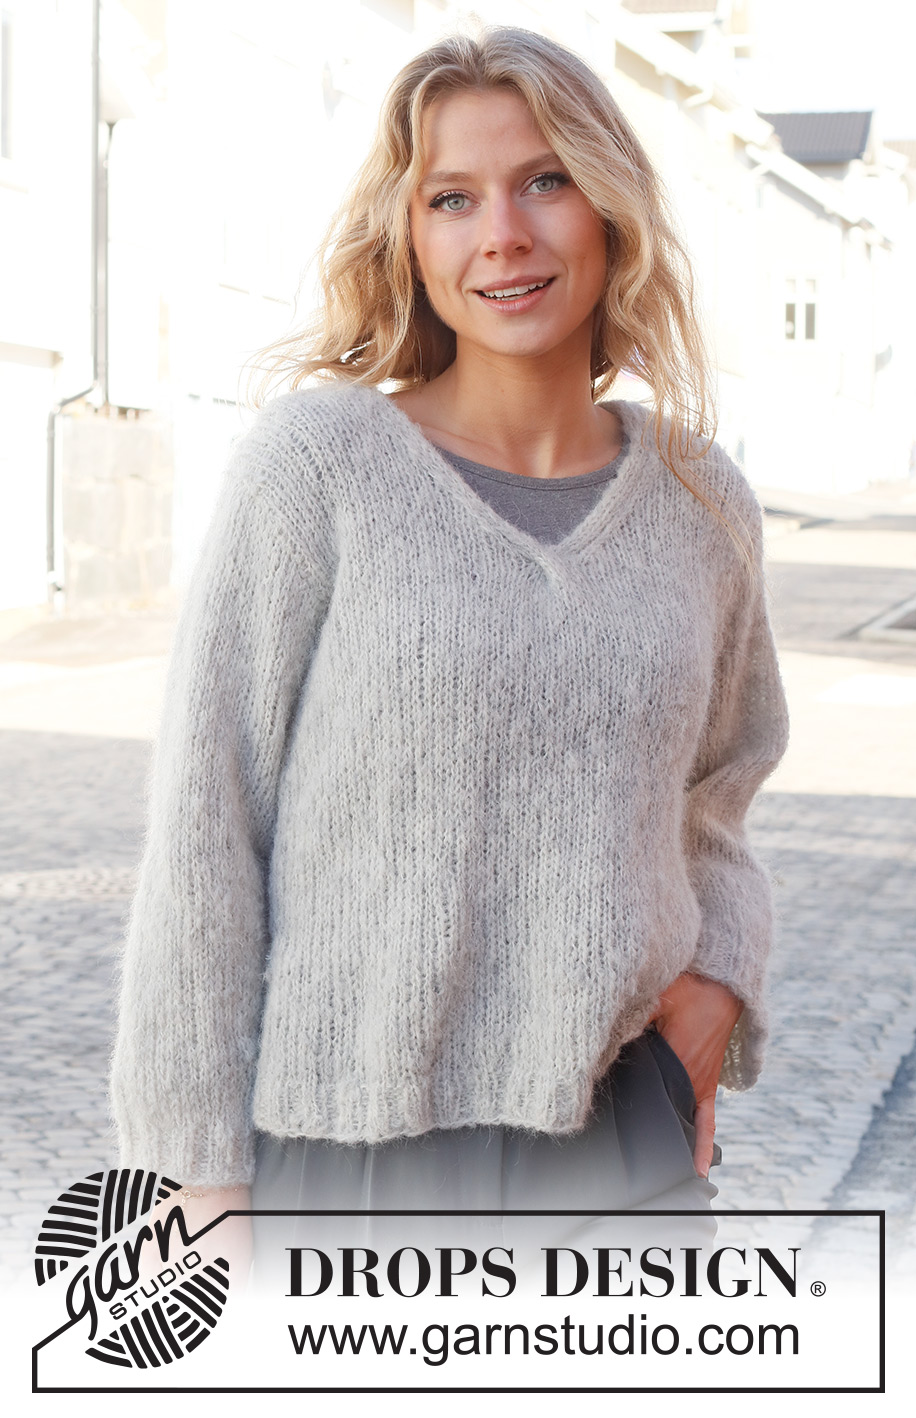
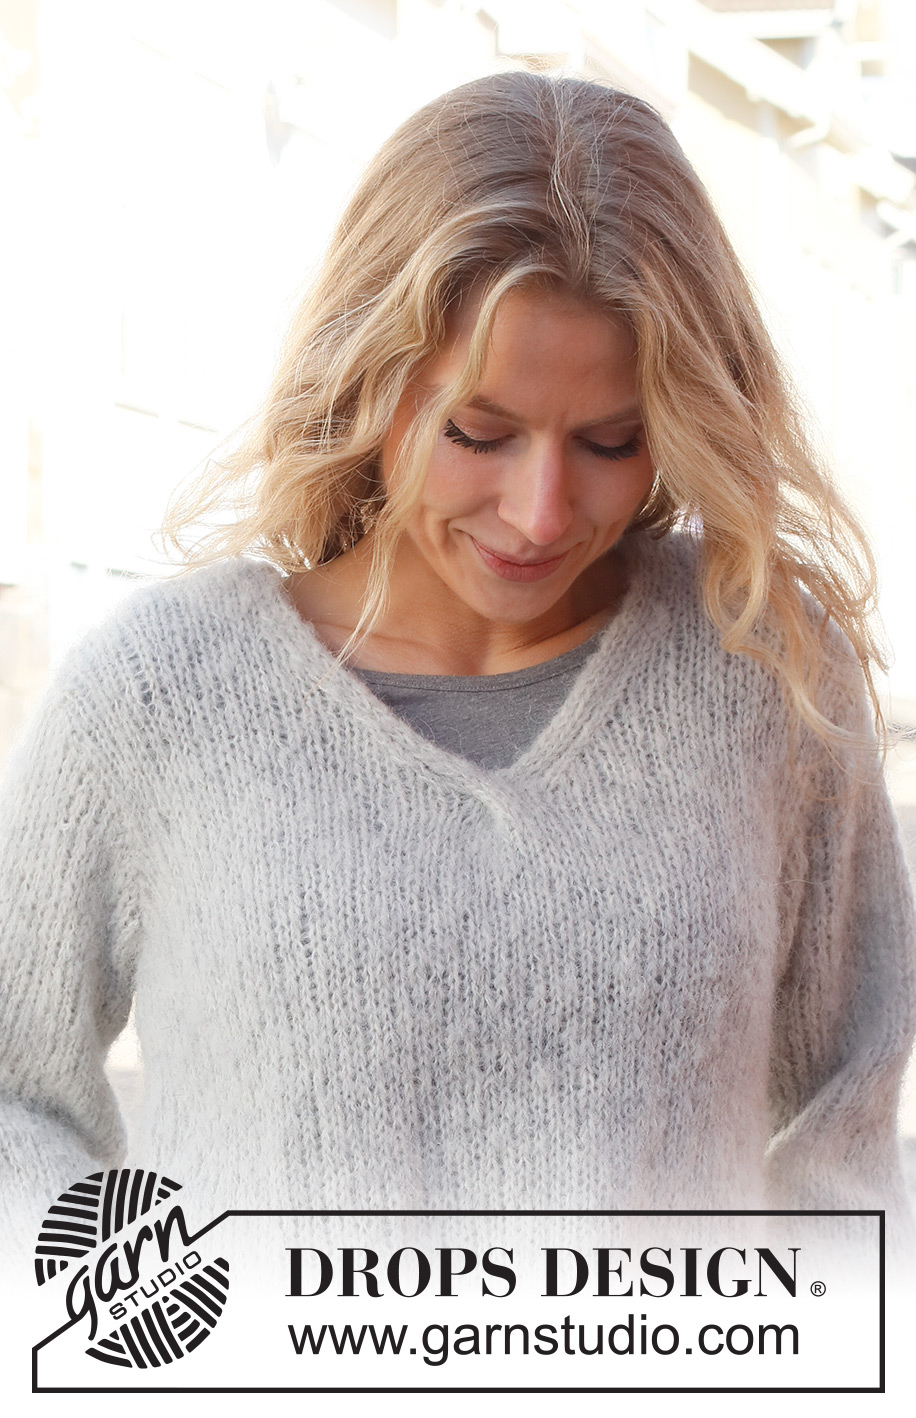
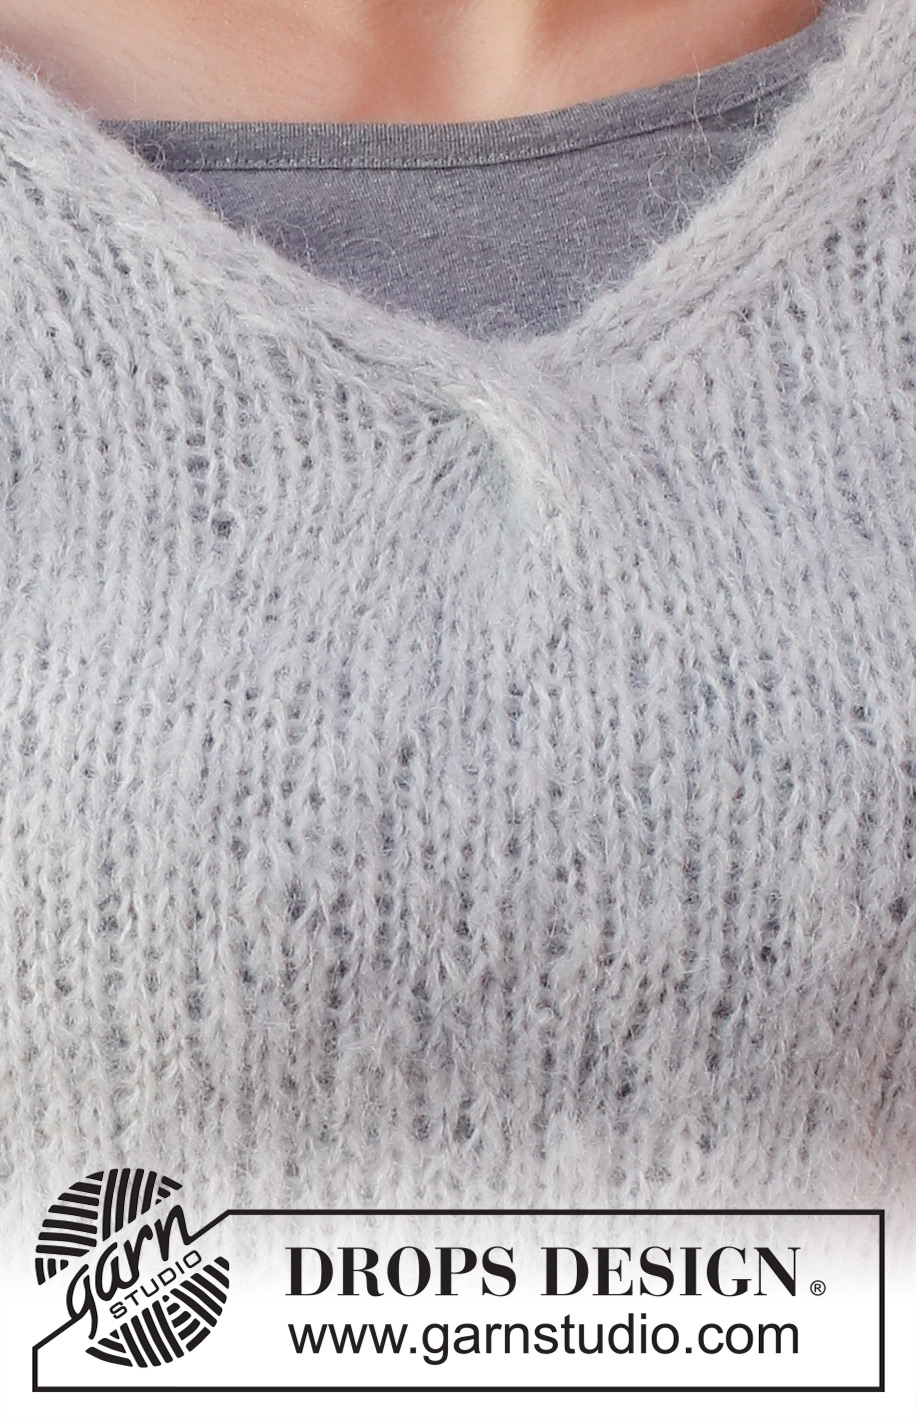
River Hill Sweater#riverhillsweater |
||||||||||
 |
 |
|||||||||
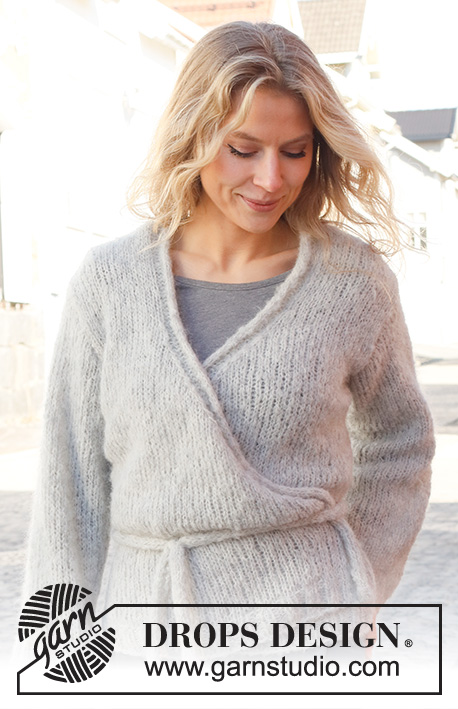
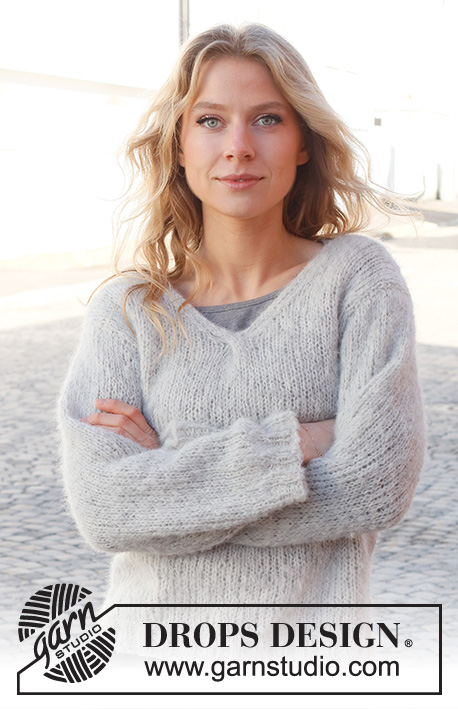
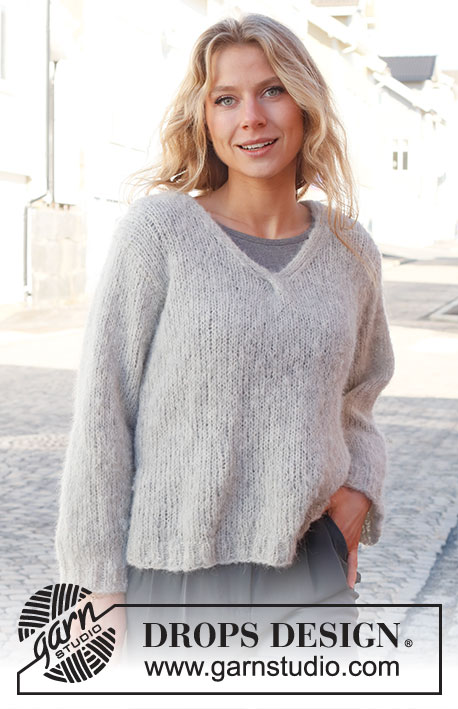
Knitted jumper in DROPS Melody. The piece is worked with V-neck and cables. Sizes S - XXXL.
DROPS 228-11 |
||||||||||
|
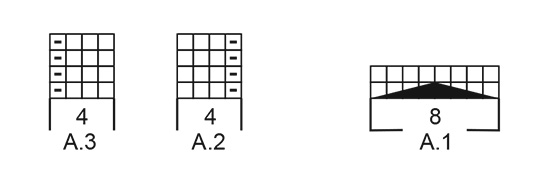
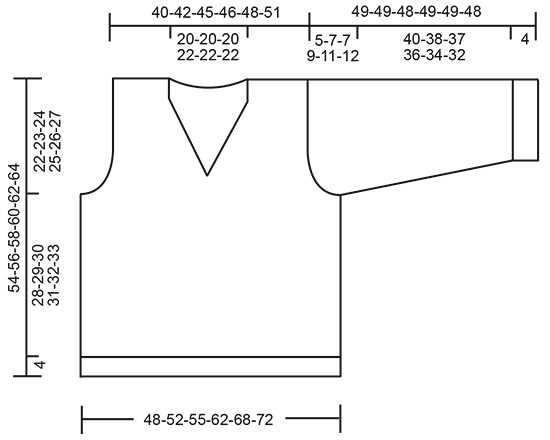
------------------------------------------------------- EXPLANATIONS FOR THE PATTERN: ------------------------------------------------------- RIDGE/GARTER STITCH (worked back and forth): Knit all rows. 1 ridge = knit 2 rows. PATTERN: See diagrams A.1 to A.3. The diagrams show all rows in the pattern from the right side. DECREASE TIP (evenly spaced): To work out how to decrease evenly, count the total number of stitches on the needle (e.g. 72 stitches) minus the edge stitches (e.g. 2 stitches) and divide the remaining stitches by the number of decreases to be made (e.g. 8) = 8.8. In this example decrease by alternately knitting together each 7th and 8th stitch and each 8th and 9th stitch (approx.). V-NECK: All decreases are worked from the right side: Decrease before A.2: Knit 2 together (= 1 stitch decreased). Decrease after A.3: Slip 1 stitch as if to knit, knit 1 and pass the slipped stitch over the knitted stitch (= 1 stitch decreased). INCREASE TIP (sleeves): Increase 1 stitch on each side by making 1 yarn over inside the edge stitch. On the next row work the yarn overs twisted to avoid holes. The new stitches are worked in stocking stitch. ------------------------------------------------------- START THE PIECE HERE: ------------------------------------------------------- JUMPER – SHORT OVERVIEW OF THE PIECE: The front and back pieces are worked separately, back and forth with circular needle and bottom up. The sleeves are worked back and forth with circular needle, bottom up. The pieces are sewn together. An i-cord cast-off edge is worked on the back piece to finish. BACK PIECE: Cast on 72-80-84-92-104-112 stitches (including 1 edge stitch on each side) with circular needle size 5.5 mm and DROPS Melody. Purl 1 row from the wrong side. Then work rib from the right side as follows: 1 edge stitch in GARTER STITCH – read description above, * purl 2, knit 2 *, work from *-* until there are 3 stitches left, purl 2 and 1 edge stitch in garter stitch. Continue this rib for 4 cm. Knit 1 row from the right side where you decrease 8-10-10-10-14-16 stitches evenly spaced – read DECREASE TIP = 64-70-74-82-90-96 stitches. Change to circular needle size 7 mm. Purl 1 row (edge stitches knitted). Continue with stocking stitch and 1 edge stitch in garter stitch on each side. REMEMBER THE KNITTING TENSION! When the piece measures 32-33-34-35-36-37 cm, cast off for the armholes at the beginning of each row as follows: 3-4-4-5-6-7 stitches 1 time, 2 stitches 1-1-1-2-3-3 times and 1 stitch 1-2-2-2-2-2 times on each side = 52-54-58-60-62-66 stitches. Continue with stocking stitch and 1 edge stitch in garter stitch on each side. When the piece measures 52-54-56-58-60-62 cm place the middle 24-24-24-26-26-26 stitches on a thread for the neck and each shoulder is finished separately. Cast off 1 stitch on the next row from the neck = 13-14-16-16-17-19 stitches on the shoulder. When the piece measures 54-56-58-60-62-64 cm, cast off. Work the other shoulder in the same way. FRONT PIECE: Cast on 72-80-84-92-104-112 stitches (including 1 edge stitch on each side) with circular needle size 5.5 mm and DROPS Melody. Purl 1 row from the wrong side. Then work rib from the right side as follows: 1 edge stitch in garter stitch, * knit 2, purl 2 *, work from *-* until there are 3 stitches left, knit 2, 1 edge stitch in garter stitch. Continue this rib for 4 cm. Knit 1 row from the right side where you decrease 8-10-10-10-14-16 stitches evenly spaced – remember DECREASE TIP = 64-70-74-82-90-96 stitches. Change to circular needle size 7 mm. Purl 1 row (edge stitches knitted). Continue with stocking stitch and 1 edge stitch in garter stitch on each side. When the piece measures 32-33-34-35-36-37 cm, cast off for the armholes at the beginning of each row as follows: 3-4-4-5-6-7 stitches 1 time, 2 stitches 1-1-1-2-3-3 times and 1 stitch 1-2-2-2-2-2 times on each side = 52-54-58-60-62-66 stitches. AT THE SAME TIME when the piece measures 36-37-38-39-40-41 cm, work A.1 over the middle 8 stitches on the row. When row 2 in the diagram has been completed, divide the piece mid-front and finish the left and right front pieces separately. LEFT FRONT PIECE: Work the next row from the right side as follows. Continue casting off for the armhole if you have not finished, work stocking stitch until there are 6 stitches left, decrease 1 stitch for the V-NECK – read description above, work A.2 over the last 4 stitches. When all stitches for armhole are cast off, work with 1 edge stitch in garter stitch towards armhole. Continue the pattern and decrease for the neck every 2nd row (each row from the right side) 10-10-9-10-10-9 times, then every 4th row 0-0-1-1-1-2 times (= 10-10-10-11-11-11 times in total). When all the decreases for the neck and armhole are finished there are 16-17-19-19-20-22 stitches on the shoulder. When the piece measures 54-56-58-60-62-64 cm, place the outermost 3 stitches by the neck on a thread and cast off the other 13-14-16-16-17-19 stitches. RIGHT FRONT PIECE: Work the next row from the right side as follows: A.3 over the first 4 stitches, decrease 1 stitch for the V-NECK – read description above, work stocking stitch to the end of the row – when all stitches for armhole are cast off, continue with 1 edge stitch in garter stitch towards armhole Continue this pattern, casting off any remaining stitches for the armhole if you have not finished and decreasing for the neck every 2nd row (each row from the right side) 10-10-9-10-10-9 times, then every 4th row 0-0-1-1-1-2 times (= 10-10-10-11-11-11 times in total). When all the decreases for the neck and armhole are finished there are 16-17-19-19-20-22 stitches on the shoulder. When the piece measures 54-56-58-60-62-64 cm, place the outermost 3 stitches by the neck on a thread and cast off the other 13-14-16-16-17-19 stitches. SLEEVES: Cast on 42-46-46-50-50-54 stitches (including 1 edge stitch on each side) with circular needle size 5.5 mm and DROPS Melody. Purl 1 row from the wrong side. Then work rib as follows: 1 edge stitch in garter stitch, * knit 2, purl 2 *, work from *-* until there is 1 stitch left, 1 edge stitch in garter stitch. Continue this rib for 4 cm. Knit 1 row from the right side where you decrease 0-3-3-5-3-6 stitches evenly spaced = 42-43-43-45-47-48 stitches. Change to circular needle size 7 mm. Purl 1 row (edge stitches knitted). Continue with stocking stitch and 1 edge stitch in garter stitch on each side. When the sleeve measures 26-21-21-21-18-18 cm, increase 1 stitch inside both edge stitches – read INCREASE TIP. Increase like this every 3-3-2-2-2-1½ cm a total of 6-7-9-9-10-11 times = 54-57-61-63-67-70 stitches. Continue working until the sleeve measures 44-42-41-40-38-36 cm (shorter measurements in larger sizes due to wider shoulders and longer sleeve cap). Now work stocking stitch back and forth for the sleeve cap, casting off at the beginning of each row as follows: 3-4-4-5-6-7 stitches 1 time, 1 stitch 0-0-0-2-4-6 times, 2 stitches 0-3-2-4-3-2 times and 3 stitches 3-1-2-0-0-0 times on both sides = 30-31-33-33-35-36 stitches. Cast off. The sleeve measures approx. 49-49-48-49-49-48 cm. Work the other sleeve in the same way. ASSEMBLY: Sew the shoulder seams with grafting stitches, inside the cast-off edges. Sew the sleeves to the body inside the cast-off edge on the sleeve and the edge stitch on the body. Sew the side seams from the armholes down – sew inside the edge stitches. V-NECK: Knit up from the right side 32 to 34 stitches (including the stitches on the thread) between each shoulder and along the back piece, with circular needle size 5.5 mm and DROPS Melody. Cut the strand. Now work an i-cord-edge as follows: Place the 3 stitches from the thread on the right front piece on circular needle size 5.5 mm. Work i-cord from the right side as follows: Knit 2, knit twisted together the next stitch and the first/next stitch on the back piece. Move the 3 stitches from the right to the left needle (in the same order). Continue like this to the end of the back piece. Cast off the remaining stitches. Sew the last 3 stitches together with the 3 stitches from the thread on the left front piece, using grafting stitches. Cut and fasten the strand. |
||||||||||
Diagram explanations |
||||||||||
|
||||||||||
 |
||||||||||
 |
||||||||||
Have you finished this pattern?Tag your pictures with #dropspattern #riverhillsweater or submit them to the #dropsfan gallery. Do you need help with this pattern?You'll find 22 tutorial videos, a Comments/Questions area and more by visiting the pattern on garnstudio.com. © 1982-2026 DROPS Design A/S. We reserve all rights. This document, including all its sub-sections, has copyrights. Read more about what you can do with our patterns at the bottom of each pattern on our site. |
||||||||||


With over 40 years in knitting and crochet design, DROPS Design offers one of the most extensive collections of free patterns on the internet - translated to 17 languages. As of today we count 324 catalogues and 12290 patterns translated into English (UK/cm). 12290
We work hard to bring you the best knitting and crochet have to offer, inspiration and advice as well as great quality yarns at incredible prices! Would you like to use our patterns for other than personal use? You can read what you are allowed to do in the Copyright text at the bottom of all our patterns. Happy crafting!
Post a comment to pattern DROPS 228-11
We would love to hear what you have to say about this pattern!
If you want to leave a question, please make sure you select the correct category in the form below, to speed up the answering process. Required fields are marked *.