
Popular categories
Looking for a yarn?


Comments / Questions (21)
![]() Andrea Maria wrote:
Andrea Maria wrote:
Wenn ich für die Ärmel abnehme, tu ich das dann in jeder Reihe oder nur in den Hin- oder Rückseiten? Liebe Grüße
31.01.2026 - 20:24DROPS Design answered:
Liebe Andrea Maria, Sie ketten am Anfang jeder Reihe ab, also am Anfang jeder Hin-Reihe und am Anfang jeder Rück-Reihe, dadurch ketten Sie beidseitig ab - d.h. an der einen Seite des Rückenteils ketten Sie am Anfang jeder Hin-Reihe und an der anderen Seite am Anfang jeder Rück-Reihe ab. Viel Spaß beim Weiterstricken!
02.02.2026 - 12:23
![]() Joanna wrote:
Joanna wrote:
Proszę jeszcze o informacje co się dzieje z 3 oczkami na nitce na prawym oraz lewym przodzie ?
21.10.2024 - 13:11DROPS Design answered:
Witaj Joanno, przyszywasz te 3 oczka do początku i końca I-corda na środku tyłu. Pozdrawiamy!
21.10.2024 - 15:55
![]() Joanna wrote:
Joanna wrote:
DEKOLT V: Na drutach z żyłką nr 5,5 nabrać na prawej stronie robótki 32 - 34 oczek (w tym oczka na nitce) między ramionami, wzdłuż dekoltu tyłu, włóczką DROPS Melody. Odciąć nitkę. - proszę o pomoc z ta częścią instrukcji. W rozmiarze L z tylu zabraliśmy 24 oczka i po 3 oczka z na przodzie robótki - skąd mamy 32-34 oczka ? I jaka nitkę odcinamy ?
17.10.2024 - 09:28DROPS Design answered:
Witaj Joanno, mamy już wykonany I-cord na lewym i prawym przodzie. Zostaje wykończenie dekoltu tyłu. Dlatego nabierasz wzdłuż brzegu robótki 4 oczka (od prawego ramienia do oczek na nitce), następnie przerabiasz 24 oczka z nitki i nabierasz 4 oczka (kończąc na lewym ramieniu). Odcinasz tą nitkę, którą nabierałaś oczka (zostawiając dłuższy jej fragment, który później należy schować w robótce). Ponownie zaczynasz nową nitką od początku nabieranych oczek (na prawej stronie robótki) i wykonujesz I-cord wzdłuż dekoltu tyłu. Pozdrawiamy!
21.10.2024 - 08:50
![]() Anna wrote:
Anna wrote:
Buongiorno non ho mai lavorato un bordo i- cord mi potreste indicare per favore una vostro video . Grazie mille. Anna
24.09.2024 - 15:09DROPS Design answered:
Buonasera Anna, provi a vedere se questo video le può essere di aiuto. Buon lavoro!
24.09.2024 - 22:24
![]() Lucy Stewart wrote:
Lucy Stewart wrote:
We have a customer who knitted this pattern using a bulky yarn and loved the pattern. She now wants to knit it in sock yarn or fingering weight - can you convert the pattern or give us guidance for how to direct her how much yarn she would need. She wants to make the Large size. Thank you! -
05.05.2024 - 20:39DROPS Design answered:
Dear Lucy, please understand, that with having many thousands of patterns available for free on our site, we cannot modify them to each individual request. You (or your customer) can search our pattern library, and find something similar, maybe THIS ONE perhaps? Happy Crafting!
05.05.2024 - 21:20
![]() Claudine wrote:
Claudine wrote:
En réponse, cela veux dire que les 3 mailles en attente du devant gauche ne sont pas tricotées mais directement cousues ? Décidément j ai du mal à saisir
12.10.2023 - 16:42DROPS Design answered:
Bonjour Claudine, tout à fait, les 3 m du devant gauche vont être cousues aux 3 mailles de la bordure i-cord tricotées à partir du devant droit le long de l'encolure dos. Bon tricot!
13.10.2023 - 08:30
![]() Claudine wrote:
Claudine wrote:
En réponse à votre explication , il y a quand même quelque chose qui me chagrine sur l encolure. Il est dit de rabattre les mailles donc logiquement je n ai plus de mailles sur l aiguille de droite. Et on dit de coudre les 3 mailles de gauche en attente. J ai du mal à saisir. Faut il les tricoter aussi pour la bordure ? Je suis perdue
12.10.2023 - 12:02DROPS Design answered:
Bonjour Claudine, vous tricotez une bordure I-cord le long de l'encolure dos, autrement dit, vous tricotez la dernière des 3 mailles de la bordure i-cord avec la maille suivante relevée de l'encolure dos jusqu'à ce que toutes les mailles relevées le long de l'encolure dos aient été tricotées avec la dernière de ces 3 mailles, vous rabattez alors ces 3 dernières mailles et les cousez aux 3 mailles de la fin du devant gauche. Bon tricot!
12.10.2023 - 14:13
![]() Claudin wrote:
Claudin wrote:
Bonjour Je ne comprends pas les finitions de l encolure : ‘’Rabattre les mailles restantes. Coudre les 3 dernières mailles ensemble aux 3 mailles en attente du devant gauche.’’ Il me reste donc à droite 3 mailles à droite et à gauche les 3 mailles en attente. Je les couds donc ensemble c est cela.? Comment fait on ? Avez vous une vidéo explicative ? Merci de votre retour
11.10.2023 - 18:10DROPS Design answered:
Bonjour Mme Claudin, c'est tout à fait ça, utilisez par exemple la technique de la couture des épaules (cf vidéo) pour assembler ces 3 mailles des deux devants. Bon tricot!
12.10.2023 - 09:10
![]() Camus wrote:
Camus wrote:
Bonjour Si j ai bien compris, les manches se tricotent jusqu au bout en aller-retour avec l aiguille circulaire, c est bien cela ? Merci de votre réponse
25.09.2023 - 18:50DROPS Design answered:
Bonjour Mme Camus, tout à fait. Bon tricot!
26.09.2023 - 11:20
![]() Elisa wrote:
Elisa wrote:
Ich habe den Pullover in weinrot gestrickt und er siehr fantastisch aus! Leider verstehe ich nicht den letzten Schritt: "Die restlichen Maschen abketten. Die abgeketteten 3 Maschen und die 3 stillgelegten Maschen des linken Vorderteils im Maschenstich zusammennähen". Muss ich so abketten wie im Video des I-cords gezeigt und erst dann verbinden? Ich möchte nichts falsch machen - könnte jemand das anders erklären oder ein Video zeigen?
27.04.2023 - 18:56DROPS Design answered:
Liebe Elisa, in diesem Video zeigen wir, wie man Maschen zusammennähen kann, so können Sie diese 3 Maschen (nach I-cord Abketten) zusammen mit den 3 Maschen (Vorderteil) abketten. Viel Spaß beim fertigstellen!
28.04.2023 - 09:44
|
||||||||||
River Hill Sweater#riverhillsweater |
||||||||||
 |
 |
|||||||||
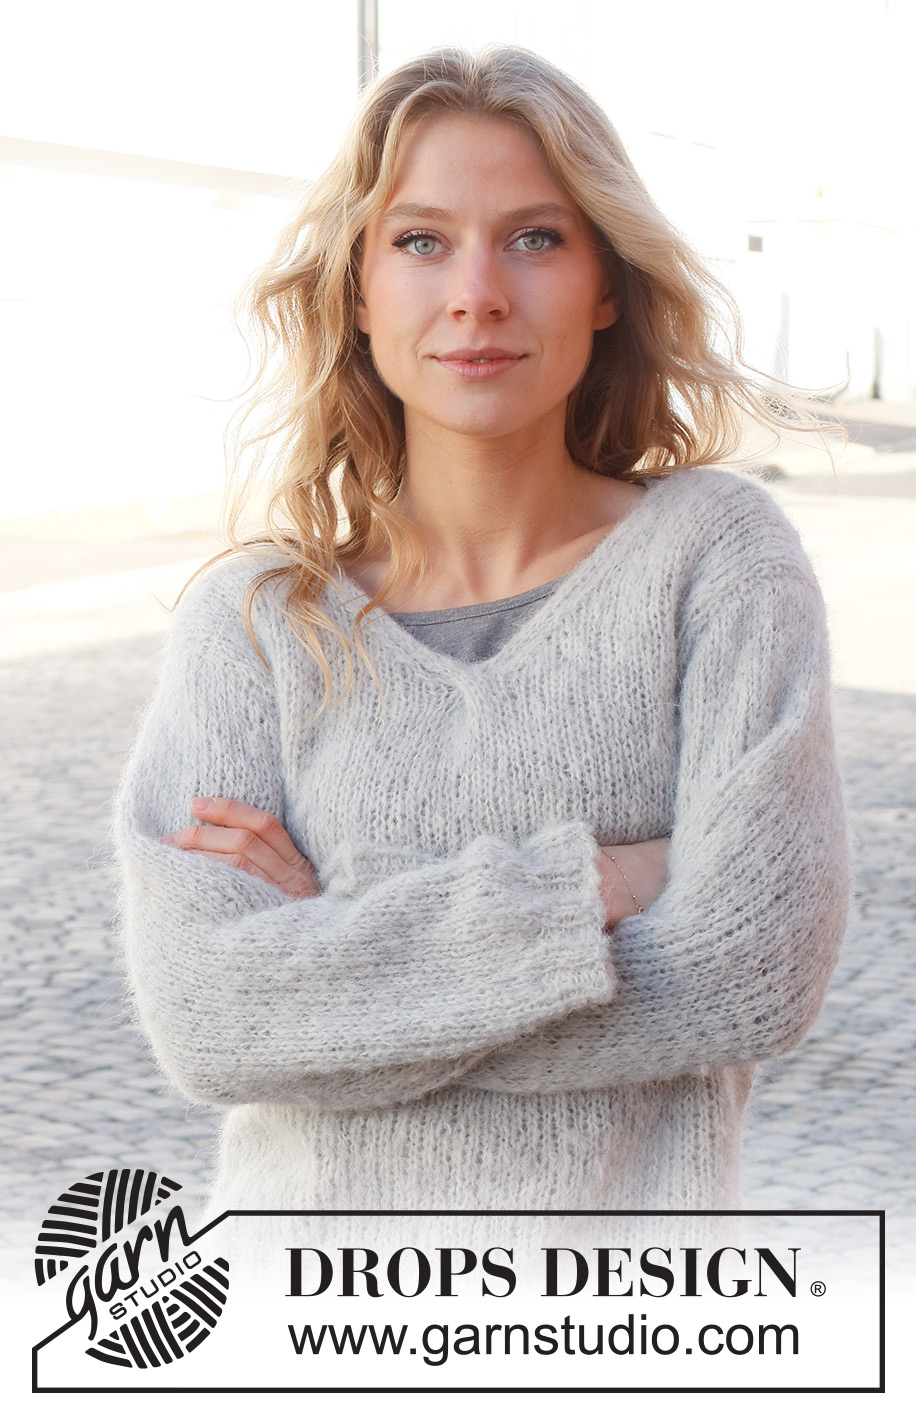
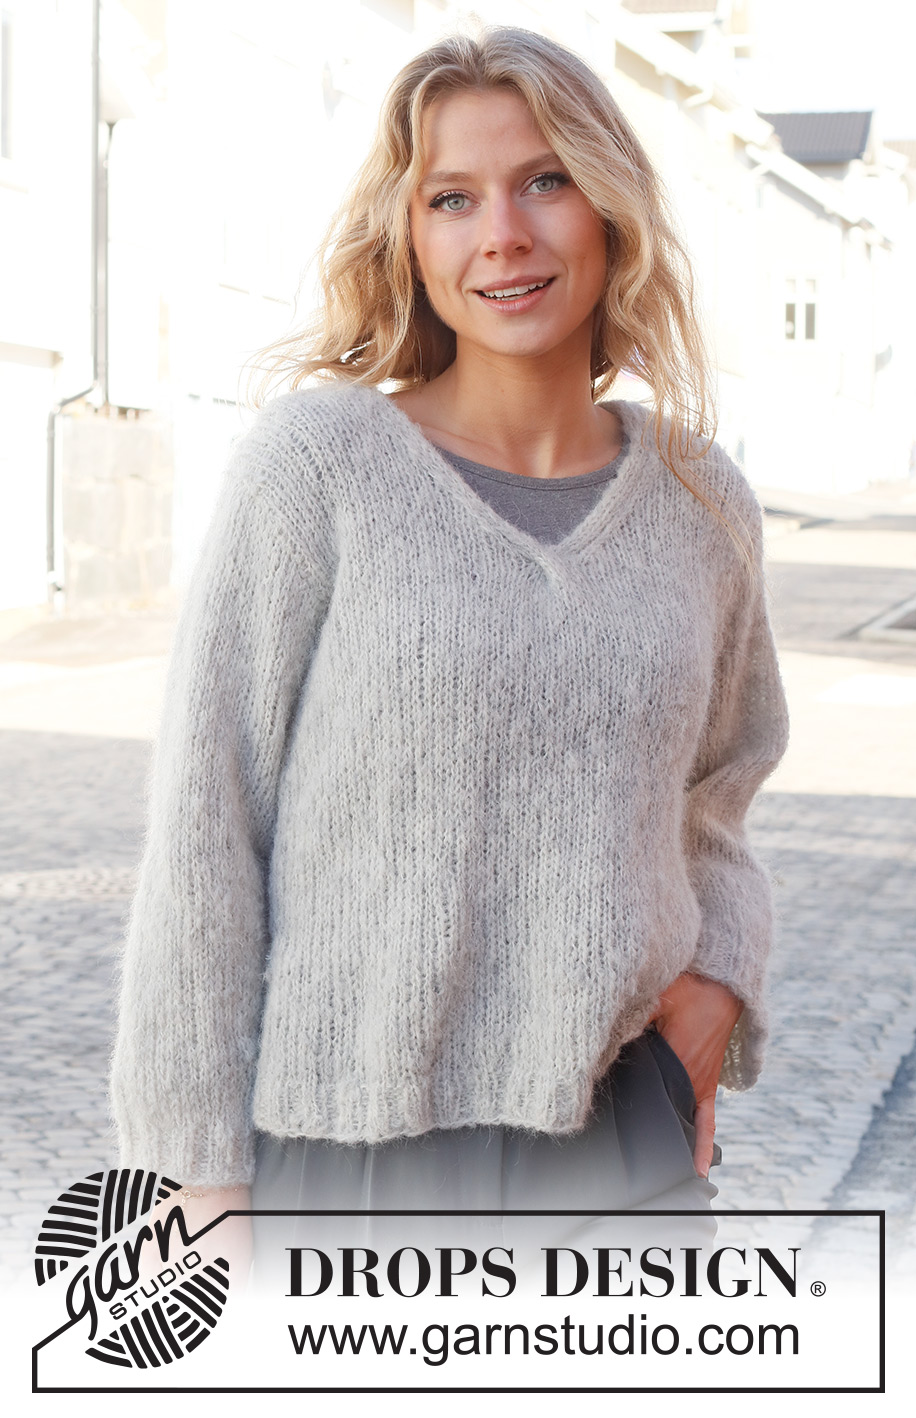
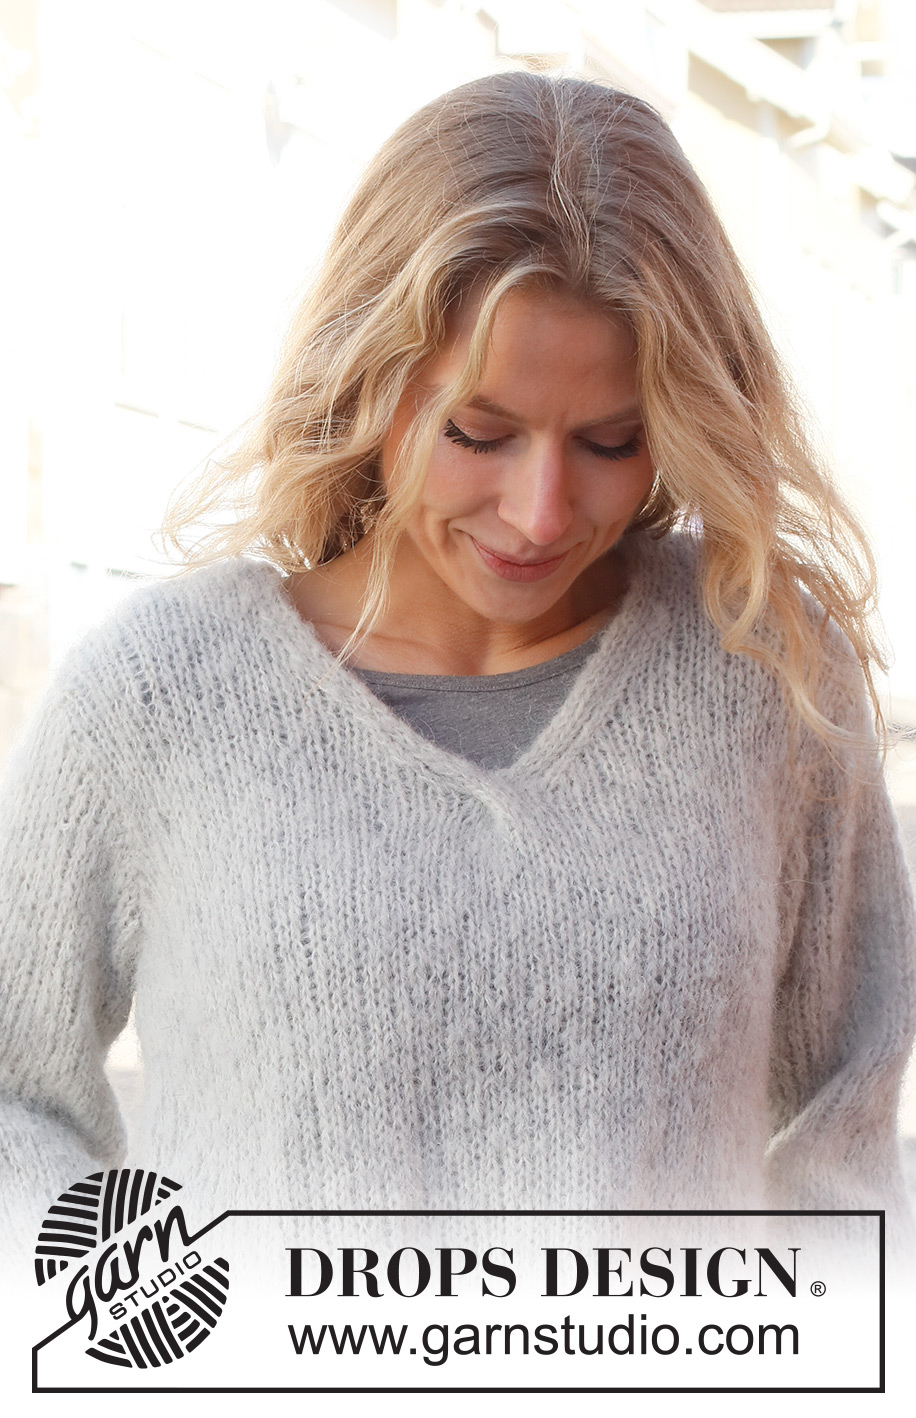
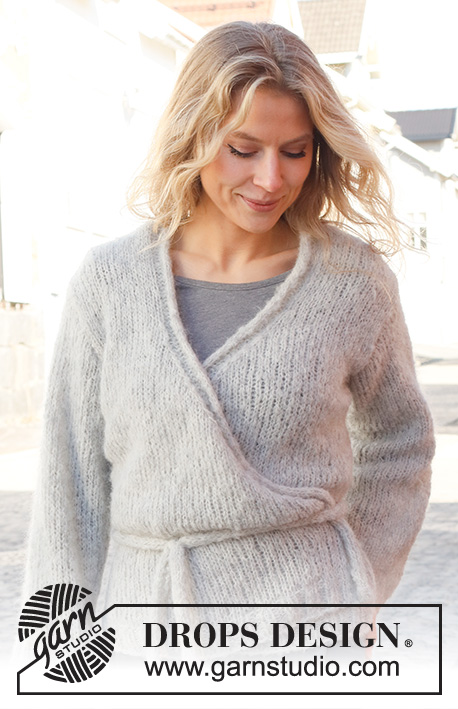
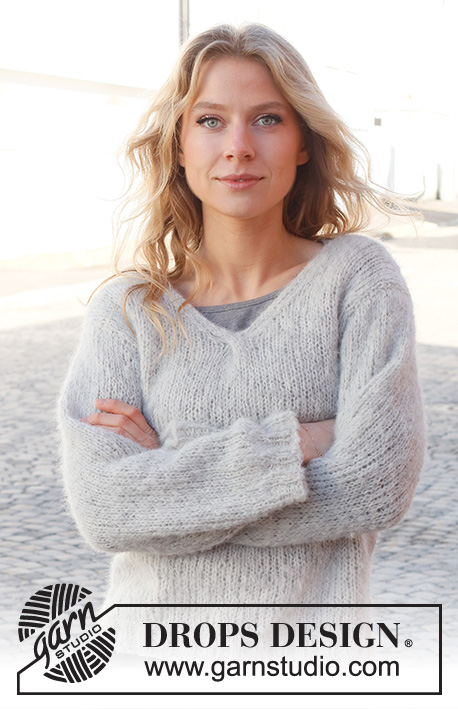
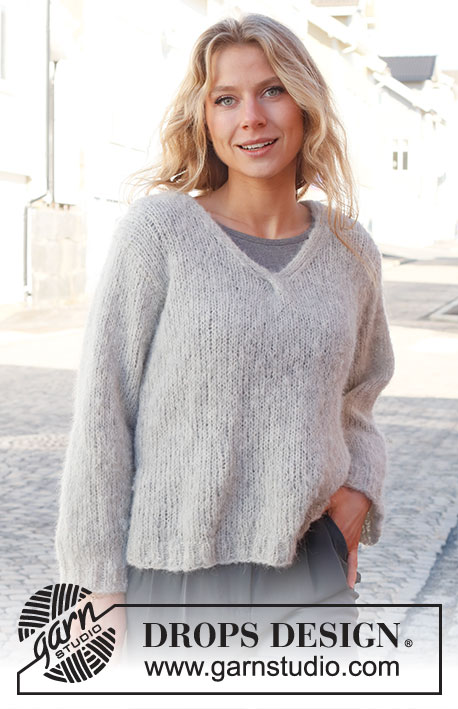
Knitted jumper in DROPS Melody. The piece is worked with V-neck and cables. Sizes S - XXXL.
DROPS 228-11 |
||||||||||
|
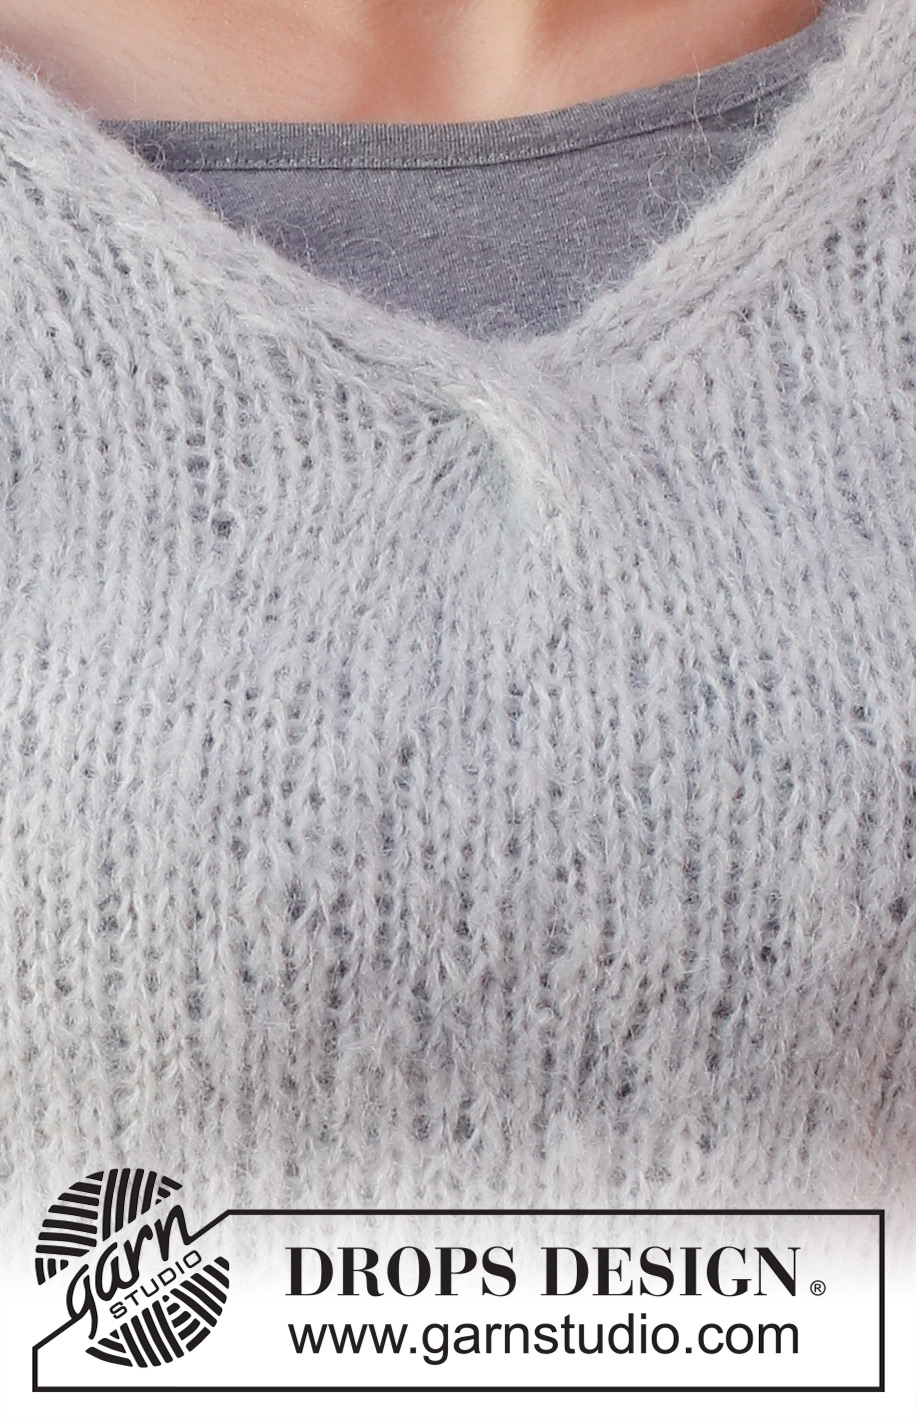
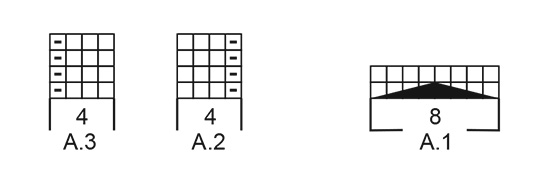
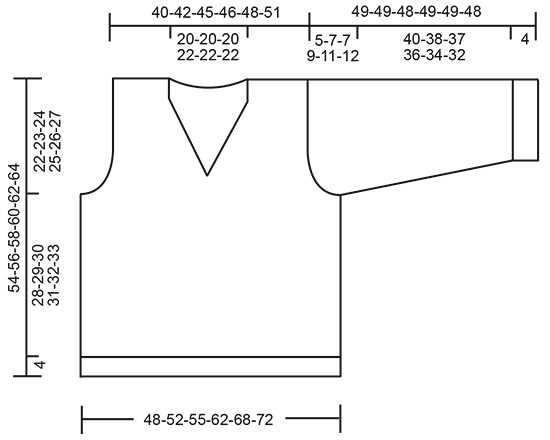
------------------------------------------------------- EXPLANATIONS FOR THE PATTERN: ------------------------------------------------------- RIDGE/GARTER STITCH (worked back and forth): Knit all rows. 1 ridge = knit 2 rows. PATTERN: See diagrams A.1 to A.3. The diagrams show all rows in the pattern from the right side. DECREASE TIP (evenly spaced): To work out how to decrease evenly, count the total number of stitches on the needle (e.g. 72 stitches) minus the edge stitches (e.g. 2 stitches) and divide the remaining stitches by the number of decreases to be made (e.g. 8) = 8.8. In this example decrease by alternately knitting together each 7th and 8th stitch and each 8th and 9th stitch (approx.). V-NECK: All decreases are worked from the right side: Decrease before A.2: Knit 2 together (= 1 stitch decreased). Decrease after A.3: Slip 1 stitch as if to knit, knit 1 and pass the slipped stitch over the knitted stitch (= 1 stitch decreased). INCREASE TIP (sleeves): Increase 1 stitch on each side by making 1 yarn over inside the edge stitch. On the next row work the yarn overs twisted to avoid holes. The new stitches are worked in stocking stitch. ------------------------------------------------------- START THE PIECE HERE: ------------------------------------------------------- JUMPER – SHORT OVERVIEW OF THE PIECE: The front and back pieces are worked separately, back and forth with circular needle and bottom up. The sleeves are worked back and forth with circular needle, bottom up. The pieces are sewn together. An i-cord cast-off edge is worked on the back piece to finish. BACK PIECE: Cast on 72-80-84-92-104-112 stitches (including 1 edge stitch on each side) with circular needle size 5.5 mm and DROPS Melody. Purl 1 row from the wrong side. Then work rib from the right side as follows: 1 edge stitch in GARTER STITCH – read description above, * purl 2, knit 2 *, work from *-* until there are 3 stitches left, purl 2 and 1 edge stitch in garter stitch. Continue this rib for 4 cm. Knit 1 row from the right side where you decrease 8-10-10-10-14-16 stitches evenly spaced – read DECREASE TIP = 64-70-74-82-90-96 stitches. Change to circular needle size 7 mm. Purl 1 row (edge stitches knitted). Continue with stocking stitch and 1 edge stitch in garter stitch on each side. REMEMBER THE KNITTING TENSION! When the piece measures 32-33-34-35-36-37 cm, cast off for the armholes at the beginning of each row as follows: 3-4-4-5-6-7 stitches 1 time, 2 stitches 1-1-1-2-3-3 times and 1 stitch 1-2-2-2-2-2 times on each side = 52-54-58-60-62-66 stitches. Continue with stocking stitch and 1 edge stitch in garter stitch on each side. When the piece measures 52-54-56-58-60-62 cm place the middle 24-24-24-26-26-26 stitches on a thread for the neck and each shoulder is finished separately. Cast off 1 stitch on the next row from the neck = 13-14-16-16-17-19 stitches on the shoulder. When the piece measures 54-56-58-60-62-64 cm, cast off. Work the other shoulder in the same way. FRONT PIECE: Cast on 72-80-84-92-104-112 stitches (including 1 edge stitch on each side) with circular needle size 5.5 mm and DROPS Melody. Purl 1 row from the wrong side. Then work rib from the right side as follows: 1 edge stitch in garter stitch, * knit 2, purl 2 *, work from *-* until there are 3 stitches left, knit 2, 1 edge stitch in garter stitch. Continue this rib for 4 cm. Knit 1 row from the right side where you decrease 8-10-10-10-14-16 stitches evenly spaced – remember DECREASE TIP = 64-70-74-82-90-96 stitches. Change to circular needle size 7 mm. Purl 1 row (edge stitches knitted). Continue with stocking stitch and 1 edge stitch in garter stitch on each side. When the piece measures 32-33-34-35-36-37 cm, cast off for the armholes at the beginning of each row as follows: 3-4-4-5-6-7 stitches 1 time, 2 stitches 1-1-1-2-3-3 times and 1 stitch 1-2-2-2-2-2 times on each side = 52-54-58-60-62-66 stitches. AT THE SAME TIME when the piece measures 36-37-38-39-40-41 cm, work A.1 over the middle 8 stitches on the row. When row 2 in the diagram has been completed, divide the piece mid-front and finish the left and right front pieces separately. LEFT FRONT PIECE: Work the next row from the right side as follows. Continue casting off for the armhole if you have not finished, work stocking stitch until there are 6 stitches left, decrease 1 stitch for the V-NECK – read description above, work A.2 over the last 4 stitches. When all stitches for armhole are cast off, work with 1 edge stitch in garter stitch towards armhole. Continue the pattern and decrease for the neck every 2nd row (each row from the right side) 10-10-9-10-10-9 times, then every 4th row 0-0-1-1-1-2 times (= 10-10-10-11-11-11 times in total). When all the decreases for the neck and armhole are finished there are 16-17-19-19-20-22 stitches on the shoulder. When the piece measures 54-56-58-60-62-64 cm, place the outermost 3 stitches by the neck on a thread and cast off the other 13-14-16-16-17-19 stitches. RIGHT FRONT PIECE: Work the next row from the right side as follows: A.3 over the first 4 stitches, decrease 1 stitch for the V-NECK – read description above, work stocking stitch to the end of the row – when all stitches for armhole are cast off, continue with 1 edge stitch in garter stitch towards armhole Continue this pattern, casting off any remaining stitches for the armhole if you have not finished and decreasing for the neck every 2nd row (each row from the right side) 10-10-9-10-10-9 times, then every 4th row 0-0-1-1-1-2 times (= 10-10-10-11-11-11 times in total). When all the decreases for the neck and armhole are finished there are 16-17-19-19-20-22 stitches on the shoulder. When the piece measures 54-56-58-60-62-64 cm, place the outermost 3 stitches by the neck on a thread and cast off the other 13-14-16-16-17-19 stitches. SLEEVES: Cast on 42-46-46-50-50-54 stitches (including 1 edge stitch on each side) with circular needle size 5.5 mm and DROPS Melody. Purl 1 row from the wrong side. Then work rib as follows: 1 edge stitch in garter stitch, * knit 2, purl 2 *, work from *-* until there is 1 stitch left, 1 edge stitch in garter stitch. Continue this rib for 4 cm. Knit 1 row from the right side where you decrease 0-3-3-5-3-6 stitches evenly spaced = 42-43-43-45-47-48 stitches. Change to circular needle size 7 mm. Purl 1 row (edge stitches knitted). Continue with stocking stitch and 1 edge stitch in garter stitch on each side. When the sleeve measures 26-21-21-21-18-18 cm, increase 1 stitch inside both edge stitches – read INCREASE TIP. Increase like this every 3-3-2-2-2-1½ cm a total of 6-7-9-9-10-11 times = 54-57-61-63-67-70 stitches. Continue working until the sleeve measures 44-42-41-40-38-36 cm (shorter measurements in larger sizes due to wider shoulders and longer sleeve cap). Now work stocking stitch back and forth for the sleeve cap, casting off at the beginning of each row as follows: 3-4-4-5-6-7 stitches 1 time, 1 stitch 0-0-0-2-4-6 times, 2 stitches 0-3-2-4-3-2 times and 3 stitches 3-1-2-0-0-0 times on both sides = 30-31-33-33-35-36 stitches. Cast off. The sleeve measures approx. 49-49-48-49-49-48 cm. Work the other sleeve in the same way. ASSEMBLY: Sew the shoulder seams with grafting stitches, inside the cast-off edges. Sew the sleeves to the body inside the cast-off edge on the sleeve and the edge stitch on the body. Sew the side seams from the armholes down – sew inside the edge stitches. V-NECK: Knit up from the right side 32 to 34 stitches (including the stitches on the thread) between each shoulder and along the back piece, with circular needle size 5.5 mm and DROPS Melody. Cut the strand. Now work an i-cord-edge as follows: Place the 3 stitches from the thread on the right front piece on circular needle size 5.5 mm. Work i-cord from the right side as follows: Knit 2, knit twisted together the next stitch and the first/next stitch on the back piece. Move the 3 stitches from the right to the left needle (in the same order). Continue like this to the end of the back piece. Cast off the remaining stitches. Sew the last 3 stitches together with the 3 stitches from the thread on the left front piece, using grafting stitches. Cut and fasten the strand. |
||||||||||
Diagram explanations |
||||||||||
|
||||||||||
 |
||||||||||
 |
||||||||||
Have you finished this pattern?Tag your pictures with #dropspattern #riverhillsweater or submit them to the #dropsfan gallery. Do you need help with this pattern?You'll find 22 tutorial videos, a Comments/Questions area and more by visiting the pattern on garnstudio.com. © 1982-2026 DROPS Design A/S. We reserve all rights. This document, including all its sub-sections, has copyrights. Read more about what you can do with our patterns at the bottom of each pattern on our site. |
||||||||||


With over 40 years in knitting and crochet design, DROPS Design offers one of the most extensive collections of free patterns on the internet - translated to 17 languages. As of today we count 324 catalogues and 12290 patterns translated into English (UK/cm). 12290
We work hard to bring you the best knitting and crochet have to offer, inspiration and advice as well as great quality yarns at incredible prices! Would you like to use our patterns for other than personal use? You can read what you are allowed to do in the Copyright text at the bottom of all our patterns. Happy crafting!
Post a comment to pattern DROPS 228-11
We would love to hear what you have to say about this pattern!
If you want to leave a question, please make sure you select the correct category in the form below, to speed up the answering process. Required fields are marked *.