
Popular categories
Looking for a yarn?


Comments / Questions (121)
![]() Birte Kjellander wrote:
Birte Kjellander wrote:
Når jeg klikker på “Denne opskrift er blevet rettet” vises et ikon: “ opdateret online “ - men dette er ikke klik-bart. Hvor kan jeg finde rettelsen ?
08.01.2025 - 13:05DROPS Design answered:
Hei Birthe. Når du klikker på den røde rettelse linjen, skal det dukke opp 2 forklaringer datert 20.09.2021 og 08.10.2021. Begge gjelder diagram A.2. Riktig diagram A.2 er oppdatert og er den du ser på siden/ ligger over målskissen. mvh DROPS Design
13.01.2025 - 11:59
![]() M Gulen wrote:
M Gulen wrote:
Waar staat de correctie van damestrui autum weather 228-1
22.12.2024 - 12:54DROPS Design answered:
Dag M Gulen,
In het online patroon zijn de correcties al verwerkt. Als je een afdruk hebt van voor de correctiedatum, dan is daar de correctie nog niet in doorgevoerd.
02.01.2025 - 20:48
![]() Annette wrote:
Annette wrote:
Hej drops jeg skal i gang med 128-1 når man starter på mønstret er det så den side der er 3 m alså Højer side ? Hilsen Annette
10.12.2024 - 14:31DROPS Design answered:
Hej Annette, ja du starter med 3 masker, så 5 masker og sidst 2 masker, sæt 1 mærke imellem hver rapport, så er det let at se hvor du skal tage ud :)
11.12.2024 - 13:31
![]() Alexandra wrote:
Alexandra wrote:
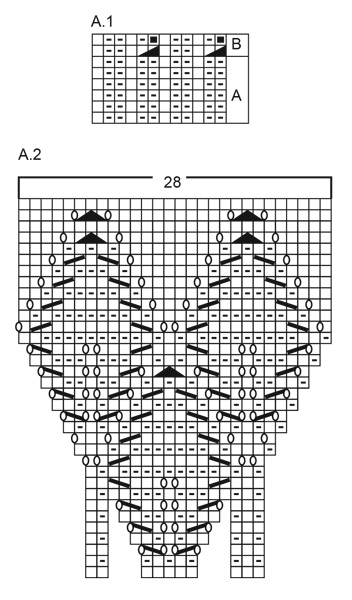
Can you help me understand how to read charts? I know it’s bottom to top and right to left, but is each symbol read as it is or mirrored? For example in A2, third row from the bottom , after knitting the first 3 stitches and doing a yarn over, is that read normally as a knit two together? Thanks.
09.12.2024 - 09:33DROPS Design answered:
Dear Alexandra, you can find more information about our knitting charts in the following lesson: https://www.garnstudio.com/lesson.php?id=68&cid=19. When you work on the right side (like here, where you work in the round) you work the symbols as shown. The diagonal lines have a different meaning each depending on the orientation of the line; in round 3 of A.2 you have: knit 3, yarn over, knit 2 together, yarn over, knit 1, yarn over, slip 1 stitch as if to knit, knit 1 and pass the slipped stitch over the knitted stitch, yarn over, knit 2. Happy knitting!
15.12.2024 - 13:13
![]() Mireille P wrote:
Mireille P wrote:
Bonjour j'ai un soucis vous vous êtes carrément trompé dans l'explication de ce pull à partir de l'empiècent en XL on a pas 90 mailles mais 108 ce qui me donne un total de 248 mailles,non pas 252 comme vous le dites donc avec 27 augmentation j'obtiens 275 mailles et pas 279 pouvez vous me donner les bon chiffres pour diviser le travail j'ai dépensé de l'argent pour la laine et je ne veux pas être bloquée à cause de votre maivaise explication merci . Cordialement Mireille
05.11.2024 - 15:01DROPS Design answered:
Bonjour Mireille, vous tricotez d'abord 9 fois les 12 mailles de A.1A soit (9x12=108), puis vous tricotez A.1B = vous diminuez 2 m dans chaque A.1B, il reste ainsi 10 m x 9 = 90 mailles sur l'aiguille. Vous tricotez maintenant 9 fois les 10 mailles de A.2 (=9x10= 90), et vous augmentez comme indiqué dans le diagramme. Quand A.2 est terminé, vous avez 28 mailles dans chaque A.2 soit 9x28=252 mailles. Pensez à bien placer un marqueur entre chaque diagramme, entre chacun des 9 motifs tout le tour, ce sera ainsi plus facile de vérifier votre nombre de mailles. Bon tricot!
05.11.2024 - 16:54
![]() Monika wrote:
Monika wrote:
Witam, do tego projektu chce wykorzystać włóczkę alpaka która mam w domu i dodać Kid-Silk ale nie jestem pewna jaka ilość powinnam zakupić tej drugiej włóczkę na rozmiar XL. z góry dziękuję za pomoc
16.09.2024 - 13:27DROPS Design answered:
Witaj Moniko, na 300 g Alpaki będziesz potrzebować 125 g Kid-Silka. Na 350 g Alpaki będziesz potrzebować 150 g Kid-Silka. Pozdrawiamy!
17.09.2024 - 11:01
![]() Marita wrote:
Marita wrote:
Jeg er på omgang 4 på A2, men etter gang 8 så er jeg ikke tilbake på der merketråden ble satt? Hvordan kan dette bli riktig, jeg ser for meg at mønsteret bare blir forskjøvet og vridd? Jeg strikker str. L.
08.09.2024 - 09:58DROPS Design answered:
Hei Marita. Diagrammet utvider seg, men om du har alle økningene diagrammet viser så skal start og slutt hele tiden komme på samme plass. Når du strikker bærestykket skal det strikkes 8 rapporter av A.2. Sett maskemarkører mellom hver rapport så har du en bedre oversikt, slik at du enkelt kan se om du har fått med deg alle økningene. mvh DROPS Design
09.09.2024 - 11:25
![]() Julie wrote:
Julie wrote:
I bærestykket står der “fortsæt i glatstrik til arbejdet måler 22 cm”. Jeg er i tvivl om hvor man skal måle fra?
24.08.2024 - 13:19DROPS Design answered:
Hei Julie. I oppskriften, under HALSKANT og siste linje står det: Sæt 1 mærke på omgangen, bærestykket skal måles fra dette mærke. Det er fra dette merket du skal måle fra. mvh DROPS Design
26.08.2024 - 13:26
![]() Moky Nouviale wrote:
Moky Nouviale wrote:
Je cherche, sans la trouver, la correction du diagramme A2 du pull Autumn wreath. Où puis-je la trouver ? Merci.
25.07.2024 - 13:58DROPS Design answered:
Bonjour, si vous avez imprimé les explications après la date de la correction, le diagramme en ligne est désormais juste, sinon, il peut être sage de l'imprimer à nouveau. Bon tricot!
29.07.2024 - 11:18
![]() Romina wrote:
Romina wrote:
Los diagramas como se leen ? De a bajo hacia arriba? Derecha izquierda? En el diagrama A1 b se debe empezar tejiendo con dos puntos juntos al revés? O se lee del otro lado? Y A2? La primera fila se hacen todos los puntos en derecho , luego la segunda fila, revés, derecho, revés? Estoy algo confundida...
23.07.2024 - 01:29DROPS Design answered:
Hola Romina, puedes leer más información sobre cómo trabajar nuestros diagramas en la siguiente lección:https://www.garnstudio.com/lesson.php?id=68&cid=23. Este patrón se trabaja en redondo, por lo que todas las filas se ven por el lado derecho, como se trabajan, y se leen de derecha a izquierda y de arriba abajo. A.1b comienza con: 2 puntos juntos de revés, derecho, 2 reveses, derecho; y se repite de este modo. En A.2 comienzas con una vuelta de derecho, la siguiente es de elástico: 1 derecho, 1 revés.
18.08.2024 - 20:16
|
|||||||||||||||||||||||||
Autumn Wreath#autumnwreathsweater |
|||||||||||||||||||||||||
 |
 |
||||||||||||||||||||||||
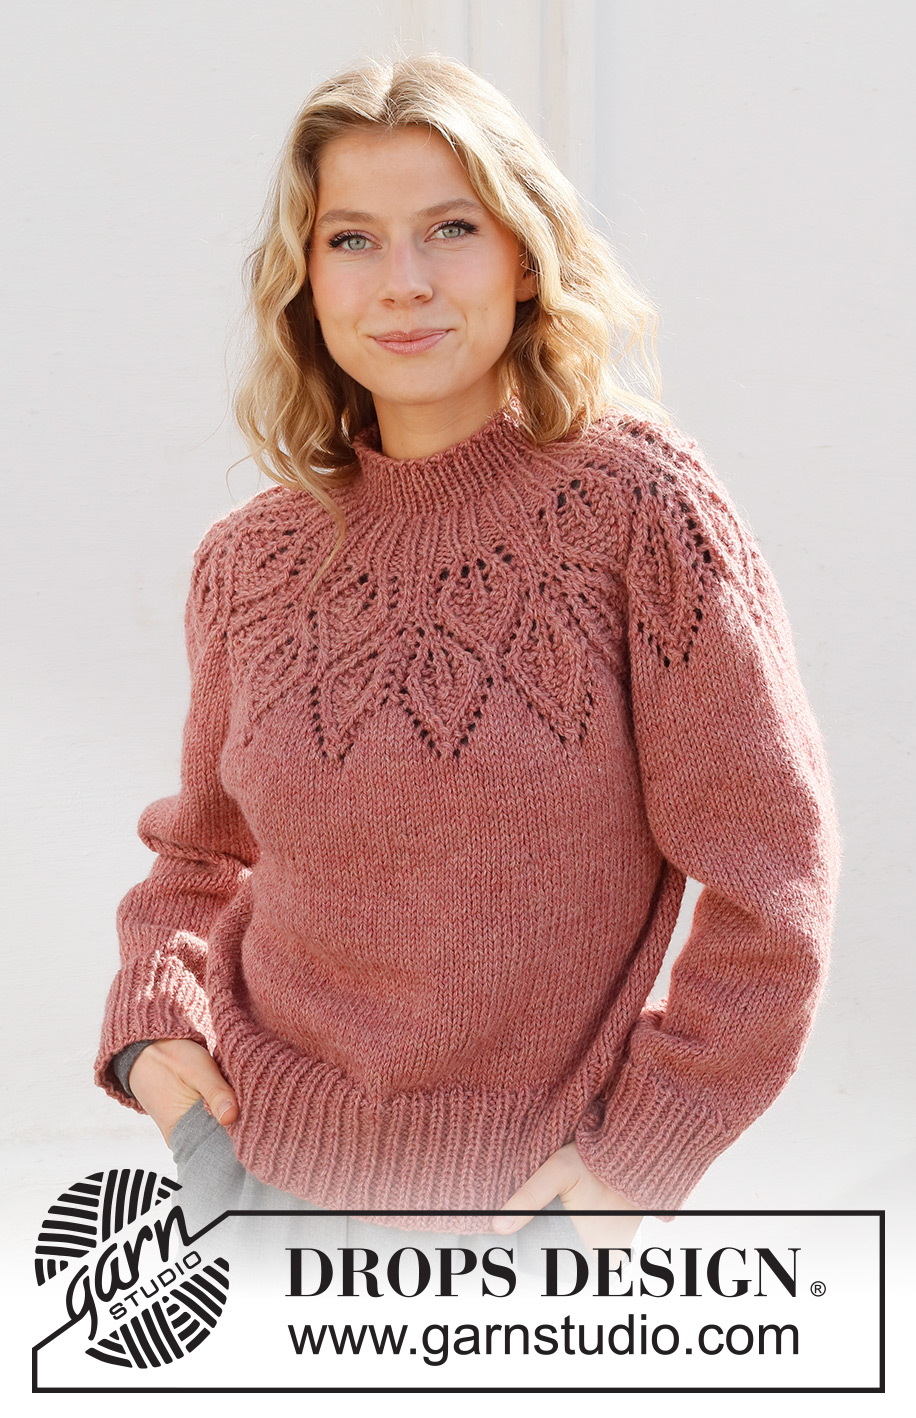
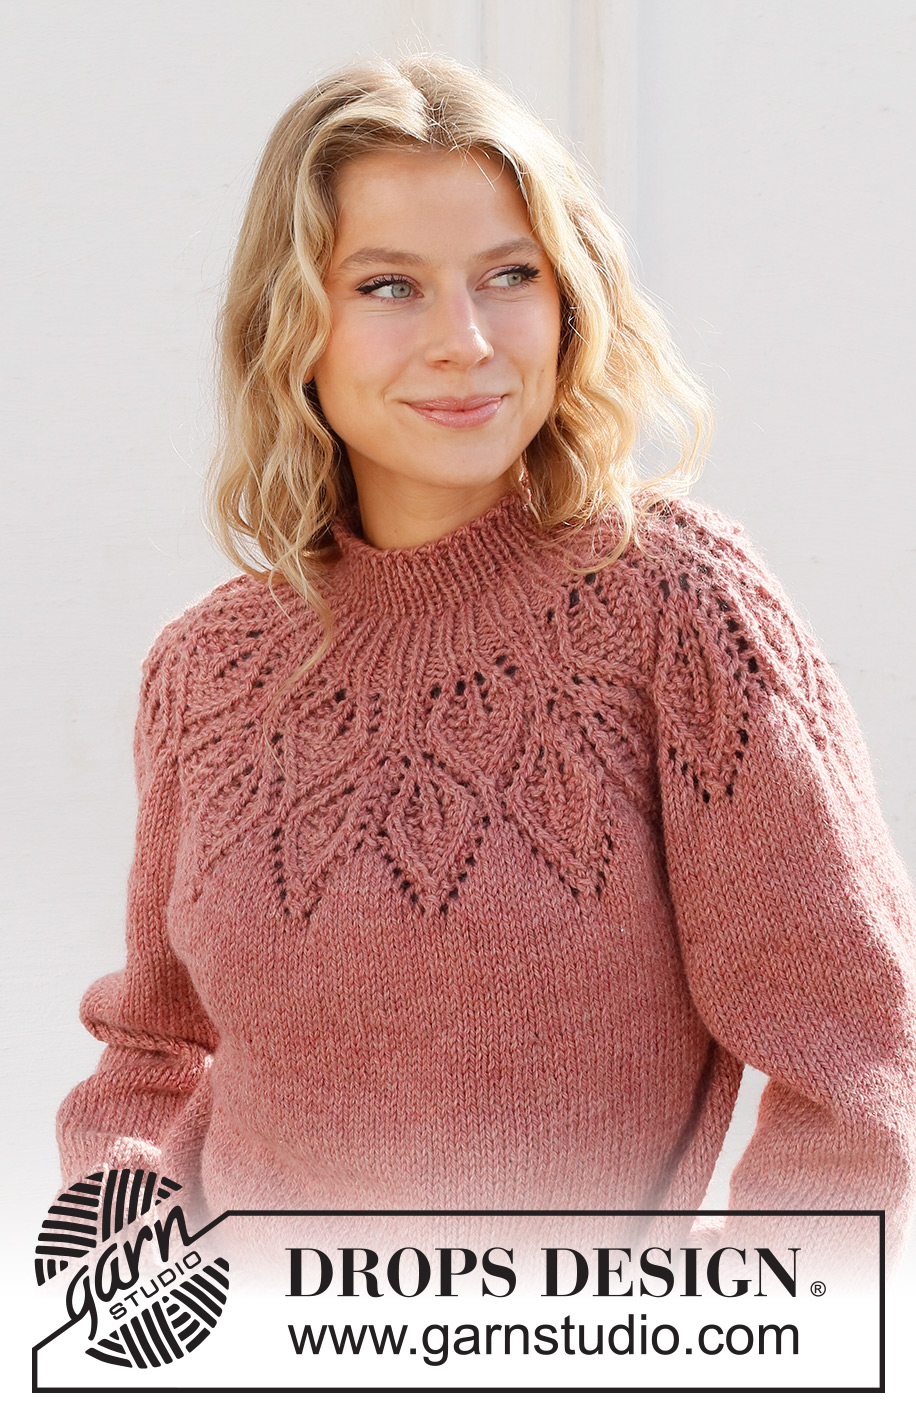
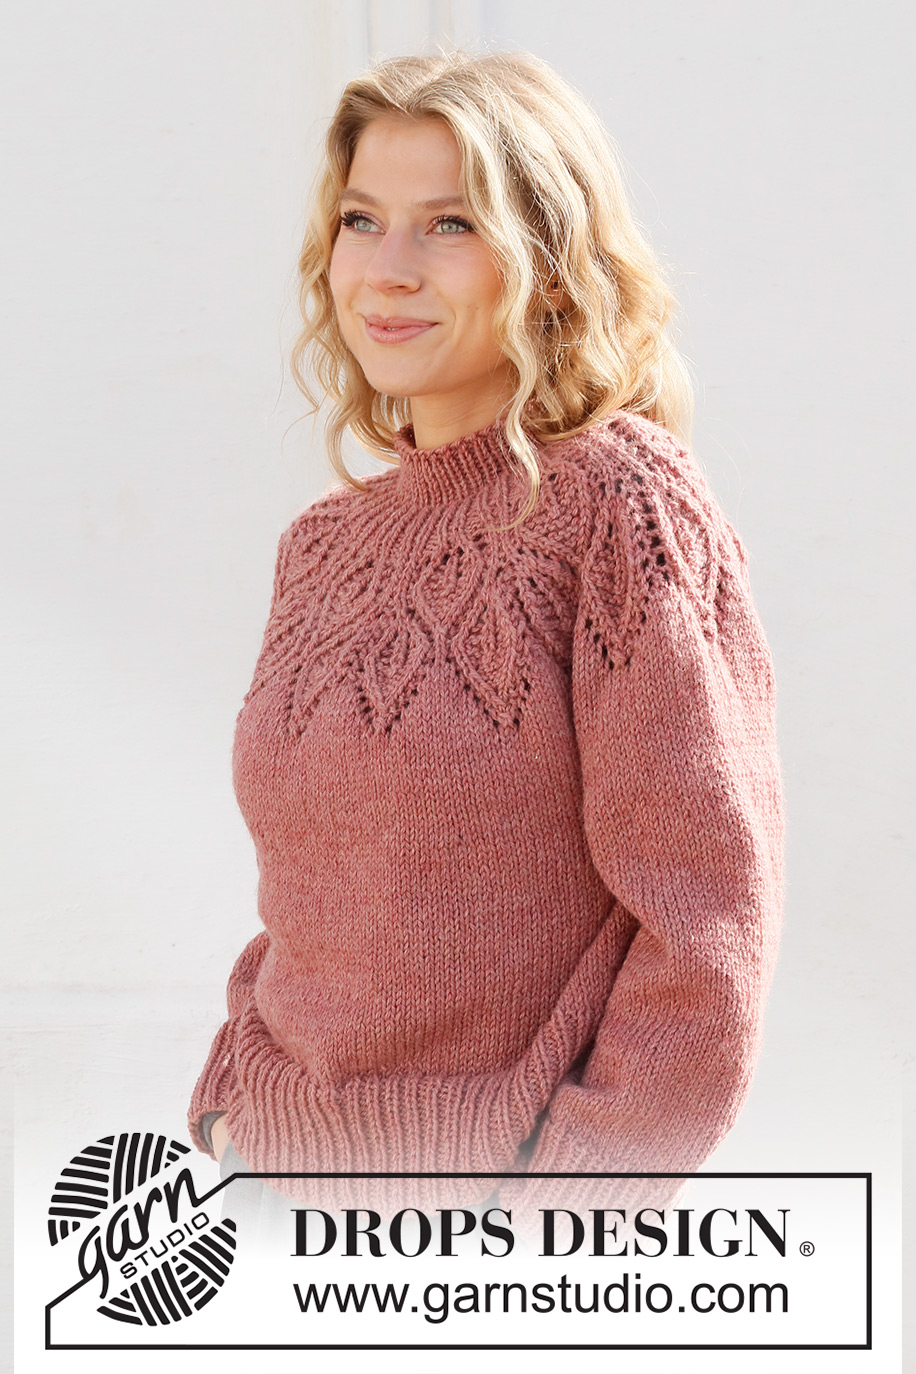
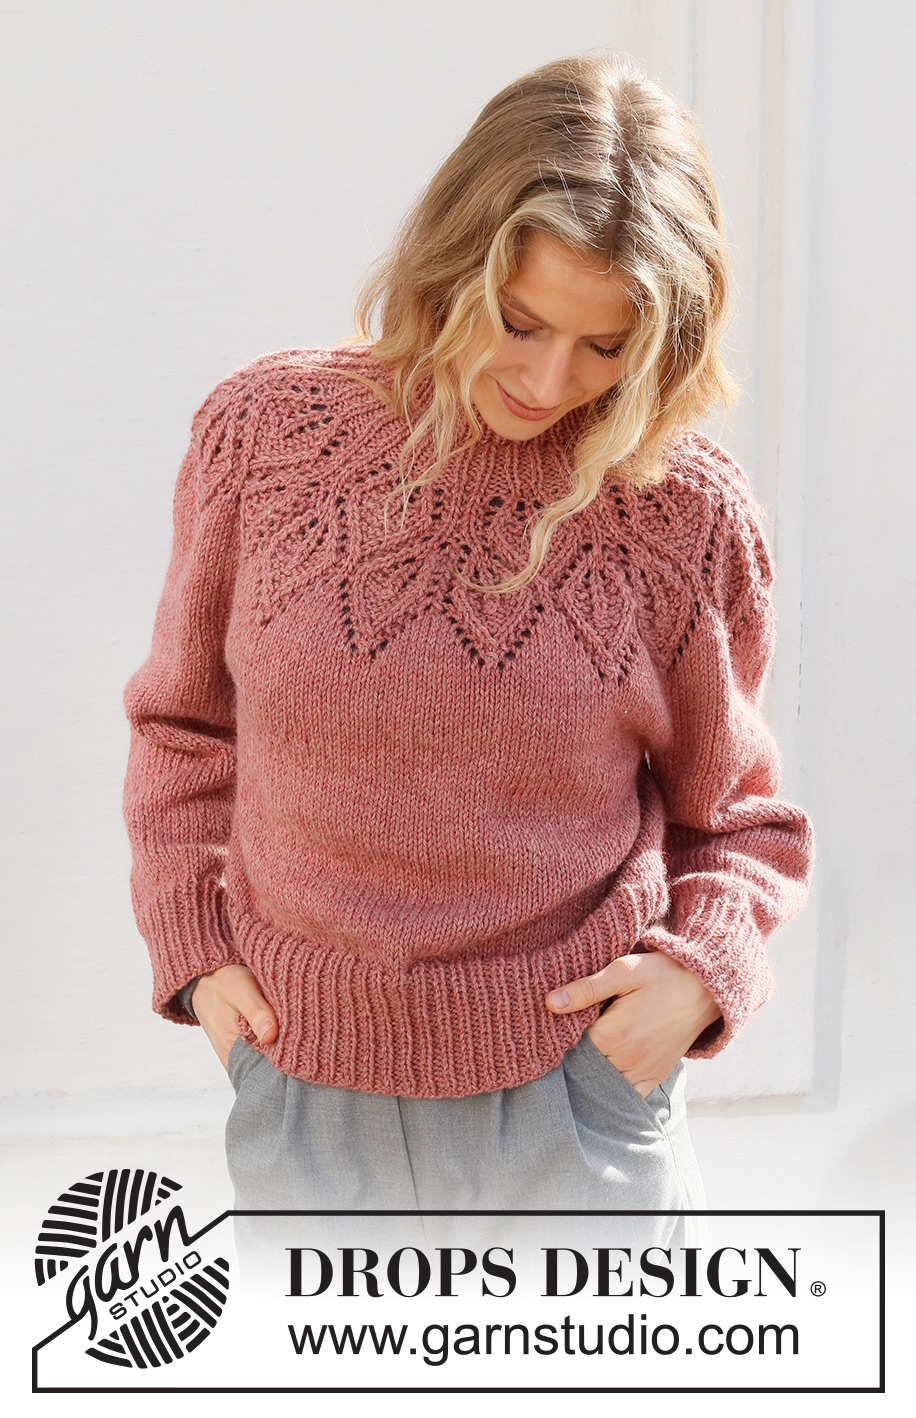
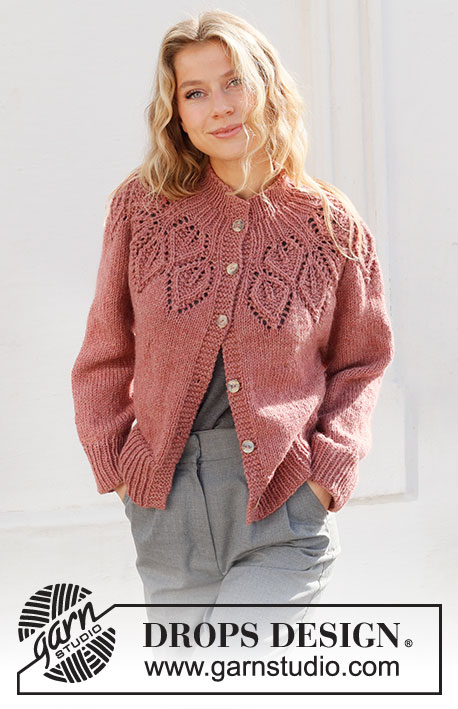
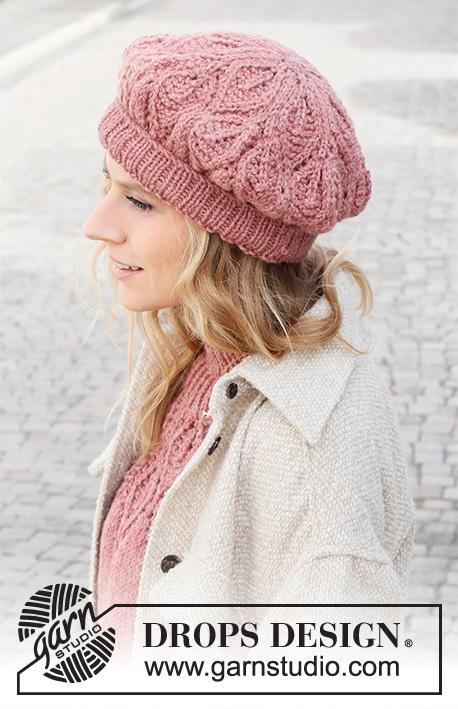
Knitted jumper in DROPS Nepal. The piece is worked top down, with round yoke and leaf pattern. Sizes S - XXXL.
DROPS 228-1 |
|||||||||||||||||||||||||
|
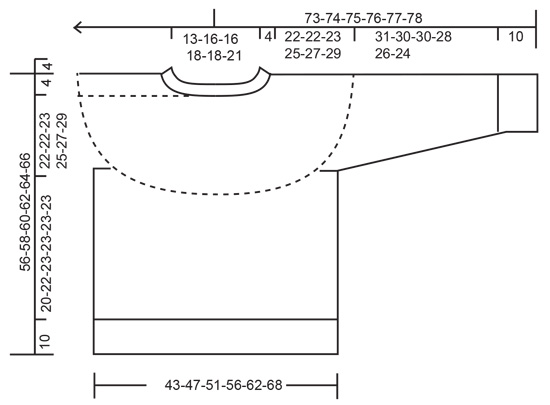
EXPLANATIONS FOR THE PATTERN: ------------------------------------------------------- PATTERN: See diagrams A.1 and A.2. INCREASE TIP (evenly spaced): To work out how to increase evenly, count the total number of stitches on the needle (e.g. 64 stitches) and divide by the number of increases to be made (e.g. 20) = 3.2. In this example, increase by making 1 yarn over after approx. each 3rd stitch. DECREASE TIP (for sleeves): Decrease 1 stitch on either side of the marker thread as follows: Work until there are 3 stitches left before the marker thread, knit 2 together, knit 2 (marker thread sits between these 2 stitches), slip 1 stitch as if to knit, knit 1 and pass the slipped stitch over the knitted stitch (2 stitches decreased). CASTING-OFF TIP: To avoid the cast-off edge being tight you can cast off with a larger size needle. If the edge is still tight, make 1 yarn over after approx. each 6th stitch at the same time as casting off; the yarn overs are cast off as normal stitches. ------------------------------------------------------- START THE PIECE HERE: ------------------------------------------------------- JUMPER – SHORT OVERVIEW OF THE PIECE: The neck and yoke are worked in the round with circular needle, from mid back and top down. The yoke is divided for body and sleeves and the body is continued in the round with circular needle. The sleeves are worked in the round with double pointed needles/short circular needle, top down. NECK: Cast on 64-68-72-76-80-84 stitches with short circular needle size 4.5 mm and DROPS Nepal. Knit 1 round, then work rib (knit 1, purl 1) for 4 cm. Knit 1 round where you increase 20-28-24-32-28-36 stitches evenly spaced – read INCREASE TIP = 84-96-96-108-108-120 stitches. Insert 1 marker in the round; the yoke is measured from this marker. YOKE: Work A.1A over all stitches (= 7-8-8-9-9-10 repeats of 12 stitches) for 4 cm, then work A.1B (= 2 rounds). There are now 70-80-80-90-90-100 stitches. Change to circular needle size 5.5 mm. Now work A.2 over A.1 (= 7-8-8-9-9-10 repeats of 10 stitches). REMEMBER THE KNITTING TENSION! When A.2 has been completed in height there are 196-224-224-252-252-280 stitches and the piece measures approx. 20 cm from the marker. Knit 1 round where you increase 18-11-27-27-47-42 stitches evenly spaced = 214-235-251-279-299-322 stitches. Continue with stocking stitch until the piece measures 22-22-23-25-27-29 cm. Now divide for the body and sleeves on the next round as follows: Work the first 30-33-35-39-43-48 stitches (= half back piece), place the next 46-50-54-60-62-64 stitches on a thread for the sleeve, cast on 8-8-10-10-12-12 stitches (= in side under sleeve), work the next 62-69-73-81-89-98 stitches (= front piece), place the next 46-50-54-60-62-64 stitches on a thread for the sleeve, cast on 8-8-10-10-12-12 stitches (= in side under sleeve), work the last 30-33-35-39-43-48 stitches (= half back piece). The body and sleeves are finished separately. THE PIECE IS NOW MEASURED FROM HERE. BODY: = 138-151-163-179-199-218 stitches. Continue with stocking stitch in the round until the piece measures 20-22-23-23-23-23 cm. There is approx. 10 cm left to finished length; try the jumper on and work to desired length. To avoid the following rib being tight, knit 1 round where you increase 24-26-29-31-35-37 stitches evenly spaced = 162-177-192-210-234-255 stitches. Change to circular needle size 4.5 mm and work rib (knit 1, purl 2) for 10 cm. Cast off with knit over knit and purl over purl - read CASTING-OFF TIP. The jumper measures approx. 56-58-60-62-64-66 cm from the shoulder down. SLEEVES: Place the 46-50-54-60-62-64 stitches from the thread on the one side of the piece on double pointed needles/short circular needle size 5.5 mm and knit up 1 stitch in each of the 8-8-10-10-12-12 stitches cast on under the sleeve = 54-58-64-70-74-76 stitches. Insert a marker thread in the middle of the new stitches under the sleeve and start the round at the marker thread. Work stocking stitch in the round for 4 cm, then decrease 1 stitch on each side of the marker thread – read DECREASE TIP. Decrease like this every 3½-3-2-1½-1½-1 cm a total of 8-9-11-13-15-15 times = 38-40-42-44-44-46 stitches. Continue with stocking stitch until the sleeve measures 31-30-30-28-26-24 cm. NOTE: Shorter measurements in larger sizes due to wider neck and longer yoke. Increase 4-5-6-7-7-8 stitches evenly spaced = 42-45-48-51-51-54 stitches. Change to double pointed needles size 4.5 mm and work rib (knit 1, purl 2) for 10 cm. Cast off with knit over knit and purl over purl - remember CASTING-OFF TIP. The sleeve measures approx. 41-40-40-38-36-34 cm from the division. Work the other sleeve in the same way. |
|||||||||||||||||||||||||
Diagram explanations |
|||||||||||||||||||||||||
|
|||||||||||||||||||||||||
 |
|||||||||||||||||||||||||
 |
|||||||||||||||||||||||||
Have you finished this pattern?Tag your pictures with #dropspattern #autumnwreathsweater or submit them to the #dropsfan gallery. Do you need help with this pattern?You'll find 28 tutorial videos, a Comments/Questions area and more by visiting the pattern on garnstudio.com. © 1982-2026 DROPS Design A/S. We reserve all rights. This document, including all its sub-sections, has copyrights. Read more about what you can do with our patterns at the bottom of each pattern on our site. |
|||||||||||||||||||||||||


With over 40 years in knitting and crochet design, DROPS Design offers one of the most extensive collections of free patterns on the internet - translated to 17 languages. As of today we count 324 catalogues and 12290 patterns translated into English (UK/cm). 12290
We work hard to bring you the best knitting and crochet have to offer, inspiration and advice as well as great quality yarns at incredible prices! Would you like to use our patterns for other than personal use? You can read what you are allowed to do in the Copyright text at the bottom of all our patterns. Happy crafting!
Post a comment to pattern DROPS 228-1
We would love to hear what you have to say about this pattern!
If you want to leave a question, please make sure you select the correct category in the form below, to speed up the answering process. Required fields are marked *.