
Popular categories
Looking for a yarn?


Comments / Questions (13)
![]() Cecilie wrote:
Cecilie wrote:
Hej, jeg er i tvivl om de udtagninger der skal laves ved sadelskulder. Der står at der kun skal tages ud ud til sadelskulder i første omgang. Samtidig skal der tages ud på hver omgang totalt 16 gange så det bliver 174 masker som skal strikkes løbende ind i A1. Jeg forstår ikke hvilke udtagninger der er tale om, som skal laves ved hver omgang. og er de totale 16 gange 16 udtagninger pr pind, eller antallet af pinde der skal laves udtagninger på? Jeg kan ikke få det til at blive 174 m
16.12.2025 - 15:26DROPS Design answered:
Hei Cecilie. I str. 5/6 år har du 110 masker etter økningen i halskanten. Så settes det 4 merker i arbeidet, det skal økes før/etter disse 4 merkene 16 ganger = 4 x 16 = 64 økte masker + 110 masker du hadde = 64 + 110 = 174 masker. Les ØKETIPS-2 på hvordan det skal økes og se gjerne hjelpevideoen: Hvordan tages der ud til sadelskulder (du finner hjelpevideoene til denne genseren til høyre / eller under bildet). mvh DROPS Design
22.12.2025 - 12:44
![]() Vanille wrote:
Vanille wrote:
Hello, J’utilise la baby mérinos, j’ai monté 84 mailles aux aiguilles 2,5 mmm.. après 3cm de cotes 2/2 le diamètre du col me semble vraiment tout petit .(32cm étiré, je ne pense pas qu’une tête passe ) j’ai pourtant bien fait mon échantillon qui était juste . Que me faut il faire?
28.07.2025 - 13:57DROPS Design answered:
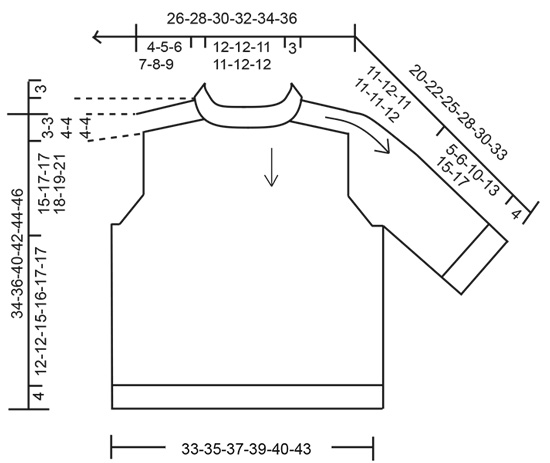
Bonjour Vanille, si votre rang de montage est trop serré, la tête pourrait ne pas passer, pensez à ajuster le rang de montage si nécessaire. Toutefois, l'encolure est juste ainsi, les 84 mailles autour du cou sont suffisantes pour un enfant de 3/4 ans et doivent donner ainsi 12 cm de largeur d'encolure + 3 cm de hauteur d'épaules (cf schéma). Bon tricot!
29.07.2025 - 08:59
![]() Mona wrote:
Mona wrote:
For the sleeves. After picking up and knitting the new stitches (8) and then inserting a marker in the middle of them, do I get a new piece of yarn to start knitting at the marker? Should I have just picked up the 4 stitches only to start with and keep knitting the other 54 sleeve stitches and then pick up the rest of the 4?
03.07.2025 - 12:17DROPS Design answered:
Dear Mona, you can see in this lesson, from picture 17) how to work sleeves, you can start picking up the 8 sts mid under sleeve, then work the stitches from thread, then work the first 4 sts, insert a marker here (in the middle of the 8 new sts), rounds now start here. Happy knitting!
04.07.2025 - 11:57
![]() Isabel Martins wrote:
Isabel Martins wrote:
Nas instruções eu faço os aumentos das frentes e costas e só depois irei fazer os aumentos das mangas, está correcto? Normalmente é ao mesmo tempo
03.06.2025 - 17:48
![]() Hanne wrote:
Hanne wrote:
Hei. Jeg har et spørmål angående den største størrelsen. Stemmer det at det skal være kun 100masker i vrangborden på halskant? Det ser så lite ut til en 13åring. Å jeg er ikke så flink til å lese mønster. På forhånd takk.
28.02.2025 - 10:11DROPS Design answered:
Hej Hanne, halsen skal ikke være så stor, ribkanten bliver elastisk, men du må ikke slå alt for stramt op :)
06.03.2025 - 11:59
![]() Rikke Højensbo wrote:
Rikke Højensbo wrote:
Hej, jeg har et ekstra spørgsmål. Når man strikker mønster A1, starter man mønsteret på forstykket. Når man kommer til bagstykket, skal man så fortsætte mønsteret fra forstykket, eller starter man forfra med en ret, to ret sammen osv (str 3/4). På forhånd tak :-)
13.11.2024 - 14:13
![]() Rikke Højensbo wrote:
Rikke Højensbo wrote:
Jeg har nu slået 84 masker op på rundpind 21/2 80 cm, som der står i opskriften. Er det meningen der skal strikkes rundt, er pinden for lang, eller er det meningen, der skal strikkes frem og tilbage og så syes sammen senere. Er der et sted, hvor man kan se hvad der menes med omslag og strikke drejet ret. Hvad menes med mærke? er det en tråd i anden farve? Mvh Rikke
05.11.2024 - 11:35DROPS Design answered:
Hej Rikke, du starter med at strikke rundt, hvis rundpinden er for lang, kan du bruge strømpepinde. Jo vi har videoer som viser og forklarer alle dine spørgsmål. Klik på "videoer" øverst i opskriften :)
07.11.2024 - 08:11
![]() Josephine wrote:
Josephine wrote:
Hallo. Es geht mir um den Abschnitt der Sattelschulter-Zunahmen. Für die größte Größe heißt es, 26x die Zunahmen bis 230 Maschen erreicht sind. Dann ist angegeben, dass A1 in der Höhe zu Ende gestrickt wird. Wenn ich die 26 Zunahmen und 230 Maschen erreicht habe, fehlen noch 4 Runden bis A1 beendet ist. Auch die Länge von ca. 9 cm ist noch nicht erreicht. Stricke ich diese Runden ohne Zunahmen und fange dann mit den Ärmelzunahmen an?
26.04.2023 - 21:26DROPS Design answered:
Liebe Josephine, wenn A.1 fertig in der Höhe ist wird dann A.2 gestrickt, Beachten Sie nur, daß A.2 schön auf A.1 passt damit das Muster genauso in der Höhe sowie in der Breite wierdeholt wird. Wenn die 9 cm noch nicht erreicht sind, stricken Sie bis die Arbeit 9 cm misst (ohne Zunahmen). Viel Spaß beim stricken!
27.04.2023 - 08:13
![]() Riri wrote:
Riri wrote:
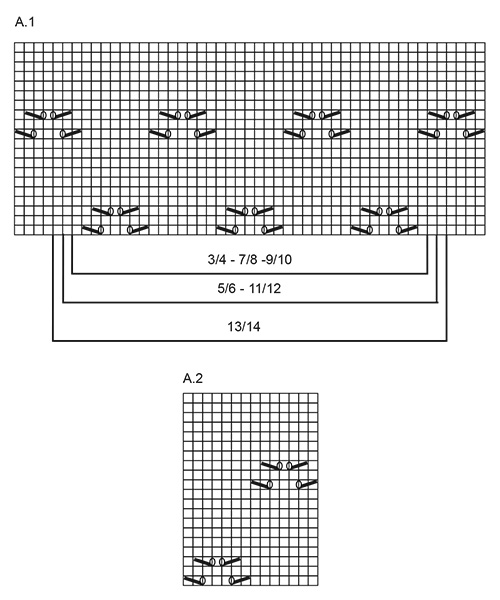
Noch eine Frage. Ist das Diagramm kopfüber dargestellt?
15.03.2022 - 10:00DROPS Design answered:
Liebe Riri, Diagram lesen Sie von unten nach oben (wie immer) - hier lesen Sie mehr über Diagramme. Viel Spaß beim stricken!
15.03.2022 - 10:19
![]() Riri wrote:
Riri wrote:
Hallo! Ich arbeite gerade an gr 5/6 von diesem schönen Muster. leider habe ich probleme. Ich dachte laut des Diagrams dass ich mit dem muster ab Reihe 8 anfangen soll. Auf dem Bild sehe ich dass es direkt unter der Halsblende anfängt (?!) das wäre die erste Frage. Welche Reihe unter der Halsblende fängt das Muster an? und 2.te Sache. In der 8 Reihe habe ich dann 55 Maschen (39 + 16 Zunahmen) Man braucht 14 für das Muster. Ich komme mit der Einteilung gar nicht klar. Vielen Dank f. d. Hilfe
15.03.2022 - 09:31DROPS Design answered:
Liebe Riri, in Größe 5/6 stricken Sie die 39 Maschen in A.1 ab der 1. Reihe wie im Diagram gezeichnet, dann stricken Sie die Zunahmen bei jeder Reihe wie im Diagram: glatt rechts bis die 11. Reihe wo Sie diese Maschen im Lochmuster stricken. Viel Spaß beim stricken!
15.03.2022 - 10:25
|
|||||||||||||||||||||||||
Pink Peony#pinkpeonysweater |
|||||||||||||||||||||||||
 |
 |
||||||||||||||||||||||||
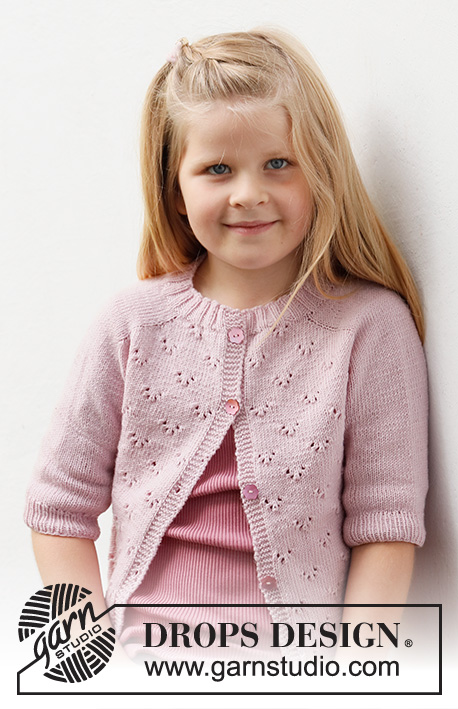
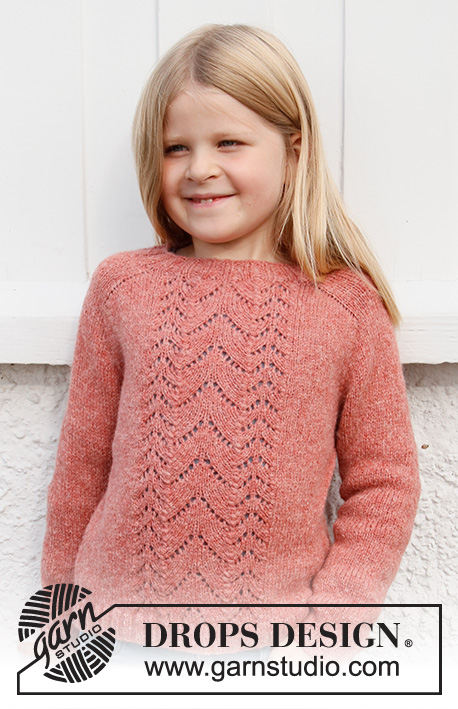
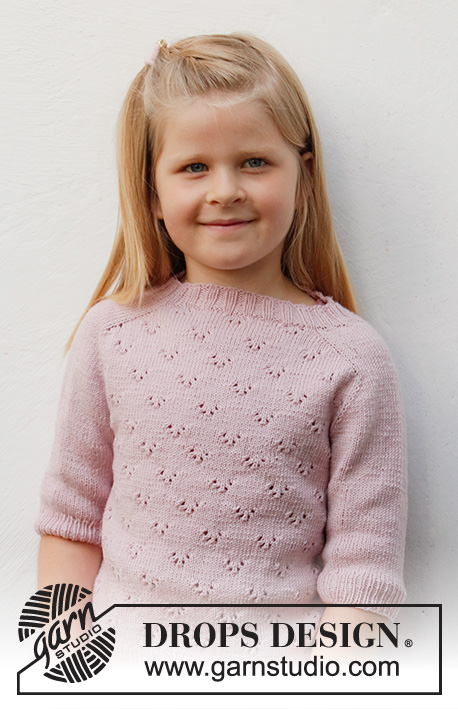
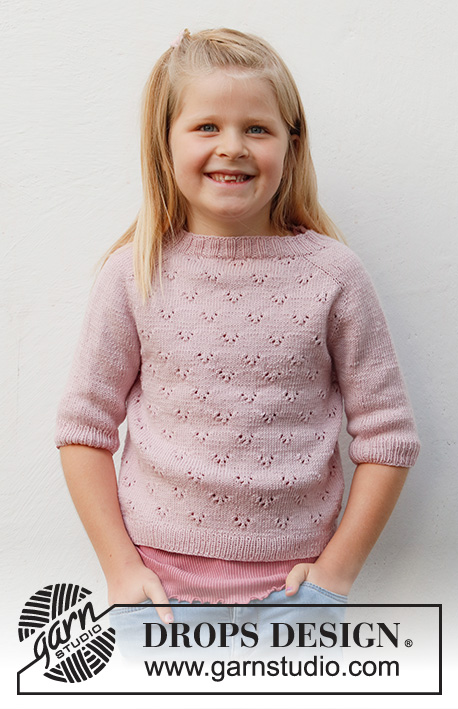
Knitted jumper for children in DROPS Baby Merino. The piece is worked top down with saddle-shoulders, lace pattern and short sleeves. Sizes 3-14 years.
DROPS Baby & Children 38-21 |
|||||||||||||||||||||||||
|
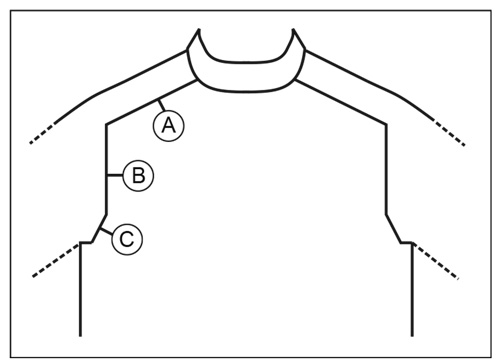
------------------------------------------------------- EXPLANATIONS FOR THE PATTERN: ------------------------------------------------------- PATTERN: See diagrams A.1 and A.2. Find your size in the diagram. INCREASE TIP-1 (evenly spaced): To work out how to increase evenly, count the total number of stitches on the needle (e.g. 84 stitches) and divide by the number of increases to be made (e.g. 22) = 3.8. In this example, increase by making 1 yarn over after alternately each 3rd and 4th stitch (approx.). On the next round work the yarn overs twisted to avoid holes. INCREASE TIP-2 (for saddle shoulders, sleeves and yoke): BEFORE MARKER: The new stitch twists to the right. Use the left needle to pick up the strand between 2 stitches from the previous round, pick up the back strand and knit in the front loop. AFTER MARKER: The new stitch twists to the left. Use the left needle to pick up the strand between 2 stitches from the previous round, pick up the front strand and knit in the back loop. CASTING-OFF TIP: To avoid the cast-off edge being tight you can cast off with a larger size needle. If the edge is still tight, make 1 yarn over after approx. each 6th stitch at the same time as casting off; the yarn overs are cast off as normal stitches. ------------------------------------------------------- START THE PIECE HERE: ------------------------------------------------------- JUMPER – SHORT OVERVIEW OF THE PIECE: The neck and yoke are worked in the round with circular needle, top down. Stitches are increased for the shoulders, then for the sleeves and finally for the yoke. The yoke is divided for the body and sleeves and the body continued in the round. The sleeves are worked in the round with double pointed needles/short circular needle, top down. NECK: Cast on 84-88-92-92-96-100 stitches with circular needle size 2.5 mm and Baby Merino. Knit 1 round, then work rib (knit 2, purl 2) for 3 cm. When the rib is finished, knit 1 round where you increase 22-22-26-26-26-26 stitches evenly spaced – read INCREASE TIP-1 = 106-110-118-118-122-126 stitches. Knit 1 round; yarn overs knitted twisted. Change to circular needle size 3 mm. YOKE: The beginning of the round is the transition between right shoulder and back piece. Insert 1 marker after the first 35-36-41-41-42-43 stitches (= approx. mid-front) – THE PIECE IS MEASURED FROM HERE! In addition, insert 4 other markers as described below – without working the stitches and each marker inserted between 2 stitches. The markers are used when increasing and should be of a different colour to the marker on the neck. Marker 1: Insert the marker before the first stitch on the round (= back side of right shoulder when garment is worn). Marker 2: Count 16-16-22-22-22-22 stitches from marker 1 (= shoulder), insert the marker before the next stitch. Marker 3: Count 37-39-37-37-39-41 stitches from marker 2 (= front piece), insert the marker before the next stitch. Marker 4: Count 16-16-22-22-22-22 stitches from marker 3 (= shoulder), insert the marker before the next stitch. There are now 37-39-37-37-39-41 stitches left on round after marker 4 (= back piece). Allow the 4 markers to follow your work onwards. INCREASES FOR SADDLE SHOULDERS: Read the whole of the next section before continuing! Piece is now worked with A.1 over the stitches on front piece and back piece (see diagram for your size), and stocking stitch over the stitches on saddle shoulder/sleeves. AT THE SAME TIME, on the first round increase 4 stitches for the shoulders as follows: Increase 1 stitch BEFORE markers 1 and 3 and increase 1 stitch AFTER markers 2 and 4 – read INCREASE TIP-2. You are only increasing on the front and back pieces, the number of sleeve stitches remains the same. Increase like this every round a total of 12-16-20-22-24-26 times = 154-174-198-206-218-230 stitches. REMEMBER THE KNITTING TENSION! The increased stitches are worked into A.1. When A.1 is finished in height, continue pattern the same way upwards (A.2 shows 1 repetition of pattern), make sure that A.2 fits over the stitches from A.1. After the last increase, the piece measures approx. 4-5-6-7-8-9 cm from the marker on the neck. Now increase for the sleeves as described below. INCREASES FOR SLEEVES: Continue with stocking stitch over the stitches on the sleeves, and continue pattern as before on front piece and back piece. AT THE SAME TIME on the next round increase 4 stitches as follows: Increase 1 stitch AFTER markers 1 and 3 and increase 1 stitch BEFORE markers 2 and 4. You are only increasing on the sleeves and the number of stitches on the front and back pieces remains the same. The increased stitches are worked in stocking stitch. Increase like this every 2nd round a total of 13-17-15-16-18-19 times = 206-242-258-270-290-306 stitches. The piece measures approx. 12-16-15-17-19-21 cm from the marker on the neck. INCREASES FOR YOKE: Now increase 1 stitch on each side of all 4 markers as follows: Work until there is 1 stitch left before markers 1 and 3, increase 1 stitch before the marker, work 1 stitch, move the marker to the right needle and increase 1 stitch after the marker. Work to markers 2 and 4, increase 1 stitch before the marker, move the marker to the right needle, work 1 stitch and increase 1 stitch after the marker (= 8 stitches increased). You are now increasing on both the front and back pieces and on the sleeves. The increased stitches are worked into A.2 on the back/front piece and in stocking stitch on the sleeves. Increase like this every 2nd round a total of 5-2-2-1-0-0 times = 246-258-274-278-290-306 stitches. When all the increases are finished, the piece measures approx. 15-17-17-18-19-21 cm from the marker on the neck. If the piece is shorter than this, continue working without further increases to the correct length. Now divide the piece for body and sleeves on the next round as follows: Place the first 52-54-56-56-58-60 stitches on a thread for sleeve, cast on 8-8-8-10-10-10 new stitches (= in the side, under the sleeve), work as before over the next 71-75-81-83-87-93 stitches (= front piece), place the next 52-54-56-56-58-60 stitches on a thread for sleeve, cast on 8-8-8-10-10-10 new stitches (= in the side, under the sleeve), and work as before over the last 71-75-81-83-87-93 stitches (= back piece). Body and sleeves are finished separately. THE PIECE IS NOW MEASURED FROM HERE. BODY: = 158-166-178-186-194-206 stitches. Work A.2 as before; the stitches which do not fit into A.2 in the sides are worked in stocking stitch. Continue working until the piece measures 12-12-15-16-17-17 cm from the division. There is approx. 4 cm left to finished length; try the jumper on and continue to desired length. Knit 1 round where you increase 36-36-36-40-44-44 stitches evenly spaced = 194-202-214-226-238-250 stitches. NOTE: You increase stitches here to prevent the rib being tight. Change to circular needle size 2.5 mm and work rib (knit 1, purl 1) for 4 cm. Cast off with knit over knit and purl over purl – read CASTING-OFF TIP! The jumper measures approx. 34-36-40-42-44-46 cm from the shoulder down. SLEEVES: Place the 52-54-56-56-58-60 stitches from the thread on the one side of the piece on short circular needle/double pointed needles size 3 mm and knit up 1 stitch in each of the 8-8-8-10-10-10 stitches cast on under the sleeve = 60-62-64-66-68-70 stitches. Insert a marker thread in the middle of the new stitches under the sleeve. Start at the marker thread and work stocking stitch in the round. Continue working until the sleeve measures 5-6-10-13-15-17 cm from the division, There is approx. 4 cm left to finished length; try the jumper on and continue to desired length. Knit 1 round where you decrease 4 stitches evenly spaced = 56-58-60-62-64-66 stitches. Change to double pointed needles size 2.5 mm and work rib (knit 1, purl 1) for 4 cm. Cast off with knit over knit and purl over purl – remember CASTING-OFF TIP! The sleeve measures approx. 9-10-14-17-19-21 cm from the division. Work the other sleeve in the same way. |
|||||||||||||||||||||||||
Diagram explanations |
|||||||||||||||||||||||||
|
|||||||||||||||||||||||||
 |
|||||||||||||||||||||||||
 |
|||||||||||||||||||||||||
 |
|||||||||||||||||||||||||
Have you finished this pattern?Tag your pictures with #dropspattern #pinkpeonysweater or submit them to the #dropsfan gallery. Do you need help with this pattern?You'll find 28 tutorial videos, a Comments/Questions area and more by visiting the pattern on garnstudio.com. © 1982-2026 DROPS Design A/S. We reserve all rights. This document, including all its sub-sections, has copyrights. Read more about what you can do with our patterns at the bottom of each pattern on our site. |
|||||||||||||||||||||||||


With over 40 years in knitting and crochet design, DROPS Design offers one of the most extensive collections of free patterns on the internet - translated to 17 languages. As of today we count 324 catalogues and 12290 patterns translated into English (UK/cm). 12290
We work hard to bring you the best knitting and crochet have to offer, inspiration and advice as well as great quality yarns at incredible prices! Would you like to use our patterns for other than personal use? You can read what you are allowed to do in the Copyright text at the bottom of all our patterns. Happy crafting!
Post a comment to pattern DROPS Baby & Children 38-21
We would love to hear what you have to say about this pattern!
If you want to leave a question, please make sure you select the correct category in the form below, to speed up the answering process. Required fields are marked *.