
Popular categories
Looking for a yarn?


Comments / Questions (121)
![]() MARIE THERESE wrote:
MARIE THERESE wrote:
Bonjour je ne comprends pas vos diminutions 2 devant .pouvez vous m expliquer après avoir laisser les m centr. en attente comment diminuer tous les rangs - 6 fois 1m merci
20.03.2026 - 16:47DROPS Design answered:
Bonjour Marie-Thérèse, après avoir mis les mailles de l'encolure devant en attente, vous terminez chaque devant séparément: pour le devant droit, vous diminuez après les 3 premières mailles : vous tricotez 3 m jersey puis vous diminuez 1 m comme indiqué; pour le devant gauche, vous diminuez avant les 3 dernières mailles: vous tricotez sur l'endroit jusqu'à ce qu'il reste 5 mailles, vous diminuez 1 m (2 m ens à l'end) et vous tricotez les 3 dernières mailles en jersey. Vous tricotez 1 rang sur l'envers (sans diminuer) et vous répétez ces 2 rangs encore 5 fois = vous avez diminué 6x 1 m tous les rangs sur l'endroit. Bon tricot!
23.03.2026 - 07:25
![]() MARIE THERESE wrote:
MARIE THERESE wrote:
Bonjour effectivement je me suis rendue compte qu'il n y avait pas de raglan dans ce modèle excusez-moi de vous avoir fait perdre du temps pour rien. MERCI surtout pour vos conseils et bonne journée avec toutes mes excuses
05.03.2026 - 10:31
![]() MARIE THERESE wrote:
MARIE THERESE wrote:
Bonjour comment vous diminuez 1 maille en raglan pour 3 et 2 mailles je les tricote ensemble à 3m des bords mais pour 1m comment SVP MERCI
04.03.2026 - 08:57DROPS Design answered:
Bonjour Marie-Thérèse, est-il possible que vous tricotiez un autre modèle que celui-ci? Il n'y a pas d'emmanchures raglan ici. À moins que vous ne parliez des emmanchures? Si tel est le cas alors pour les emmanchures, on doit rabattre les mailles (pas les diminuer) en début de rang de chaque côté: rabattez les 3 premières mailles du rang, terminez le rang et tournez; rabattez les 3 premières mailles, terminez le rang = vous avez rabattu 1 x 3 m de chaque côté. Rabattez ensuite 1 x 2 m de chaque côté de la même façon puis 1 à 3 fois 1 m de chaque côté de la même façon. Bon tricot!
05.03.2026 - 09:16
![]() GUIBERT wrote:
GUIBERT wrote:
Je ne compreds pas vos diminutions je tricote le modèle ai248 j'ai 103 m et 14 diminutions soit 7.34 çà veut dire que sur le même rang je fais les 14 diminutions à la 7è , puis 13è ou 14è m, puis 20ème /21è m etc... jusqu'à mes 14 diminutions est ce bien çà MERCI pour votre patience à répondre à toutes nos questions ...bonne jornée
18.02.2026 - 08:52DROPS Design answered:
Bonjour Mme Guibert, pensez à utiliser la petite calculatrice que vous trouverez en bas à droite de la page, vous verrez ainsi le calcul exact et comment diminuer. Bon tricot!
19.02.2026 - 08:17
![]() GUIBERT wrote:
GUIBERT wrote:
J ai decidé de faire le modèle ai248 en taille L fait avec 350G de drops AIR soit 7 pelotes soit 1050mètres. Je veux le faire avec brushed ALPACA SILK 1 FIL Je prends combien de pelotes sachant que ce sont des 25g j ai pensé à _ 8 pelotes soit 200g et 1120mètres est-ce bon? merci
16.02.2026 - 19:36DROPS Design answered:
Bonjour Mme Guibert, pensez à utilisez le convertisseur qui fait le calcul tout seul :) Il vous faudra effectivement 200 g Brushed Alpaca Silk (soit 8 pelotes) pour la taille L. Bon tricot!
17.02.2026 - 15:19
![]() GUIBERT wrote:
GUIBERT wrote:
Je voudrais faire c pull en point de riz faut il prendre les mêmes explications en ce qui concerne le nombre de mailles à monter et faut il prendre plus de laine merci
15.02.2026 - 11:33DROPS Design answered:
Bonjour Mme Guibert, vérifiez que vous avez bien le bon échantillon à la fois en largeur et en hauteur, si tel est le cas, la quantité de laine devrait être la même sinon, il vous faudra probablement ajuster , votre magasin saura vous aider et vous conseiller, même par mail ou téléphone. Bon tricot!
17.02.2026 - 14:33
![]() Gaby wrote:
Gaby wrote:
Bonsoir aprés les diminutions encolure, doit-on continuer les 3 mailles jersey coté encolure jusqu'en haut de l'ouvrage ?merci.
03.02.2026 - 21:13DROPS Design answered:
Bonjour Gaby, tout à fait, retrouvez sous DIMINUTIONS–2 (encolure devant). comment tricoter les diminutions de l'encolure pour les 2 épaules. Bon tricot!
04.02.2026 - 17:23
![]() Jayne wrote:
Jayne wrote:
Please can you explain the A1 pattern in rows as i am not clear from the diagram? Many thanks
18.01.2026 - 09:15DROPS Design answered:
Dear Jayne, starting from the right side, work A.1 as follows: (knit all stitches) on first row, then on 2nd row (from the wrong side), repeat (K1, P1) all the row. You will get rib 1 stitch in stocking stitch (1st stitch A.1), 1 stitch in garter stitch (2nd stitch A.1). Happy knitting!
19.01.2026 - 10:10
![]() Mauduit wrote:
Mauduit wrote:
Bonjour , je souhaite tricoter ce modèle en Brushed Alpaca Silk 1 fil aiguille n°5 et en côtes perlées .Es-ce que je peux suivre ce modèle ? Sinon pouvez-vous m'en proposer un autre . Merci de votre réponse . Bien à vous
03.04.2025 - 16:03DROPS Design answered:
Bonjour Mme Mauduit, tant que vous avez le même échantillon vous pouvez probablement suivre les indications de ce modèle, les indications du devant et du dos sont en cm, donc indépendants du nombre de rangs en côtes fantaisie; pensez juste que le point utilisé peut affecter la quantité nécessaire. Les manches se tricotent ici en jersey, si votre échantillon est juste en largeur et en hauteur, il vous suffira de suivre les indications sans avoir à ajuster/ adapter. Bon tricot!
04.04.2025 - 07:48
![]() Letizia wrote:
Letizia wrote:
Grazie per la risposta, forse c'è bisogno di una correzione: Mettere ora in attesa su un ferma maglie le 17-17-19-21-23-25 maglie centrali per lo scollo, e finire ogni spalla separatamente. v = per la spalla rimangono 18-21-22-25-29-32 maglie. Proseguire finché il lavoro non misura 62-64-66-68-70-72 cm; intrecciare le maglie. Lavorare l’altra spalla in modo uguale. Non sono riportate 27 maglie né le diminuzioni ❤️grazie ancora
01.02.2025 - 23:54
|
|||||||
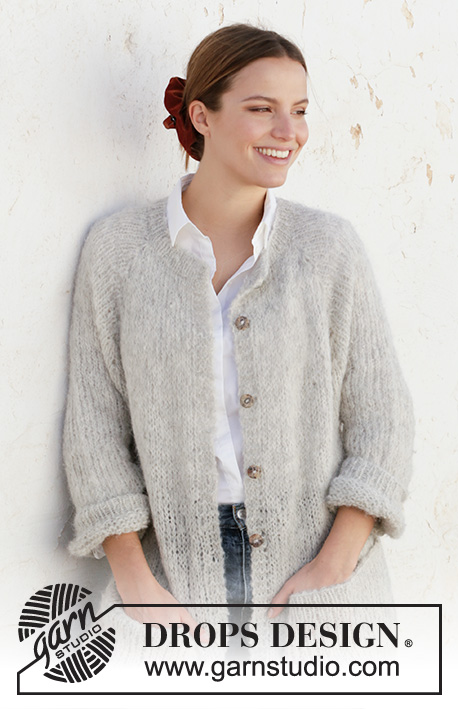
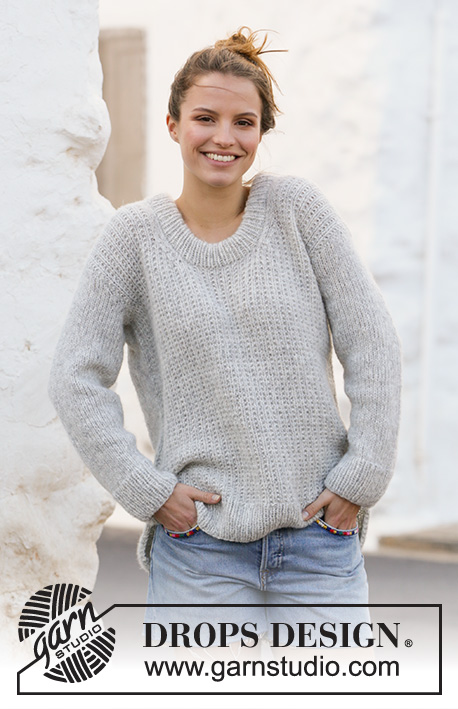
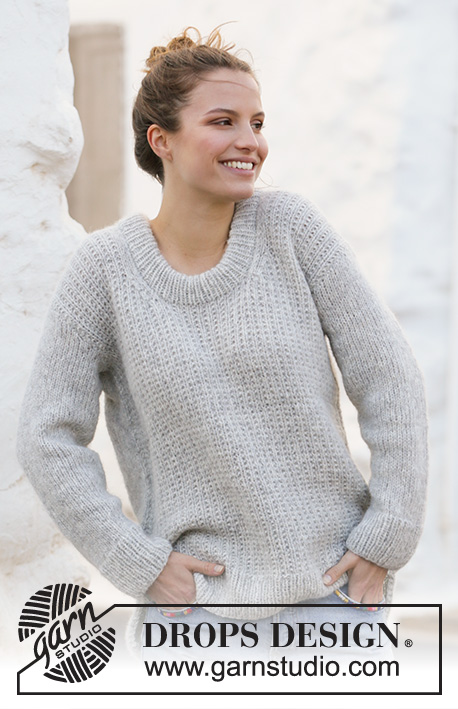
Rainy Day Sweater#rainydaysweater |
|||||||
 |
 |
||||||
Knitted jumper with textured pattern in DROPS Air. Size: S - XXXL
DROPS 210-5 |
|||||||
|
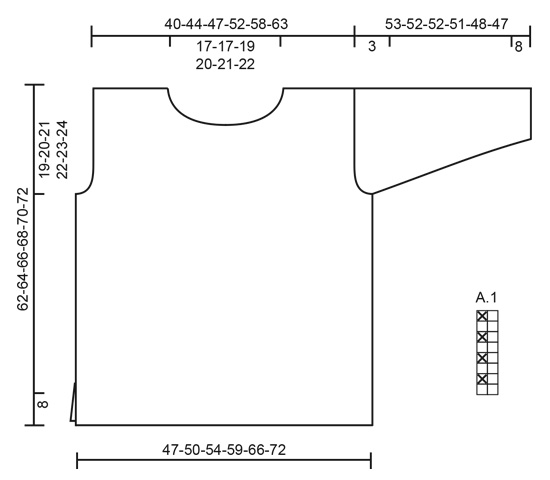
---------------------------------------------------------- EXPLANATION FOR THE PATTERN: ---------------------------------------------------------- GARTER STITCH (back and forth): Knit all rows. 1 ridge vertically = knit 2 rows. PATTERN: See diagram A.1. DECREASE TIP-1 (evenly): To calculate how to decrease evenly, use the total number of stitches on row (e.g. 89 stitches) and divide stitches by number of decreases to be done (e.g. 12) = 7.4. In this example decrease by knitting approx. every 6th and 7th stitch together. DECREASE TIP-2 (applies to neck decrease front piece): Decrease inside 3 stitches, continue these 3 stitches in stocking stitch up along neck edge. All decreases are done from the right side. Decrease as follows before stitches slipped on a stitch holder for neck (left shoulder). Work until 5 stitches on needle (towards stitches slipped on a stitch holder), knit 2 together, work the last 3 stitches on needle in stocking stitch. Decrease as follows after stitches slipped on a stitch holder for neck (right shoulder). Work 3 stitches in stocking stitch, slip next stitch knitwise, knit next stitch, pass slipped stitch over, work the rest of row. INCREASE TIP (applies to sleeves): Begin 1 stitch before marker thread, make 1 yarn over, 2 stitches (marker thread is in the middle of these stitches), make 1 yarn over. On next round knit yarns over twisted to avoid holes. ---------------------------------------------------------- START THE PIECE HERE: ---------------------------------------------------------- JUMPER - SHORT OVERVIEW OF THE PIECE: Work jumper back and forth in 2 parts that are sewn together when finished. Work sleeves in the round on double pointed needles. BACK PIECE: Cast on 89-97-103-113-125-137 stitches on circular needle size 4.5 mm with Air. Purl 1 row from wrong side, then work as follows from right side: 2 edge stitches in in GARTER STITCH – see explanation above, * knit 1/purl 1 *, repeat from *-* until 3 stitches remain, knit 1 and 2 stitches in garter stitch. Continue like this until piece measures 8 cm. Switch to circular needle size 5.5 mm. Knit 1 row from right side while decreasing 12-14-14-16-18-20 stitches evenly - READ DECREASE TIP-1 = 77-83-89-97-107-117 stitches. Work A.1 with 1 edge stitch in garter stitch in each side. When piece measures 43-44-45-46-47-48 cm, cast off for armholes in each side. Cast off stitches at beginning of every row in each side: Cast off 3 stitches 1-1-1-1-1-1 time, 2 stitches 1-1-1-1-1-1 time and 1 stitch 1-1-2-2-2-3 times = 65-71-75-83-93-101 stitches. Continue in A.1 until piece measures 60-62-64-66-68-70 cm. Now cast off the middle 27-27-29-31-33-35 stitches for neck, and finish each shoulder separately. Then decrease on next row from the neck as follows: 1 stitch 1 time = 18-21-22-25-29-32 stitches remain for shoulder. Continue until piece measures 62-64-66-68-70-72 cm, and cast off. Work the other shoulder the same way. FRONT PIECE: Cast on and work as on back piece until piece measures 54-56-58-60-62-64 cm. Now slip the middle 17-17-19-21-23-25 stitches on 1 stitch holder for neck, and finish each shoulder separately. Then decrease every row from the right side as follows: 1 stitch 6 times - READ DECREASE TIP-2 (applies to neck) = 18-21-22-25-29-32 stitches remain for shoulder. Continue until piece measures 62-64-66-68-70-72 cm , and cast off. Work the other shoulder the same way. SLEEVE: Work sleeves in the round on double pointed needles/ circular needle, bottom up. Divide piece when decreasing for sleeve cap and work back and forth on needle. Cast on 46-48-50-52-52-56 stitches on double pointed needles size 4.5 mm with Air. Knit 1 round, then work rib, knit 1/purl 1. When piece measures 8 cm, switch to double pointed needles size 5.5 mm, and work in stocking stitch On first round in in stocking stitch decrease 8-8-8-8-8-10 stitches evenly = 38-40-42-44-44-46 stitches. Insert a marker thread at beginning of round = mid under sleeve. Continue in stocking stitch, AT THE SAME TIME when piece measures 10-10-10-10-12-12 cm, increase 1 stitch on each side of marker thread - READ INCREASE TIP. Work yarn overs twisted on next round to avoid holes. Increase every 3½-3½-3-3-2-2 cm 11-12-13-13-15-15 times in total = 60-64-68-70-74-76 stitches. When piece measures 50-49-49-48-45-44 cm, cast off 3 stitches on each side of marker thread (= 6 stitches cast off mid under sleeve), then work sleeve back and forth. Cast off for sleeve cap at beginning of every row in each side as follows: 2 stitches 1 time, 3 stitches 1 time, then cast off the remaining stitches. Work another sleeve the same way. ASSEMBLY: Sew the shoulder seams. Sew in sleeves. Sew side seams inside 1 edge stitch until 8 cm remain = vent. NECK EDGE: Pick up approx. 92-106 stitches with circular needle size 4,5 mm around the neck (including stitches on stitch holder and adapt so that the number of stitches is divisible by 2). Work rib knit 1/purl 1 for 9 cm. Cast off. Fold rib at the top of neck down on the inside of garment. Fasten rib to form a folding edge. To avoid a tight neck edge and avoiding the edge to tip outwards, it is important to make the seam elastic. |
|||||||
Diagram explanations |
|||||||
|
|||||||
 |
|||||||
Have you finished this pattern?Tag your pictures with #dropspattern #rainydaysweater or submit them to the #dropsfan gallery. Do you need help with this pattern?You'll find 27 tutorial videos, a Comments/Questions area and more by visiting the pattern on garnstudio.com. © 1982-2026 DROPS Design A/S. We reserve all rights. This document, including all its sub-sections, has copyrights. Read more about what you can do with our patterns at the bottom of each pattern on our site. |
|||||||


With over 40 years in knitting and crochet design, DROPS Design offers one of the most extensive collections of free patterns on the internet - translated to 17 languages. As of today we count 324 catalogues and 12290 patterns translated into English (UK/cm). 12290
We work hard to bring you the best knitting and crochet have to offer, inspiration and advice as well as great quality yarns at incredible prices! Would you like to use our patterns for other than personal use? You can read what you are allowed to do in the Copyright text at the bottom of all our patterns. Happy crafting!
Post a comment to pattern DROPS 210-5
We would love to hear what you have to say about this pattern!
If you want to leave a question, please make sure you select the correct category in the form below, to speed up the answering process. Required fields are marked *.