
Popular categories
Looking for a yarn?


Comments / Questions (15)
![]() Martine wrote:
Martine wrote:
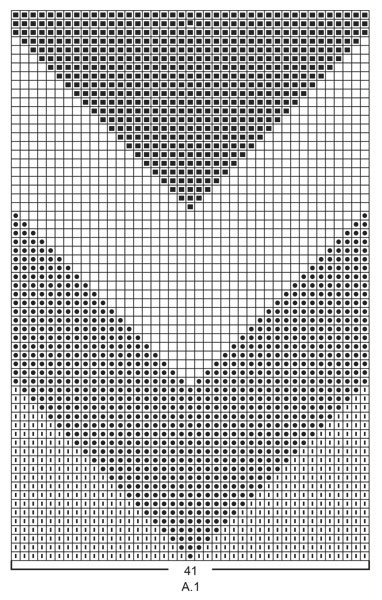
Bonjour je suis sur drops je suis sur drops modele pull femme le diagramme les rayures il montre 41 maille et au mileu 41 je doi faire 2fois le diagrammes pour arriver a mes mail moner je doi monter 138 mailles et le diagramme fait 41 m svp merci
27.03.2026 - 17:36DROPS Design answered:
Bonjour Martine, en XXXL, vous montez 138 m mais vous diminuez 13 m au 1er rang après les côtes, il doit vous rester 125 m que vous tricotez ainsi 1 m lisière, 41 m en beige, puis vous tricotez les 41 m de A.1, et vous terminez par 41 m en beige et 1 m lisière. Le diagramme A.1 ne se tricote qu'une seule fois en hauteur, mais on va continuer les diagonales de couleur jusqu'à ce que les rayures atteignent les côtés. Bon tricot!
07.04.2026 - 08:12
![]() TD wrote:
TD wrote:
Is the knitting tension given that for the 5.5 needles ??
20.01.2025 - 10:37DROPS Design answered:
Dear TD, correct, tension is worked with larger needle size. Happy knitting!
20.01.2025 - 15:35
![]() Sylvie wrote:
Sylvie wrote:
Bonjour (encore moi…) Pouvez vous m’expliquer comment relever les 5 mailles pour l’encolure svp (1ère fois que je tricote un pull!). Merci par avance
02.11.2024 - 21:19DROPS Design answered:
Bonjour Sylvie, retrouvez comment faire dans cette vidéo à partir du time code 6:15 environ. Bon tricot!
04.11.2024 - 08:48
![]() Sylvie wrote:
Sylvie wrote:
Bonjour Je suis perplexe car pour une taille L le schéma indique que la pointe du col V se situe au dessus des 58 cm en partant du bas mais dans le titi, il est indiqué de commencer les diminutions du col V quand l’ouvrage mesure 40cm… pouvez vous m’indiquer si c’est correct ? Merci
01.11.2024 - 11:55DROPS Design answered:
Bonjour Sylvie, on commence l'encolure V quand le devant mesure 40 cm, les 58 cm indiqués à droite du schéma correspondent à la hauteur totale du pull: des côtes jusqu'aux épaules. Bon tricot!
01.11.2024 - 16:37
![]() Alice wrote:
Alice wrote:
Je ne suis pas sûre de comment commencer les manche. Je relève 30 mailles devant et 30mailles dans le dos ?
15.01.2024 - 08:53DROPS Design answered:
Bonjour Alice, c'est exact pour la taille M. Bon tricot!
15.01.2024 - 10:17
![]() Katleen wrote:
Katleen wrote:
Beste, Ik begrijp niet wat u bedoelt met deze beschrijving ivm aanzet V hals. Graag wat meer uitleg. ‘Brei op de volgende naald (goede kant) recht tot de 5 steken averecht midden voor. Neem dan 1 steek op in elk van de 5 averechte steken, maar neem deze op aan de achterkant van deze 5 steken.’ Thanks !
15.05.2023 - 18:25DROPS Design answered:
Dag Katleen,
In plaats van de rechter naald in de voorste lus van de steek te steken, steek je de naald nu in de achterste lus van de steek. In elke steek brei je 2 steken. Dus in de eerste steek brei je twee steken, in de tweede steek brei je 2 steken, enzovoorts.
17.05.2023 - 18:01
![]() Annie wrote:
Annie wrote:
Je ne comprends pas les 5 mailles au point mousse côté encolure pouvez vous m expliquer svp d avance merci
21.02.2021 - 20:28DROPS Design answered:
Bonjour Annie, quand on tricote les 2 devants séparément, on les tricote en jersey = comme avant, mais avec 1 maille lisière au point mousse côté emmanchure et 5 mailles au point mousse côté encolure, autrement dit, sur l'endroit, tricotez toutes les mailles à l'endroit et sur l'envers, tricotez les 5 mailles côté encolure (en début de rang sur l'envers pour le devant gauche/en fin de rang sur l'envers pour le devant droit) à l'endroit (tout comme la maille lisière côté emmanchure). Bon tricot!
22.02.2021 - 09:26
![]() Anne Vowinckel wrote:
Anne Vowinckel wrote:
Gehen die Streifen über die ganze Breite? Im Diagramm sieht es so aus, als ob an der Seite noch beige gestrickt wird. Auf dem Foto sieht es anders aus.
24.10.2020 - 17:11DROPS Design answered:
Liebe Frau Vowinckel, ja genau, die streifen gehen über die ganze Breite, dh so wie in A.1 beidseitig weitestricken bis die Randmaschen mit der unteren bzw neuen Farbe gestrickt wird, dh Sie werden dann bei einigen Reihen mit 5 und eben mit 7 knäuel stricken. Viel Spaß beim stricken!
26.10.2020 - 08:04
![]() Catherine Cortesi wrote:
Catherine Cortesi wrote:
Bonjour, Je ne suis pas sûre de comprendre les explications pour les manches : au début, elles sont ouvertes, c'est ça ? Ce sont les deux centimètres qui permettent de donner l'aisance du dessous de bras ? Merci de votre réponse.
02.10.2020 - 14:50DROPS Design answered:
Bonjour Mme Cortesi, vous avez tout à fait compris, ces 2 cm du haut de la manche seront cousues le long des mailles rabattues pour les emmanchures dos/devant sur les côtés, et on termine ensuite la manche en rond. Bonne continuation!
02.10.2020 - 15:11
![]() Elke Jahn wrote:
Elke Jahn wrote:
Ich möchte gerne wissen, ob in dem Diagramm A1 nur die Hinreihen oder die Hin- und Rückreihen angegeben sind. Können Sie mir da bitte helfen? Vielen Dank!
22.01.2020 - 09:48DROPS Design answered:
Liebe Frau Jahn, alle Reihen sind im Diagramme gezeichnet, dh die Hin- sowie die Rückreihen - hier lesen Sie mehr über Diagramme. Viel Spaß beim stricken!
22.01.2020 - 10:18
|
|||||||||||||
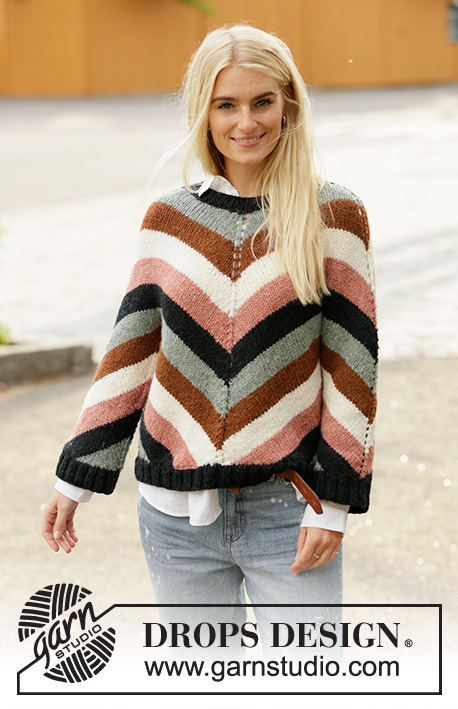
Grand Canyon Nights#grandcanyonnightssweater |
|||||||||||||
 |
 |
||||||||||||
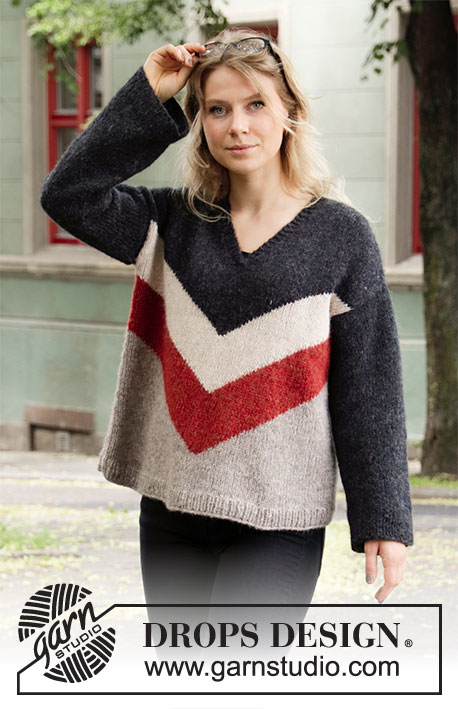
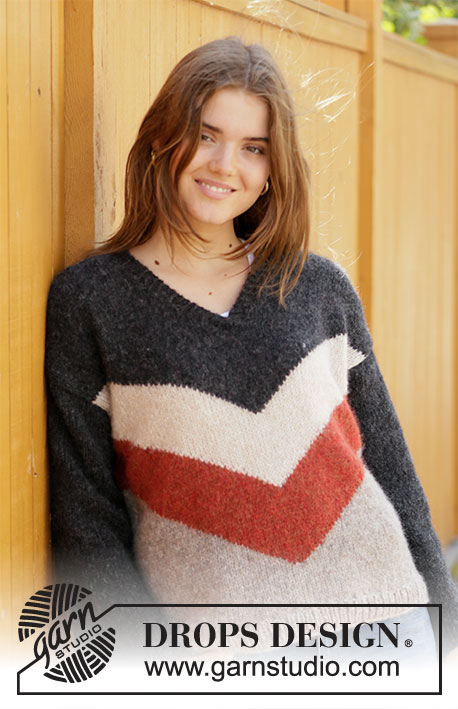
Knitted jumper with stripes and V-neck in DROPS Air. Size: S - XXXL
DROPS 205-43 |
|||||||||||||
|
---------------------------------------------------------- EXPLANATION FOR THE PATTERN: ---------------------------------------------------------- GARTER STITCH (back and forth): Knit all rows. 1 ridge vertically = knit 2 rows. PATTERN: See diagram A.1. Work the entire diagram in stocking stitch and continue stripes the same way as A.1 shows out in each side on front and back piece. Work with 3, 5 or 7 balls on row (depending on where you are in the pattern), to avoid long jumps with the yarn on the wrong side. I.e. At the bottom of jumper when first stripes begin, work with 1 ball beige on each side of jumper and 1 ball orange in the middle of jumper. NOTE: To avoid holes at colour change twine the yarns together. DECREASE TIP-1 (evenly): To calculate how to decrease evenly, use the total number of stitches on row (e.g. 100 stitches), minus edge stitches (2 stitches) and divide the remaining 98 stitches by number of decreases to be done (e.g. 9) = 10.8. In this example decrease by knitting approx. every 10th and 11th stitch together. Do not decrease over edge stitches. DECREASE TIP-2 (applies to V-neck): Decrease for V-neck inside 5 edge stitches in garter stitch towards mid front. All decreases are done from the right side! Decrease as follows after 5 edge stitches in garter stitch: Slip 1 stitch knitwise, knit 1, pass slipped stitch over stitch worked (= 1 stitch decreased). Decrease as follows before 5 edge stitches in garter stitch: Begin 2 stitches before the 5 edge stitches and knit 2 together (= 1 stitch decreased). ---------------------------------------------------------- START THE PIECE HERE: ---------------------------------------------------------- JUMPER - SHORT OVERVIEW OF THE PIECE: Work front and back piece back and forth on circular needle separately, bottom up. Sew the shoulder seams. Then pick up stitches along armholes for sleeves. Work sleeves back and forth on circular needle until sleeve cap is done, then work the rest of sleeve in the round on double pointed needles/circular needle, top down until finished measurements. Finally sew the bottom of armhole. Sew jumper together when finished. FRONT PIECE: Cast on 94-100-108-118-126-138 stitches on circular needle size 4.5 mm with beige. Purl 1 row (= wrong side). Then work rib (= knit 1/purl 1) with 1 edge stitch in GARTER STITCH - read explanation above, in each side. When rib measures 4 cm, switch to circular needle size 5.5 mm. Knit 1 row from right side while decreasing 9-9-9-11-11-13 stitches evenly - read DECREASE TIP-1 = 85-91-99-107-115-125 stitches. Then work in stocking stitch with 1 edge stitch in garter stitch in each side. REMEMBER THE KNITTING TENSION! When piece measures 9-10-11-12-13-14 cm from cast-on edge, begin stripes - read PATTERN. Work first row as follows from right side: Work 1 edge stitch in garter stitch with beige, work 21-24-28-32-36-41 stitches in stocking stitch with beige, work A.1 (= 41 stitches), work 21-24-28-32-36-41 stitches in stocking stitch with beige and finish with 1 edge stitch in garter stitch with beige. Continue pattern like this. When piece measures 36-37-38-39-40-41 cm, cast off 2 stitches at beginning of the 2 next rows for armholes = 81-87-95-103-111-121 stitches. Continue pattern as before. When piece measures 38-39-40-41-42-43 cm, begin decrease for V-neck. I.e. work next row from wrong side as follows: Work 38-41-45-49-53-58 stitches as before, knit 5 stitches, work the remaining 38-41-45-49-53-58 stitches as before. On next row (right side), knit until the 5 purl stitches mid front. Then pick up 1 stitch in each of the 5 purl stitches but pick up on the back of these 5 stitches. Keep these 43-46-50-54-58-63 first stitches on needle (i.e. 38-41-45-49-53-58 stitches + 5 stitches that were knitted up). Slip the remaining 43-46-50-54-58-63 stitches on 1 stitch holder. Finish each side of V-neck separately. LEFT SIDE FRONT (when garment is worn): Begin from wrong side and work in stocking stitch back and forth with 5 edge stitches in garter stitch towards mid front and 1 edge stitch in garter stitch towards the side. Continue pattern the same way as before till all stitches are worked in black. AT THE SAME TIME on next row from right side, decrease 1 stitch for V-neck towards mid front - read DECREASE TIP-2. Decrease like this every other row 3-3-4-4-4-4 times in total and then every 4th row 4-4-4-4-5-5 times in total. After last decrease there are 36-39-42-46-49-54 stitches on needle. Work until piece measures 54-56-58-60-62-64 cm from cast-on edge. Begin from right side and cast of the first 31-34-37-41-44-49 stitches on shoulder (make sure to avoid a tight cast-off edge) = 5 stitches in garter stitch remain on needle. Work in garter stitch back and forth over these 5 stitches for approx. 8-8-9-9-9-9 cm. Cast off. RIGHT SIDE FRONT (when garment is worn): Slip the 43-46-50-54-58-63 stitches from stitch holder back on circular needle size 5.5 mm. Begin from right side and work in stocking stitch back and forth with 5 edge stitches in garter stitch towards mid front and 1 edge stitch in garter stitch towards the side. Continue pattern the same way as before till all stitches are worked in black. AT THE SAME TIME on next row from right side, decrease 1 stitch for V-neck towards mid front - read DECREASE TIP-2. Decrease like this every other row 3-3-4-4-4-4 times in total and then every 4th row 4-4-4-4-5-5 times in total. After last decrease there are 36-39-42-46-49-54 stitches on needle. Work until piece measures 54-56-58-60-62-64 cm from cast-on edge. Begin from wrong side and cast of the first 31-34-37-41-44-49 stitches on shoulder (make sure to avoid a tight cast-off edge) = 5 stitches in garter stitch remain on needle. Work in garter stitch back and forth over these 5 stitches for approx. 8-8-9-9-9-9 cm. Cast off. BACK PIECE: Cast on 94-100-108-118-126-138 stitches on circular needle size 4.5 mm with beige. Purl 1 row (= wrong side). Then work rib (= knit 1/purl 1) with 1 edge stitch in garter stitch in each side. When rib measures 4 cm, switch to circular needle size 5.5 mm. Knit 1 row from right side while decreasing 9-9-9-11-11-13 stitches evenly - read DECREASE TIP-1 = 85-91-99-107-115-125 stitches. Then work in stocking stitch with 1 edge stitch in garter stitch in each side. When piece measures 9-10-11-12-13-14 cm from cast-on edge, begin stripes and work the same way as on front piece (i.e. stripes on front and back piece are identical). When piece measures 36-37-38-39-40-41 cm, cast off 2 stitches at beginning of the 2 next rows for armholes = 81-87-95-103-111-121 stitches. Continue pattern as before until all stitches are worked in black. Work until piece measures 52-54-56-58-60-62 cm from cast-on edge. On next row cast off the middle 17-17-19-19-21-21 stitches for neck and finish each shoulder separately. Work in stocking stitch and cast off 1 stitch on next row from the neck = 31-34-37-41-44-49 stitches remain on shoulder. Continue to work until piece measures 54-56-58-60-62-64 cm. Loosely cast off with knitting from right side. Work the other shoulder the same way. ASSEMBLY: Sew shoulder seams inside cast-off edge. SLEEVE: Pick up stitches along armhole on front and back piece, i.e. begin in one side of piece where stitches were cast off for armhole, and pick up from right side 58-60-64-68-70-74 stitches inside 1 edge stitch in garter stitch on circular needle size 5.5 with black (i.e. do not pick up stitches along the bottom of armhole). Work in stocking stitch back and forth with 1 edge stitch in garter stitch in each side. When sleeve measures 2 cm in all sizes from where stitches were knitted up, insert 1 marker at the beginning and end of row. Markers show where sleeve should be sewn in at the bottom of armhole, and measure sleeve from these markers! Switch to double pointed needles/short circular needle size 5.5 mm and work in stocking stitch in the round. Work until sleeve measures 41-40-39-37-36-33 cm (approx. 4 cm remain before finished measurements, try the jumper on and work to desired length). Knit 1 round while increasing 6-6-6-6-8-8 stitches evenly = 64-66-70-74-78-82 stitches. Switch to a short circular needle size 4.5 mm. Work rib in the round = knit 1/purl 1 for 4 cm. Loosely cast off stitches with knit over knit and purl over purl. Sleeve measures approx. 47-46-45-43-42-39 cm from stitches where knitted up. Work the other sleeve the same way. ASSEMBLY: Sew side seams inside 1 edge stitch. Sew sleeve to the bottom of armhole from marker and in towards the corner in each side. Sew neck edge together mid back and sew neck edge to neck line in the back of neck - make sure the seam is in towards the wrong side. |
|||||||||||||
Diagram explanations |
|||||||||||||
|
|||||||||||||
 |
|||||||||||||
 |
|||||||||||||
Have you finished this pattern?Tag your pictures with #dropspattern #grandcanyonnightssweater or submit them to the #dropsfan gallery. Do you need help with this pattern?You'll find 27 tutorial videos, a Comments/Questions area and more by visiting the pattern on garnstudio.com. © 1982-2026 DROPS Design A/S. We reserve all rights. This document, including all its sub-sections, has copyrights. Read more about what you can do with our patterns at the bottom of each pattern on our site. |
|||||||||||||


With over 40 years in knitting and crochet design, DROPS Design offers one of the most extensive collections of free patterns on the internet - translated to 17 languages. As of today we count 324 catalogues and 12290 patterns translated into English (UK/cm). 12290
We work hard to bring you the best knitting and crochet have to offer, inspiration and advice as well as great quality yarns at incredible prices! Would you like to use our patterns for other than personal use? You can read what you are allowed to do in the Copyright text at the bottom of all our patterns. Happy crafting!
Post a comment to pattern DROPS 205-43
We would love to hear what you have to say about this pattern!
If you want to leave a question, please make sure you select the correct category in the form below, to speed up the answering process. Required fields are marked *.