
Popular categories
Looking for a yarn?


Comments / Questions (11)
![]() Elena wrote:
Elena wrote:
Je fais ce modèle pour une amie qui a exactement les mesures de la taille M. Mais quand j'ai commencé le col, elle le trouvait trop grand alors je l'ai recommencé avec la taille S e de plus petites aiguilles. J'ai peut quand même qu'il soit trop petit, donc j'aimerais augmenter et arriver au nombre de mailles pour la M après le col et la rehausse. Qu'en pensez-vous? Merci
10.12.2024 - 06:47DROPS Design answered:
Bonjour Elena, notez que si vous n'avez pas l'échantillon, vous n'aurez pas les bonnes mesures (celles du schéma), vous pouvez probablement jouer sur le nombre de mailles après le col pour un col plus serré, mais vérifiez bien votre tension avant de choisir la taille correspondante. Retrouvez plus d'infos sur les tailles ici et sur l'échantillon là. Bon tricot!
11.12.2024 - 08:27
![]() Elena wrote:
Elena wrote:
MERCI pour votre réponse, c'est très clair et je me réjouis de tricoter mon premier modèle DROPS... avec du jacquard!
15.11.2024 - 08:57
![]() ELENA wrote:
ELENA wrote:
Bonjour, je ne comprends pas bien comment on peut introduire des augmentations "approximativement" quand on est dans le dessin, si on doit suivre le schéma n'y a-t-il pas des décalages? Y A-T-IL UNE VIDEO QUI EXPLIQUE COMMENT LIRE LES DIAGRAMMES QUAND IL Y A DES AUGMENTATIONS? MERCI BEAUCOUP
14.11.2024 - 16:09DROPS Design answered:
15.11.2024 - 08:45
![]() Tina Östin wrote:
Tina Östin wrote:
After midnight kofta: framkanten, stickas den i svart först när mönstret är färdigstickat? I vitt mönstergården?
09.12.2022 - 09:35DROPS Design answered:
Hei Tine. Litt usikker på hva du mener med " I vitt mönstergården?", men når diagram A.1 er ferdig strikket, strikkes det videre med fargen sort. Slik står det under FRAM- OCH BAKSTYCKE: ..... Sticka slätstickning fram och tillbaka med svart och 5 framkantsmaskor i rätstickning i varje sida mot mitt fram – kom ihåg knapphål på höger framkant. mvh DROPS Design
12.12.2022 - 12:59
![]() Sara wrote:
Sara wrote:
Hi, what cast-on method would you suggest for this?
03.06.2022 - 15:41DROPS Design answered:
Dear Sara, we usually use the continental method - see this video. But feel free to use your favorite cast on edge, just make sure your cast-on edge is not too tight - Happy knitting!
03.06.2022 - 16:09
![]() Josie wrote:
Josie wrote:
Bonjour, j'ai reçu ma laine Sky pour réaliser le cardigan 205-26. Lorsque j'ai regardé la photo des modèles Sky, c'était écrit 23m, j C'était parfait pour mon échantillon. Mais pour les explications de ce modèle, l'échantillon est de 20m. Qu'est ce que je ne comprends pas svp ? Merci et bonne journée.
26.01.2022 - 10:12DROPS Design answered:
Bonjour Josie, le nombre de mailles varie en fonction de l'effet et de la texture souhaitée, par ex. 23 m pour un bonnet, mais l'échantillon de "base" est de 21 mailles pour 10 cm (cf nuancier), on va tricoter ici un peu plus souplement avec 20 mailles pour 10 cm. Pensez à bien adapter la taille des aiguilles si besoin pour que votre échantillon corresponde. Bon tricot!
26.01.2022 - 13:11
![]() Rosemarie Olivebring wrote:
Rosemarie Olivebring wrote:
Stickar jag framstycke, 8 nya uppläggningsmaskor bakstycke 8 uppläggningsmaskor plus framstycke i ett enda stycke?
17.01.2022 - 19:19DROPS Design answered:
Hei Rosemarie. Om du mener når du skal dele bærestykket til bol og ermer, strikkes dette i et stykke. Maskene du setter på tråder, strikkes når bolen er ferdig. mvh DROPS Design
18.01.2022 - 12:52
![]() Rosemarie Olivebring wrote:
Rosemarie Olivebring wrote:
Jag undrar på diagrammet för XXL vid pil 2 och 3 är det bara 4 maskor. 2 av maskorna har tagits bort.?
08.01.2022 - 20:03
![]() April Anderson wrote:
April Anderson wrote:
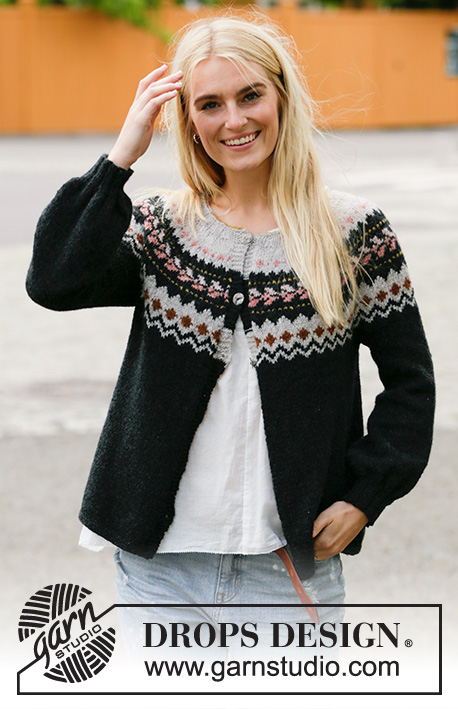
The picture of the woman wearing the sweater shows a sweater that is not a cardigan! She is wearing a pullover. Is this pattern for a cardigan or a pullover?
21.11.2019 - 21:18DROPS Design answered:
Dear Mrs Anderson, you will find the After Midnight jacket/cardigan pattern here and the After Midnight Sweater pattern here. Happy knitting!
22.11.2019 - 08:54
![]() Anne wrote:
Anne wrote:
Wunderschön! Auch die Farbzusammenstellung gefällt mir. Und ich finde die Ärmel klasse, machen die Jacke peppig.
24.09.2019 - 21:57
|
||||||||||||||||||||||
After Midnight#aftermidnightjacket |
||||||||||||||||||||||
 |
 |
|||||||||||||||||||||
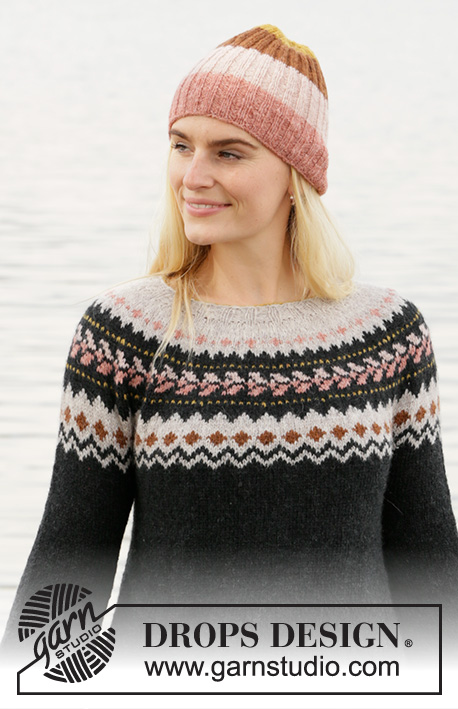
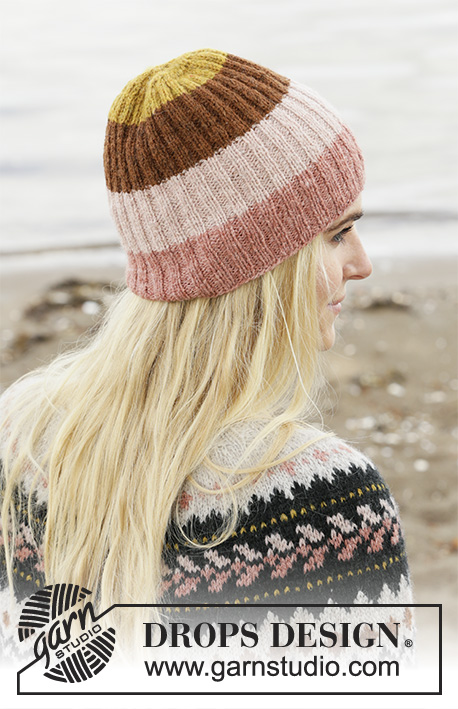
Knitted jacket in DROPS Sky. The piece is worked top down with round yoke and Nordic pattern on the yoke. Sizes S - XXXL.
DROPS 205-26 |
||||||||||||||||||||||
|
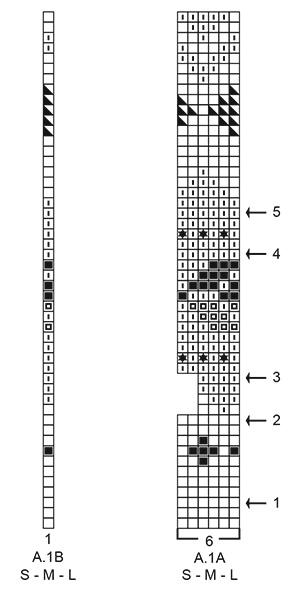
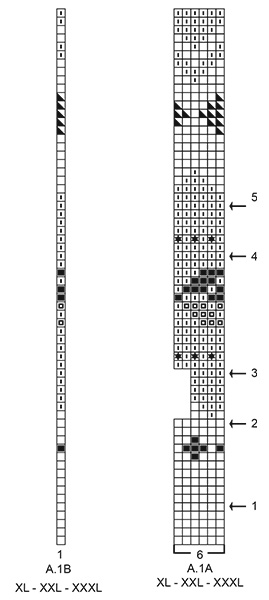
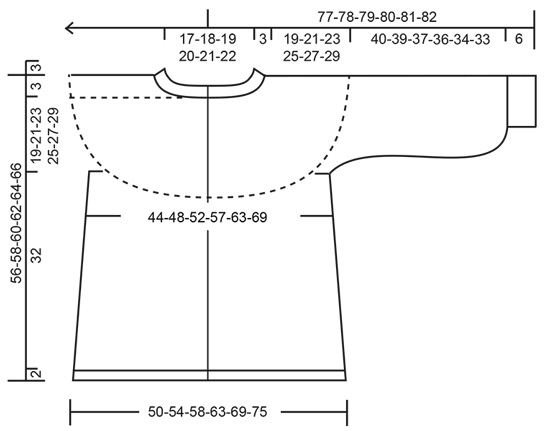
------------------------------------------------------- EXPLANATIONS FOR THE PATTERN: ------------------------------------------------------- RIDGE/GARTER STITCH (worked back and forth): Knit all rows. 1 ridge in height = Knit 2 rows. ELEVATION (back of neck): So the jacket is slightly higher at the back of the neck when working a round yoke, you can work an elevation as described here. Skip this section if you do not want an elevation. Insert a marker thread in the middle stitch of the row. Start from the right side with light beige and knit 14-15-16-16-17-18 stitches past the marker thread, turn, tighten strand and purl 29-31-33-33-35-37 stitches. Turn, tighten strand and knit 43-46-49-49-52-55 stitches, turn, tighten strand and purl 57-61-65-65-69-73 stitches. Turn, tighten strand and knit 71-76-81-81-86-91 stitches, turn, tighten strand and purl 85-91-97-97-103-109 stitches. Turn, tighten the strand and knit to end of row. Then purl 1 row (bands worked in garter stitch). Then work YOKE as described in the text. PATTERN: See diagram A.1. Choose diagram for your size. The whole pattern is worked in stocking stitch. KNITTING TIP: To avoid the knitting tension becoming tighter when working pattern it is important that the strands at the back are not tight. Use a size larger needle when working pattern if this is a problem. INCREASE TIP (evenly spaced): To work out how to increase evenly, count the total number of stitches on the needle (e.g. 100 stitches) minus the bands (e.g. 10 stitches) and divide the remaining stitches by the number of increases to be made (e.g. 43) = 2.1. In this example, increase by making 1 yarn over after approx. each 2nd stitch. Do not increase on bands. On the next row work the yarn overs twisted to avoid holes. INCREASE TIP-2 (for sides of body and mid under sleeves): All increases are worked from the right side! Work until there are 3 stitches left before the marker thread, make 1 yarn over, knit 6 (marker thread sits between these 6 stitches) make 1 yarn over (= 2 stitches increased). On the body the yarn overs are purled twisted on the next row (wrong side) to avoid holes. On the sleeves the yarn overs are knitted twisted on the next round to avoid holes. The new stitches are worked in stocking stitch. DECREASE TIP (for mid under sleeves): Work until there are 5 stitches left before the marker thread, knit 2 together, knit 6 (marker thread sits between these 6 stitches), slip 1 stitch as if to knit, knit 1 and pass the slipped stitch over the knitted stitch (= 2 stitches decreased). BUTTONHOLES: Work buttonholes on the right band (when the garment is worn). Work from the right side when there are 3 stitches left on the row as follows: Make 1 yarn over, knit 2 together and knit 1. On the next row (wrong side), knit the yarn over to leave a hole. The first buttonhole is worked when the rib on the neck measures approx. 1½-2 cm. Then work the other 5-5-6-6-7-7 buttonholes with approx. 9-9½-8-8½-7½-8 cm between each one. CASTING OFF TIP: To avoid the cast-off edge being tight you can cast off with a double strand or a larger size needle. ------------------------------------------------------- START THE PIECE HERE: ------------------------------------------------------- JACKET – SHORT OVERVIEW OF THE PIECE: The neck and the yoke are worked back and forth with circular needle from mid front, top down. The yoke is divided for body and sleeves. The body is continued back and forth with circular needle from mid front. The sleeves are worked in the round with short circular needle/double pointed needles, top down. NECK: Cast on 100-104-108-112-116-120 stitches (including 5 band stitches on each side towards mid front) with circular needle size 3.5 mm and curry. Purl 1 row (= wrong side). Change to light beige. The next row is worked as follows from the right side: 5 band stitches in GARTER STITCH – read description above, * knit 2, purl 2 *, work from *-* until there are 7 stitches left on the row, knit 2 and finish with 5 band stitches in garter stitch. Continue this rib for 3 cm but remember the BUTTONHOLE on the right band – read description above. Purl 1 row from the wrong side where you increase 43-45-47-49-51-53 stitches evenly spaced – read INCREASE TIP-1 (bands worked in garter stitch; do not increase on bands) = 143-149-155-161-167-173 stitches. Insert 1 marker at the beginning of the row; the yoke will be measured from this marker. Change to circular needle size 4.5 mm. Now you can work an ELEVATION in the back of the neck – read description above. If you do not want an elevation, go straight to YOKE. YOKE: The next row is worked as follows from the right side: 5 band stitches in garter stitch, work A.1A until there are 6 stitches left on the row (= 22-23-24-25-26-27 repeats of A.1A with 6 stitches), work A.1B (= 1 stitch) and finish with 5 band stitches in garter stitch. Continue this pattern. REMEMBER THE KNITTING TENSION! AT THE SAME TIME on each row marked with an arrow in A.1A increase stitches evenly spaced as described below – read INCREASE TIP-1! Arrow-1: Increase 42-48-48-54-60-60 stitches evenly spaced = 185-197-203-215-227-233 stitches (there is now room for 29-31-32-34-36-37 repeats of A.1A with 6 stitches). Arrow-2: Increase 38-42-48-52-52-58 stitches evenly spaced = 223-239-251-267-279-291 stitches (there is now room for 53-57-60-64-67-70 repeats of A.1A with 4 stitches). Arrow-3: Increase 28-30-36-44-50-50 stitches evenly spaced = 251-269-287-311-329-341 stitches (there is now room for 40-43-46-50-53-55 repeats of A.1A with 6 stitches). Arrow-4: Increase 18-24-30-30-36-42 stitches evenly spaced = 269-293-317-341-365-383 stitches (there is now room for 43-47-51-55-59-62 repeats of A.1A with 6 stitches). Arrow-5: Increase 12-18-18-24-24-36 stitches evenly spaced = 281-311-335-365-389-419 stitches (there is now room for 45-50-54-59-63-68 repeats of A.1A with 6 stitches). When A.1 has been completed in height the piece measures 19-19-19-25-25-25 cm from the marker on the neck. Continue with stocking stitch and black and with 5 band stitches in garter stitch on each side towards mid front, until the piece measures 19-21-23-25-27-29 cm from the marker on the neck. Now divide the yoke for body and sleeves continuing with black on the next row as follows: Work 46-50-53-58-63-69 stitches in garter stitch and stocking stitch as before (= front piece), place the next 54-61-67-72-74-77 stitches on 1 thread for sleeve, cast on 6-6-8-8-10-10 new stitches on the needle (= in side under sleeve), work 81-89-95-105-115-127 stitches in stocking stitch (= back piece), place the next 54-61-67-72-74-77 stitches on 1 thread for sleeve, cast on 6-6-8-8-10-10 new stitches on the needle (= in side under sleeve) and work the remaining 46-50-53-58-63-69 stitches in stocking stitch and garter stitch as before (= front piece). Body and sleeves are finished separately. THE PIECE IS NOW MEASURED FROM HERE! BODY: = 185-201-217-237-261-285 stitches. Insert 1 marker thread 49-53-57-62-68-74 stitches in from each side (= in sides of body). There are 87-95-103-113-125-137 stitches between the marker threads on the back piece. Allow the threads to follow your work onwards; they will be used when increasing in the sides. Work stocking stitch back and forth using black and with 5 band stitches in garter stitch on each side towards mid front – remember buttonholes on right band. When the piece measures 5 cm from the division in all sizes, increase 1 stitch on each side of both marker threads – read INCREASE TIP-2 (= 4 stitches increased). Increase like this every 5 cm a total of 6 times on each side = 209-225-241-261-285-309 stitches. Continue working until the piece measures 32 cm from the division in all sizes (there is approx. 2 cm left to finished length; you can try the jacket on and work to desired length). Change to circular needle size 3.5 mm and work 3 ridges back and forth over all stitches. Cast off with knit from the right side – read CASTING OFF TIP! The jacket measures approx. 56-58-60-62-64-66 cm from the shoulder down. SLEEVE: Place the 54-61-67-72-74-77 stitches from the thread on the one side of the piece on short circular needle/double pointed needles size 4.5 mm and knit up 1 stitch in each of the 6-6-8-8-10-10 stitches cast on under the sleeve = 60-67-75-80-84-87 stitches. Insert 1 marker thread in the middle of the 6-6-8-8-10-10 new stitches. Allow the thread to follow your work onwards; it will be used when decreasing and increasing mid under sleeve. Start the round at the marker thread and work stocking stitch in the round with black. When the sleeve measures 2 cm from the division in all sizes decrease 2 stitches mid under sleeve – read DECREASE TIP. Decrease like this every 3½-2-1½-1-1-1 cm a total of 4-6-7-8-9-8 times = 52-55-61-64-66-71 stitches. Work until the piece measures 16-16-16-13-13-12 cm from the division (shorter measurements in larger sizes due to wider neck and longer yoke). Now increase 2 stitches mid under sleeve – read INCREASE TIP-2. Increase as follows every 1 cm a total of 18-16-17-20-20-20 times = 88-87-95-104-106-111 stitches. Continue working until the sleeve measures 39-38-36-35-33-32 cm from the division. Knit 1 round where you decrease 0-0-0-0-2-0 stitches evenly spaced = 88-87-95-104-104-111 stitches. The next round is worked as follows: Knit 0-1-1-0-0-1, * knit 2 together *, work from *-* to end of round = 44-44-48-52-52-56 stitches left. Change to double pointed needles size 3.5 mm and work rib (= knit 2 / purl 2) for 6 cm. Cast off with knit over knit and purl over purl – remember CASTING OFF TIP. The sleeve measures approx. 46-45-43-42-40-39 cm from the division. Work the other sleeve in the same way. ASSEMBLY: Sew buttons onto left band. |
||||||||||||||||||||||
Diagram explanations |
||||||||||||||||||||||
|
||||||||||||||||||||||
 |
||||||||||||||||||||||
 |
||||||||||||||||||||||
 |
||||||||||||||||||||||
Have you finished this pattern?Tag your pictures with #dropspattern #aftermidnightjacket or submit them to the #dropsfan gallery. Do you need help with this pattern?You'll find 29 tutorial videos, a Comments/Questions area and more by visiting the pattern on garnstudio.com. © 1982-2026 DROPS Design A/S. We reserve all rights. This document, including all its sub-sections, has copyrights. Read more about what you can do with our patterns at the bottom of each pattern on our site. |
||||||||||||||||||||||


With over 40 years in knitting and crochet design, DROPS Design offers one of the most extensive collections of free patterns on the internet - translated to 17 languages. As of today we count 324 catalogues and 12290 patterns translated into English (UK/cm). 12290
We work hard to bring you the best knitting and crochet have to offer, inspiration and advice as well as great quality yarns at incredible prices! Would you like to use our patterns for other than personal use? You can read what you are allowed to do in the Copyright text at the bottom of all our patterns. Happy crafting!
Post a comment to pattern DROPS 205-26
We would love to hear what you have to say about this pattern!
If you want to leave a question, please make sure you select the correct category in the form below, to speed up the answering process. Required fields are marked *.