
Popular categories
Looking for a yarn?


Comments / Questions (29)
![]() Daniela wrote:
Daniela wrote:
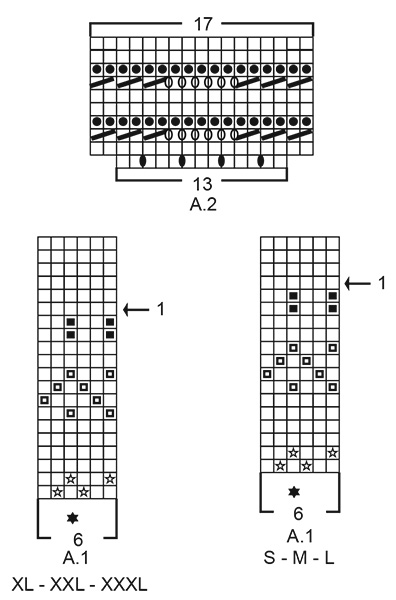
Ho problemi con il diagramma A2 perché al 3° ferro alla fine del giro mi ritrovo solo 2 maglie che da lavorare insieme, e non 6 per avere la possibilità di lavorare per 3 volte due maglie insieme, come da diagramma. C'è qualche errore? Grazie!
26.05.2021 - 00:21DROPS Design answered:
Buonasera Daniela, il diagramma A.2 è corretto: provi a mettere dei marcapunti alla fine di ogni ripetizione del diagramma per identificare meglio eventuali errori. Buon lavoro!
27.05.2021 - 00:06
![]() Sofia McMonagle wrote:
Sofia McMonagle wrote:
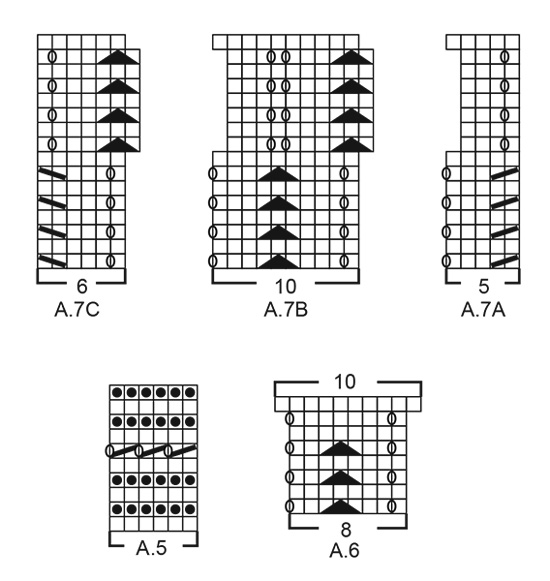
Förstår inte hur ökningen från 73 maskor till 91 maskor går till när man stickar A. 6. Behöver en dupertydlig förklaring till hur jag stickar A6
08.09.2019 - 09:42DROPS Design answered:
Hej. Du har 73 m på stickan så du stickar A.6 (=8 maskor) 9 gånger + 1 m slätstickning sist. På varv 7 i diagrammet ökas det 2 maskor per rapport (omslagen) så det innebär att du på sista varvet har 10 maskor per rapport istället för 8. 10 m x 9 rapporter + 1 maska slätstickning sist = 91 m. Lycka till!
10.09.2019 - 10:20
![]() Ursula Blohm wrote:
Ursula Blohm wrote:
Liebes Drops-Team, sind die Korrekturen, die hier angesprochen wurden, bei der aktuellen Anleitung bereits berücksichtigt ? Ich fange gerade an, den Pullover zu stricken. Vielen Dank schon jetzt für Ihre Antwort
28.08.2019 - 20:54DROPS Design answered:
Liebe Frau Blohm, wenn Sie die Anleitung nach der Korrektur drücken, dann stimmt die Online-Anleitung, sonnst können Sie sie am besten nochmal drücken. Viel Spaß beim stricken!
29.08.2019 - 09:06
![]() Åshild Vågnes wrote:
Åshild Vågnes wrote:
Kan ikke finne A-5, A-6 og A-7 når jeg skal strikke ermene?
06.06.2019 - 21:43DROPS Design answered:
Hei Åshild. Diagrammene A.5-A.7 ligger rett under A.3, og over målskissen nederst på siden. Om du har problemer med å se dem kan du forøke å benytte en annen enhet (PC, nettbrett etc). God fornøyelse
07.06.2019 - 08:07
![]() Agnes wrote:
Agnes wrote:
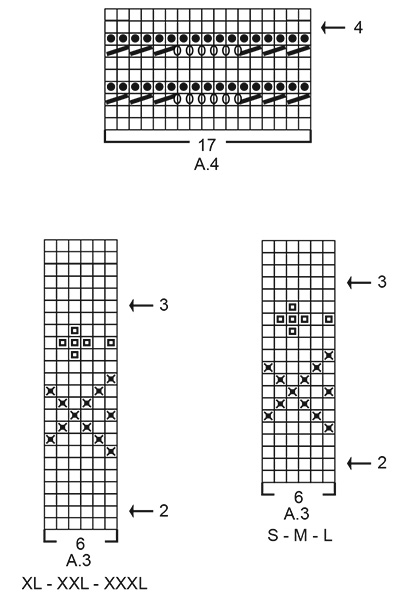
A4 scheint das selbe Problem zu haben wie A2 zuvor... hier ist auch entweder eine Abnahme zu wenig eingezeichnet oder soll das als versteckte Zunahme in dieser Reihe gedacht sein?
26.05.2019 - 13:52DROPS Design answered:
Liebe Agnes, stimmt, A.4 wird auch korrigiert, danke für den Hinweis. Viel Spaß beim stricken!
27.05.2019 - 11:12
![]() Margret wrote:
Margret wrote:
Hallo,liebe Dropse,bin mit dem Stricken bei der Passe bei A2 ,der obere Teil ist mir unklar,wieder 6M.zusammen und 6 Umschläge ist ok,dann aber nur 2mal 2M zus.stricken,das wären ja dann 18 M ,nicht 17!!! Bitte Klärung,danke ,freundlichst Margret
09.04.2019 - 21:08DROPS Design answered:
Liebe Margret, Sie sind ja recht, A.2 wird korrigiert, es soll 3 Mal 2 M re zussammen am Ende dieser Reihe. Viel Spaß beim stricken!
10.04.2019 - 14:42
![]() Irene Jensen wrote:
Irene Jensen wrote:
Tak for A3 diagram. Men der er fejl i diagrammerne A2 og A4. I øverste rækker, mangler der en streg = (strik to m sammen). Ellers passer m antallet ikke.
28.03.2019 - 08:54
![]() Annegunn Rangnes Bøe wrote:
Annegunn Rangnes Bøe wrote:
Takk for rask reaksjon med hensyn på diagram 3A😊 Morsom genser å strikke.
27.03.2019 - 23:01
![]() Irene Jensen wrote:
Irene Jensen wrote:
Hej. Flot model og nu er jeg kommet til diagram A3. Kan I sige noget om hvornår den blir lagt op ?
27.03.2019 - 10:38
![]() Tone Engjom wrote:
Tone Engjom wrote:
Hvorfor er ikke A3 med i mønsteret?
27.03.2019 - 07:19DROPS Design answered:
Hei Tone. Nå er A.3 tilgjengelig. Takk for beskjed, og god fornøyelse
27.03.2019 - 08:17
|
||||||||||||||||||||||||||||||||||
Relaxing in Reykjavik#relaxinginreykjaviksweater |
||||||||||||||||||||||||||||||||||
 |
 |
|||||||||||||||||||||||||||||||||
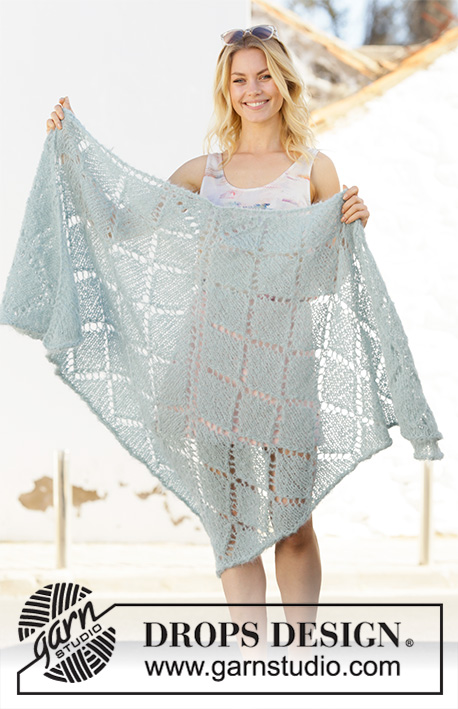
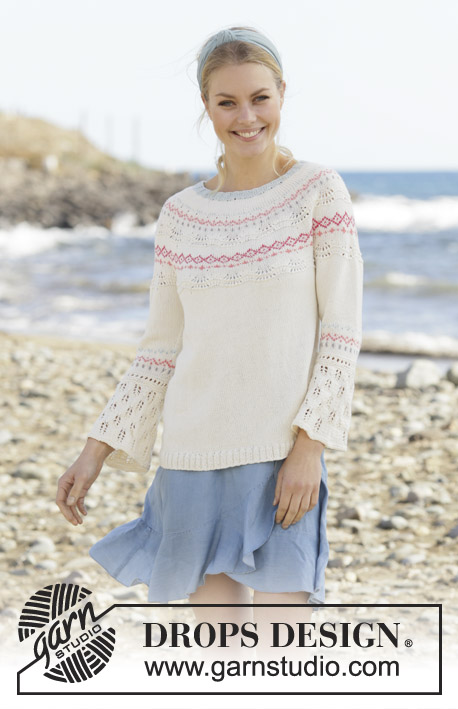
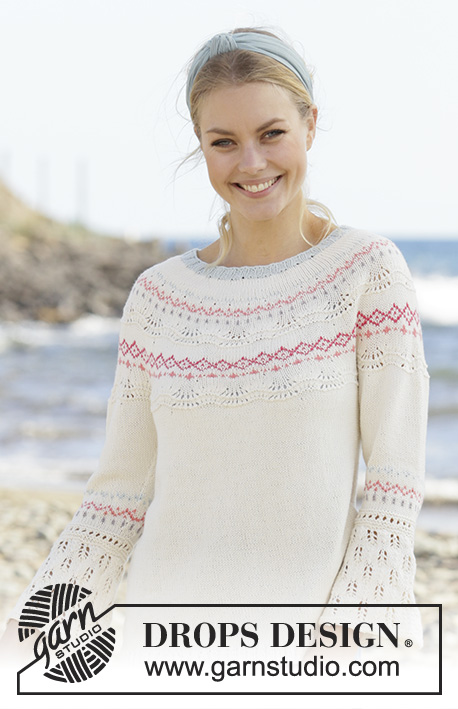
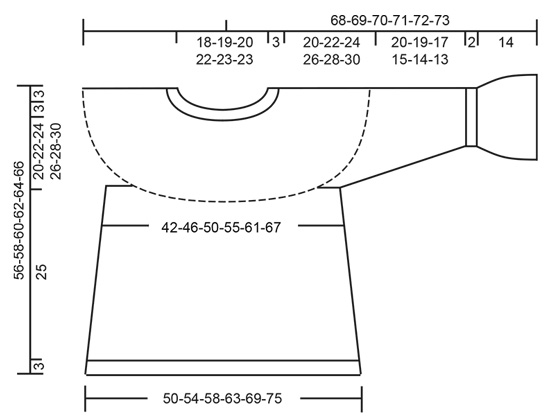
Knitted jumper in DROPS Safran. The piece is worked top down with round yoke, Nordic pattern, lace pattern and ¾-length sleeves. Sizes S - XXXL.
DROPS 199-12 |
||||||||||||||||||||||||||||||||||
|
----------------------------------------------------- EXPLANATIONS FOR THE PATTERN: ------------------------------------------------------- RIDGE/GARTER STITCH (worked back and forth): Knit all rows. 1 ridge in height = Knit 2 rows. PATTERN: See diagrams A.1 to A.7. Choose diagram for your size (applies to A.1 and A.3). KNITTING TIP: To avoid the knitting tension becoming tighter when working 2-coloured pattern, it is important the strands at the back are not tight. Use a half needle-size larger when working pattern if necessary. INCREASE TIP-1 (evenly spaced): To work out how to increase evenly, count the total number of stitches on the needle (e.g. 116 stitches) and divide by the number of increases to be made (e.g. 38) = 3.1. In this example, increase by making 1 yarn over after approx. each 3rd stitch. On the next round knit the yarn overs twisted to avoid holes. INCREASE TIP-2 (for sides of body): Work until there are 8 stitches left before the marker thread, make 1 yarn over, knit 16 (marker thread sits in middle of these 16 stitches), 1 yarn over (= 2 stitches increased at marker thread and a total of 4 stitches increased on round). On the next round knit the yarn overs twisted to avoid holes. Then work the new stitches in stocking stitch. DECREASE TIP (for mid under sleeve): Decrease 1 stitch on each side of the marker thread as follows: Work until there are 3 stitches left before the marker thread, knit 2 together, knit 3 (marker thread sits in the middle stitch of these 3 stitches), slip 1 stitch as if to knit, knit 1 and pass the slipped stitch over the knitted stitch (2 stitches decreased). ------------------------------------------------------- START THE PIECE HERE: ------------------------------------------------------- JUMPER - SHORT OVERVIEW OF THE PIECE: Neck and yoke are worked in the round with circular needle, top down. The yoke is divided for body and sleeves. The body is continued in the round with circular needle. Sleeves are worked in the round with short circular needle/double pointed needles, top down. NECK: Cast on 116-120-124-132-136-140 stitches with short circular needle size 2.5 mm and mint. Knit 1 round. Then work rib in the round (= knit 2, purl 2) for 3 cm. Change to off white and knit 1 round where you increase 38-40-42-44-46-46 stitches evenly spaced – read INCREASE TIP-1 = 154-160-166-176-182-186 stitches. Knit 1 round (yarn overs knitted twisted). Then work yoke as described below. YOKE: Change to circular needle size 3 mm and work stocking stitch in the round with off white. REMEMBER THE KNITTING TENSION! When the piece measures 4-5-5-5-6-6 cm from the cast-on edge increase 38-44-44-46-46-54 stitches evenly spaced = 192-204-210-222-228-240 stitches. When the piece measures 5-6-7-7-8-9 cm from the cast-on edge work A.1 (= 32-34-35-37-38-40 repeats of 6 stitches). Read KNITTING TIP and continue this pattern. AT THE SAME TIME on the round marked with arrow-1 in A.1 increase 16-30-50-51-71-72 stitches evenly spaced = 208-234-260-273-299-312 stitches. When A.1 has been completed, work A.2 (= 16-18-20-21-23-24 repeats of 13 stitches). When A.2 has been completed there are 272-306-340-357-391-408 stitches on the needle. Now work A.3 (the number of stitches does not fit repeats of 6 stitches, but this does not matter as the first row is worked in 1 colour). AT THE SAME TIME on the round marked with arrow-2 in A.3, increase 16-18-20-21-23-24 stitches evenly spaced = 288-324-360-378-414-432 stitches (there is now room for 48-54-60-63-69-72 repeats of 6 stitches). Continue this pattern. AT THE SAME TIME on the round marked with arrow-3 in A.3, increase 18-16-14-30-28-27 stitches evenly spaced = 306-340-374-408-442-459 stitches. When A.3 has been completed, work A.4 (= 18-20-22-24-26-27 repeats of 17 stitches). Continue this pattern. AT THE SAME TIME on the round marked with arrow-4 in A.4 increase 14-12-10-4-2-13 stitches evenly spaced = 320-352-384-412-444-472 stitches. When A.4 has been completed the piece measures approx. 23-24-25-27-28-29 cm from the cast-on edge. Continue with off white until the piece measures 23-25-27-29-31-33 cm from the cast-on edge. Now divide the yoke for body and sleeves on the next round as follows: Work 47-51-55-60-66-72 stitches in stocking stitch (= ½ back piece), place the next 66-74-82-86-90-92 stitches on 1 thread for sleeve, cast on 6-8-10-12-14-16 new stitches on the needle (= in side under sleeve), work 94-102-110-120-132-144 stitches in stocking stitch, place the next 66-74-82-86-90-92 stitches on 1 thread for sleeve, cast on 6-8-10-12-14-16 new stitches on the needle (= in side under sleeve) and work the remaining 47-51-55-60-66-72 stitches in stocking stitch. Cut the strand. Body and sleeves are finished separately. THE PIECE IS NOW MEASURED FROM HERE! BODY: = 200-220-240-264-292-320 stitches. Insert 1 marker thread on each side of the body, in the middle of the 6-8-10-12-14-16 stitches cast on under each sleeve. Allow the threads to follow your work onwards – they will be used when increasing in the sides. Start the round at 1 of the marker threads and work stocking stitch in the round with off white. When the piece measures 2 cm from the division, increase 1 stitch on each side of both marker threads – read INCREASE TIP-2 (= 4 stitches increased). Increase like this every 2½ cm a total of 10 times on each side = 240-260-280-304-332-360 stitches. Continue working until the piece measures 27 cm from the division (or to desired length; there is 3 cm left to finished length). Knit 1 round where you increase 60-64-68-76-84-88 stitches evenly spaced = 300-324-348-380-416-448 stitches; this is done to avoid the rib being tight. Change to circular needle size 2.5 mm and work rib (= knit 2, purl 2) for 3 cm. Change back to circular needle size 3 mm and cast off with knit over knit and purl over purl. The jumper measures approx. 56-58-60-62-64-66 cm from the shoulder down. SLEEVE: Place the 66-74-82-86-90-92 stitches from the thread on the one side of the piece on short circular needle or double pointed needles size 3 mm and knit up 1 stitch in each of the 6-8-10-12-14-16 stitches cast on under the sleeve = 72-82-92-98-104-108 stitches on the needle. Insert 2 marker threads in the piece (without working the stitches): Start mid under the sleeve in the middle of the de 6-8-10-12-14-16 stitches and insert 1 marker thread in the first stitch after the middle, count 35-40-45-48-51-53 stitches and insert the other marker thread in the next stitch. There are 35-40-45-48-51-53 stitches left on round after the last marker thread. Allow the threads to follow your work onwards; the first marker thread will be used when decreasing mid under sleeve, the second when deciding where to start the pattern. Start the round mid under sleeve, before the stitch with marker thread and work stocking stitch in the round with off white. When the piece measures 3-3-3-2-2-2 cm from the division, decrease 2 stitches mid under sleeve – read DECREASE TIP. Decrease like this every 3½-1½-1-1-1-1 cm a total of 5-9-13-13-12-11 times = 62-64-66-72-80-86 stitches. AT THE SAME TIME when the piece measures 14-13-11-9-8-7 cm from the division (shorter measurements in larger sizes due to wider neck and longer yoke), work A.1 (continue the decreases mid under sleeve while working A.1– count from mid top of sleeve to decide where to start the pattern; the stitch with marker thread should match the stitch marked with a star in A.1. When A.1 has been completed, i.e. after 4-4-4-6-6-6 rounds with off white, change to double pointed needles size 2.5 mm. The sleeve measures approx. 20-19-17-15-14-13 cm from the division. Work A.5. When A.5 has been completed change back to double pointed needles size 3 mm and knit 2 rounds where you increase 11-9-7-9-9-3 stitches evenly spaced on the second round = 73-73-73-81-89-89 stitches. The next round is worked as follows: Work A.6 until there is 1 stitch left (= 9-9-9-10-11-11 repeats of 8 stitches) and finish with 1 stitch in garter stitch. Continue this pattern. When A.6 has been completed there are 91-91-91-101-111-111 stitches on the needles. The next round is worked as follows: Work A.7A (= 5 stitches), A.7B until there are 6 stitches left (= 8-8-8-9-10-10 repeats of 10 stitches) and finish with A.7C (= 6 stitches). Continue this pattern until A.7 has been worked a total of 2 times in height. Knit 1 round, then work 2 RIDGES over all stitches – read description above. Loosely cast off with knit. The sleeve measures approx. 36-35-33-31-30-29 cm from the division. Work the other sleeve in the same way. |
||||||||||||||||||||||||||||||||||
Diagram explanations |
||||||||||||||||||||||||||||||||||
|
||||||||||||||||||||||||||||||||||
 |
||||||||||||||||||||||||||||||||||
 |
||||||||||||||||||||||||||||||||||
 |
||||||||||||||||||||||||||||||||||
 |
||||||||||||||||||||||||||||||||||
Have you finished this pattern?Tag your pictures with #dropspattern #relaxinginreykjaviksweater or submit them to the #dropsfan gallery. Do you need help with this pattern?You'll find 28 tutorial videos, a Comments/Questions area and more by visiting the pattern on garnstudio.com. © 1982-2026 DROPS Design A/S. We reserve all rights. This document, including all its sub-sections, has copyrights. Read more about what you can do with our patterns at the bottom of each pattern on our site. |
||||||||||||||||||||||||||||||||||


With over 40 years in knitting and crochet design, DROPS Design offers one of the most extensive collections of free patterns on the internet - translated to 17 languages. As of today we count 324 catalogues and 12290 patterns translated into English (UK/cm). 12290
We work hard to bring you the best knitting and crochet have to offer, inspiration and advice as well as great quality yarns at incredible prices! Would you like to use our patterns for other than personal use? You can read what you are allowed to do in the Copyright text at the bottom of all our patterns. Happy crafting!
Post a comment to pattern DROPS 199-12
We would love to hear what you have to say about this pattern!
If you want to leave a question, please make sure you select the correct category in the form below, to speed up the answering process. Required fields are marked *.