
Popular categories
Looking for a yarn?


Comments / Questions (88)
![]() Solange wrote:
Solange wrote:
Solange 10-03-2019 bonjour dans le modèle vous commencez par les manches comment commencer. par le devant
10.04.2019 - 17:12DROPS Design answered:
Bonjour Solange, ce modèle se tricote dans le sens de la longueur d'une manche à l'autre, pour que les côtes soient toujours dans le même sens, sauf si vous voulez un pull sans manches (alors vous pourrez probablement commencer par monter le nombre de mailles correspondant au dos et au devant, après que les augmentations soient terminées), il vous faudra bien suivre les indications. Votre magasin saura vous conseiller pour tout ajustement éventuel. Bon tricot!
11.04.2019 - 09:33
![]() Giovanna wrote:
Giovanna wrote:
Buongiorno, sicuramente sbaglio qualcosa e vorrei capire cosa. Se avvio 43 maglie, fatti tutti gli 11 aumenti da entrambi i lati non mi ritrovo con 65 maglie ma con 85. Anche perché le coste inglesi così descritte fanno già aumentare le maglie da 43 a 63 al secondo ferro. Dove sto sbagliando? Grazie
07.04.2019 - 11:23DROPS Design answered:
Buongiorno Giovanna. Nel testo non vengono conteggiate le maglie gettate. Sono state avviate 43 maglie. Dopo il secondo ferro sono 43 m + 20 gettati. Dopo gli aumenti ai lati ci sono 43 m + 22 m aumentate (65 m) + 20 gettati. Buon lavoro !
07.04.2019 - 22:33
![]() Claire wrote:
Claire wrote:
Je viens de terminer ce pull en sky couleur curry...ravie du resultat...amusant a tricoter dans ce sens. J’ai tricoté en plus un petit chale en pointe au point mousse (modele drops aussi) pour couvrir le cou , ca donne un effet col roulé bien confortable Merci pour vos superbes modèles tres bien expliqués Du coup une copine m’a demandé le meme en blanc !
18.03.2019 - 23:38
![]() Martina wrote:
Martina wrote:
Wenn ich nach den 44cm Ärmel die Zunahmen mache, wie stricke ich diese locker angeschlagenen Maschen (2x2 Maschen, 4x6 Maschen) in den nächsten Runden?
13.03.2019 - 21:04DROPS Design answered:
Liebe Martina, die neuen Maschen werden im Vollpatent, mit 1 Randmasche kraus rechts auf beiden Seiten gestrickt. Viel Spaß beim stricken!
14.03.2019 - 09:52
![]() Waltraud wrote:
Waltraud wrote:
Ich will den Pulli in Gr. S stricken. Stimmt die Materialangabe von 250 g. Der Pulli ist salopp gehalten und Patent dürfte mehr Material verbrauchen?????
04.03.2019 - 12:46DROPS Design answered:
Liebe Waltraud, wenn Ihre Maschenprobe stimmt (= 15 M x 42 Reihen in der Höhe im Vollpatent), dann brauchen Sie 250g DROPS Sky in Größe S. Viel Spaß beim stricken!
04.03.2019 - 13:16
![]() Waltraud wrote:
Waltraud wrote:
Habe vor, das Modell in Alpaka gemischt mit Delight print, beides Garngruppe A, zu stricken. Geht das?
04.03.2019 - 09:33DROPS Design answered:
Liebe Waltraud, dieses Modell wird mit Sky gestrickt, dh ein Garn der Garngruppe B, versuchen Sie unseren Garnumrechner um die unterschiedlichen Alternative zu sehen. Hier lesen Sie mehr über Garnalternativen. Viel Spaß beim stricken!
04.03.2019 - 11:37
![]() Joke Huisman wrote:
Joke Huisman wrote:
Joke Als ikde trui Daily Wonder wil breien met pen 4 ipv ,et 4,5 kan ik dn een maat groter nemen/
23.02.2019 - 17:57DROPS Design answered:
Dag Joke,
Dat hangt er vanaf hoeveel steken je in je proeflapje hebt op 10 cm. Het aantal op te zetten steken (maar ook het aantal minderingen/meerderingen etc.) is berekent op basis van het aantal steken dat in 10 cm zit. Dus als je een proeflapje maakt en dit opmeet, zou je dat uit kunnen rekenen.
26.02.2019 - 09:30
![]() Sophie wrote:
Sophie wrote:
Guten Tag liebes Drops Team. Ich möchte diesen Pulli stricken, wundere mich aber über die Maschenprobe. Stimmt es, dass es 42 Reihen sollen? Ich hab es jetzt schon mit verschiedenen Nadelgrößen versucht, es sind immer nur um die 24 R. Ist es einfach ein Zahlendreher? Selbst bei dünnerer Wolle ist die Reihenzahl ja selten über 40. Vielen Dank!
09.02.2019 - 15:29DROPS Design answered:
Liebe Sophie, wir haben die Reihen wieder gezählt und es muss wirklich 42 Reihen in der Höhe sein (24 M im Patent Muster, von der Vorderseite gesehen). Viel Spaß beim stricken!
14.02.2019 - 09:08
![]() Martine wrote:
Martine wrote:
Bonsoir, dans les explications de la côte anglaise, vous dites une maille point mousse. Qu'appelez vous maille point mousse
03.02.2019 - 19:36DROPS Design answered:
Bonjour Martine. 1 maille au point mousse est tricotee toujours a l'entroit > tricotez cette maille (de bord) tous les rangs à l'endroit. Bon tricot!
03.02.2019 - 23:30
![]() Susan England wrote:
Susan England wrote:
Can I shorten either the length of body and or the sleeve lengths
01.02.2019 - 19:11DROPS Design answered:
Dear Mrs England, you can adjust the pattern as you would like, should you need any individual assistance you are welcome to contact the store where you bought the yarn. Happy knitting!
04.02.2019 - 08:07
|
||||||||||
Daily Wonder#dailywondersweater |
||||||||||
 |
 |
|||||||||
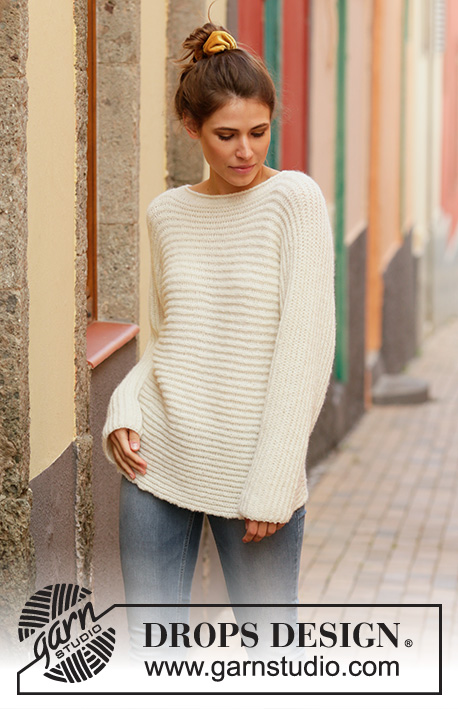
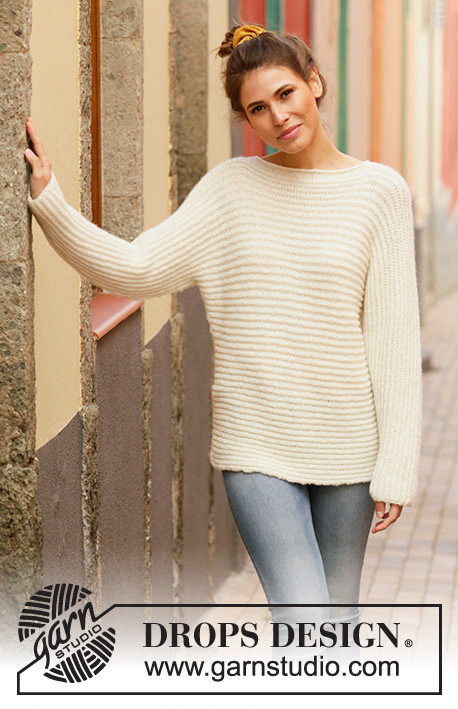
Jumper knitted sideways in DROPS Sky. The piece is worked in English rib. Sizes S - XXXL.
DROPS 201-7 |
||||||||||
|
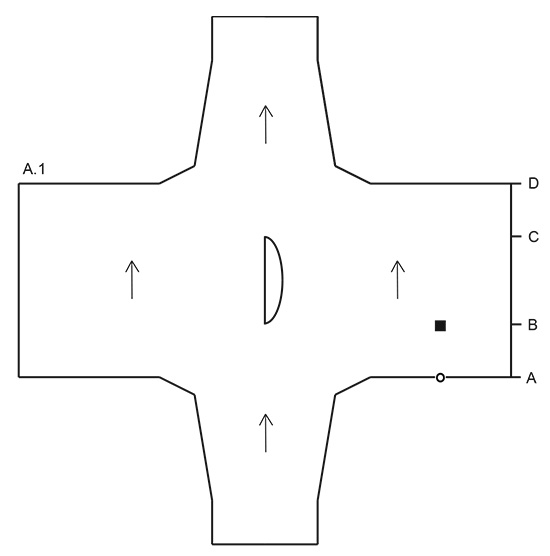
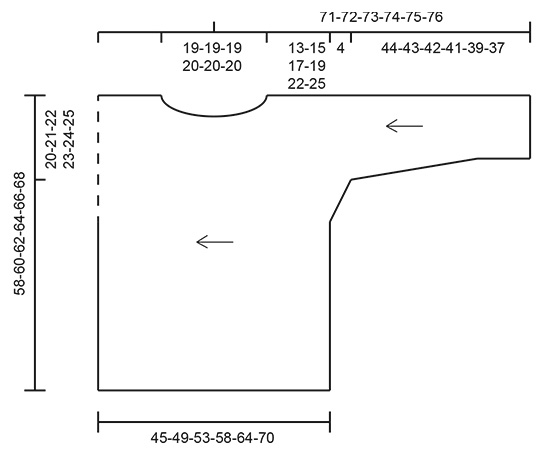
------------------------------------------------------- EXPLANATIONS FOR THE PATTERN: ------------------------------------------------------- KNITTING TIP: Make sure the garment lies flat when measuring. As this garment is worked sideways it is even more important than usual that the measurements are exact and taken on the suggested part of the garment. See sketch and Figure A.1. Figure A.1 has marks where the body should be and where the marker thread for the neck should be. All measurements for body and neck are taken in middle of garment and not by the neck, to avoid the neck/width of body being wrong. ENGLISH RIB: ROW 1 (= right side): 1 stitch in garter stitch, * knit 1, 1 yarn over, slip 1 stitch as if to purl *, work from *-* until there are 2 stitches left on the row and finish with knit 1 and 1 stitch in garter stitch. ROW 2 (= wrong side): 1 stitch in garter stitch, * 1 yarn over, slip 1 stitch as if to purl, knit together next stitch and yarn over *, work from *-* until there are 2 stitches left on row and finish with 1 yarn over, slip 1 stitch as if to purl and 1 stitch in garter stitch. ROW 3 (= right side): 1 stitch in garter stitch, * knit together next stitch and yarn over, 1 yarn over, slip 1 stitch as if to purl *, work from *-* until there are 2 stitches left on row, knit together next stitch and yarn over and 1 stitch in garter stitch. Repeat ROWS 2-3 - NOTE: From ROW 2 the stitches with yarn overs are always knitted. The yarn over lies over the stitch and is knitted together with the stitch. ------------------------------------------------------- START THE PIECE HERE: ------------------------------------------------------- JUMPER - SHORT OVERVIEW OF THE PIECE: The piece is worked back and forth with circular needle in one piece from the sleeve to the neck. It is then divided and front and back pieces are worked separately until the neck is finished. The piece is joined again and continued in one piece. It is very important to get the correct measurements as you work, read KNITTING TIP in description above. JUMPER: Cast on 39-41-43-43-45-45 stitches with circular needle size 4.5 mm and Sky (= bottom of sleeve). Work ENGLISH RIB - see description above. When the piece measures 12 cm increase 1 stitch in each side inside the 1 stitch every 3-2½-2½-2-2-1½ cm a total of 10-11-11-13-13-15 times = 59-63-65-69-71-75 stitches - the increased stitches are worked into the English rib as you go. REMEMBER THE KNITTING TENSION! When the piece measures 44-43-42-41-39-37 cm, loosely cast on stitches on both sides at the end of each row as follows: 2 stitches 2 times, 4 stitches 6 times and then 30-30-32-32-36-36 stitches 1 time. You have now cast on stitches for the body; insert a marker in the middle of the last stitches cast on - this is the side of the body and you now measure from here - read KNITTING TIP in description above and see Figure A.1 point A! There are 175-179-185-189-199-203 stitches on the needle. Continue with English rib. When the piece measures 13-15-17-19-22-25 cm from the marker in the side (from point A to point B in Figure A.1), work the next row as follows (make sure this row is worked from the wrong side): Work 87-89-92-94-99-101 stitches (= back piece) and then place these stitches on a thread, cast off 5 stitches for neck, work 83-85-88-90-95-97 stitches (= front piece). Insert a marker thread in the middle of the piece here; the neck is measured from here (position the marker thread so that it is directly over the marker in the side, see Figure A.1, there is 13-15-17-19-22-25 cm between the marker (point A) and the marker thread (point B)). Now continue by working the front piece at the same time as you decrease for neck. FRONT PIECE: There are 83-85-88-90-95-97 stitches on the needle. Decrease to neck on every row from the neck as follows: 1 stitch 8 times = 75-77-80-82-87-89 stitches. Work until the piece measures 15-15-15-16-16-16 cm from the marker thread (point B) and 28-30-32-35-38-41 cm from the marker in the side of body (point A). Loosely cast on for neck, at the end of each row towards the neck as follows: 1 stitch 8 times and 5 stitches 1 time = 88-90-93-95-100-102 stitches. The neck measures approx. 19-19-19-20-20-20 cm from the marker thread (from point B to point C). Then place all stitches on a thread and continue with the back piece. Cut the strand. BACK PIECE: Place the 87-89-92-94-99-101 stitches from the thread on the circular needle. Continue with the back piece until the neck measures 19-19-19-20-20-20 cm (see Figure A.1 point C) - adjust so that you have worked the same length as on the front piece. Both pieces can now be placed on the same needle and you continue working in one piece. FRONT AND BACK PIECE: Place the 88-90-93-95-100-102 stitches from the thread on the same circular needle as the back piece = 175-179-185-189-199-203 stitches. Continue working until the front/back pieces measures 45-49-53-58-64-70 cm from the marker in the side of the body (from point A to point D). Now loosely cast off on each side, at the beginning of each row as follows: 30-30-32-32-36-36 stitches 1 time, 4 stitches 6 times and 2 stitches 2 times = 59-63-65-69-71-75 stitches. Insert 1 new marker here and now measure from here. Work the same length over the stitches as on the other sleeve after the last increase, then decrease 1 stitch on each side inside the 1 stitch every 3-2½-2½-2-2-1½ cm a total of 10-11-11-13-13-15 times = 39-41-43-43-45-45 stitches. Work until the piece measures 44-43-42-41-39-37 cm from the marker and loosely cast off. NOTE! When casting off, work the yarn overs together with their stitches below AT THE SAME TIME as you cast off. ASSEMBLY: Fold the piece, wrong side to wrong side. Start sewing outermost on sleeve. Sew in the outermost loop of the outermost stitch along the whole sleeve and then down the side of front/back piece. Repeat on other side. NECK: Knit up stitches around the whole neck inside the 1 edge stitch (make sure you knit up in purled stitches mid front and along the neck on the back piece). Knit up approx. 90-106 stitches from the right side with short circular needle size 4.5 mm and Sky. Work 8 rounds of stocking stitch and then loosely cast off. The edge should roll. |
||||||||||
Diagram explanations |
||||||||||
|
||||||||||
 |
||||||||||
 |
||||||||||
Have you finished this pattern?Tag your pictures with #dropspattern #dailywondersweater or submit them to the #dropsfan gallery. Do you need help with this pattern?You'll find 21 tutorial videos, a Comments/Questions area and more by visiting the pattern on garnstudio.com. © 1982-2026 DROPS Design A/S. We reserve all rights. This document, including all its sub-sections, has copyrights. Read more about what you can do with our patterns at the bottom of each pattern on our site. |
||||||||||


With over 40 years in knitting and crochet design, DROPS Design offers one of the most extensive collections of free patterns on the internet - translated to 17 languages. As of today we count 324 catalogues and 12290 patterns translated into English (UK/cm). 12290
We work hard to bring you the best knitting and crochet have to offer, inspiration and advice as well as great quality yarns at incredible prices! Would you like to use our patterns for other than personal use? You can read what you are allowed to do in the Copyright text at the bottom of all our patterns. Happy crafting!
Post a comment to pattern DROPS 201-7
We would love to hear what you have to say about this pattern!
If you want to leave a question, please make sure you select the correct category in the form below, to speed up the answering process. Required fields are marked *.