
Popular categories
Looking for a yarn?


Comments / Questions (61)
![]() DROPS Design wrote:
DROPS Design wrote:
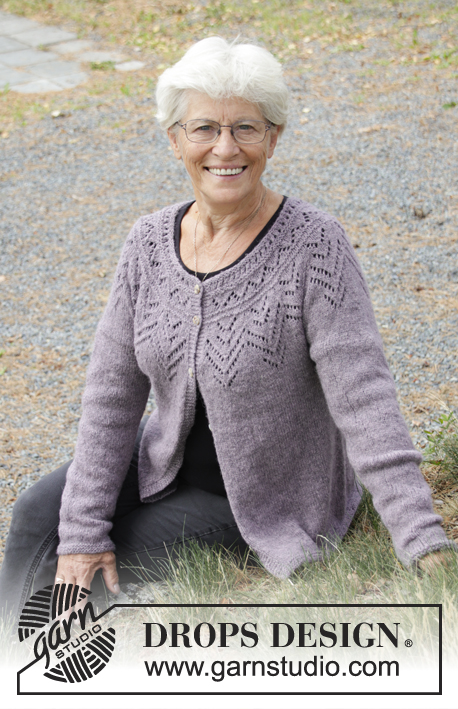
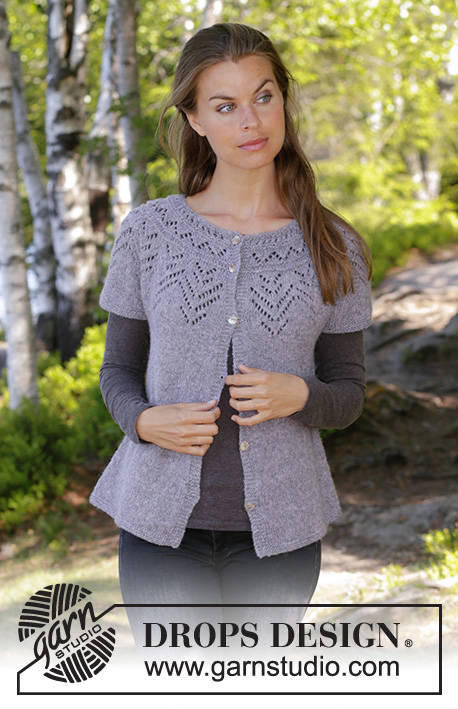
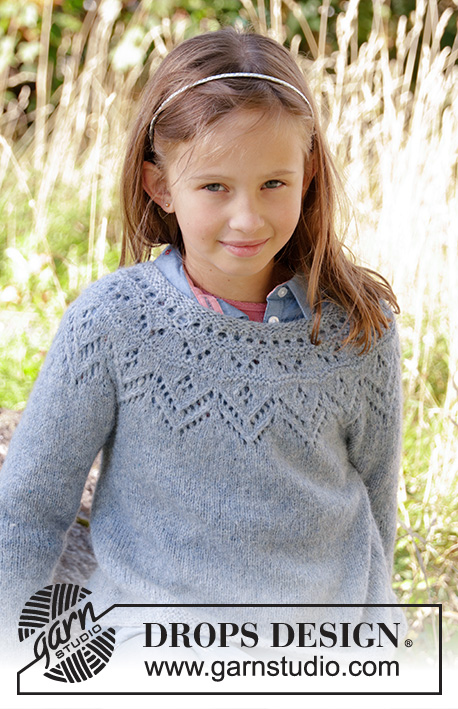
Colour alternative shown are: A) DROPS Sky 19.
14.02.2019 - 12:24
![]() Susanne wrote:
Susanne wrote:
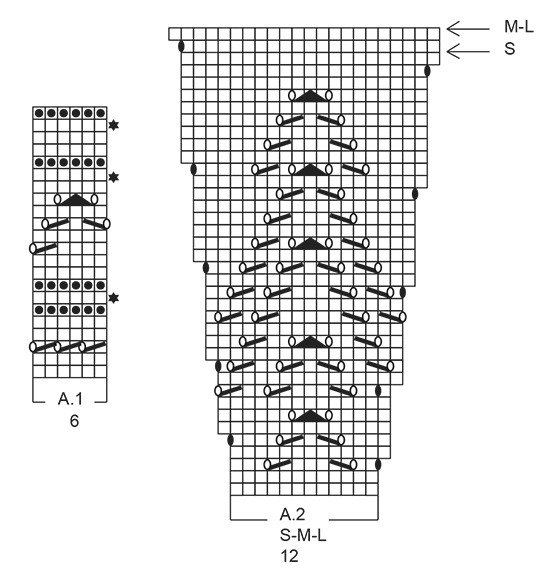
Har et spørgsmål til diagram 2a str l Mangler der ikke noget i diagram forklaring ? Der er 3 firkanter uden “mønster” i, den ene udgør retmasker, men de 2 andre starter med = og forklaring ....
05.02.2019 - 22:14DROPS Design answered:
Hei Susanne. Det er bare den øverste firkanten (= rettmaske) som er tom, de andre firkantene har mønster i. Har du problemer med å se dem uansett hvaslags enhet du bruker (mobil, PC, nettbrett) ?
08.02.2019 - 14:38
![]() Morgane_tralala wrote:
Morgane_tralala wrote:
Bonjour. Je voulais savoir dans quel sens se tricotait les motifs A1 et A2 ? Est ce qu'on les tricote du haut vers le bas ou inversement ? Merci
24.01.2019 - 00:02DROPS Design answered:
Bonjour Morgane_tralala, le pull se tricote de haut en bas, mais les diagrammes se lisent de bas en haut, tricotez tous les rangs des diagrammes de droite à gauche en commençant par le coin en bas à droite. Bon tricot!
24.01.2019 - 10:02
![]() Antonella wrote:
Antonella wrote:
Buongiorno. Ho fatto il diagramma A2 e alla fine, facendo 17 ripetizioni per la mia taglia (XL), mi mancano esattamente 17 maglie nel conto totale, 374. Ogni ripetizione è di 22 come da diagramma ma alla fine nel conteggio, pare mancare un aumento. Può esserci un errore o sbaglio qualcosa?
14.01.2019 - 12:01DROPS Design answered:
Buongiorno Antonella. I diagrammi sono corretti. Per la sua taglia (XL) alla fine del diagramma A2, ogni ripetizione è formata da 23 maglie (quindi 11 m aumentate in ogni ripetizione). Verifichi di aver seguito il diagramma A2 con sotto l'indicazione della sua taglia. Buon lavoro!
14.01.2019 - 13:15
![]() Maminko wrote:
Maminko wrote:
Ce pull est très joli, mais, si les tricots commencés par le haut ont une très belle encolure, celle-ci présente l'inconvénient d'être trop décolletée pour bien protéger le cou du froid. C'est ce qui me fait hésiter à réaliser un tel modèle.
18.11.2018 - 21:46
![]() Giegl wrote:
Giegl wrote:
Hallo, in der Erläuterung zum Diagramm wird bei dem Umschlag (schwarz gefüllt) gesagt, dass man ihn verschränkt abstricken soll, damit er ein Loch bildet. Soll dieser nicht gerade kein Loch bilden? VG
07.11.2018 - 07:40DROPS Design answered:
Liebe Frau Giegl, ja genau hier will man ein Loch vermeiden - es wird korrigiert, danke für den Hinweis. Viel Spaß beim stricken!
07.11.2018 - 08:40
![]() Carol Derrick wrote:
Carol Derrick wrote:
I love your beautful designs, but the patterns are so difficult to follow. Please can you give us the same designs but presented in the normal style of pattern..ie..knitted on 2 needles from the bottom up. The same result can be achieved with far less frustration.
23.10.2018 - 20:06DROPS Design answered:
Dear Mrs Detrick, you will find all informations about adapting a pattern for circular needles into straight needles here - it might be sometimes easier to work with circular needles in the round, and our videos can help you to learn how to do. In any case, you can contact your DROPS store for any individual assistance. Happy knitting!
24.10.2018 - 09:00
![]() Kim wrote:
Kim wrote:
That's odd, as far as I can see row 3 in diagram A1 is all plain knits.
28.08.2018 - 08:30DROPS Design answered:
Hi Kim. You read the diagrams as usual: From bottom to top, from the right to the left. The first 2 rows of A.1 are knit stitches throughout the rounds, the third round is knit two together, 1 yarn over, repeated over all stitches on the round. Happy knitting.
28.08.2018 - 14:02
![]() Kim wrote:
Kim wrote:
I realized my previous comment might be better off as a "questions". In figure A1 there seems to be holes missing in row 3?
27.08.2018 - 10:00DROPS Design answered:
Hello Kim. Row 3 in diagram A1 is correct: you knit 2 sts together and work 1 yarn over and repeat on all sts on round. The total number of sts doesn’t change. Happy knitting!
27.08.2018 - 19:14
![]() Kim wrote:
Kim wrote:
There seems to be holes missing, figure A1 row three ought to have some?
26.08.2018 - 12:23
|
|||||||||||||||||||||||||
Agnes Sweater#agnessweater |
|||||||||||||||||||||||||
 |
 |
||||||||||||||||||||||||
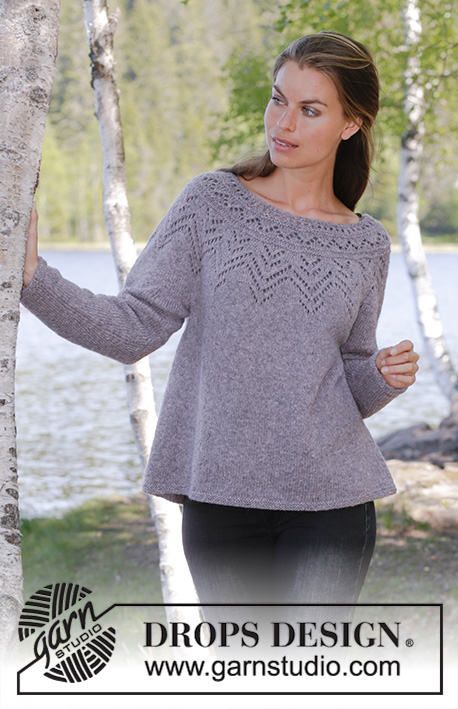
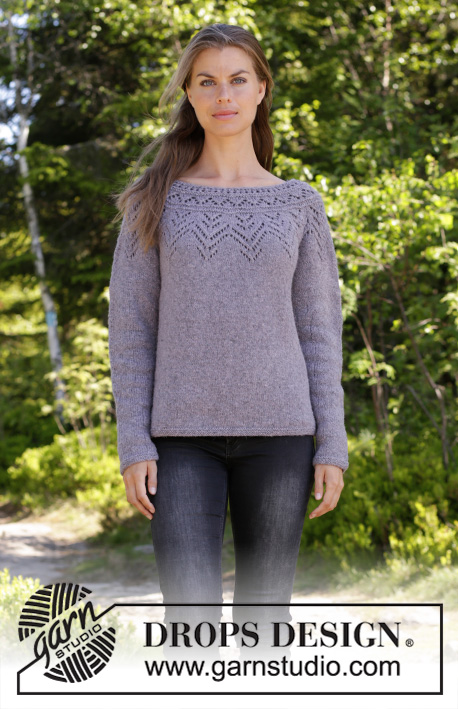
Knitted jumper with round yoke in DROPS Sky. The piece is worked top down with lace pattern. Sizes S - XXXL.
DROPS 197-16 |
|||||||||||||||||||||||||
|
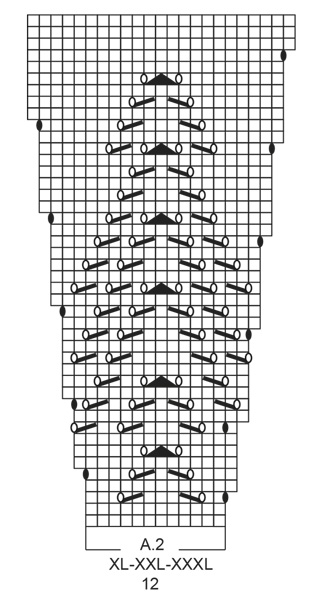
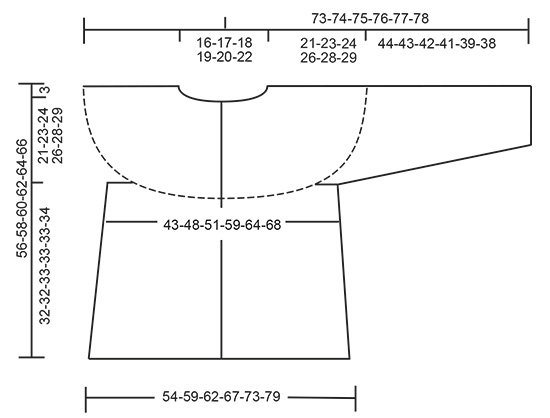
EXPLANATIONS FOR THE PIECE: ------------------------------------------------------- RIDGE/GARTER STITCH (worked in the round): 1 ridge = 2 rounds. Knit 1 round and purl 1 round. PATTERN: See diagrams A.1 and A.2. Choose diagram for your size. ELEVATION (for back of neck): The elevation is worked in garter stitch. Insert 1 marker at the start of the round (= approx. mid back). Start from the right side and knit as far as 7-8-8-9-9-10 stitches past the marker thread, turn, tighten the strand and knit 14-16-16-18-18-20 stitches back. Turn, tighten the strand and knit 21-24-24-27-27-30 stitches, turn, tighten the strand and knit 28-32-32-36-36-40 stitches back. Turn, tighten the strand and knit 35-40-40-45-45-50 stitches, turn, tighten the strand and knit 42-48-48-54-54-60 stitches back. Turn, tighten the strand and knit 49-56-56-63-63-70 stitches back, turn, tighten the strand and knit to marker thread. INCREASE TIP-1 (evenly spaced): To work out how to increase evenly, count the total number of stitches on the needle (e.g. 92 stitches) and divide these stitches by the number of increases to be made (e.g. 22) = 4.18. In this example, increase by making 1 yarn over after approx. each 4th stitch. On the next round, work the yarn overs twisted to avoid holes. INCREASE TIP-2 (for sides of body): All increases are made from the right side. Work until there are 2 stitches left before the marker thread, 1 yarn over, knit 4 stitches (the marker thread sits in the middle of these stitches) 1 yarn over. On the next round work the yarn overs twisted to avoid holes. Then work the new stitches in stocking stitch. DECREASE TIP-1 (for sleeves): Decrease 1 stitch on each side of the marker thread as follows: Work until there are 3 stitches left before the marker thread, knit 2 together, knit 2 (marker thread sits in the middle of these stitches), slip 1 as if to knit, knit 1, pass the slipped stitch over the knitted stitch. ------------------------------------------------------- START THE PIECE HERE: ------------------------------------------------------- JUMPER - SHORT OVERVIEW OF THE PIECE: The piece is worked in the round, top down with circular needle as far as the armholes, then the body and sleeves are finished separately. The body is continued in the round with circular needle. The sleeves are worked in the round with double pointed needles. YOKE: Cast on 92-96-100-108-112-118 stitches with circular needle size 3.5 mm and Sky. Work 2 RIDGES – read description above. Knit 1 round and increase 22-24-26-24-26-26 stitches evenly on round – read INCREASE TIP-1 = 114-120-126-132-138-144 stitches. Purl 1 round. Change to circular needle size 4 mm. For a better fit, you can now work an elevation in the back of the neck so that the yoke is slightly higher at the back. This elevation can be left out; the neck will then be the same front and back – read ELEVATION. Work A.1 (= 6 stitches) over all stitches (= a total of 19-20-21-22-23-24 times in width). On each round with a star (= increase round) work as follows: REMEMBER THE KNITTING TENSION! INCREASE 1: Increase 24-24-24-24-30-30 stitches evenly on round = 138-144-150-156-168-174 stitches. A.1 is then repeated 23-24-25-26-28-29 times in width. INCREASE 2: Increase 18-18-24-24-24-30 stitches evenly on round = 156-162-174-180-192-204 stitches. A.1 is then repeated 26-27-29-30-32-34 times in width. INCREASE 3: Increase 12-18-18-24-24-24 stitches evenly on round = 168-180-192-204-216-228 stitches. A.1 is then repeated 28-30-32-34-36-38 times in width. When A.1 has been worked 1 time in height the piece measures approx. 8 cm from the cast-on edge. Work A.2 (= 12 stitches) over all stitches (= 14-15-16-17-18-19 times in width). When A.2 has been worked 1 time in height there are 294-330-352-391-414-437 stitches on the needle. The piece measures approx. 21-22-22-24-24-24 cm. Continue in the round with stocking stitch until the piece measures 21-23-24-26-28-29 cm from the cast-on edge. Now divide the piece for body and sleeves as follows: Work stocking stitch over the first 42-47-49-57-62-66 stitches, place the next 64-72-78-82-84-88 stitches on a thread for sleeve and cast on 8-8-10-10-12-12 stitches under the sleeve, work stocking stitch over the next 83-93-98-114-123-130 stitches, place the next 64-72-78-82-84-88 stitches on a thread for sleeve and cast on 8-8-10-10-12-12 stitches under the sleeve, work 41-46-49-56-61-65 stitches stocking stitch = 182-202-216-247-270-285 stitches. BODY: Insert 1 marker thread in the middle of the 8-8-10-10-12-12 stitches under each sleeve. Work stocking stitch. When the piece measures 2 cm from where the body was divided from the sleeves, increase 1 stitch on each side of both marker threads – read INCREASE TIP-2. Increase like this every 2-2-2-3-3-2 cm a total of 11-11-11-9-9-12 times = 226-246-260-283-306-333 stitches. Continue with stocking stitch until the piece measures 30-30-31-31-31-32 cm from where the body was divided from the sleeves. Change to circular needle size 3.5 mm and work garter stitch until the piece measures 32-32-33-33-33-34 cm from where the body was divided from the sleeves. Cast off with knit. The piece measures approx. 56-58-60-62-64-66 cm from the shoulder down. SLEEVE: Place the 64-72-78-82-84-88 stitches from the thread on the one side of the piece on double pointed needles size 4 mm and knit up 1 stitch in each of the 8-8-10-10-12-12 stitches under the sleeve = 72-80-88-92-96-100 stitches. Insert 1 marker thread in the middle of the 8-8-10-10-12-12 stitches under the sleeve. Work stocking stitch in the round. When the piece measures 3 cm, decrease 1 stitch on each side of the marker thread - read DECREASE TIP-1. Decrease like this every 2½-2-1½-1½-1½-1½ cm a total of 13-16-19-19-20-21 times = 46-48-50-54-56-58 stitches. When the piece measures 42-41-40-39-37-36 cm from where the sleeve was divided from the body, change to double pointed needles size 3.5 mm and work 3 RIDGES in the round - see description above. Then cast off with knit. The sleeve measures a total of 65-66-66-67-67-67 cm from the cast-on edge. Work the other sleeve in the same way. |
|||||||||||||||||||||||||
Diagram explanations |
|||||||||||||||||||||||||
|
|||||||||||||||||||||||||
 |
|||||||||||||||||||||||||
 |
|||||||||||||||||||||||||
 |
|||||||||||||||||||||||||
Have you finished this pattern?Tag your pictures with #dropspattern #agnessweater or submit them to the #dropsfan gallery. Do you need help with this pattern?You'll find 28 tutorial videos, a Comments/Questions area and more by visiting the pattern on garnstudio.com. © 1982-2026 DROPS Design A/S. We reserve all rights. This document, including all its sub-sections, has copyrights. Read more about what you can do with our patterns at the bottom of each pattern on our site. |
|||||||||||||||||||||||||


With over 40 years in knitting and crochet design, DROPS Design offers one of the most extensive collections of free patterns on the internet - translated to 17 languages. As of today we count 324 catalogues and 12239 patterns translated into English (UK/cm). 12239
We work hard to bring you the best knitting and crochet have to offer, inspiration and advice as well as great quality yarns at incredible prices! Would you like to use our patterns for other than personal use? You can read what you are allowed to do in the Copyright text at the bottom of all our patterns. Happy crafting!
Post a comment to pattern DROPS 197-16
We would love to hear what you have to say about this pattern!
If you want to leave a question, please make sure you select the correct category in the form below, to speed up the answering process. Required fields are marked *.