
Popular categories
Looking for a yarn?


Comments / Questions (61)
![]() Lucie wrote:
Lucie wrote:
Bonjour, l'explication de la réhausse est elle sur un tricot en rond ? Je trouve que c'est un peu bizarre car le point mousse en rond doit être tricoté un 1er rang endroit et un 2e rang envers, mais l'explication sur la réhausse est tricotée tous en endroit. Je vous remercie pour votre retour.
26.10.2023 - 17:08DROPS Design answered:
Bonjour Lucie, la rehausse se tricote en rangs raccourcis au point mousse, vous tricoterez ainsi tous les rangs à l'endroit. Bon tricot!
27.10.2023 - 08:25
![]() Maria Grazia wrote:
Maria Grazia wrote:
Scusate, ma alle domande in italiano non rispondete? Grazie
02.05.2023 - 16:19DROPS Design answered:
Buonasera Maria Grazia, abbiamo risposto alla sua domanda. Buon lavoro!
04.05.2023 - 23:49
![]() Maria Grazia wrote:
Maria Grazia wrote:
Mod. 197/16 Agnes Sweater. Per fare alzata, in quale punto dello sprone si iniziano a lavorare i ferri accorciati? Subito dopo 2 coste a punte legaccio e prima di tutti gli aumenti che precedono inizio diagramma A.1? O dove? Al punto Tecniche Impiegate è scritto "lavorare un'alzata a punto legaccio" cosa significa e come si fa? Grazie per il supporto.
19.04.2023 - 22:28DROPS Design answered:
Buonasera Maria Grazia, l'alzata si lavora dopo il giro successivo a rovescio dopo gli aumenti all'inizio dello sprone nel punto indicato nelle spiegazioni. Buon lavoro!
04.05.2023 - 23:47
![]() CYNTHIA NAGLE wrote:
CYNTHIA NAGLE wrote:
Agnes - do you have a schematic for this sweater in inches instead of cm
07.02.2023 - 01:29DROPS Design answered:
Dear Mrs Nagle, we only have charts in cm - the US-English pattern includes measurements in inches - convert into inches here. Happy knitting!
07.02.2023 - 10:29
![]() Annette Möller wrote:
Annette Möller wrote:
Ich möchte die Anleitung Agnes Sweater runterladen. Das funktioniert nicht. Die Wollbestellung gebe ich danach gerne auf. LG. Annette
22.09.2022 - 13:45DROPS Design answered:
Liebe Frau Möller, unsere Anleitungen können nur ausgedruckt werden, aber mit Hilfe eines virtuellen Druckers können Sie sie im .pdf-Format herunterladen. Viel Spaß beim stricken!
23.09.2022 - 08:01
![]() Dena wrote:
Dena wrote:
Can your patterns be saved to Dropbox so that I can use them with Knit Companion?
25.01.2021 - 15:12DROPS Design answered:
Dear Dena, our patterns can only be printed, but using a virtual printer may allow you to save them as a .PDF file. Happy knitting!
25.01.2021 - 16:15
![]() Marlies wrote:
Marlies wrote:
Hallo, ich habe diesen Pullover für meine Enkelin gestrickt. Sie ist hellbegeistert, die Wolle super weich - kratzt überhaupt nicht. Danke für die kostenlosen Anleitungen
26.12.2020 - 10:34
![]() Anne-Sophie Doré wrote:
Anne-Sophie Doré wrote:
Merci de votre réponse. En fait ma question concernait la taille L, mais c'est équivalent à la taille M pour cette partie. Dans votre réponse, vous parlez de finir par 48 m (24 avant et 24 après le marqueur). Hors dans les explications il est dit de faire encore un rang de 56m (soit 24 avant et 32 après) et pas de retour. C'est bien l'erreur que j'avais relevée... et dont vous ne parlez pas. Une correction m'a t'elle échappé ? En tout cas merci pour tout ces modèles.
10.11.2020 - 09:35DROPS Design answered:
Bonjour Mme Doré, effectivement, j'ai compté trop vite hier :) Je vais transmettre à nos stylistes pour vérification, vous pouvez en attendant au choix, soit tricoter un rang retour avec 8 m en plus (= 56+8 = 64 m soit 32 m de chaque côté), soit vous arrêter après les 48 m (= 24 de chaque côté). Merci pour votre retour, bon tricot!
10.11.2020 - 09:49
![]() Anne-Sophie Doré wrote:
Anne-Sophie Doré wrote:
Bonjour, N'y a t'il pas une erreur dans les explications de la rehausse dos? D'un côté on va jusqu'à 24 mailles après le marqueur central et de l'autre 32 mailles! Merci de me dire si j'ai bien compris. Cordialement.
08.11.2020 - 14:52DROPS Design answered:
Bonjour Mme Doré, vous tricotez la taille M, sauf erreur? Vous tricotez d'abord 8 m après le marqueur, puis 16 m = 8 avant + 8 après, puis 24 m: 8 avant +16 après; puis 32 m: 16 avant+16 après; puis 40 m; 16 avant+24 après et enfin 48 m: 24 avant+24 après - tricotez maintenant jusqu'au début du tour et continuez l'empiècement en rond. Bon tricot!
09.11.2020 - 11:08
![]() Bernadetta wrote:
Bernadetta wrote:
Scusate ho capito ora. grazie lo stesso
09.10.2020 - 22:25
|
|||||||||||||||||||||||||
Agnes Sweater#agnessweater |
|||||||||||||||||||||||||
 |
 |
||||||||||||||||||||||||
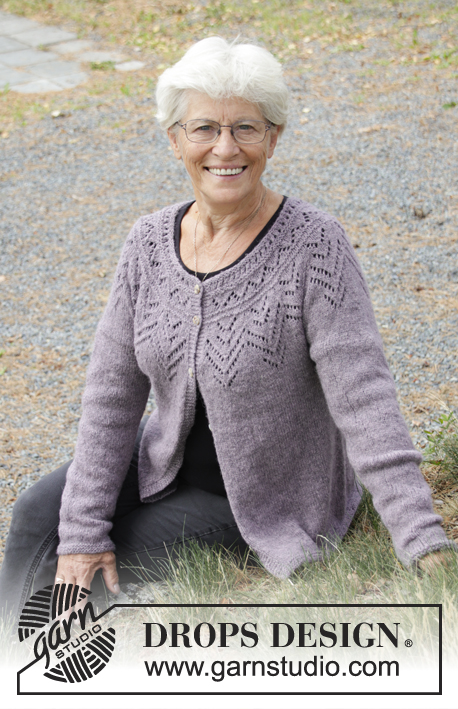
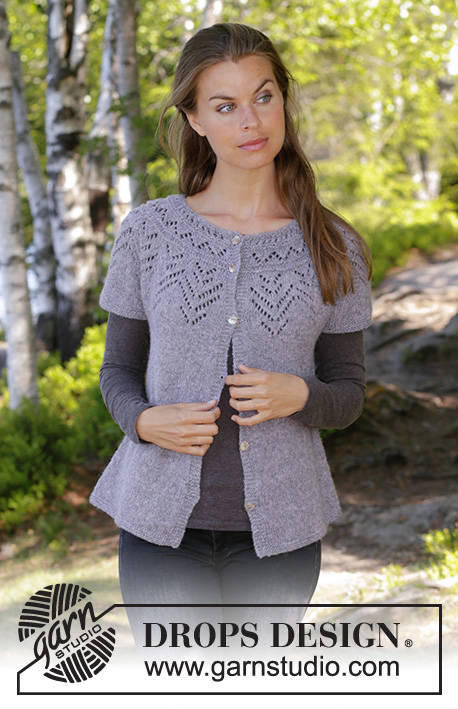
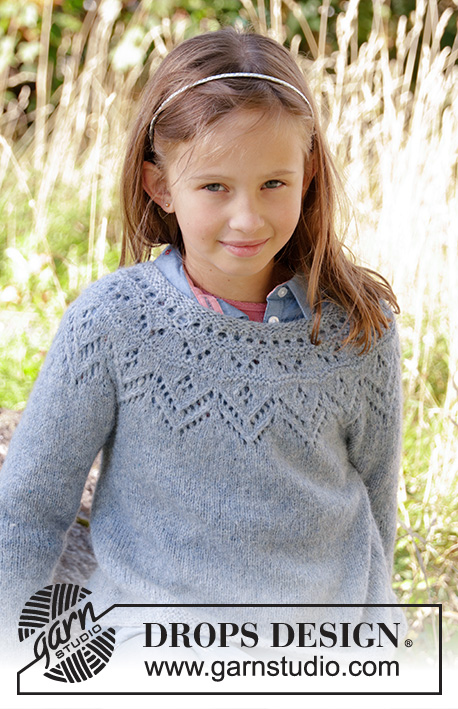
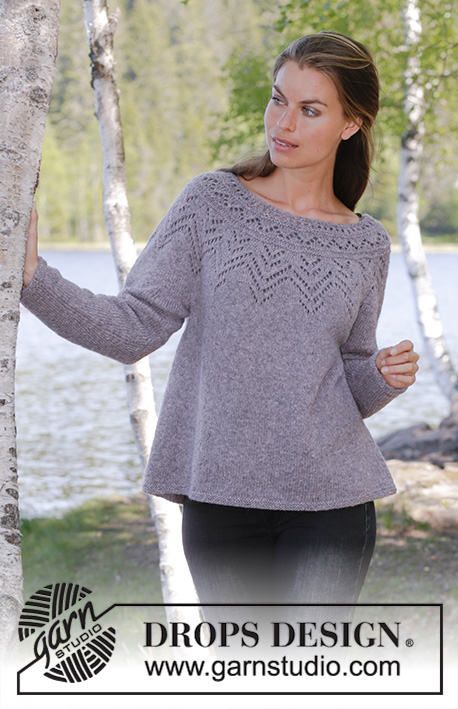
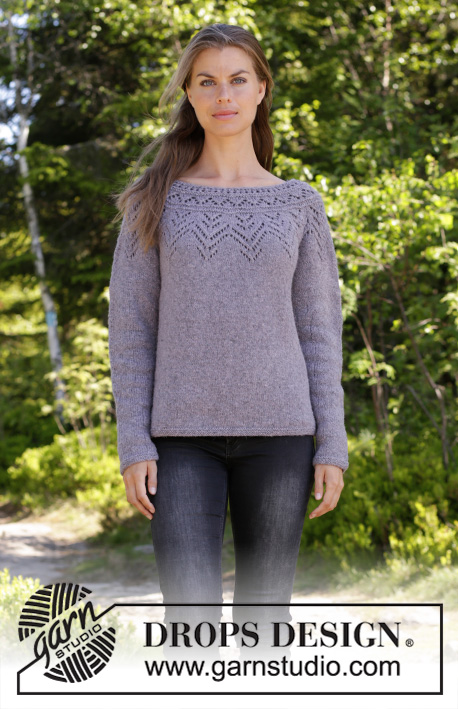
Knitted jumper with round yoke in DROPS Sky. The piece is worked top down with lace pattern. Sizes S - XXXL.
DROPS 197-16 |
|||||||||||||||||||||||||
|
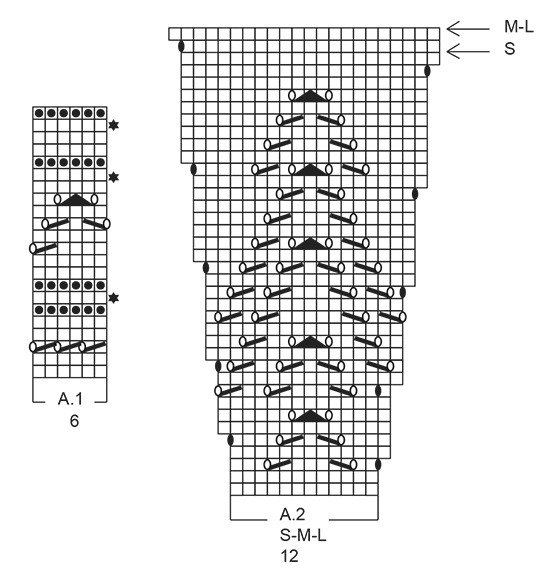
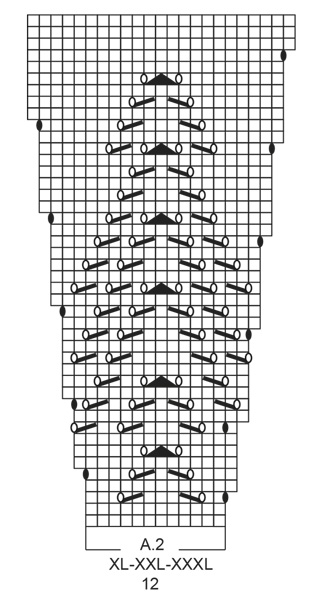
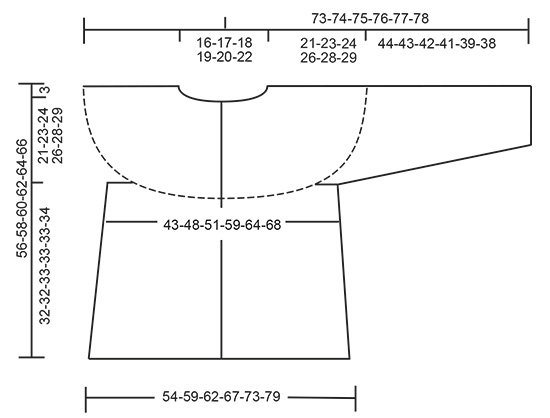
EXPLANATIONS FOR THE PIECE: ------------------------------------------------------- RIDGE/GARTER STITCH (worked in the round): 1 ridge = 2 rounds. Knit 1 round and purl 1 round. PATTERN: See diagrams A.1 and A.2. Choose diagram for your size. ELEVATION (for back of neck): The elevation is worked in garter stitch. Insert 1 marker at the start of the round (= approx. mid back). Start from the right side and knit as far as 7-8-8-9-9-10 stitches past the marker thread, turn, tighten the strand and knit 14-16-16-18-18-20 stitches back. Turn, tighten the strand and knit 21-24-24-27-27-30 stitches, turn, tighten the strand and knit 28-32-32-36-36-40 stitches back. Turn, tighten the strand and knit 35-40-40-45-45-50 stitches, turn, tighten the strand and knit 42-48-48-54-54-60 stitches back. Turn, tighten the strand and knit 49-56-56-63-63-70 stitches back, turn, tighten the strand and knit to marker thread. INCREASE TIP-1 (evenly spaced): To work out how to increase evenly, count the total number of stitches on the needle (e.g. 92 stitches) and divide these stitches by the number of increases to be made (e.g. 22) = 4.18. In this example, increase by making 1 yarn over after approx. each 4th stitch. On the next round, work the yarn overs twisted to avoid holes. INCREASE TIP-2 (for sides of body): All increases are made from the right side. Work until there are 2 stitches left before the marker thread, 1 yarn over, knit 4 stitches (the marker thread sits in the middle of these stitches) 1 yarn over. On the next round work the yarn overs twisted to avoid holes. Then work the new stitches in stocking stitch. DECREASE TIP-1 (for sleeves): Decrease 1 stitch on each side of the marker thread as follows: Work until there are 3 stitches left before the marker thread, knit 2 together, knit 2 (marker thread sits in the middle of these stitches), slip 1 as if to knit, knit 1, pass the slipped stitch over the knitted stitch. ------------------------------------------------------- START THE PIECE HERE: ------------------------------------------------------- JUMPER - SHORT OVERVIEW OF THE PIECE: The piece is worked in the round, top down with circular needle as far as the armholes, then the body and sleeves are finished separately. The body is continued in the round with circular needle. The sleeves are worked in the round with double pointed needles. YOKE: Cast on 92-96-100-108-112-118 stitches with circular needle size 3.5 mm and Sky. Work 2 RIDGES – read description above. Knit 1 round and increase 22-24-26-24-26-26 stitches evenly on round – read INCREASE TIP-1 = 114-120-126-132-138-144 stitches. Purl 1 round. Change to circular needle size 4 mm. For a better fit, you can now work an elevation in the back of the neck so that the yoke is slightly higher at the back. This elevation can be left out; the neck will then be the same front and back – read ELEVATION. Work A.1 (= 6 stitches) over all stitches (= a total of 19-20-21-22-23-24 times in width). On each round with a star (= increase round) work as follows: REMEMBER THE KNITTING TENSION! INCREASE 1: Increase 24-24-24-24-30-30 stitches evenly on round = 138-144-150-156-168-174 stitches. A.1 is then repeated 23-24-25-26-28-29 times in width. INCREASE 2: Increase 18-18-24-24-24-30 stitches evenly on round = 156-162-174-180-192-204 stitches. A.1 is then repeated 26-27-29-30-32-34 times in width. INCREASE 3: Increase 12-18-18-24-24-24 stitches evenly on round = 168-180-192-204-216-228 stitches. A.1 is then repeated 28-30-32-34-36-38 times in width. When A.1 has been worked 1 time in height the piece measures approx. 8 cm from the cast-on edge. Work A.2 (= 12 stitches) over all stitches (= 14-15-16-17-18-19 times in width). When A.2 has been worked 1 time in height there are 294-330-352-391-414-437 stitches on the needle. The piece measures approx. 21-22-22-24-24-24 cm. Continue in the round with stocking stitch until the piece measures 21-23-24-26-28-29 cm from the cast-on edge. Now divide the piece for body and sleeves as follows: Work stocking stitch over the first 42-47-49-57-62-66 stitches, place the next 64-72-78-82-84-88 stitches on a thread for sleeve and cast on 8-8-10-10-12-12 stitches under the sleeve, work stocking stitch over the next 83-93-98-114-123-130 stitches, place the next 64-72-78-82-84-88 stitches on a thread for sleeve and cast on 8-8-10-10-12-12 stitches under the sleeve, work 41-46-49-56-61-65 stitches stocking stitch = 182-202-216-247-270-285 stitches. BODY: Insert 1 marker thread in the middle of the 8-8-10-10-12-12 stitches under each sleeve. Work stocking stitch. When the piece measures 2 cm from where the body was divided from the sleeves, increase 1 stitch on each side of both marker threads – read INCREASE TIP-2. Increase like this every 2-2-2-3-3-2 cm a total of 11-11-11-9-9-12 times = 226-246-260-283-306-333 stitches. Continue with stocking stitch until the piece measures 30-30-31-31-31-32 cm from where the body was divided from the sleeves. Change to circular needle size 3.5 mm and work garter stitch until the piece measures 32-32-33-33-33-34 cm from where the body was divided from the sleeves. Cast off with knit. The piece measures approx. 56-58-60-62-64-66 cm from the shoulder down. SLEEVE: Place the 64-72-78-82-84-88 stitches from the thread on the one side of the piece on double pointed needles size 4 mm and knit up 1 stitch in each of the 8-8-10-10-12-12 stitches under the sleeve = 72-80-88-92-96-100 stitches. Insert 1 marker thread in the middle of the 8-8-10-10-12-12 stitches under the sleeve. Work stocking stitch in the round. When the piece measures 3 cm, decrease 1 stitch on each side of the marker thread - read DECREASE TIP-1. Decrease like this every 2½-2-1½-1½-1½-1½ cm a total of 13-16-19-19-20-21 times = 46-48-50-54-56-58 stitches. When the piece measures 42-41-40-39-37-36 cm from where the sleeve was divided from the body, change to double pointed needles size 3.5 mm and work 3 RIDGES in the round - see description above. Then cast off with knit. The sleeve measures a total of 65-66-66-67-67-67 cm from the cast-on edge. Work the other sleeve in the same way. |
|||||||||||||||||||||||||
Diagram explanations |
|||||||||||||||||||||||||
|
|||||||||||||||||||||||||
 |
|||||||||||||||||||||||||
 |
|||||||||||||||||||||||||
 |
|||||||||||||||||||||||||
Have you finished this pattern?Tag your pictures with #dropspattern #agnessweater or submit them to the #dropsfan gallery. Do you need help with this pattern?You'll find 29 tutorial videos, a Comments/Questions area and more by visiting the pattern on garnstudio.com. © 1982-2026 DROPS Design A/S. We reserve all rights. This document, including all its sub-sections, has copyrights. Read more about what you can do with our patterns at the bottom of each pattern on our site. |
|||||||||||||||||||||||||


With over 40 years in knitting and crochet design, DROPS Design offers one of the most extensive collections of free patterns on the internet - translated to 17 languages. As of today we count 324 catalogues and 12290 patterns translated into English (UK/cm). 12290
We work hard to bring you the best knitting and crochet have to offer, inspiration and advice as well as great quality yarns at incredible prices! Would you like to use our patterns for other than personal use? You can read what you are allowed to do in the Copyright text at the bottom of all our patterns. Happy crafting!
Post a comment to pattern DROPS 197-16
We would love to hear what you have to say about this pattern!
If you want to leave a question, please make sure you select the correct category in the form below, to speed up the answering process. Required fields are marked *.