
Popular categories
Looking for a yarn?


Comments / Questions (26)
![]() Rose wrote:
Rose wrote:
Hi there, I’m a little confused on incorporating the diagrams. When there is reference to A.1 in the same round for example, do you just keep repeating the same row? At what point do you go to a new row of the A.1 diagram?
19.07.2023 - 23:48DROPS Design answered:
Dear Rose, you can read the following lesson about our knitting diagrams: https://www.garnstudio.com/lesson.php?id=68&cid=19. Yes, when A.1 is worked several times in the same round, you repeat the same row/ round of A.1 in this round. On the next round, you will work row 2 of A.1 over the stitches of row 1 of A.1, as in the chart. Happy knitting!
20.07.2023 - 11:52
![]() Britt Lindholm Hansen wrote:
Britt Lindholm Hansen wrote:
Forstår ikke diagram A.1 række 11 og 12. Er de miderste masker ret?? Og uden de 2 vrangmasker.
18.12.2022 - 21:32DROPS Design answered:
Hej Britt, du fortsætter mønsteret over de midterste masker, du starter altså forfra. Men snoningen på hver side af A.1 gentages for hver 4.pind :)
20.12.2022 - 08:43
![]() Erika Wiegand wrote:
Erika Wiegand wrote:
Ich stricke z.Zt. das Modell Für Elise und habe folgende Frage:\\\\\\\\r\\\\\\\\nIch bin beim Rumpfteil und muß jetzt die Arbeit teilen. In der nächsten Reihe soll ich insgesamt 134 Maschen zunehmen. Warum ist das so? Ich verstehe, daß sich der Pullover nach unten erweitert, aber die 134 Maschen erscheinen mir sehr viel. Vielleicht kann ich eine Erklärung bekommen, damit ich weiter arbeiten kann. Vielen Dank im Voraus.\\r\\nErika Wiegand
06.02.2022 - 16:38DROPS Design answered:
Liebe Frau Wiegand, es wird je nach der Größe in glatt rechts + in Diagramme zugenommen, damit die Bündchen unten nicht so eng werden - aber wie kommen Sie zu 134 Zunahmen? Ich finde nur 130 M in die grössere Größe. Viel Spaß beim stricken!
07.02.2022 - 11:16
![]() Dolores Amorós Mariscal wrote:
Dolores Amorós Mariscal wrote:
En las vueltas 11-12 en el centro cómo hay que hacer, punto derecho? Estoy utilizando las agujas indicadas de 2,5 mm para el resorte y no veo que quede tan amplio el cuello como en las fotos ni utilizando agujas 3,3 mm. Es la misma calidad Flora
03.04.2021 - 11:38DROPS Design answered:
Hola Dolores. Este modelo se trabaja según el patrón con la tensión del tejido indicada en el patrón y con el número de aguja recomendada para obtener la tensión indicada. La foto es solo una referencia para una visión completa del modelo. La textura del tejido depende de cada tejedora.
03.04.2021 - 16:32
![]() Sandra wrote:
Sandra wrote:
Økningsprosessen etter vrangbord på bærestykke før diagrammønster et kan ikke være rett. Ender opp med for mange masker. Hadde også vært greit om det sto noe om hvor mange masker det skal være framme/bake og over ermene når man er ferdig med Raglansøkningen på bærestykke slik at man ikke tar av maskene til ermene på feil plass.
24.01.2021 - 11:07
![]() Sandra Rondesrveit wrote:
Sandra Rondesrveit wrote:
Økningsprosessen etter vrangbord på bærestykke før diagrammønster et kan ikke være rett. Ender opp med for mange masker. Hadde også vært greit om det sto noe om hvor mange masker det skal være framme/bake og over ermene når man er ferdig med Raglansøkningen på bærestykke slik at man ikke tar av maskene til ermene på feil plass.
24.01.2021 - 11:06
![]() Julia wrote:
Julia wrote:
Hallo, wie wird nach den rechts gestrickten Raglan-Umschlägen verfahren? Werden diese weiter rechts gestrickt oder wird das Muster verschoben? Danke und Grüße
09.09.2020 - 23:00DROPS Design answered:
Liebe Julia, die Raglanzunahmen werden rechts gestrickt, diese Zunahmen werden immer beidseitig von A.1 gestrickt damit die Maschenanzahl zwischen A.1 jeweils von 2 M zunimmt (= 8 Zunahmen pro Runde). Viel Spaß beim stricken!
10.09.2020 - 09:38
![]() Rosi wrote:
Rosi wrote:
Hola!! Podrían por favor aclararme dónde situar los marcadores? Sería una gran ayuda!! Gracias!!
10.03.2020 - 00:08DROPS Design answered:
Hola Rosi. Los marcapuntos los colocamos en los lados (laterales) del cuerpo, en el medio de los puntos que montamos bajo las mangas.
10.03.2020 - 23:29
![]() Hannelore Edeling wrote:
Hannelore Edeling wrote:
Hallo, Ich habe eine Frage: Beim Muster A1 wird auf der linken Seite die rechten Masche nach dem Umschlag sehr locker, ähnlich einer Leiter, wie vermeide ich das? Rechts sieht das viel besser aus. Auf dem Foto sind auch die Löcher sehr gut zu sehen, bei mir nur auf der linken Seite. Danke für die Info. Viele Grüße
22.02.2020 - 13:45DROPS Design answered:
Liebe Frau Edeling, versuchen Sie alle Umschläge genauso locker/fest zu stricken, blockieren (spannen) Ihren fertigen Pullover kann auch später helfen. Gerne wenden Sie sich an Ihrem Laden, sicher haben Sie mehr individuellen Tipps für Sie. Viel Spaß beim stricken!
24.02.2020 - 08:19
![]() Josiane Bocquet wrote:
Josiane Bocquet wrote:
Bonjour vos model son très beaux mes pour comprendre ses dure les explication son pas trés simple josiane
11.05.2019 - 14:13DROPS Design answered:
Bonjour Mme Bocquet, Les modèles DROPS sont réalisés par des milliers de personnes du monde entier. Nous comprenons toutefois qu’en fonction du pays, les explications puissent être formulées différemment. Nous faisons naturellement en sorte que nos modèles soient compréhensibles. Vous pouvez volontiers poser votre question ici, et pour toute assistance individuelle, vous adresser au magasin où vous avez acheté votre laine – même par mail ou téléphone. Bon tricot!
13.05.2019 - 10:51
|
||||||||||||||||||||||
Für Elise#furelisesweater |
||||||||||||||||||||||
 |
 |
|||||||||||||||||||||
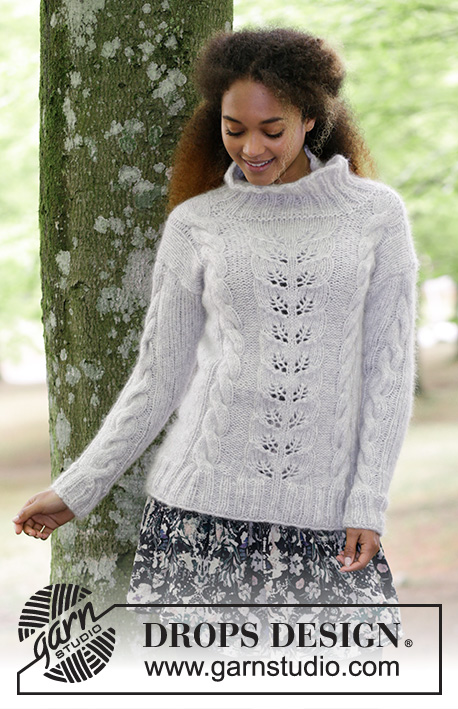
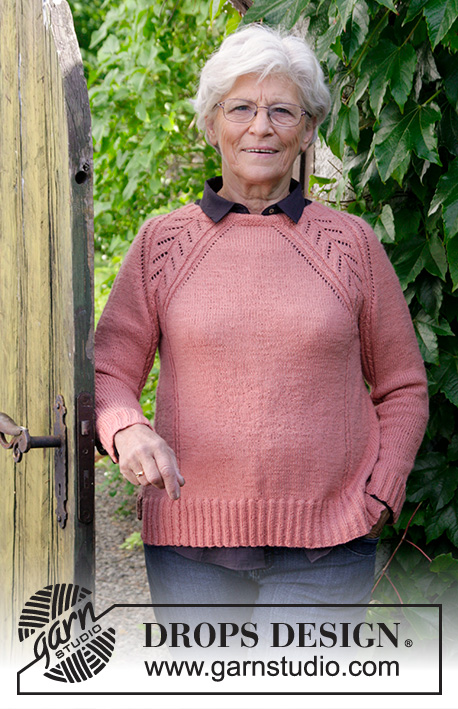
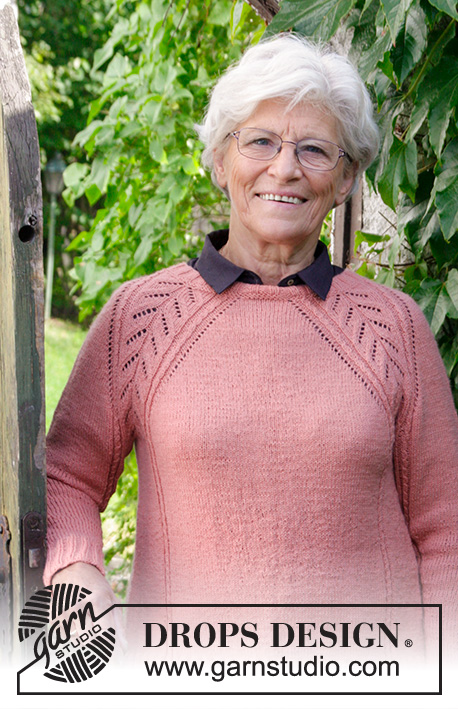
Knitted jumper with raglan, lace pattern, cables, and A-shape, knitted top down. Size: S - XXXL Piece is knitted in DROPS Flora.
DROPS 179-23 |
||||||||||||||||||||||
|
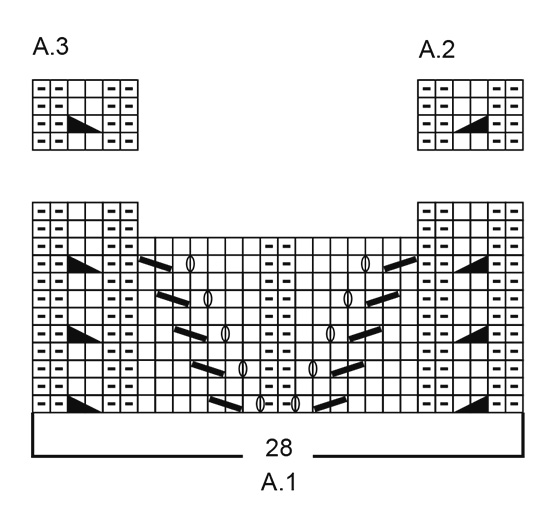
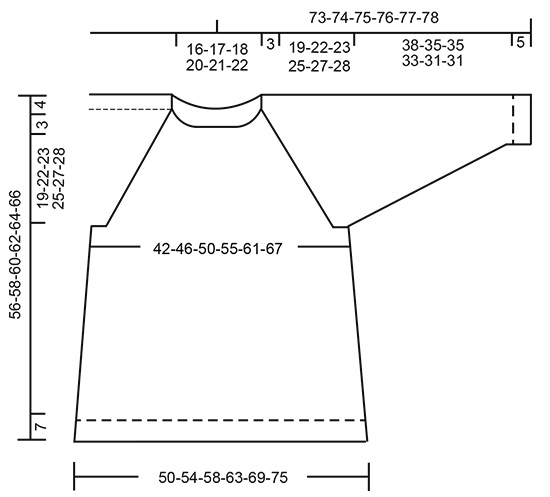
INFORMATION FOR PATTERN: GARTER STITCH (back and forth): 1 ridge = knit 2 rows. INCREASE TIP (evenly): To calculate how to increase evenly, use the number of stitches increases are done over (e.g. 28 stitches) and divide this number by number of increases to be done (e.g. 3) = 9.3. I.e. in this example increase by making a yarn over after approx. every 9th stitch. On next round knit the yarn over twisted to avoid hole. PATTERN: See diagrams A.1 to A.3. Diagrams show all rows in pattern seen from the right side. RAGLAN: Increase for raglan on each side of every repetition A.1 (= 8 increases on round) Increase 1 stitch by making 1 yarn over on each side of A.1. On next round knit the yarn overs to make holes. INCREASE TIP (applies to sides of body): Work until 5 stitches remain before marker, make 1 yarn over, knit 10 (marker thread is in the middle of these 10 stitches), make 1 yarn over (= 2 stitches increased). On next round knit yarn overs twisted to avoid holes. ---------------------------------------------------------- JUMPER: Worked in the round on circular needle. Work top down. Beginning of round is mid back. Work sleeves in the round on double pointed needles. YOKE: Cast on 125-125-130-130-140-145 stitches on a short circular needle size 2.5 mm with Flora. Knit 1 round. Then work rib = knit 2/purl 3 until piece measures 3 cm. Knit 1 round while increasing stitches as follows: Knit 28-28-28-28-30-30 while AT THE SAME TIME increasing 1-3-3-3-3-4 stitches evenly over these stitches – read INCREASE TIP (evenly), * 1 yarn over, knit 1 *, work *-* 6-6-9-9-10-12 times in total, knit 57-57-56-56-60-61 while AT THE SAME TIME increasing 3-3-4-4-4-5 stitches evenly over these stitches, * 1 yarn over, knit 1 *, work from *-* 6-6-9-9-10-12 times in total, knit 28-28-28-28-30-30 while AT THE SAME TIME increasing 1-3-3-3-3-4 stitches evenly over these stitches = 142-146-158-158-170-182 stitches. Knit 1 round where all the yarn overs are knitted twisted (to avoid holes). Purl 1 round, knit 1 round and purl 1 round. Switch to circular needle size 3 mm. REMEMBER THE KNITTING TENSION! Now work pattern as follows: Knit 5-6-9-9-12-15 (= half back piece), A.1 (= 28 stitches), knit 5 (= sleeve), A.1, knit 10-12-18-18-24-30 stitches (= front piece), A.1, knit 5 (= sleeve), A.1, knit 5-6-9-9-12-15 (= half back piece). Continue pattern like this AT THE SAME TIME on next round begin increase for RAGLAN – see explanation above. Increase like this every other round 23-27-29-33-36-38 times in total = 326-362-390-422-458-486 stitches. Work without increase until piece measures 22-25-26-28-30-31 cm from cast-on edge mid back and down! Now divide piece for body and sleeves. NOTE: Middle of A.1 is not transition between body and sleeves! Continue with A.2 (= 6 stitches) over the first 6 stitches in A.1 and work A.3 (= 6 stitches) over the last 6 stitches in A.1, knit over the middle 16 stitches of A.1. Work next row as follows: Work 46-50-54-60-66-72 stitches (= half back piece), slip the next 71-81-87-91-97-99 stitches on a stitch holder (= sleeve), cast on 8-10-12-12-14-16 new stitches under sleeve, work the next 92-100-108-120-132-144 stitches (= front piece), slip the next 71-81-87-91-97-99 stitches on a stitch holder (= sleeve), cast on 8-10-12-12-14-16 new stitches under sleeve, work the remaining 46-50-54-60-66-72 stitches (= half back piece). NOW MEASURE PIECE FROM HERE! BODY: = 200-220-240-264-292-320 stitches. Insert 1 marker thread in the middle of the new stitches cast-on under each sleeve in each side (= 4-5-6-6-7-8 new stitches on each side of marker thread) and 100-110-120-132-146-160 stitches between marker threads. Continue in the round in stocking stitch, A.2 and A.3 as before. When piece measures 4 cm, increase 1 stitch on each side of marker thread in the side - read INCREASE TIP (= 4 stitches increased). Increase like this every 6th round 10 times in total in all sizes = 240-260-280-304-332-360 stitches. When piece measures 23-22-23-23-23-24 cm, divide the piece for front and back piece as follows: Work the first 28-33-38-42-48-53 stitches and increase at the same time 9-12-14-18-19-22 stitches evenly, work A.2, work 25-25-25-27-28-30 stitches and increase at the same time 7-7-7-10-9-12 stitches evenly, cast off the next 2 stitches (= vent), work 25-25-25-27-28-30 stitches and increase at the same time 7-7-7-10-9-12 stitches evenly, work A.3, work 56-66-76-84-96-106 stitches and increase 18-23-28-35-38-43 stitches evenly, work A.2, work 25-25-25-27-28-30 stitches and increase at the same time 7-7-7-10-9-12 stitches evenly, cast off the next 2 stitches (= vent), work 25-25-25-27-28-30 stitches and increase at the same time 7-7-7-10-9-12 stitches evenly, work A.3, work the remaining 28-33-38-42-48-53 stitches and increase at the same time 9-11-14-17-19-21 stitches evenly. Cut the yarn. Slip the stitches for back piece on a stitch holder. RIB FRONT PIECE: = 150-165-180-205-220-245 stitches. Work rib back and forth. Switch to circular needle size 2.5 mm. Work from right side as follows: 4 stitches in garter stitch, knit 2, * purl 3, knit 2 *, work from *-* until 4 stitches remain on row BUT continue with A.2 and A.3 over cables as before, and finish with 4 stitches in garter stitch. Continue like this back and forth until rib measures 7 cm. Cast off stitches with knit over knit and purl over purl. To avoid a tight cast-off edge cast off with a needle in a larger size. RIB BACK PIECE: = 150-165-180-205-220-245 stitches. Work as on rib on front piece. SLEEVE: Slip the 71-81-87-91-97-99 stitches from stitch holder in one side of piece on double pointed needles size 3 mm and pick in addition up 1 stitch in each of the 8-10-12-12-14-16 new stitches cast on under sleeve = 79-91-99-103-111-115 stitches. Insert a marker thread in the middle of the new stitches cast-on under sleeve (= 4-5-6-6-7-8 new stitches on each side of marker thread). Beginning of round is mid under sleeve. Work in stocking stitch in the round but continue with A.2/A.3 over the 2 small cables from raglan line. When sleeve measures 4 cm from division, decrease as follows: First decrease mid under sleeve: Work until 5 stitches remain before marker and knit 2 together, knit 6 (marker is between these stitches), slip 1 stitch knitwise, knit 1, pass slipped stitch over stitch worked (= 2 stitches decreased). Decrease like this every 8th-5th-4th-4th-3rd-3rd round 3-5-7-5-6-6 times in total = 73-81-85-93-99-103 stitches. Then decrease on the opposite side of A.2/A.3 (= on top side of sleeve), i.e. decrease as follows: Knit 5, work A.3, knit 1, knit 2 together, knit until 3 stitches remain before A.2, slip 1 stitch knitwise, knit 1, pass slipped stitch over (= 2 stitches decreased). Decrease like this every 8th-5th-4th-4th-3rd-3rd round 10-14-15-18-20-21 times in total = 53-53-55-57-59-61 stitches. Continue with stocking stitch and A.2/A.3 until sleeve measures 38-35-35-33-31-31 cm from division (NOTE: Shorter measurements in the larger sizes because of longer yoke). Work next round as follows: Work 5 stitches while increasing 2 stitches evenly, work A.3, work 31-31-33-35-37-39 stitches while increasing 8-8-11-9-7-10 stitches evenly, work A.2, work 5 stitches while increasing 2 stitches evenly = 65-65-70-70-70-75 stitches. Switch to double pointed needles size 2.5 mm. Now work rib as follows: Knit 1, purl 3, knit 2, purl 1, A.3, purl 1, * knit 2, purl 3 *, work from *-* 7-7-8-8-8-9 times, knit 2, purl 1, A.2, purl 1, knit 2, purl 3, knit 1. Continue rib in the round like this until rib measures 5 cm. Cast off stitches with knit over knit and purl over purl. To avoid a tight cast-off edge cast off with a needle in a larger size. Sleeve measures approx. 43-40-40-38-36-36 cm from division. Work the other sleeve the same way. |
||||||||||||||||||||||
Diagram explanations |
||||||||||||||||||||||
|
||||||||||||||||||||||
 |
||||||||||||||||||||||
 |
||||||||||||||||||||||
Have you finished this pattern?Tag your pictures with #dropspattern #furelisesweater or submit them to the #dropsfan gallery. Do you need help with this pattern?You'll find 28 tutorial videos, a Comments/Questions area and more by visiting the pattern on garnstudio.com. © 1982-2026 DROPS Design A/S. We reserve all rights. This document, including all its sub-sections, has copyrights. Read more about what you can do with our patterns at the bottom of each pattern on our site. |
||||||||||||||||||||||


With over 40 years in knitting and crochet design, DROPS Design offers one of the most extensive collections of free patterns on the internet - translated to 17 languages. As of today we count 324 catalogues and 12290 patterns translated into English (UK/cm). 12290
We work hard to bring you the best knitting and crochet have to offer, inspiration and advice as well as great quality yarns at incredible prices! Would you like to use our patterns for other than personal use? You can read what you are allowed to do in the Copyright text at the bottom of all our patterns. Happy crafting!
Post a comment to pattern DROPS 179-23
We would love to hear what you have to say about this pattern!
If you want to leave a question, please make sure you select the correct category in the form below, to speed up the answering process. Required fields are marked *.