
Popular categories
Looking for a yarn?


Comments / Questions (50)
![]() Annette wrote:
Annette wrote:
Warum muss der Poncho in 2 Teilen gestrickt werden. Kann man nicht einfach ein Teil stricken und spart sich das Zusammennähen der Teile ?
13.05.2018 - 10:01DROPS Design answered:
Liebe Annette, beide Stücke werden genausogleich und zusammengestrickt, so wird das Poncho im Foto gestrickt. Viel Spaß beim stricken!
14.05.2018 - 10:31
![]() Carmela wrote:
Carmela wrote:
Ganz ehrlich? Das Model trägt grösse S oder M? Bei diesem Model bestimmt nicht. Ich habe bei grösse S oder M nur 4 Muster Reihen. Auf den Bild sind es 5. Somit wir er kurzer ausfallen als gedacht. Wolle nachbestellen wird schwierig mit der gleichen Nummer. Sehr Schade und ganz ehrlich au ärgerlich!
14.04.2018 - 17:32Ana wrote:
Still, my misunderstanding is: when assembling, do I have to sew a portion of the two parts together or all from top to bottom? Thank you very much for your help!
20.03.2018 - 14:21DROPS Design answered:
Dear Ana, you will have to sew one of the short sides and along along one of the top sides (for shoulders) each side from neck - see ASSEMBLY. Happy knitting!
20.03.2018 - 15:38Ana wrote:
Sorry again :)... I meant what if I work part 2 continuing part 1, without having to sew them at the end... Sorry for my poor understanding....
20.03.2018 - 11:02Ana wrote:
Hi again! :) will it be ok if I continue part 2 without casting off part 1? Thank you!
19.03.2018 - 19:21DROPS Design answered:
Hi Ana, You will not be working part 1 anymore after you have worked part 2. Both parts are cast off and then sewn together to finish, so there is little point in not casting off part 1 when it has been completed. Happy knitting!
20.03.2018 - 08:22Ana wrote:
Hi! Very nice pattern! I was wandering if one side needs holes for the buttons. I haven't seen anything like this in the pattern. Thank you!
13.03.2018 - 18:39DROPS Design answered:
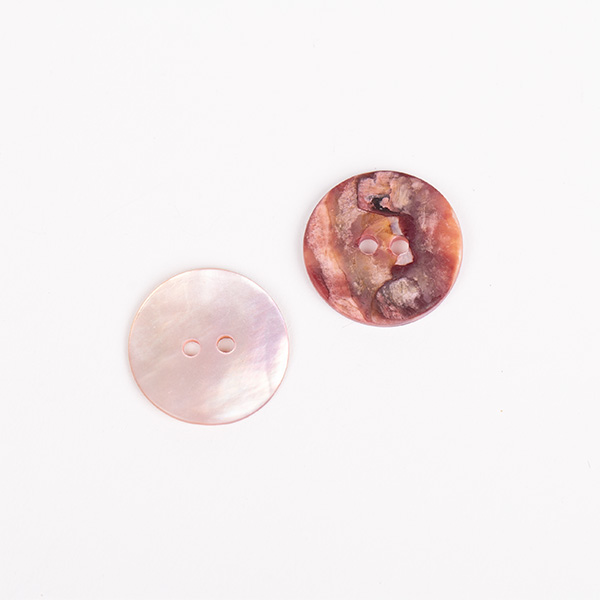
Dear Ana, there are no buttonholes, buttons are just decorative and will be sewn through both layers - see under ASSEMBLY. Happy knitting!
14.03.2018 - 09:10
![]() MARIAGIOVANNA MUGNANO wrote:
MARIAGIOVANNA MUGNANO wrote:
Buongiorno. Non ho mai lavorato con i ferri circolari e vorrei sapere se i modelli per cui sono indicati si possono realizzare anche con i ferri diritti. E come si legge la spiegazione? Grazie!
25.01.2018 - 15:35DROPS Design answered:
Buongiorno, questo modello è lavorato in ferri di andata e ritorno, per cui puoi lavorarlo con i ferri dritti seguendo le stesse istruzioni. Buon lavoro!
25.01.2018 - 16:13
![]() Gitte Olesen wrote:
Gitte Olesen wrote:
Som Gitte Jørgensen finder jeg også fejl i og med der står beskrevet at modellen viser en str S/M. Det er det ikke. Modellen har en str L/XL på. Det kan man se på antallet af gentaget mønster. Det er lidt irriterende, for jeg købte garn efter den mindste model og finder nu ud af at jeg har købt for lidt.... )-:
16.01.2018 - 20:57
![]() Gitte Jørgensen wrote:
Gitte Jørgensen wrote:
Læs gerne, hvad jeg har skrevet under “kommentar” 11/12 Mvh Gitte Jørgensen
12.12.2017 - 10:15DROPS Design answered:
Hej Gitte, Hvis du følger opskriften og holder strikkefastheden, så får du også målene som du kan se i måleskitsen nederst i opskriften. God fornøjelse!
12.12.2017 - 11:20
![]() Gitte Jørgensen wrote:
Gitte Jørgensen wrote:
Jeg har strikket denne “poncho”, men finder, at der er fejl i opskriften. Jeg fik at vide i garnbutikken, at modellen på billedet svarer til str small, og har strikket derefter, men får et alt for smalt produkt ud af arbejdet, idet der kun fremkommer 4 rækker mønster, hvor der på modellen ses 5 eller 6 rækker? Mvh Gitte Jørgensen
11.12.2017 - 11:35
|
||||||||||||||||
With Me#withmeponcho |
||||||||||||||||
|
|
||||||||||||||||
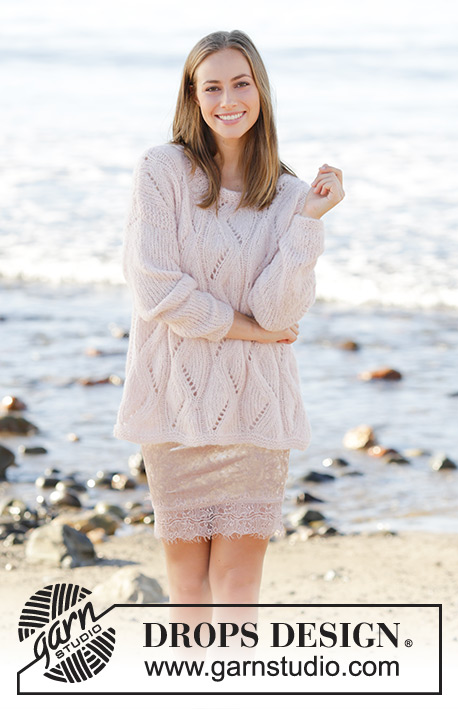
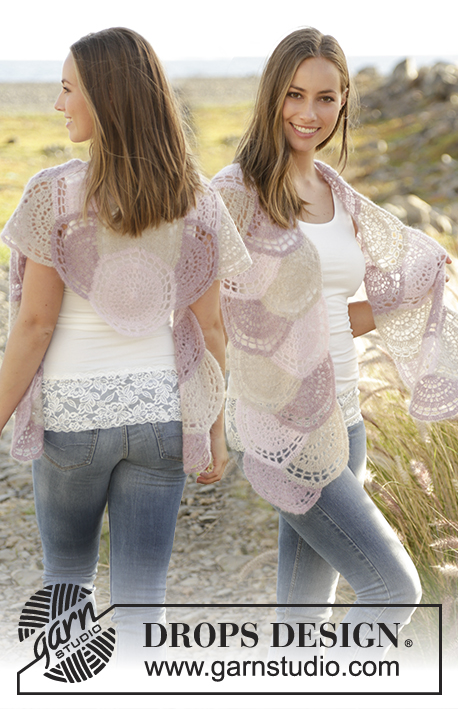
Knitted poncho with lace pattern in 2 strands DROPS Brushed Alpaca Silk, worked sideways. Size: S - XXXL.
DROPS 176-29 |
||||||||||||||||
|
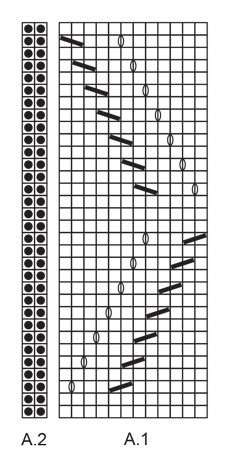
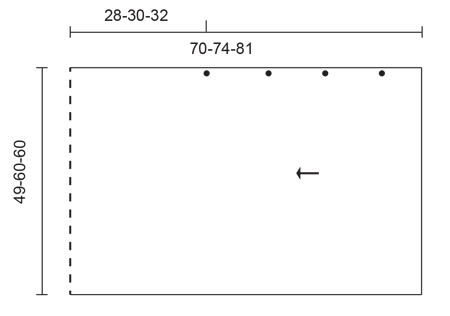
GARTER STITCH (back and forth): 1 ridge = knit 2 rows. PATTERN: See diagrams A.1 and A.2. Diagrams show all rows in pattern seen from the right side. ---------------------------------------------------------- PONCHO: Worked back and forth on circular needle in 2 parts and sewn together when finished. PART 1: Cast on 64-78-78 stitches with 1 strand of each colour with Brushed Alpaca Silk on circular needle size 6 mm. Work 3 ridges in GARTER STITCH - see explanation above. Then work according to diagram A.1 and A.2 as follows from right side: 5 edge stitches in garter stitch. * A.1 over 12 stitches, A.2 over 2 stitches *, repeat from *-* 3-4-4 times in total in width, work A.1 over 12 stitches and finish with 5 edge stitches in garter stitch. Continue to work according to diagrams A.1 and A.2. Repeat diagrams like this vertically until piece measures approx. 68-72-79 cm or desired length. Work 3 ridges and loosely cast off. Cut the strands and fasten. PART 2: Cast on and work another part the same way. ASSEMBLY: Place parts together wrong side against wrong side. Sew parts together along one short side, sew in outer loop of stitch to avoid a chunky seam. Fasten buttons in one long side and make an opening for the head as follows: Place edge stitches from one part’s long side under edge stitches from the other part’s long side. Measure approx. 28-30-32 cm from seam in short side and fasten first button here, fasten it through both layers. Fasten the other buttons evenly spaced down along the side, leave approx. 5 cm at the bottom after last button. |
||||||||||||||||
Diagram explanations |
||||||||||||||||
|
||||||||||||||||
 |
||||||||||||||||
 |
||||||||||||||||
Have you finished this pattern?Tag your pictures with #dropspattern #withmeponcho or submit them to the #dropsfan gallery. Do you need help with this pattern?You'll find 18 tutorial videos, a Comments/Questions area and more by visiting the pattern on garnstudio.com. © 1982-2026 DROPS Design A/S. We reserve all rights. This document, including all its sub-sections, has copyrights. Read more about what you can do with our patterns at the bottom of each pattern on our site. |
||||||||||||||||


With over 40 years in knitting and crochet design, DROPS Design offers one of the most extensive collections of free patterns on the internet - translated to 17 languages. As of today we count 324 catalogues and 12291 patterns translated into English (UK/cm). 12291
We work hard to bring you the best knitting and crochet have to offer, inspiration and advice as well as great quality yarns at incredible prices! Would you like to use our patterns for other than personal use? You can read what you are allowed to do in the Copyright text at the bottom of all our patterns. Happy crafting!
Post a comment to pattern DROPS 176-29
We would love to hear what you have to say about this pattern!
If you want to leave a question, please make sure you select the correct category in the form below, to speed up the answering process. Required fields are marked *.