
Popular categories
Looking for a yarn?


Comments / Questions (22)
![]() Saskia wrote:
Saskia wrote:
Hallo, ik heb een vraag over de te gebruiken naalden: in de beschrijving lees ik naalden zonder knop voor de mouwen. Waarom niet een rondbreinaald? Heb je alle naalden nodig die in de beschrijving staan? Ik lees nergens het gebruik van de 5,5 rondbreinaald? Dank, Saskia
30.10.2022 - 16:12DROPS Design answered:
Dag Sasikia,
Je kan inderdaad ook een rondbreinaald gebruiken voor de mouwen, maar net wat je prettig vindt breien. Voor de ribbelsteek heb je naald 4,5 nodig. Na de ribbelsteek brei je verder met naald 5,5.
02.11.2022 - 15:01
![]() Monika Eisenbach wrote:
Monika Eisenbach wrote:
Hallo, jetzt muss ich doch nochmal was fragen. Bei den Halsausschnitten werden im Vorderteil die mittleren Maschen stillgelegt. Warum werden dann die im Rückenteil abgekettet und nicht auch stillgelegt?
02.12.2021 - 01:15DROPS Design answered:
Liebe Frau Eisenbach, am Rückenteil werden die Maschen abgekettet, damit der Pullover seine Form besser behält (und nicht dehnt), am Vorderteil werden die Maschen stillgelegt um weniger Volumen und weichen Übergang zu haben. Aber gerne können Sie auch die Maschen am Rückenteil auch stilllegen oder die am Vorderteil abketten. Viel Spaß beim stricken!
08.12.2021 - 13:10
![]() Monika Eisenbach wrote:
Monika Eisenbach wrote:
Hallo liebes Drops-Team, jetzt muss ich doch mal nachfragen. In der Anleitung steht das man für den Halsausschnitt von der Vorderseite 60 - 74 Maschen aufnehmen soll. Ist das jetzt nur auf die Vorderseite bezogen (wäre ein bisschen viel nur für vorne) oder auch die Rückseite also das der Ausschnitt wie gewohnt rundherum geht? Ich nehme mal an das der Halsausschnitt rundherum geht. Vielen Dank und macht weiter so mit vielen tollen Strick- und Häkelideen. Viele Grüße Moni
16.11.2021 - 20:54DROPS Design answered:
Liebe Moni, diese 60 bis 74 Maschen werden von der Vorderseite (= damit "außen" Seite hier gemeint) rund den ganzen Halsausschnitt (Vorder- + Rückenteil) aufgenommen. Viel Spaß beim stricken!
17.11.2021 - 07:45
![]() Barbara Blanche wrote:
Barbara Blanche wrote:
Hola no tengo agujas circulares. Como puedo hacerlo con dos agujas comunes? Muchas gracias! tengo hilo de algodon para tejer en agujas 4 1/2 La pagina es genial
12.10.2020 - 16:52DROPS Design answered:
Hola Barbara. Este jersey se trabaja de ida y vuelta, la espalda y el delantero por separado, por lo tanto puedes hacerlo con las agujas rectas. Las agujas circulares en este caso se utilizan para tener más comodidad; con un elevado número de puntos es más cómodo trabajar con una aguja circular que con agujas rectas.
15.10.2020 - 20:22
![]() Maria wrote:
Maria wrote:
Dzień dobry, Tył tego swetra ma taki sam wzór jak przód. Czy można zrobić gładki tył, po prostu przerabiając wszystkie oczka dżersejem? Dziękuję.
05.04.2020 - 11:40DROPS Design answered:
Witaj Mario! Oczywiście, że tak. Do dzieła i koniecznie pokaż nam efekt na naszej grupie na facebooku DROPS Workshop. Pozdrawiamy
06.04.2020 - 10:20
![]() Randi Lisø wrote:
Randi Lisø wrote:
Hvorfor har dere ikke størrelsesguide på denne genseren? Vanskelig å vite koss størrelse man bør velge.
25.02.2019 - 08:49DROPS Design answered:
Hei Randi. Helt nederst, under diagrammet ligger en målskisse med alle plaggets mål i alle størrelser. Vi har nå kontrollert at dette er tilgjengelig, og det er det. God fornøyelse
25.02.2019 - 13:32
![]() Pipi wrote:
Pipi wrote:
Gracias por vuestra ayuda. El trabajo que realizan es excelente.
11.01.2019 - 11:21
![]() Gitte Bøtcher wrote:
Gitte Bøtcher wrote:
Hvor er diagrammet?
09.09.2018 - 21:10DROPS Design answered:
Hei Gitte. Vi har for øyeblikket tekniske problemer med siden vår, dette medfører at diagrammer og bilder dessverre ikke lastes ordentlig. Vi jobber med å løse problemet, og siden vil være tilbake som normalt så snart som mulig. Du kan følge med på vår twitter eller facebookside for oppdateringer. Beklager dette
10.09.2018 - 11:51
![]() Suki wrote:
Suki wrote:
Jeg savner diagrammet til mønstret??
09.09.2018 - 20:24DROPS Design answered:
Hei Suki Vi har for øyeblikket tekniske problemer med siden vår, dette medfører at diagrammer og bilder dessverre ikke lastes ordentlig. Vi jobber med å løse problemet, og siden vil være tilbake som normalt så snart som mulig. Du kan følge med på vår twitter eller facebookside for oppdateringer. Beklager dette
10.09.2018 - 12:50Nella wrote:
I'm having trouble with the twisted yarn over increase for the sleeve. I keep getting holes. Has anyone done it with an easier increase like the knit 1 front and back? Wondering if that would work as well. Thank you Nella
17.03.2018 - 00:47DROPS Design answered:
Dear Nella, you might try to substitute the increase with the kfb, but there will be a tiny bump (like the purl stitch) in its place. that might disrupt the pattern. I would suggest that instead of the kfb, try to pull the yarn thighter, when you do the yarnover, or do the increase by raising the yarn between two stitches of the previous row, and knit that twisted. Happy Knitting!
17.03.2018 - 12:32
|
||||||||||||||||
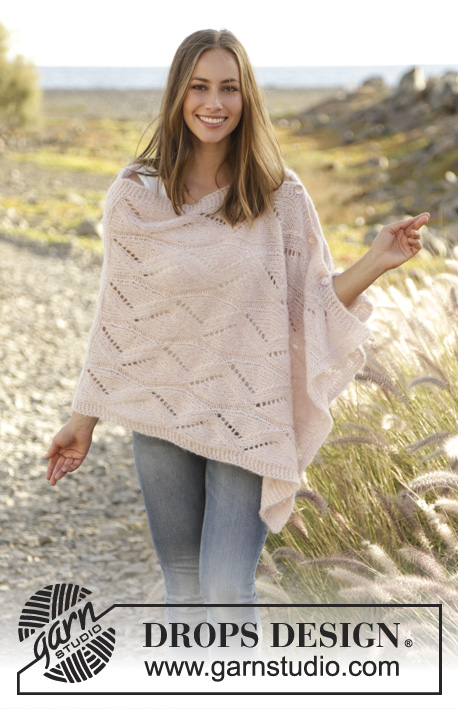
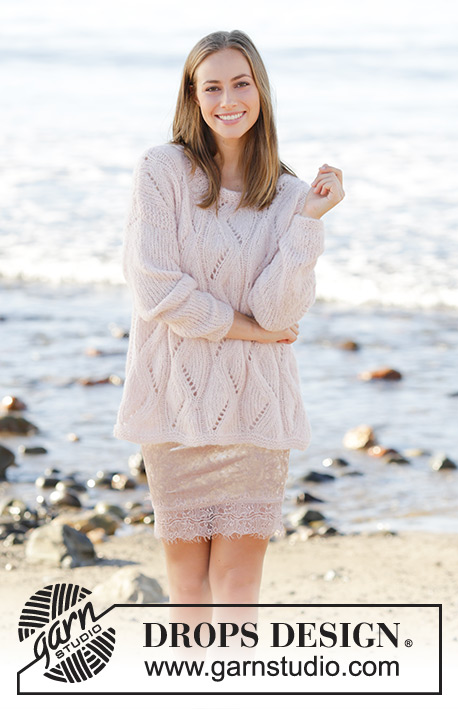
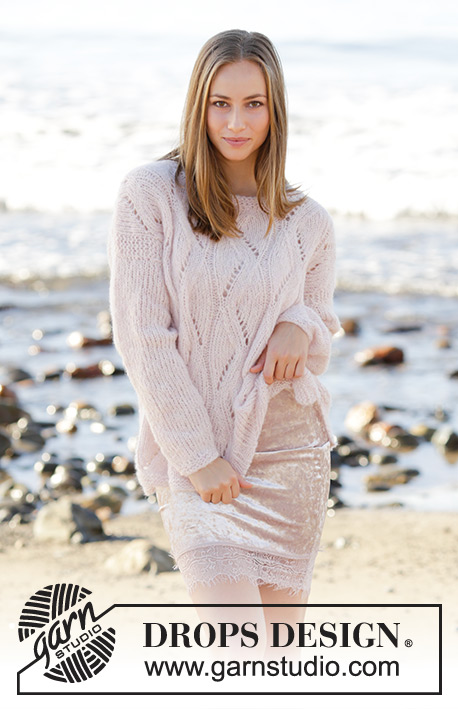
Sweet Maggie#sweetmaggiesweater |
||||||||||||||||
 |
 |
|||||||||||||||
Knitted jumper with lace pattern in 2 strands DROPS Brushed Alpaca Silk. Size: S - XXXL
DROPS 176-31 |
||||||||||||||||
|
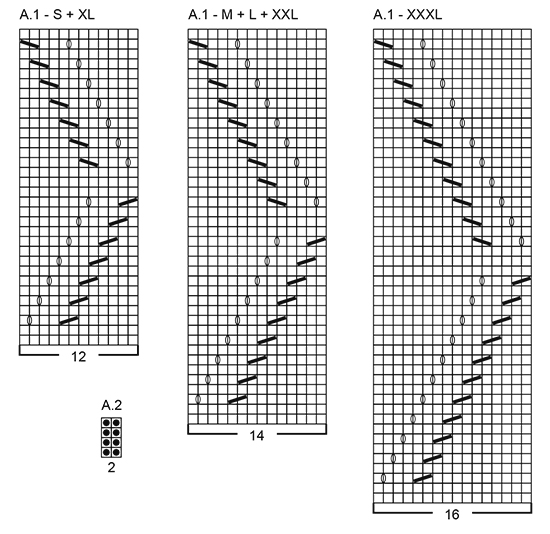
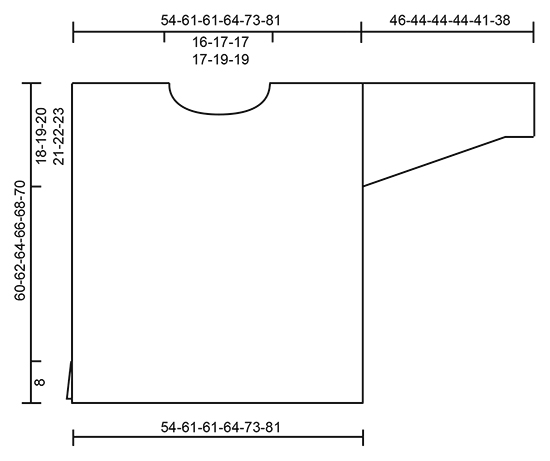
GARTER STITCH (back and forth): 1 ridge = knit 2 rows. GARTER STITCH (worked in the round): 1 ridge = 2 rounds. Knit 1 round and purl 1 round. PATTERN: See diagrams A.1 and A.2. Diagrams show all rows in pattern seen from the right side. Choose diagram for your size. INCREASE TIP (applies to mid under sleeve): Begin 1 stitch before marker, make 1 yarn-over, knit 2, 1 yarn-over. On next round knit yarn-over twisted to avoid holes. ---------------------------------------------------------- JUMPER: Work front and back piece back and forth on circular needle. BACK PIECE: Cast on 76-86-86-90-102-114 stitches on circular needle size 4.5 mm with 1 strand of each colour (= 2 strands). Work 3 ridges in GARTER STITCH - see explanation above. Switch to circular needle size 5.5 mm and work next row from right side as follows: 4 edge stitches in garter stitch, * work A.1 (= 12-14-14-12-14-16 stitches), A.2 (= 2 stitches) *, repeat from *-* 4-4-4-5-5-5 times in total, work A.1 (= 12-14-14-12-14-16 stitches) and finish with 4 edge stitches in garter stitch. Continue pattern like this. REMEMBER THE KNITTING TENSION When piece measures 42-43-44-45-46-47 cm, insert 1 marker in each side (marks armholes). Continue to work until piece measures 58-60-62-64-66-68 cm. Now cast off the middle 20-22-22-22-24-24 stitches for neck and finish each shoulder separately. Continue with lace pattern and 4 edge stitches in garter stitch towards armhole and cast off 1 stitch on next row from the neck = 27-31-31-33-38-44 stitches remain on row for shoulder. Continue until piece measures 60-62-64-66-68-70 cm and cast off - make sure to avoid a tight cast-off edge. Work the other shoulder the same way. FRONT PIECE: Cast on the same number of stitches as on back piece and work as back piece until piece measures 54-56-57-59-60-64 cm. Now slip the middle 14-16-16-16-18-18 stitches on 1 stitch holder for neck and finish each shoulder separately. Continue with lace pattern and 4 edge stitches in garter stitch towards the armhole and cast off for neck at beginning of every row from the neck as follows: 2 stitches 1 time and 1 stitch 2 times = 27-31-31-33-38-44 stitches remain for shoulder. Continue until piece measures 60-62-64-66-68-70 cm and cast off - make sure to avoid a tight cast-off edge. Work the other shoulder the same way. SLEEVE: Work sleeves in the round on double pointed needles. Cast on 28-30-30-32-34-34 stitches on double pointed needles size 4.5 mm with 1 strand of each colour (= 2 strands). Work 3 ridges in GARTER STITCH - see explanation above. Switch to double pointed needles size 5.5 mm and insert 1 marker at beginning of round (= mid under sleeve). Work in stocking stitch. When piece measures 8-8-10-10-11-13 cm, increase 2 stitches mid under sleeve - READ INCREASE TIP. Increase like this every 3½-3-2½-2½-2-1½ cm 11-12-13-13-14-15 times in total = 50-54-56-58-62-64 stitches. When piece measures 46-44-44-44-41-38 cm, loosely cast off all stitches. Knit another sleeve the same way. ASSEMBLY: Sew the shoulder seams. Sew side seams from markers at the armholes and down - sew in outer loops of edge stitches to avoid a chunky seam, but leave approx. 8 cm at the bottom of each side for vents. Sew in sleeves. NECK EDGE: Pick up from right side approx. 60 to 74 stitches around the neck (including stitches on stitch holder at the front) on a short circular needle size 4.5 mm with 1 strand of each colour. Work 3 ridges but begin by purling 1 round and loosely cast off by knitting on last round. |
||||||||||||||||
Diagram explanations |
||||||||||||||||
|
||||||||||||||||
 |
||||||||||||||||
 |
||||||||||||||||
Have you finished this pattern?Tag your pictures with #dropspattern #sweetmaggiesweater or submit them to the #dropsfan gallery. Do you need help with this pattern?You'll find 28 tutorial videos, a Comments/Questions area and more by visiting the pattern on garnstudio.com. © 1982-2026 DROPS Design A/S. We reserve all rights. This document, including all its sub-sections, has copyrights. Read more about what you can do with our patterns at the bottom of each pattern on our site. |
||||||||||||||||


With over 40 years in knitting and crochet design, DROPS Design offers one of the most extensive collections of free patterns on the internet - translated to 17 languages. As of today we count 324 catalogues and 12290 patterns translated into English (UK/cm). 12290
We work hard to bring you the best knitting and crochet have to offer, inspiration and advice as well as great quality yarns at incredible prices! Would you like to use our patterns for other than personal use? You can read what you are allowed to do in the Copyright text at the bottom of all our patterns. Happy crafting!
Post a comment to pattern DROPS 176-31
We would love to hear what you have to say about this pattern!
If you want to leave a question, please make sure you select the correct category in the form below, to speed up the answering process. Required fields are marked *.