
Popular categories
Looking for a yarn?


Comments / Questions (29)
![]() Anna wrote:
Anna wrote:
Sto lavorando lo scaldacollo e devo fare le coste finali.Non riesco a capire come aumentare 4 maglie sulle prime 17 m e sulle successive. Gli aumenti devono essere eseguiti tutti insieme?
14.10.2021 - 21:39DROPS Design answered:
Buonasera Anna, deve aumentare 4 maglie distribuite in modo uniforme sulle 17 maglie. Buon lavoro!
14.10.2021 - 21:50
![]() Cilla wrote:
Cilla wrote:
Varför finns de ingen bild på insida dessa vantar? Sen ska mönstret fortsätta till toppen? Detta blir lättare att förstå ifall man har bild på båda sidorna på vantarna.
11.10.2021 - 11:33DROPS Design answered:
Hei Cilla. Vi skal undersøke bildearkivet vårt og se om vi finner noen bilder som viser innsiden av vottene. mvh DROPS Design
11.10.2021 - 16:07
![]() Faranaaz wrote:
Faranaaz wrote:
Hoi! Ik heb een vraag over de halswarmer. Als je A3.A en A3.B helemaal hebt gebreidt, dus alle 4 de naalden, dan heb je toch 2 steken per stuk gemeerderd? Je gaat in A3.A bijvoorbeeld van 8 steken naar 10 steken, toch? Dus in totaal is dat dus 8 meerderingen per 4 naalden. Nu staat er dat je deze in gerstenkorrel erbij moet doen, ik weet alleen niet zeker welke er dan bij moeten. Klopt het dat dit de laatste 2 steken van A3.B zijn en de eerste 2 steken van A3.A? Alvast bedankt!
05.05.2020 - 14:35DROPS Design answered:
Dag Faranaaz,
Het is de bedoeling dat je de gemeerderde steken in gerstekorrel breit over de schouder. Op het voor- en achterpand brei je tricotsteek (zie afbeelding). De 8 steken van A.3a en A.3 b moeten uiteindelijk boven elkaar blijven als je het patroon opnieuw in de hoogte blijft. Je meerdert inderdaad in totaal 8 steken op elke 4 naalden.
05.05.2020 - 15:42
![]() Ingrid wrote:
Ingrid wrote:
Gillade inte att bården får helt olika utseende på vantarna. Den lyfta maskan ligger på längden på den ena vanten och på tvären på den andra. Lösningen blev att sticka vänstervanten spegelvänt, dvs sticka alla maskor från vänster till höger!
05.02.2019 - 08:38
![]() Helene wrote:
Helene wrote:
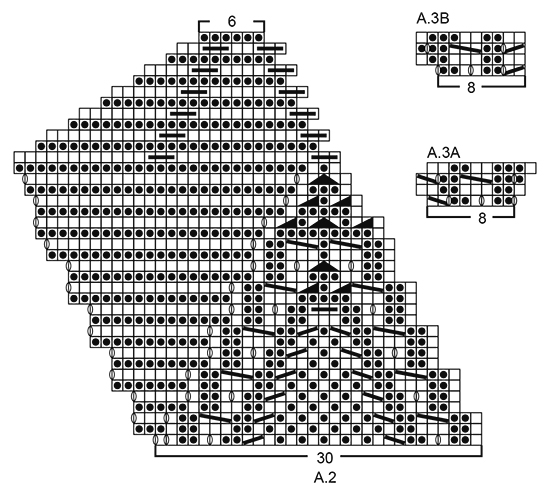
I diagrammet A2, skal de masker slået om strikkes drejet på næste pind? Det står ikke, men jeg kan ikke se huller på huen på billedet
11.12.2018 - 23:20DROPS Design answered:
Hei Helene. I og med at det er samme symbol for kast i alle diagrammene skal det ikke strikkes vridd, og det skal bli hull. - du kan se det er hull langs flettene på halsen og vottene. Det er ikke så lett å se på luen da hullraden blir nesten på toppen, men det er en hullrad der også. Det er selvfølgelig ikke noe i veien for at du strikker kastene vridd om du ikke ønsker hull. God fornøyelse.
12.12.2018 - 09:27Jo-Ann Vickers wrote:
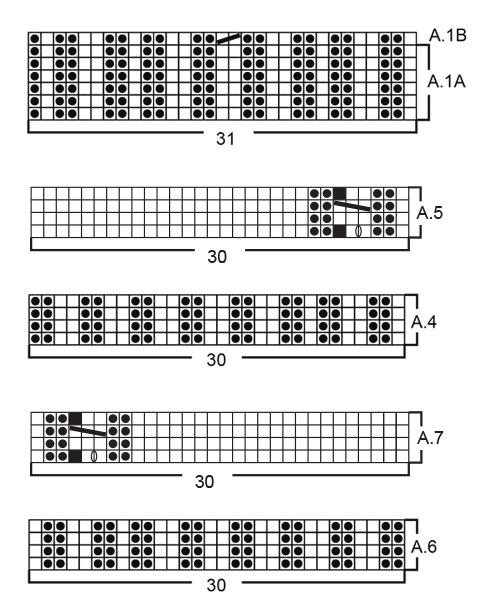
I am trying to knit the mitts. I am having difficulty with the A5 part of the pattern- the A5 is not 30 stitches? It is 29 stitches and when you take out the skip the square- it is 28 stitches? How do I do this? Thanks Jo-Ann Vickers Toronto, Ontario Canada
15.09.2018 - 03:04DROPS Design answered:
Dear Mrs Vickers, work the first 7 sts as shown in A.5 - see how to work the mock cable with one YO on row 1 below - and knit all remaining sts to the end of round (our Designteam will edit the diagram, thank you). Happy knitting!
17.09.2018 - 08:19
![]() Nathalie.Bourassa wrote:
Nathalie.Bourassa wrote:
Au 5ième rangs je reprend la ligne 1 du diagramme A.3A mais entre mes 2 marqueurs il y a maintenant 10 mailles alors que la ligne 1 du diagramme A.3A compte 8 mailles a tricoté.......que dois-je faire avec les 2 mailles qui reste???
10.08.2018 - 13:27DROPS Design answered:
Bonjour Mme Bourassa, vous devez tricoter ces 4 rangs entre les marqueurs que vous avez mis (qui délimitent les 8 mailles à tricoter au 1er rang), les augmentations se tricotent au point de riz (cf explications). Bon tricot!
10.08.2018 - 15:25
![]() Nathalie Bourassa wrote:
Nathalie Bourassa wrote:
Dans le diagramme de A.3A et A.3B il y a 4 rangs d’indiqué.......rendu au 5ième rangs quel diagramme dois-je suivre ? Merci!
10.08.2018 - 02:02DROPS Design answered:
Bonjour Mme Bourassa, reprenez simplement A.3A et A.3B au 1er rang et répétez les 4 rangs des diagrammes. Bon tricot!
10.08.2018 - 08:41
![]() Josette LAMOTHE wrote:
Josette LAMOTHE wrote:
Bonjour ou se trouve le point fantaisie A3 MERCIIIIIIIII
24.02.2018 - 10:37DROPS Design answered:
Bonjour, vous trouverez A.3a i A.3b a la fin, apres les explications. Bon travail!
24.02.2018 - 15:34
![]() Virginia wrote:
Virginia wrote:
I used this lovely pattern but knit much longer, making a poncho. It turned out beautiful. Thanks
04.05.2017 - 18:30
|
|||||||||||||||||||||||||||||||
A Royal Embrace#aroyalembraceset |
|||||||||||||||||||||||||||||||
 |
 |
||||||||||||||||||||||||||||||
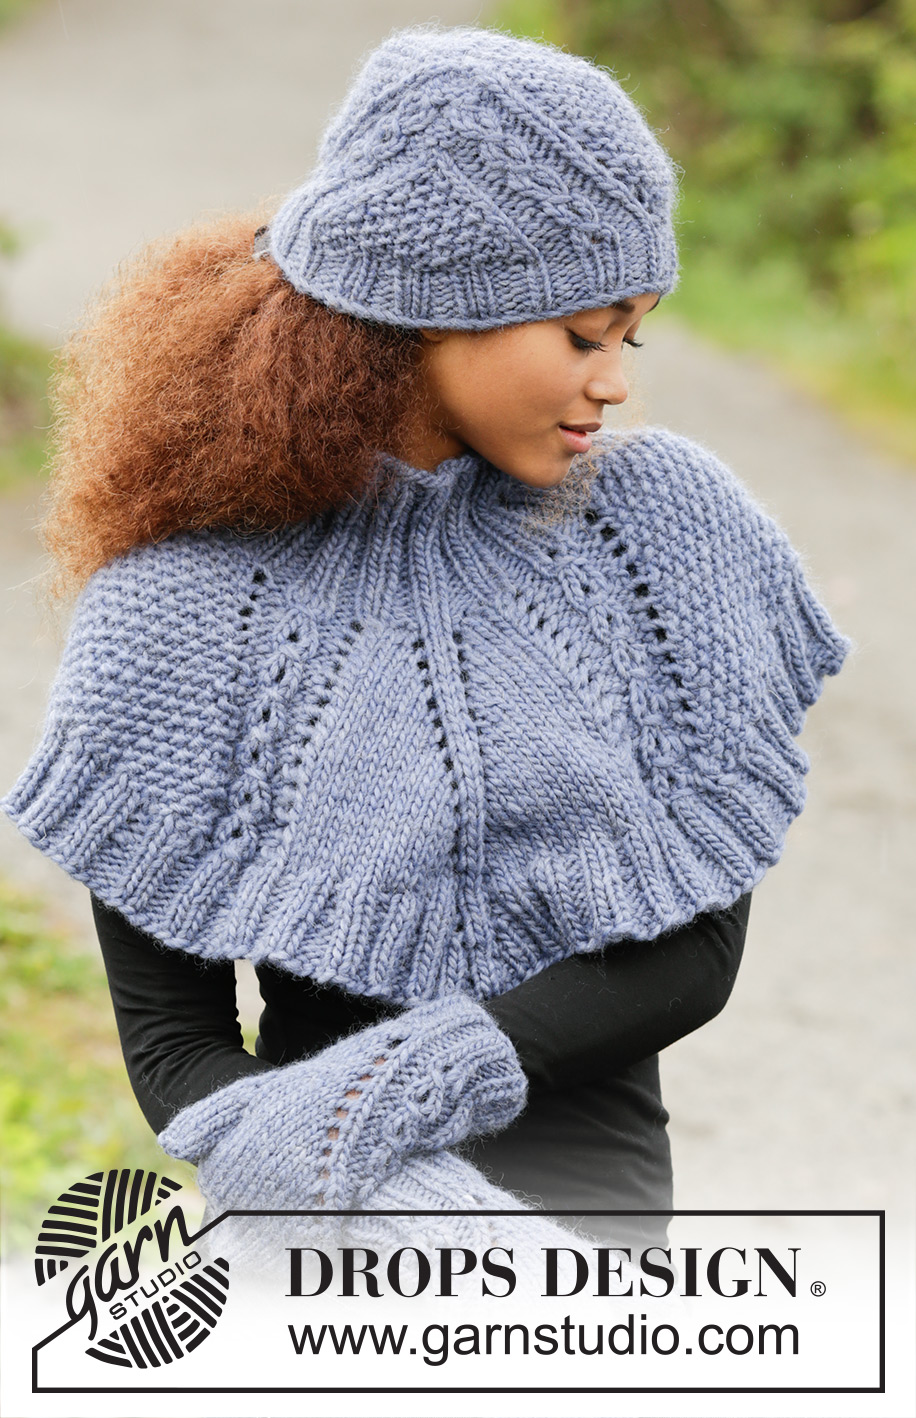
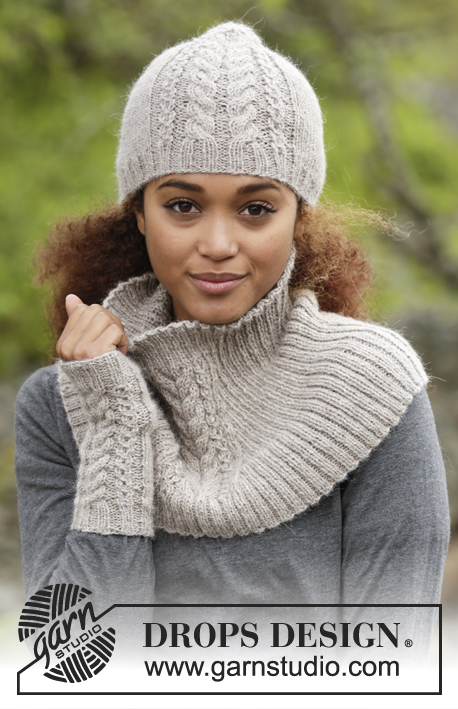
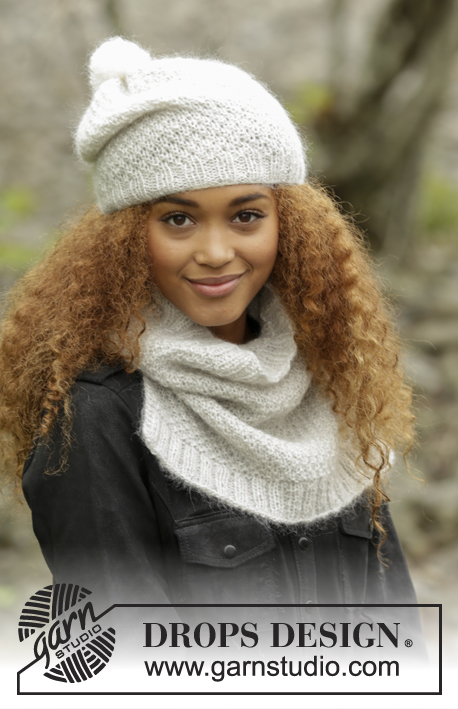
Set consists of: Knitted DROPS hat, neck warmer and mittens with textured pattern in “Snow”.
DROPS 171-18 |
|||||||||||||||||||||||||||||||
|
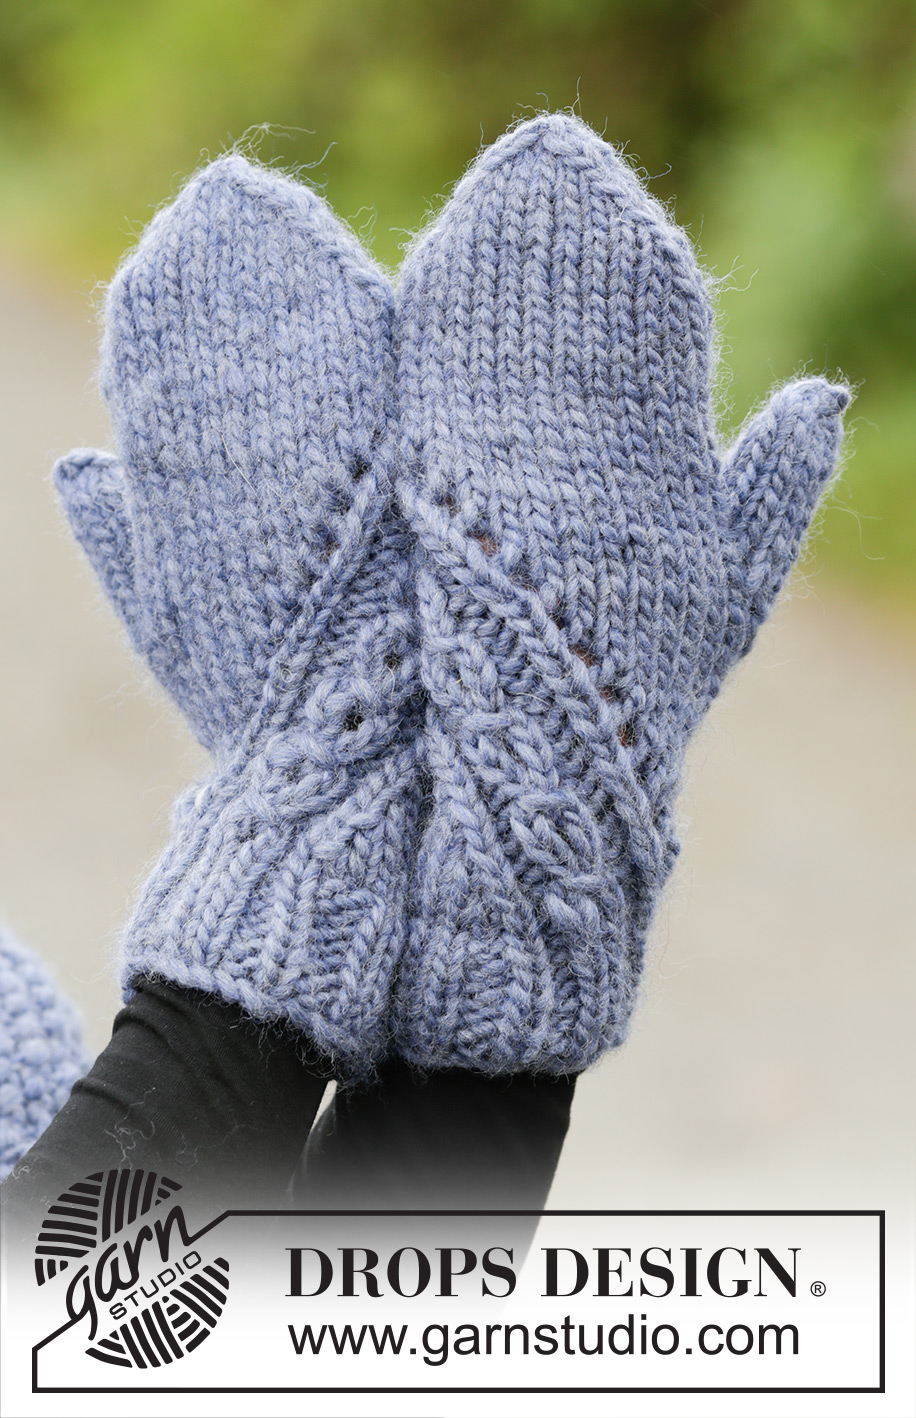
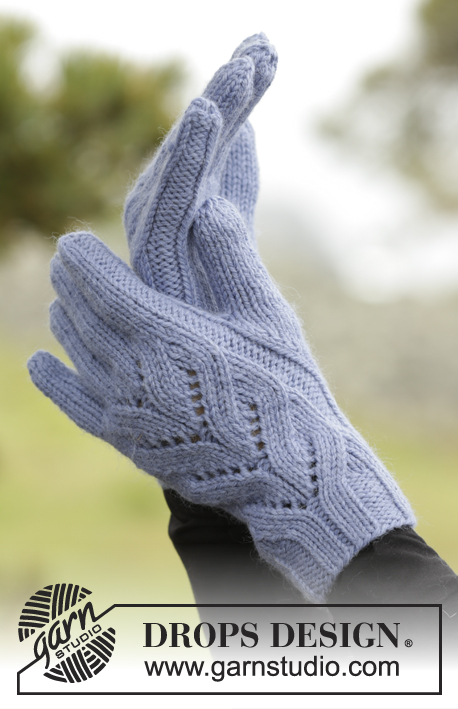
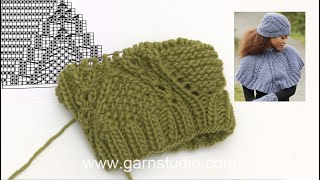
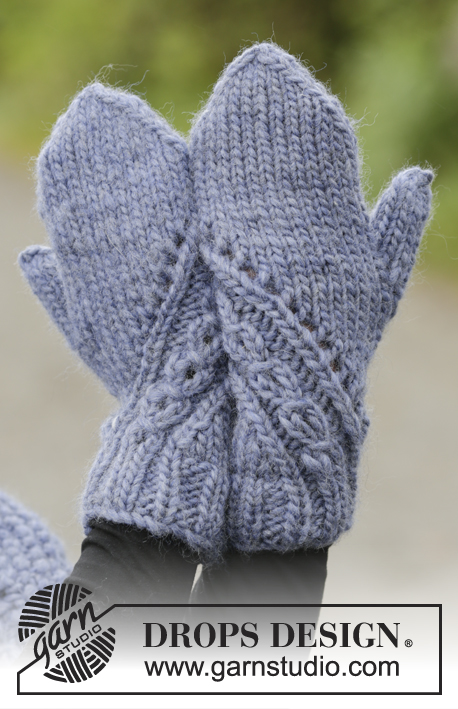
HAT: PATTERN: See diagrams A.1 and A.2. ---------------------------------------------------------- HAT: Worked in the round on circular needle, switch to double pointed needles when needed. Cast on 62 sts on circular needle size 6 mm with Snow. K 1 round. Then work rib according to diagram A.1A (= 2 repetitions of 31 sts). When rib measures 4 cm, work next round as shown in diagram A.1B = 60 sts on needle. Switch to circular needle size 7 mm and work pattern in the round according to diagram A.2 (= 2 repetitions of 30 sts). REMEMBER THE KNITTING TENSION When diagram A.2 has been worked, 12 sts remain on needle. K 1 round while K all sts tog 2 by 2 = 6 sts remain on needle. Cut the yarn and pull it through the remaining sts, tighten tog and fasten. Hat measures approx. 24 cm from top and down. ---------------------------------------------------------- NECK WARMER: MOSS ST: ROUND 1: * K 1, P 1 *, repeat from *-*. ROUND 2: P over K and K over P. Repeat 2nd round. PATTERN: See diagram A.3. INCREASE MID FRONT/MID BACK: Inc 1 st on each side of the middle 2 sts front and back. Inc 1 st by making 1 YO, on next round K YO to make holes. ---------------------------------------------------------- NECK WARMER: Worked in the round on circular needle, top down. Cast on 56 sts on a short circular needle size 7 mm with Snow. K 1 round. Work next round as follows: P 1, * K 2, P 2 *, repeat from *-* until 3 sts remain on round, finish with K 2 and P 1. Continue rib like this until piece measures approx. 12 cm or desired length. Switch to circular needle size 8 mm and work next round as follows (beg of round = in the side): 3 sts MOSS ST – see explanation above (= over shoulder), A.3A (= 8 sts), 6 sts in stocking st (= front), A.3B (= 8 sts), 6 sts in moss st (= over shoulder), A.3A (= 8 sts), 6 sts in stocking st (= back), A.3B (= 8 sts) and 3 sts in moss st (= over shoulder). Insert 1 marker on each side of all A.3A/A.3B (markers are only used to indicate where A.3 beg and end – move markers upwards when working). Continue pattern like this and inc and dec as shown in A.3A/A.3B (work sts inc in moss st = 4 sts per inc round). AT THE SAME TIME on first round beg INC MID FRONT/MID BACK – see explanation above (= 4 sts inc per inc round – work inc sts in stocking st). Inc like this every other round 14 times in total (or desired length – approx. 5 cm remain until finished measurements). After all inc, 168 sts on needle. RIB: Switch to circular needle size 7 mm and work next round as follows (continue inc on each side of the middle 2 sts front and back on every other round until finished measurements): * K the first/next 17 sts and inc 4 sts over these sts (= 21 sts), P 2, K 2, P 2 over A.3, K the next 18 sts and inc 2 sts over these sts (= 20 sts), K 2 (= mid front), K over the next 18 sts and inc 2 sts over these sts (= 20 sts), P 2, K 2, P 2 over A.3 and K the next 17 sts and inc 4 sts over these sts (= 21 sts) *, repeat from *-* one more time = 192 sts on needle. Work next round as follows: K 1, * P 2, K 2 *, repeat from *-* until 3 sts remain on round and finish with P 2 and K 1 (rib will continue neatly over A.3 in the diagonal lines and over the 2 mid sts front and back – work sts inc mid front and mid back in rib). When rib measures 2 cm, inc every other P 2 to P 3 = approx. 216 sts (inc 1 st by making 1 YO in transition between K and P, on next round P YO twisted to avoid holes). When rib measures approx. 5 cm (adjust to that 4 sts have been inc on each side of mid st front and back) cast off with K over K and P over P. Neck warmer measures approx. 36 cm from top and down on the shortest. ---------------------------------------------------------- MITTENS: PATTERN: See diagrams A.4 to A.7. INCREASE TIP (applies to displacement of pattern): Inc 1 st before or after marker by making 1 YO. On next round K the YO to make hole. DECREASE TIP: Dec as follows after marker: Slip 1 st as if to K, K 1, psso. Dec as follows before marker: Beg 2 sts before marker, K 2 tog. ---------------------------------------------------------- LEFT MITTEN: Work size S in the round on double pointed needles size 6 and 7 mm. Work size M/L in the round on double pointed needles size 7 and 8 mm. Cast on 30 sts on double pointed needles size 6-7 mm with Snow. K 1 round. Then work rib according to diagram A.4 (= 1 repetition of 30 sts). When piece measures 4 cm, switch to double pointed needles size 7-8 mm. Insert 1 marker at beg of round and 1 marker after the first 7 sts on round - move the markers upwards when working. Then work pattern according to diagram A.5 (= 1 repetition of 30 sts). After 2 round beg displacement of pattern. Inc before first marker – READ INCREASE TIP and dec after 2nd marker – READ DECREASE TIP. Continue pattern AT THE SAME TIME inc and dec like this every other round 12 times in total (when displacement is done, remove markers and continue pattern without inc/dec). REMEMBER THE KNITTING TENSION AT THE SAME TIME when piece measures 13-14 cm, inc 1 st on each side of next to last st on round for thumb gusset (inc 1 st by making 1 YO, on next round K YO twisted to avoid holes). Work 1 round without inc for thumb gusset. On next round inc for thumb gusset on each side of 3 sts in thumb gusset = 5 sts in thumb gusset. Work 1-2 rounds without inc. Then slip the 5 thumb sts on 1 stitch holder. On next round cast on 1 new st behind sts on stitch holder = 30 sts. When piece measures 23-24 cm, insert 1 marker in each side (= 15 sts between markers). Work in stocking st over all sts while AT THE SAME TIME dec on each side of both markers - READ DECREASE TIP (= 4 sts dec). Repeat dec every round a total of 6 times = 6 sts remain on needle. Cut the yarn and pull it through the remaining sts, tighten tog and fasten. The entire mitten measures approx. 27-28 cm. THUMB: Slip the 5 thumb sts back on double pointed needles size 7-8 mm. Pick up 5 sts behind the thumb = 10 sts. Work stocking st in the round until thumb measures 5-6 cm. On next round K tog all sts 2 by 2 = 5 sts. Repeat on next round = 3 sts remain. Cut the yarn and pull it through the remaining sts, tighten tog and fasten. RIGHT MITTEN: Cast on and work as left mitten but reversed - i.e. work rib according to diagram A.6 and pattern according to diagram A.7. Then insert 1 marker after the first 23 sts and 1 marker at the end of round. When pattern is displaced, dec before first marker and inc after 2nd marker. Inc thumb gusset on each side of 2nd st on round. |
|||||||||||||||||||||||||||||||
Diagram explanations |
|||||||||||||||||||||||||||||||
|
|||||||||||||||||||||||||||||||
 |
|||||||||||||||||||||||||||||||
 |
|||||||||||||||||||||||||||||||
Have you finished this pattern?Tag your pictures with #dropspattern #aroyalembraceset or submit them to the #dropsfan gallery. Do you need help with this pattern?You'll find 29 tutorial videos, a Comments/Questions area and more by visiting the pattern on garnstudio.com. © 1982-2026 DROPS Design A/S. We reserve all rights. This document, including all its sub-sections, has copyrights. Read more about what you can do with our patterns at the bottom of each pattern on our site. |
|||||||||||||||||||||||||||||||


With over 40 years in knitting and crochet design, DROPS Design offers one of the most extensive collections of free patterns on the internet - translated to 17 languages. As of today we count 324 catalogues and 12290 patterns translated into English (UK/cm). 12290
We work hard to bring you the best knitting and crochet have to offer, inspiration and advice as well as great quality yarns at incredible prices! Would you like to use our patterns for other than personal use? You can read what you are allowed to do in the Copyright text at the bottom of all our patterns. Happy crafting!
Post a comment to pattern DROPS 171-18
We would love to hear what you have to say about this pattern!
If you want to leave a question, please make sure you select the correct category in the form below, to speed up the answering process. Required fields are marked *.