
Popular categories
Looking for a yarn?


Comments / Questions (25)
![]() Diane Caron wrote:
Diane Caron wrote:
How is it possible to net square 1 flat and still achieve the cable?
13.02.2021 - 17:56DROPS Design answered:
Dear Mrs Caron, at the end of square, you will first decrease evenly 12 stitches then knit2 rows over the 38 stitches. The decreases should compensate the stitches incraesed at the beginning for the cables, and that way you should have same height at the top as at the bottom. Happy knitting!
15.02.2021 - 08:24
![]() Ann-Kristin wrote:
Ann-Kristin wrote:
Hvorfor skal man legge opp 38 masker for så å ta ut til 50, så felle til 38på rute 1, for så øke til 45 igjen på rute 2,og så felle til 38,for så å legge ut til 56 og felle til 38 på rute 3.forstår ikke alle disse inn og ut leggene. Skal ikke rutene være kvadratiske?
27.06.2019 - 15:05DROPS Design answered:
Hei Ann-Kristin. Jo, rutene skal være kvadratiske og like store. Fordi det er ulike strukturer og mønster på de ulike rutene må du legge til/trekke fra masker for å få dem til å bli like store. En flette trekker seg sammen, og trenger derfor fler masker for å oppnå samme størrelse som feks glattstrikk. Det er derfor vanlig å øke rett før du begynner å strikke flette, og felle det samme antall masker når fletten er ferdig. Andre strukturer med rett og vrang oppfører seg også ulikt i forhold til både fletter og glattstrikk. Det er derfor det økes og felles ulikt for hver rute. God fornøyelse
28.06.2019 - 14:42
![]() Vincent wrote:
Vincent wrote:
Bonjour, sur le carré 4 devant, je ne comprends pas comment faire concrètement \"Tricoter les 12 premières m comme avant, glisser les 16 m suivantes sur un arrêt de mailles pour l\'encolure, et tricoter les 12 dernières m comme avant\", car si je mets de côté 16 mailles de coté, puis je tricote les 12 mailles suivantes à la suite, cela fait un \"pli\". Auriez-vous une vidéo de ce passage? Merci beaucoup
22.01.2019 - 22:36DROPS Design answered:
Bonjour Vincent, tricotez les 16 mailles de l'encolure avant de les glisser en attente, ainsi vous n'avez pas à couper le fil, et vous n'avez pas de pli. Bon tricot!
23.01.2019 - 10:06
![]() Birgit Mehl wrote:
Birgit Mehl wrote:
Hej Kan man ikke strikke de 3 ruder til henholdsvis forstykke og bagstykke, således man er fri for at sy dem sammen? Det er jo et spørgsmål om, der er samme antal pinden hver rude. Mvh Birgit
18.01.2019 - 15:04DROPS Design answered:
Hei Birgit. Rutene er omtrent like store, så du kan gjerne strikke dem i ett stykke om du ønsker det. God fornøyelse.
25.01.2019 - 14:24
![]() Nicole wrote:
Nicole wrote:
Ist doch sehr anspruchsvoll. Ich entschuldige mich schon vorab fürs nerven 😬
16.03.2017 - 22:37
![]() Nicole wrote:
Nicole wrote:
Außerdem hab ich das Q. 1 angefangen und was überlesen. Ich habe die Rückreihen gestrickt wie sie erscheinen. Also wäre das doppelt so lang. Ist ist mir aufgefallen das ganz oben steht dir Rückreihen werden im Diagramm auch angezeigt. Dann wären die RM aber nicht kraus sondern glatt???
16.03.2017 - 22:36DROPS Design answered:
Liebe Nicole, die Rückreihe lesen Sie von links nach rechts im Diagram, jede ungerade Reihe ist eine Hin-R (= 1., 3., 5. usw R, diese werden rechts nach links gelesen) und jede gerade Reihe ist eine Rück-R (= 2., 4., 6. usw R, die werden links nach rechts gelesen) . Viel Spaß beim stricken!
17.03.2017 - 08:44
![]() Nicole wrote:
Nicole wrote:
Hallo nochmal. Das Quadrat 1 endet mit nur der Hinreihe aber sowohl oben bei "Quadrat eines Streifens" als auch "Quadrat 2" beginnen beide jeweils mit dem Hinweis "Hinreihe". Da passt doch was nicht, oder seh ich das falsch. Wo ist die Rückreihen abgeblieben. So ist es übrigens bei allen Q. Am oberen Ende zum abketten verstehe ich es ja aber mittendrin?
16.03.2017 - 22:29DROPS Design answered:
Liebe Nicole, wenn Sie das erste Quadrat eines Streifens stricken, sollen Sie mit 1 Hin-R re und 1 Rück-R re stricken, dann mit 1 Rück-R re enden, siehe "QUADRATE". Dazwischen sollen Sie das Quadrat wie beschrieben stricken. Viel Spaß beim stricken!
17.03.2017 - 08:42
![]() Nicole wrote:
Nicole wrote:
Hallo, wie werden die Randmaschen hier gestrickt? Lt. dem Video müsste ich es Kraus rechts Stricken. Also genau so wie im Diagramm angezeigt? Da zählen somit die Randmaschen wie ganz normale Maschen?
15.03.2017 - 20:42DROPS Design answered:
Liebe Nicole, die Randmaschen werden gestrickt, wie im Diagram gezeigt, dh es gibt 2 M Krausrechts auf beiden Seiten. Viel Spaß beim stricken!
16.03.2017 - 08:50
![]() Christelle wrote:
Christelle wrote:
Bonjour, J'aime beaucoup cette tunique mais je préférerais la réaliser avec la laine Drops Brushed Alpaca Silk, pour un rendu plus moelleux. Est ce possible ? Merci à vous,cordialement. Christelle
24.01.2017 - 09:39DROPS Design answered:
Bonjour Christelle, Nepal et Brushed Alpaca Silk ont des propriétés différentes et le rendu sera différent - lisez en plus ici et demandez conseil à votre magasin DROPS. Bon tricot!
24.01.2017 - 10:00
![]() Cindy Brashear wrote:
Cindy Brashear wrote:
I am having trouble with square 3 it says to increase the number of stitches to 56. And follow the diagram. However in A3a. There's only 12 stitches and if you repeat those stitches 3 times like it says, there are quite a few stitches leftover. Am I missing something?
26.11.2016 - 05:41DROPS Design answered:
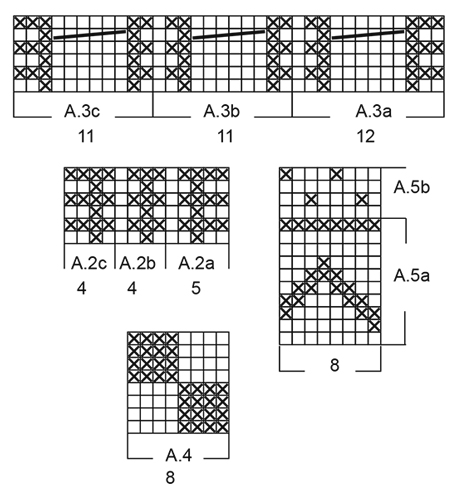
Dear Mrs Brashear, work these 56 sts as follows: 12 sts in A.3a, then work a total of 3 times the 11 sts in A.3b (= over the next 33 sts), and finish with the 11 sts in A.1c = 12 + 33 + 11 = 56 sts. Happy knitting!
28.11.2016 - 09:09
|
|||||||||||||||||||
Comfort Chronicles#comfortchroniclesponcho |
|||||||||||||||||||
|
|
|||||||||||||||||||
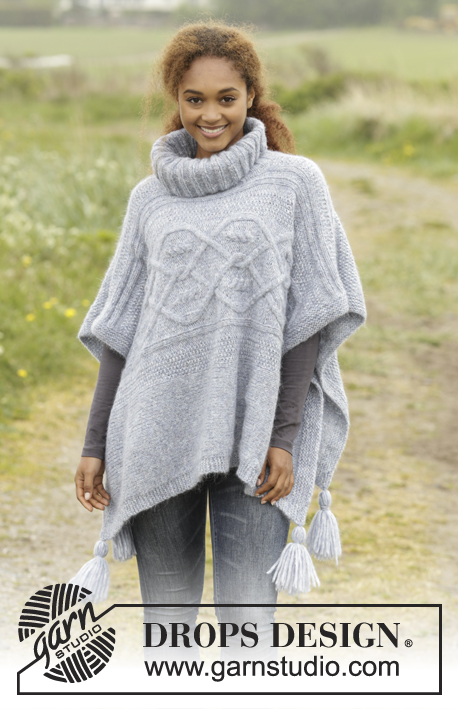
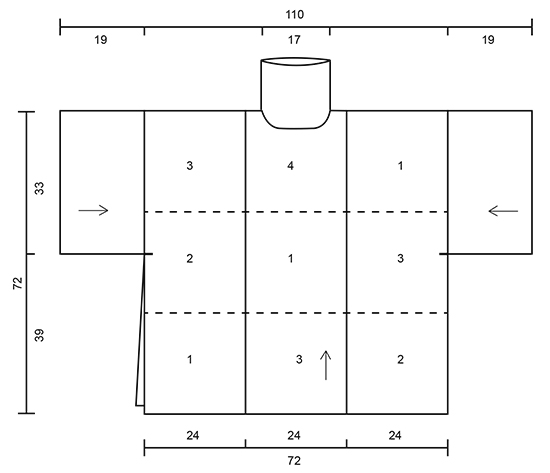
Knitted DROPS poncho with sleeves, vents, squares in cables and textured pattern in ”Nepal”. One-size
DROPS 172-22 |
|||||||||||||||||||
|
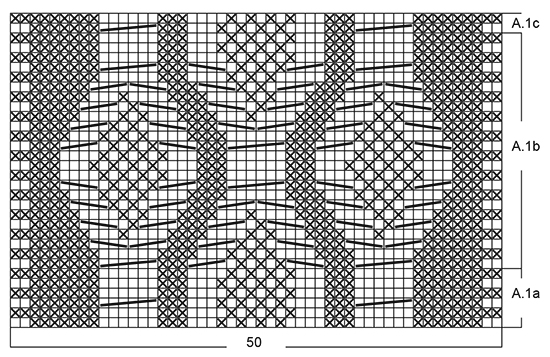
GARTER ST (back and forth): K all rows. 1 ridge = 2 rows K. GARTER ST (worked in the round): 1 ridge = 2 rounds. * K 1 round and P 1 round *, repeat from *-*. PATTERN: See diagrams A.1 to A.5. The diagrams show all rows in pattern seen from RS. STRIPS: Strip 1: Square 1, 2, and 3. Strip 2: Square 3, 1, and 4 (= neck dec). Strip 3: Square 2, 3, and 1. SQUARES: First square on a strip: Cast on 38 sts on circular needle size 5 mm with Nepal. K 1 row from RS and K 1 row from WS. Work square as explained. Finish with 1 row K from WS. Second square on a strip: K 1 row from RS and K 1 row from WS. Work square as explained. Finish with 1 row K from WS. Last square on a strip: K 1 row from RS and K 1 row from WS. Work square as explained. Finish with K 1 row from WS and K 1 row from RS. Cast off from WS with K over all sts. ---------------------------------------------------------- PONCHO: Work front and back piece as 2 equal parts, except square 4 which has dec for neck. For each part work 3 strips with 3 different squares. There are 4 different squares in total. Sew strips tog across. READ STRIPS and SQUARES, see chart. Work strips back and forth on circular needle. REMEMBER THE KNITTING TENSION SQUARE 1: K 1 row from RS while AT THE SAME TIME inc 12 sts evenly (do not inc the 2 outermost sts in each side) = 50 sts. P 1 row from WS. Work A.1a. Then work A.1b 2 times in total vertically, finish with A.1c. Then K 1 row from RS while AT THE SAME TIME dec 12 sts evenly (do not dec the 2 outermost sts in each side) = 38 sts. K 1 row from WS and K 1 row from RS. SQUARE 2: K 1 row from RS while AT THE SAME TIME inc 7 sts evenly (do not inc the 2 outermost sts in each side) = 45 sts. P 1 row from WS. Then work A.2a, A.2b 9 times in total in width, finish with A.2c. Repeat A.2 upwards until square measures approx. 1 cm less than the finished SQUARE 1 (adjust after row from WS). Now K 1 row from RS while AT THE SAME TIME dec 7 sts evenly (do not dec the 2 outermost sts in each side) = 38 sts. K 1 row from WS and K 1 row from RS. SQUARE 3: K 1 row from RS while AT THE SAME TIME inc 18 sts evenly (do not inc the 2 outermost sts in each side) = 56 sts. P 1 row from WS. Then work A.3a, A.3b 3 times in total in width, finish with A.3c. Continue like this and repeat A.3 upwards until square measures approx. 1 cm less than the finished SQUARE 1 (adjust so that 3 rows have been worked after last cable). Now K 1 row from RS while AT THE SAME TIME dec 18 sts evenly (do not dec the 2 outermost sts in each side) = 38 sts. K 1 row from WS and K 1 row from RS. SQUARE 4 - BACK PIECE: K 1 row from RS while AT THE SAME TIME inc 2 sts evenly (do not inc the 2 outermost sts in each side) = 40 sts. P 1 row from WS. Then work A.4 with 2 sts in GARTER ST - see explanation above - in each side. Repeat A.4 in width and vertically - AT THE SAME TIME when piece measures 20 cm, cast off for neck as follows, beg from RS: Work the first 7 sts, cast off the next 26 sts, work the remaining 7 sts as before. NOTE: 1 edge st towards the neck in garter st. Then finish each shoulder separately as follows: On next row from neck cast off 1 st = 6 sts remain for shoulder. Continue like this until square measures approx. 1 cm less than the finished SQUARE 1 (adjust so that one half or whole repetition vertically). Now K 1 row from RS, K 1 row from WS and K 1 row from RS. When cast off is done, work the other shoulder the same way. SQUARE 4 - FRONT PIECE: K 1 row from RS while AT THE SAME TIME inc 2 sts evenly (do not inc the 2 outermost sts in each side) = 40 sts. P 1 row from WS. Then work A.4 with 2 sts in GARTER ST - see explanation above - in each side. Repeat A.4 in width and vertically - AT THE SAME TIME when piece measures 18 cm (adjust after one whole or half repetition vertically), cast off for neck as follows, beg from RS: Work the first 12 sts in pattern as before, slip the next 16 sts on a stitch holder for neck, and work the remaining 12 sts as before. Then to cast off for neck on every row from neck as follows: 3 sts 1 time, 2 sts 1 time and 1 st 1 time = 6 sts remain for shoulder. Continue like this until square measures approx. 1 cm less than the finished SQUARE 1 (and adjust after SQUARE 4 on back piece). Now K 1 row from RS, K 1 row from WS and K 1 row from RS. When cast off is done, work the other shoulder the same way. ASSEMBLY: Sew strips tog across as shown on chart - sew in outer loops of edge sts to avoid a chunky seam. Then sew the shoulder seams. NECK: Worked in the round on a short circular needle. Beg from RS with Nepal and circular needle size 5 mm mid on top of one shoulder and pick up 96 sts (incl the 16 sts from stitch holder on front piece). P 1 round. Now work in GARTER ST - see explanation above. Continue like this until neck measures 13 cm. Cast off with * K 1, P 1 *, repeat from *-* until all sts are cast off (this is done to avoid a tight cast-off edge). Fold the neck outwards. SLEEVE: Worked in the round on a short circular needle. Cast on 106 sts on circular needle size 5 mm with Nepal. Work 4 ridges. K 1 round while AT THE SAME TIME inc 6 sts evenly = 112 sts. Then work A.5a over all sts (= 14 repetitions on round). When A.5a has been worked vertically, work A.5b. Then repeat A.5b vertically until piece measures 19 cm. Cast off. Work the other sleeve the same way. ASSEMBLY: Fasten sleeve approx. 33 cm down from shoulder, the remaining 39 cm (= vent). Fasten the other sleeve the same way. |
|||||||||||||||||||
Diagram explanations |
|||||||||||||||||||
|
|||||||||||||||||||
 |
|||||||||||||||||||
 |
|||||||||||||||||||
 |
|||||||||||||||||||
Have you finished this pattern?Tag your pictures with #dropspattern #comfortchroniclesponcho or submit them to the #dropsfan gallery. Do you need help with this pattern?You'll find 20 tutorial videos, a Comments/Questions area and more by visiting the pattern on garnstudio.com. © 1982-2026 DROPS Design A/S. We reserve all rights. This document, including all its sub-sections, has copyrights. Read more about what you can do with our patterns at the bottom of each pattern on our site. |
|||||||||||||||||||


With over 40 years in knitting and crochet design, DROPS Design offers one of the most extensive collections of free patterns on the internet - translated to 17 languages. As of today we count 324 catalogues and 12290 patterns translated into English (UK/cm). 12290
We work hard to bring you the best knitting and crochet have to offer, inspiration and advice as well as great quality yarns at incredible prices! Would you like to use our patterns for other than personal use? You can read what you are allowed to do in the Copyright text at the bottom of all our patterns. Happy crafting!
Post a comment to pattern DROPS 172-22
We would love to hear what you have to say about this pattern!
If you want to leave a question, please make sure you select the correct category in the form below, to speed up the answering process. Required fields are marked *.