
Popular categories
Looking for a yarn?


Comments / Questions (173)
![]() Marie Auffret wrote:
Marie Auffret wrote:
Bonjour, Pour la taille M, quand on tricote le dos/ devant nous avons 184 mailles. Nous devons diminuer 3 fois 4 diminutions au total . Il nous reste donc 172 mailles et non 168. N'y aurait -il pas une erreur ? D'ailleurs vous dîtes après qu'il faut augmenter 5 fois 4 augmentations soit 20 mailles et on a bien 192 mailles après ces augmentations. Merci d'avance pour votre réponse.
12.04.2023 - 10:26DROPS Design answered:
Bonjour Mme Auffret, effectivement, il faut les répéter encore 3 fois soit 4 fois au total (la correction va être faite), vous avez ainsi 184 m - (4x4)= 168 mailles. Vous augmentez ensuite 6 fois au total (d'abord 1 fois puis encore 5 fois) = 168+ (6x4) = 192 mailles. Bon tricot!
12.04.2023 - 12:49
![]() Marie Auffret wrote:
Marie Auffret wrote:
Bonjour, Je viens de finir l'empiècement et je crois avoir bien suivi vos explications. Je suis inquiète car lorsque je regarde le devant ou le dos du pull les lignes de trous du raglan sont inversées quand je regarde la manche gauche et la manche droite. Est-ce normal ou bien est-ce que j'ai loupé une explication? Merci d'avance. NB:Je vous aurai bien envoyé une photo pour vous montrer. J'espère que vous avez compris.
28.03.2023 - 20:42DROPS Design answered:
Bonjour Mme Auffret, je ne suis malheureusement pas bien sûre de saisir, les augmentations doivent partir du col en diagonale vers les manches: le point fantaisie des manches augmente et les mailles jersey (dos/devant) aussi. les lignes des raglans doivent former une ligne nette avec les jetés de chaque côté. N'hésitez pas à envoyer une photo à votre magasin ou même dans le DROPS Workshop pour qu'une autre tricoteuse puisse vous aider. Bon tricot!
29.03.2023 - 09:52
![]() Maren Butti wrote:
Maren Butti wrote:
Größe L , bisher 20 cm ab Armausschnitt gestrickt, passt wie angegossen. Gestrickt aus Seide/ Baumwollmischung, Creme, Nadel 4, Maschenprobe 21M auf 10 cm. Statt Muster glatt rechts im Rumpf stricke ich jede 6. REIHE und jede 6. Masche links, versetzt, wie im Perlmuster. Die Ärmel werde ich nur als kurze Ärmel stricken. Als Bündchen dort und unten im Rumpf nochmal Lochmusterreihe wie am Hals. Bin sehr zufrieden.
11.03.2023 - 11:54
![]() Marie Auffret wrote:
Marie Auffret wrote:
Désolée de vous avoir ennuyée ,j'ai compris mon erreur. Peut-être à plus tard. Merci
05.03.2023 - 11:24
![]() Marie Auffret wrote:
Marie Auffret wrote:
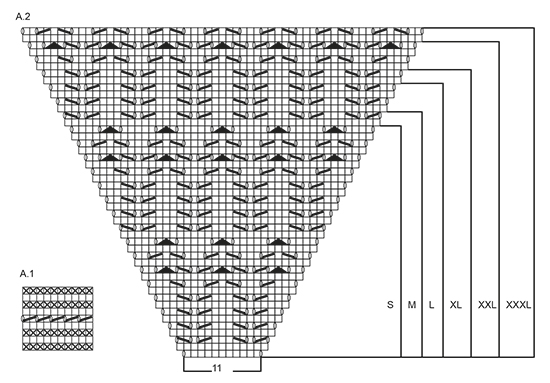
Bonjour, J'aime beaucoup votre site et je le diffuse autour de moi. Vous avez toujours répondu à mes questions et cela m'a bien aidé. On alterne un tour à l'endroit et un tour à l'envers soit du jersey mais dans le diagramme A2 et A3 il n'y a pas de rangs à l'envers. J'ai du rater une explication ??????
05.03.2023 - 10:08DROPS Design answered:
Bonjour Mme Auffret et merci :) On tricote ici A.2 en rond, donc on va tricoter les tours sans point ajourés tout à l'endroit (les tours 1 et 2 de A.2 ainsi que tous les tours pairs de A.2). De même dans A.3, on tricote les rangs pairs à l'endroit sur l'endroit. Bon tricot!
06.03.2023 - 09:42
![]() Jessie Davies wrote:
Jessie Davies wrote:
Note: YARN OVERS DIFFICULT TO SEE in pattern and when pattern is printed. Look carefully, they are there
12.07.2022 - 22:22
![]() Jessie Davies wrote:
Jessie Davies wrote:
In the 12 sts increase for the raglan, where are the increases for the sleeves? I can see the four increases front and back on each side of the A2. That adds up to 8 total. Many thanks
12.07.2022 - 21:00DROPS Design answered:
Dear Jessie, the increases for the sleeves are included within the chart, so they are worked in A.2. Happy knitting!
13.07.2022 - 11:44
![]() Jessie Davies wrote:
Jessie Davies wrote:
Confused. When I am starting the raglan, do I begin 3 stitches before the marker.? Or before A2 which is one stitch after the marker? I am knitting the yoke and have reached the “ continue this pattern” place thank you
12.07.2022 - 17:13DROPS Design answered:
Dear Jessie, you need to start 3 stitches before A.2. Happy knitting!
13.07.2022 - 11:42
![]() Isabel wrote:
Isabel wrote:
Hallo, bei den Ärmeln habe ich massive Schwierigkeiten, weil das Muster nie aufgeht. Am Anfang soll man ja, z.B. bei Größe L eine Masche Stricken dann A3 und dann 2 M Stricken. Ich frage mich ob das so beibehalten werden soll oder nur für die erste Runde gilt ?? Es geht nämlich vor allem nach den Abnahmen nie auf und dadurch entsteht natürlich nicht das vorgegebene Muster. Grüße
03.07.2022 - 21:33DROPS Design answered:
Liebe Isabel, es gilt nur für die ganz erste Runde, wenn Sie die Maschen wiederstricken. Nach 4 cm werden Sie abnehmen, wegen der Abnahmen werden immer weniger Maschen am Anfang und am Ende der Runde im Muster gestrickt. Wenn nicht genügend Maschen für A.3 sind, dann stricken Sie diese Maschen lieber glatt rechts. Viel Spaß beim stricken!
04.07.2022 - 08:21
![]() Margherita wrote:
Margherita wrote:
Buongiorno, per fare il campione con il motivo traforato, quale diagramma devo utilizzare? Grazie
15.05.2022 - 16:52DROPS Design answered:
Buonasera Margherita, può utilizzare il diagramma A.2 o più ripetizioni di A.3. Buon lavoro!
17.05.2022 - 18:43
|
|||||||||||||||||||
Sea Nymph#seanymphsweater |
|||||||||||||||||||
 |
 |
||||||||||||||||||
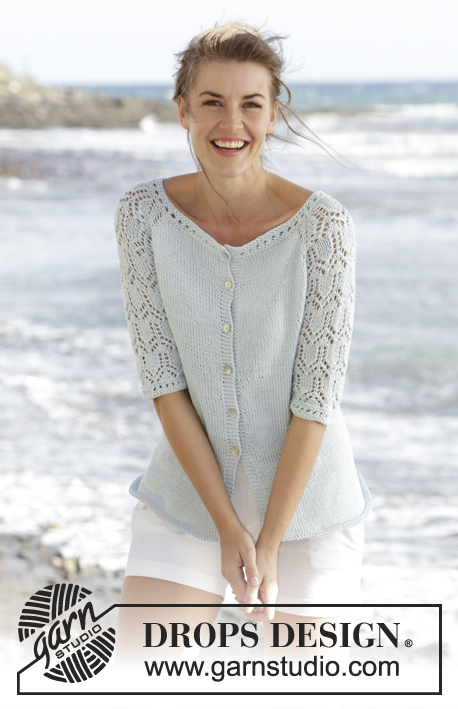
Knitted DROPS jumper with raglan, lace pattern and ¾ sleeves in "Muskat". Worked top down. Size: S - XXXL.
DROPS 168-1 |
|||||||||||||||||||
|
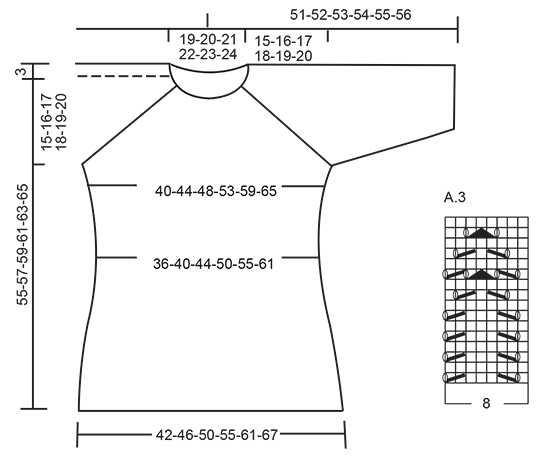
GARTER ST (worked in the round): 1 ridge = 2 rounds. * K 1 round and P 1 round *, repeat from *-*. PATTERN: See diagrams A.1 to A.3. See diagram for size! RAGLAN: Inc every other round as follows: Inc 4 sts on back piece, 4 sts on front piece and 2 sts on each sleeve (= 12 sts inc, inc on sleeve are drawn in pattern) – beg 3 sts before each A.2 and work as follows: 1 YO, K 1, 1 YO, K 2 (marker is in the middle of these sts), A.2, K 2 (marker is in the middle of these sts), 1 YO, K 1, 1 YO. K the YOs closest to markers on next row to make holes, K YOs towards back/front piece twisted to avoid holes. Inc 12 sts this way 0-2-3-7-10-14 times more (= 1-3-4-8-11-15 times in total, first inc is explained in the text). Then inc every other round as follows: Inc 2 sts on back piece, 2 sts on front piece and 2 sts on each sleeve (= 8 sts inc, inc on sleeve are drawn in pattern) – beg 2 sts before each A.2 and work as follows: 1 YO, K 2 (marker is in the middle of these sts), A.2, K 2 (marker is in the middle of these sts), 1 YO. K YOs on next round to make a hole. Inc 8 sts this way 16-15-16-13-12-9 times in total. ---------------------------------------------------------- JUMPER: Worked in the round on circular needle, top down. YOKE: Cast on 87-91-95-99-103-107 sts on circular needle size 4 mm with Muskat. K 1 round, them work A.1, on last round in A.1 inc 15 sts evenly = 102-106-110-114-118-122 sts. Then work as follows from mid back: K 17-18-19-20-21-22, 1 YO, K 1, 1 YO, K 2 (insert a marker between these sts), A.2 (= 11 sts), K 2 (insert a marker between these sts), 1 YO, K 1, 1 YO, K 34-36-38-40-42-44, 1 YO, K 1, 1 YO, K 2 (insert a marker between these sts), A.2, K 2 (insert a marker between these sts), 1 YO, K 1, 1 YO, K 17-18-19-20-21-22. Continue this pattern, and inc for RAGLAN as explained above, first inc is now done. REMEMBER THE KNITTING TENSION When A.2 has been worked vertically - see marking for your size, there are 242-262-286-314-346-374 sts on round, inc are now done. Work next round as follows: Work 38-42-46-52-58-64 sts (= half back piece), slip the next 45-47-51-53-57-59 sts on a stitch holder (= sleeve), cast on 8 sts under sleeve, work the next 76-84-92-104-116-128 sts (= front piece), slip the next 45-47-51-53-57-59 sts on a stitch holder (= sleeve), cast on 8 new sts under sleeve, work the last 38-42-46-52-58-64 sts (= half back piece). BODY: There are now 168-184-200-224-248-272 sts on body. Continue in stocking st. Insert a marker in each side, in the middle of the 8 new sts that were cast on. NOW MEASURE PIECE FROM HERE. When piece measures 4 cm, dec 1 st on each side of marker (= 4 sts dec), repeat dec every 4-4-4-5-5-5 cm 3 more times = 152-168-184-208-232-256 sts. When piece measures 22-23-24-25-26-27 cm, inc 1 st on each side of each marker (= 4 sts inc), repeat inc every 2 cm 5 more times = 176-192-208-232-256-280 sts. When piece measures 36-37-38-39-40-41 cm, work 2 ridges in GARTER ST - see explanation above, over all sts. Cast off K 1/P 1 (to avoid a wavy cast-off edge), piece measures approx. 55-57-59-61-63-65 cm from cast-on edge. SLEEVE: Worked in the round. Slip sts from sleeve back on double pointed needles size 4 mm, pick up 1 st in each of the 8 sts under sleeve = 53-55-59-61-65-67 sts. Insert 1 marker mid under sleeve = beg of round. NOW MEASURE PIECE FROM HERE! Then work as follows: 6-7-1-2-4-5 sts in stocking st, A.3 over the next 40-40-56-56-56-56 sts (beg A.3 where A.2 ends for your size), 7-8-2-3-5-6 sts in stocking st. When piece measures 4 cm, dec 1 st on each side of marker. Work the sts that do not fit the pattern in stocking st, make sure that no of dec and inc in pattern is correct. Repeat dec every 7-7-5-5-3-3 cm 2-2-3-3-4-4 more times = 47-49-51-53-55-57 sts. When piece measures 24-23-23-22-22-21 cm, work A.1 over all sts, then cast off. Work the other sleeve the same way. |
|||||||||||||||||||
Diagram explanations |
|||||||||||||||||||
|
|||||||||||||||||||
 |
|||||||||||||||||||
 |
|||||||||||||||||||
Have you finished this pattern?Tag your pictures with #dropspattern #seanymphsweater or submit them to the #dropsfan gallery. Do you need help with this pattern?You'll find 25 tutorial videos, a Comments/Questions area and more by visiting the pattern on garnstudio.com. © 1982-2026 DROPS Design A/S. We reserve all rights. This document, including all its sub-sections, has copyrights. Read more about what you can do with our patterns at the bottom of each pattern on our site. |
|||||||||||||||||||


With over 40 years in knitting and crochet design, DROPS Design offers one of the most extensive collections of free patterns on the internet - translated to 17 languages. As of today we count 324 catalogues and 12290 patterns translated into English (UK/cm). 12290
We work hard to bring you the best knitting and crochet have to offer, inspiration and advice as well as great quality yarns at incredible prices! Would you like to use our patterns for other than personal use? You can read what you are allowed to do in the Copyright text at the bottom of all our patterns. Happy crafting!
Post a comment to pattern DROPS 168-1
We would love to hear what you have to say about this pattern!
If you want to leave a question, please make sure you select the correct category in the form below, to speed up the answering process. Required fields are marked *.