
Popular categories
Looking for a yarn?


Comments / Questions (39)
![]() Paula wrote:
Paula wrote:
He realizado esta chaqueta ¡y ha sido todo un éxito! La he tejido ennla talla más grande y queda muy bien. El color que he elegido es rojo/granate. Y he puesto unos botones metálicos de color gris medio. Muchas gracias por crear un patrón tan bonito. Ha sido un placer tejer y que el resultado fuera tan bonito. Un saludo.
26.01.2020 - 11:15
![]() Mary wrote:
Mary wrote:
Hello, I was wondering if you could please help me with the sleeve part: how are you supposed to colocate the stitches so that there is one seed stitch line in the middle and the increases you make coincide with pattern 2 and 3? It is for an M size. Do you have to leave 5 stitches at each side of side stitch as in the body part? Could you please help me and tell me exactly how you do it? I would be very grateful.
15.07.2017 - 01:10DROPS Design answered:
Dear Mary, you can read herehere how to center a diagram, ie the 1st st in M.1 should be in the middle of the sleeve here. Happy knitting!
17.07.2017 - 08:19
![]() Betty wrote:
Betty wrote:
Je n'arrive pas à déchiffrer les explications concernant la réalisation de ce modèle en S. Si je respecte les indications pour la réalisation du Dos & Devant, je n'arrive pas à obtenir le nombre de mailles indiqué et les mailles au point de riz là où elles doivent tomber. Pourriez-vous me reformuler ces informations en langage clair ?
18.03.2016 - 20:36DROPS Design answered:
Bonjour Betty, en taille S, tricotez les 145 m ainsi: 5 m point de riz, 33 m de M1 (= commencez à la flèche soit 11 m de M.1 puis les 12 m du diag + les 10 premières m du diagramme), 1 m au point de riz (= la maille avec le marqueur), 9 m jersey, puis M1 sur les 58 m suivantes (= répétez 4 x M.1 en commençant par la 1ère m et tricotez ensuite les 10 premières m du diagramme), 1 m point de riz (m avec le marqueur), 9 m jersey, 24 m de M1 (= 2 fois le diagramme) puis 5 m au point de riz. Bon tricot!
21.03.2016 - 09:08
![]() Celia wrote:
Celia wrote:
Laat mijn vorige vraag maar het is me opeens duidelijk dat die 7 stekendie afgekant moeten worden aan weerzijde van het achterpand zitten, dan klopt het helemaal.
15.04.2013 - 15:58
![]() Celia wrote:
Celia wrote:
Bij het afkanten van de voorpanden heb ik een vraag. Eerst moeten er 7 steken (maat xl) af gekant worden inde voorpanden voor het armsgat. Dan hou je 42 steken over per voorpand. Dan bij de beschrijving van het linker voorpand wordt gesteld dat er nog 49 steken zouden zijn. Heb ik het correct dat dit er 42 zijn en dan begin ik met het afkanten van de rest van de steken voor het armsgat (4 maal 2 en 4 maal 1)?
15.04.2013 - 15:39DROPS Design answered:
Mooi dat het probleem is opgelost. Veel breiplezier verder!
16.04.2013 - 10:06
![]() Sigrid wrote:
Sigrid wrote:
Verzweifelte Frage: 5 Maschen Perlmuster, 43 Muster 1 und die markierte Maschen sind 49 Maschen. Für den Rücken nun 7 rechte Maschen und nochmal 80 Maschen Muster 1? Das sind 87. Wieder eine markierte Masche und 7 rechte Maschen, 36 Maschen Muster 1 und 5 Randmaschen sind auch 49. Rechts und links der markierten Maschen sind gar nicht die gleiche Maschenanzahl von rechten Maschen bei mir entstanden. Wie soll das aussehen? Schief?
09.04.2013 - 20:41DROPS Design answered:
Liebe Sigrid, es ist wichtig, dass das Muster wie auf dem Foto in der Mitte symmetrisch ist. Stricken Sie die 48 M der Seitenteile wie in der Anleitung beschrieben einmal 5+43 M und dann 7+36+5 M. Und haben Sie jeweils an der richtigen Stelle im Diagramm begonnen?
10.04.2013 - 08:49Sylvia wrote:
I mean, stitch by stich....:(..thank you.
17.03.2013 - 21:10Sylvia wrote:
Could you, pls, write here 6-th row in the M-size, i am absolutely confused with it :(
17.03.2013 - 20:42DROPS Design answered:
For size M you just start pattern where arrow shows(i.e. middle of pattern). Rows are same for all sizes.
12.04.2013 - 16:18
![]() Drops Design France wrote:
Drops Design France wrote:
Bonjour Marianne, on augmente de chaque côté de la m des côtés, soit 4 fois 2 augmentations x 2 côtés pour le gilet = + 16 m soit un total de 169 m. La formule a été modifiée. Bon tricot !
14.01.2012 - 17:10Marianne Oppitz wrote:
Il y a une erreur dans les augmentations. Si j'augmente 4x de chaque côté, cela me donne 8 mailles supplémentaires. 161+8=169 et pas 177... Il y a peut-être quelque chose qui m'échappe ... Merci pour votre aide
14.01.2012 - 16:37
|
|||||||
DROPS 71-1 |
|||||||
 |
 |
||||||
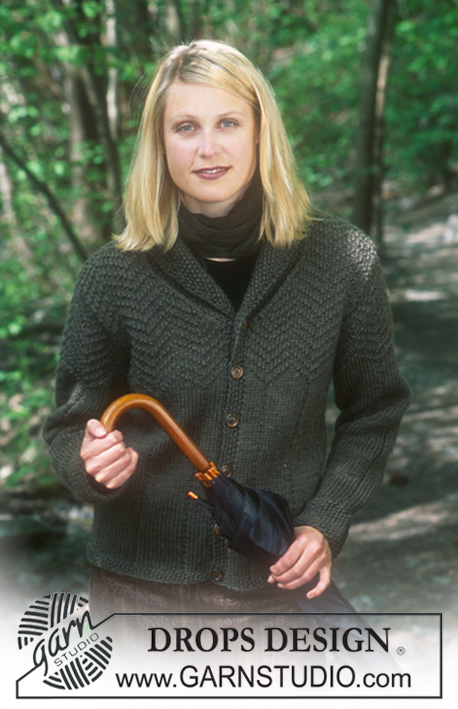
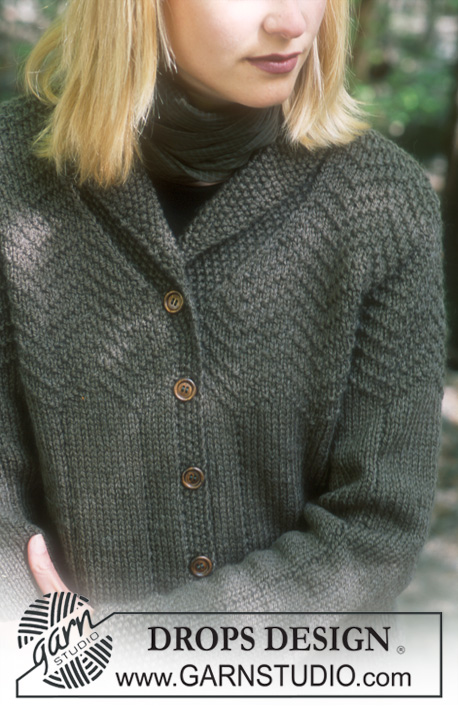
DROPS Cardigan in Alaska
DROPS 71-1 |
|||||||
|
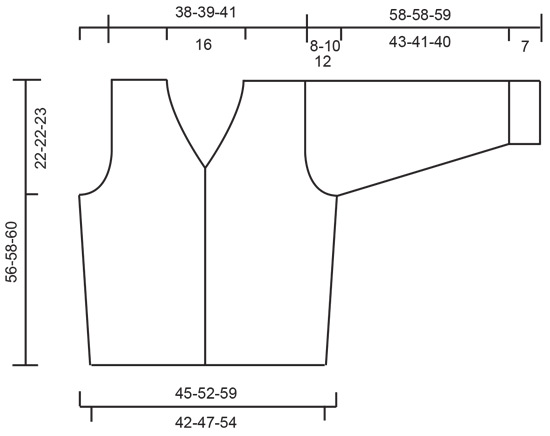
Gauge: 16 sts x 20 rows on larger needles in stockinette st = 10 x 10 cm Garter st, when knitting flat: Knit all sts, all rows. Pattern: See chart. The chart is showing every row in the pattern seen from the right side Buttonhole: Make buttonholes along right buttonband. 1 buttonhole = bind off the 3rd and 4th sts from front edge and cast on 2 new sts on the next row. The top buttonhole will be made in the collar sts. Make buttonholes when the piece measures: Size XS/S: 1, 9, 16, 24, 31 and 38 cm. Size M: 1, 9, 17, 25, 33 and 40 cm Size L/XL: 2, 10, 18, 26, 34 and 41 cm Knitting tips (for neck): All decs are made from right side. Right front (as when the garment as worn): Dec 1 st as follows: sl 1, K 1, psso. Left front: Dec 1 st as follows: K 2 tog. Seed Stitch (on an even number of sts): Row 1: * K 1, P 1 * Row 2: * P 1, K 1 * Repeat Rows 1-2. ---------------------------------------------------------------- BODY Cast on 145-161-185 sts on smaller needles. Knit 5 rows seed st - make buttonholes on right buttonband - see instructions above. Change to larger needles, placing a marker 39-43-49 sts in from each center front edge (to mark the sides). Establish pattern as follows (right side row): 5 edge sts in seed st, 33-37-43 sts in Pattern 1 - start at appropriate arrow on the chart, 1 st in seed st, 9-7-7 sts stockinette st, then knit Pattern 1 - start at right side of chart, not at arrow - over 58-68-80 sts, 1 st seed st, 9-7-7 sts stockinette st, 24-30-36 sts in Pattern 1 - start at right side of chart, not at arrow - then 5 edge sts in seed st. Continue with pattern as established until the piece measures 10-7-7 cm . Inc 1 st at each side of side st (st in seed st) every 10-6-6 cm 2-4-4 times - knit the increased sts in stockinette st as you go along. After all incs there are 153-177-201 sts on needles and the pattern now continues across all the sts. When the piece measures 30-32-33 cm knit Pattern 2 and then repeat Pattern 3 to finished measurements - start at appropriate arrow on the chart after the button band in seed st. When the piece measures 34-36-37 cm knit the next row as follows: 38-44-49 sts for the front, bind off 5-5-7 sts for armhole, 67-79-89 sts for the back, bind off 5-5-7 sts for armhole, 38-44-49 sts for the front. Knit each side separately. Left front: = 38-44-49 sts. Read the entire next section before knitting. Armhole: bind off for armhole at the side every other row: 2 sts 0-2-4 times and 1 st 3-4-4 times. Collar: At the same time when the piece measures 35-37-38 cm inc 2 sts inside 1 edge st at center front edge, for collar - knit the increased sts for collar in seed st as you go along. Then knit 2 rows seed st only over the outermost 7 sts (button band) - do not knit the remaining sts on the row. These short rows begin the collar shaping. Then inc 1 st inside 1 edge st every row 8 times, then every other row 6 times, then every 4 rows 2 times = 18 sts increased for collar - knit the increased sts in seed st as you go along. Neck shaping: At the same time when the piece measures 39-41-42 cm dec for the neckline (while continuing to inc for collar) as follows: dec 1 st inside the seed sts 12 times every other row - see knitting tips. When the piece measures 56-58-60 cm bind off the 18-19-20 shoulder sts. Now only the seed sts remain on needles = 23 sts. Continue with seed st over these sts as follows: * 2 rows over all sts, 2 rows over only the outermost 16 sts *, repeat from * - * until the collar measures approx. 8 cm or length needed to reach center back. Put sts on a st holder. Right front: = 38-44-49 sts. Knit the same as left front, reversing all shaping, and make buttonholes on button band (see instructions above). Back: = 67-79-89 sts. Bind off for armholes at both sides as on front = 61-63-65 sts. When the piece measures 54-56-58 cm bind off the center 23-23-23 sts for the neck. On the next row dec 1 st at each neck edge. Bind off the remaining 18-19-20 shoulder sts when the piece measures 56-58-60 cm. Sleeve: Cast on 38-42-46 sts on smaller needles. Knit seed st for 7 cm. Change to larger needles and Pattern 1 - place the pattern on the sleeve so that there is a single seed st column at the center. When the piece measures 8 cm inc 1 st at each side every 6 rows 14-13-12 times = 66-68-70 sts - knit the increased sts in the pattern as you go along. At the same time when the piece measures 46-44-43 cm knit Pattern 2, then repeat Pattern 3 to finished measurements. When sleeve measures 50-48-47 cm bind off for sleeve cap at each side every other row: 3 sts 2-2-1 time, 2 sts 2-2-3 times, 1 st 0-2-4 times, then 2 sts at each side until the piece measures 57-57-58 cm and then 3 sts each side 1 time. The piece measures approx. 58-58-59 cm , bind off the remaining sts. Assembly: Sew shoulder seams. Sew the collar together at center back invisibly. Sew the collar to back neck. Sew the sleeve seams and set into Body. Sew on buttons. |
|||||||
Diagram explanations |
|||||||
|
|||||||
 |
|||||||
 |
|||||||
Have you finished this pattern?Tag your pictures with #dropspattern or submit them to the #dropsfan gallery. Do you need help with this pattern?You'll find 27 tutorial videos, a Comments/Questions area and more by visiting the pattern on garnstudio.com. © 1982-2026 DROPS Design A/S. We reserve all rights. This document, including all its sub-sections, has copyrights. Read more about what you can do with our patterns at the bottom of each pattern on our site. |
|||||||


With over 40 years in knitting and crochet design, DROPS Design offers one of the most extensive collections of free patterns on the internet - translated to 17 languages. As of today we count 324 catalogues and 12290 patterns translated into English (UK/cm). 12290
We work hard to bring you the best knitting and crochet have to offer, inspiration and advice as well as great quality yarns at incredible prices! Would you like to use our patterns for other than personal use? You can read what you are allowed to do in the Copyright text at the bottom of all our patterns. Happy crafting!
Post a comment to pattern DROPS 71-1
We would love to hear what you have to say about this pattern!
If you want to leave a question, please make sure you select the correct category in the form below, to speed up the answering process. Required fields are marked *.