
Popular categories
Looking for a yarn?


Comments / Questions (60)
![]() Sophie Millot wrote:
Sophie Millot wrote:
Suite de mon précédent message : ce que vous indiquez comme demi-dos gauche dans le modèle est impossible car la manche se retrouve en début de rang, soit à droite du montage et donc va se placer derrière le demi-devant droit , donc correspond au demi-dos droit. Alors comment corriger ce montage ? Désolée mais je retourne le problème dans tous les sens. Cordialement
24.02.2025 - 22:11DROPS Design answered:
Bonjour Mme Millot, dans ma réponse précédente, j'avais omis que le dos gauche se tricote de haut en bas, mais il va ensuite être cousu au devant gauche (toujours quand on porte la veste), pas derrière le demi-devant droit. Pour le demi-dos gauche, vous rabattez les mailles des manches en début de rang sur l'endroit, si vous le posez sur votre devant gauche, les hauteurs doivent correspondre. Bon tricot!
25.02.2025 - 10:04
![]() Sophie Millot wrote:
Sophie Millot wrote:
Pour le demi-dos gauche, parlez vous de la gauche vu de face ou gauche sur le corps ? après la section 10, il faut aller en section 4, vous parlez de l'aiguille droit alors qu'on utilise une aiguille circulaire et les explications ne semblent pas donner le résultat attendu. Merci pour votre réponse, je suis bloquée.
24.02.2025 - 14:50DROPS Design answered:
Bonjour Mme Millot, chaque partie gauche/droite s'entend quand on porte la veste, ainsi le demi-dos gauche sera ensuite cousu au devant gauche et correspond au côté gauche de la veste. Pour tricoter la section -4, glissez les premières mailles sur l'aiguille droite, sans les tricoter, en ne gardant que les 2 dernières mailles sur l'endroit et tricotez le 1er rang sur 2 mailles, puis tricotez 2 mailles en plus tous les rangs sur l'endroit en mettant les 2 mailles de l'aiguille gauche sur l'aiguille droite. Bon tricot!
24.02.2025 - 16:09
![]() Sandra Morgan-Griffiths wrote:
Sandra Morgan-Griffiths wrote:
Can I buy a Drops Colour Chart and if so where please Thank You
19.05.2023 - 16:42DROPS Design answered:
Dear Sandra, we have no DROPS Colour Charts. You can print the yarn info page, alongside the colours of each yarn, by accessing to the specific yarn page and clicking on the button "print".
21.05.2023 - 18:14
![]() Justyna wrote:
Justyna wrote:
Dobry wieczór. Zastanawiam się gdzie popełniam błąd, bo niezależnie od tego jak robię kołnierz, to zawsze wychodzi mi ta sama wersja (a muszę zrobić odwrotność do lewego przodu...). Już próbowałam na wszystkie sposoby i za każdym razem, nawet jak zaczynam na lewej stronie robótki, moja mniejsza część kołnierza jest po tej samej stronie. Więc mam dwa "lewe przody"... Proszę o pomoc bo już nie wiem jak się za to zabrać.
23.03.2023 - 00:11DROPS Design answered:
Witaj Justyno, ważne jest aby rzędy skrócone były przerabiane od środka przodu, czyli z tej strony, z której kołnierz jest dłuższy. De facto te dwie części możesz wykonać tak samo, a następnie kołnierz drugiej strony obrócić (jedna część kołnierza będzie widoczna na prawej stronie, a druga na lewej), aby później z odpowiedniej strony nabrać oczka na ramiona. Pozdrawiamy!
23.03.2023 - 16:23
![]() Sophie wrote:
Sophie wrote:
Bonjour, ce modèle peut il être feutré? Et si oui, quelle taille faut il tricoter pour obtenir une taille S après feutrage. Merci d'avance
16.04.2021 - 11:51DROPS Design answered:
Bonjour Sophie, il n'est pas prévu de feutrer la veste terminée. Nous ne sommes malheureusement pas en mesure de pouvoir adapter chacun de nos modèles à chaque demande. Merci de bien vouloir contacter votre magasin, même par mail ou téléphone, pour toute assistance complémentaire - ou éventuellement à un forum spécialisé. Merci pour votre compréhension.
16.04.2021 - 14:43
![]() Carla wrote:
Carla wrote:
Hola, Nepal va tejido con doble hebra o simple? porque he notado que es mucho mas fino que big delight.
09.06.2020 - 14:58DROPS Design answered:
Hola Carla. Ambos hilos pertenecen al mismo grupo de lanas (grupo C) y la chaqueta se trabaja con un hilo.
13.06.2020 - 20:43
![]() Wendy wrote:
Wendy wrote:
Ik ben begonnen om dit model in maat XXL te breien. Maar nog voor deel 1 zou je 52 steken moeten overhouden. Als ik in het patroon tel kom ik uit op 50. Bij 81 steken minder/kant je 31 steken. (Minder 2x1 en 5x1 st, en kant 2x2 en 4x5 st af) M.vr.gr. Wendy
06.11.2019 - 09:50DROPS Design answered:
Dag Wendy,
Het patroon is gecontroleerd en er zat inderdaad een fout in de vertaling. Er is nu een correctie gemaakt in het aantal minderingen voor de mouw op het voorpand.
22.11.2019 - 10:57
![]() Ilka wrote:
Ilka wrote:
Hallo, ich habe alle Teile fertig. Verstehe aber nicht, wie der Kragen zusammengenäht werden soll. Wenn ich ihn in der Mitte zusammennähe sieht es komisch aus und es steht dort ja auch"an den rückwärtigen Halsausschnitt nähen." Der ist doch aber schon fest. (ist es richtig, dass bei den Rückenteilen kein Kragen gestrickt wird?) Es ist leider weder durch die Zeichnung noch durch die Bilder zu sehen, da keine richtige Rückseite gezeigt wird...... und irgendwie erklärt es sich mir nicht..
15.09.2019 - 16:48DROPS Design answered:
Liebe Ika, die angeschlagenen Maschen für den Kragen für beiden Vorderteile werden zusammengenäht, dann nähen Sie den Kragen (= die kleinste Länge) am Halsausschnitt vom Rückenteil. Viel Spaß beim fertigstellen!
16.09.2019 - 11:18
![]() Ilka Fricke wrote:
Ilka Fricke wrote:
Stricke ich bei Abschnitt 1 Vorderteil die 1 R. In der Hin-oder Rückreihe. Wenn ich es wie laut Anleitung str. sind bei mir die verkürzungen auf der falschen Seite. Kann man die Kommentare in meinem Fall "deutsch" ändern? Manche Fragen würden dann evtl. nicht doppelt gestellt. Ich kann z. B. kein norwgisch, spanisch etc. würde aber gerne die Kommentare lesen...
25.07.2019 - 18:21DROPS Design answered:
Liebe Ilka, die Kommentare können wir leider nicht übersetzen. - Den Kragen (längere Seite des Kragens) beginnen Sie ja mit einer Rück-Reihe. Die kürzere Seite (die, die Sie ab der Hin-Reihe stricken), liegt in Richtung Seite der Jacke, dort schlagen Sie auch die Maschen für den Ärmel an. Die Abnahmen erfolgen am vorderen Rand der Jacke, das Abketten der Maschen für den Ärmel an der Seite (d.h. ab der Rück-Reihe). Wenn Sie dann Abschnitt 1 ab der Hin-Reihe stricken, werden die Reihen in Richtung Seite der Jacke kürzer als in Richtung vorderer Rand. Gutes Gelingen weiterhin!
27.07.2019 - 09:25
![]() Cecilie Skovbjerg wrote:
Cecilie Skovbjerg wrote:
Jeg undrer mig over at der anbefales pind 8 til garntyper, der normalt strikkes på pind 5? Er der fejl?
19.07.2019 - 21:30DROPS Design answered:
Hei Ceccilie. På denne jakken skal det strikkes løs og derfor større pinner enn det vi vanligvis bruker til Nepal og Big Delight. Men husk å sjekke din strikkefasthet. mvh Drops design
09.09.2019 - 14:58
|
|||||||
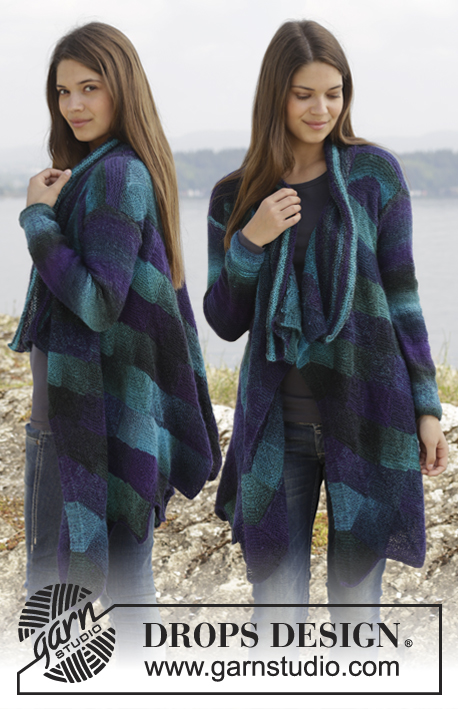
Northern Lights#northernlightsjacket |
|||||||
 |
 |
||||||
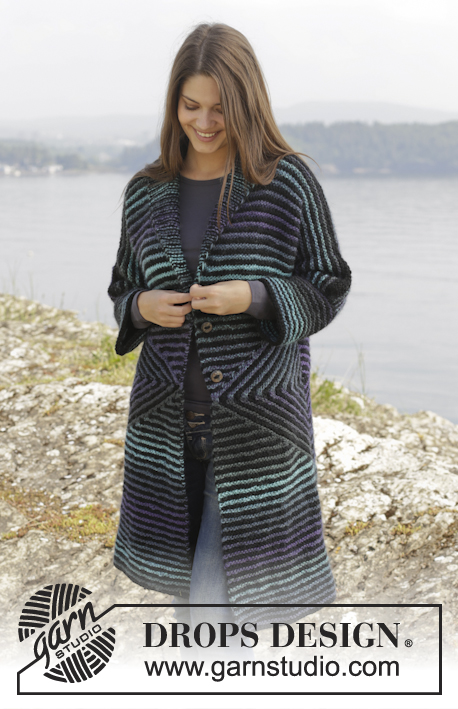
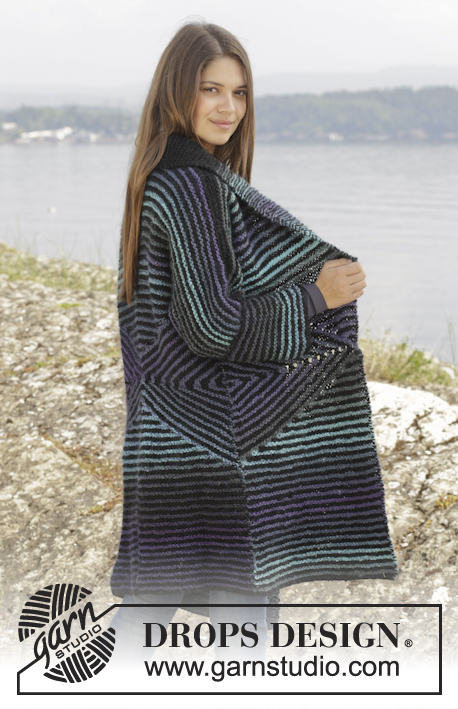
Knitted DROPS jacket in garter st with short rows and stripes, worked top down in ”Big Delight” and ”Nepal”. Size: S - XXXL.
DROPS 158-17 |
|||||||
|
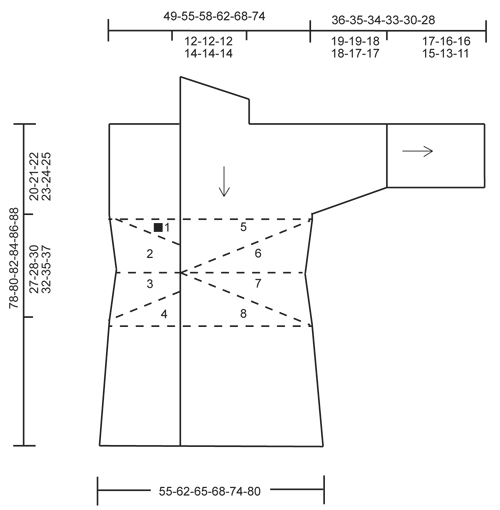
GARTER ST (back and forth on needle): K all rows. 1 ridge = 2 rows K. PATTERN: * K 2 rows with Big Delight (= 1 stripe), K 2 rows with Nepal (= 1 stripe) *, repeat from *-*. TIP 1: When changing colour in stripes, the strands must always be on WS of piece. TIP 2: To make the colour transitions in Big Delight pretty when switching ball, it is important to find a ball that starts with the same colour last ball ended with. COLLAR: * K 1 row over all sts, turn piece, K 1 row over all sts, turn piece, K 1 row over the first 17-17-17-18-18-18 sts, turn piece, K 1 row, turn piece *, repeat from *-*. BUTTONHOLES: Dec for buttonholes on right front piece. 1 buttonhole = K tog fourth and fifth st from mid front and make 1 YO. Dec for buttonholes (measured from shoulder) when piece measures: SIZE S: 29 and 37 cm. SIZE M: 30 and 38 cm SIZE L: 31 and 39 cm. SIZE XL: 32 and 40 cm SIZE XXL: 33 and 41 cm SIZE XXXL: 34 and 42 cm. ---------------------------------------------------------- JACKET: Worked in 4 parts, left and right back piece are sewn tog mid back when finished. Pick up sts around the sleeves and work a cuff from elbow and down. Work back and forth on circular needle so that piece can be moved to the opposite side and worked from each side of needle. READ TIP 2! RIGHT FRONT PIECE: Work back and forth on circular needle size 8 mm in GARTER ST - see explanation above, work from collar and down. Cast on 22-22-22-24-24-24 sts with Nepal and work COLLAR - see explanation above (1st row = WS). When collar measures 8-8-8-9-9-9 cm on the shortest side, cast on 49-53-53-55-57-61 new sts for sleeve from the shortest side on collar = 71-75-75-79-81-85 sts. Insert 1 marker on this row – now measure piece from here. REMEMBER THE KNITTING TENSION! Now work piece in PATTERN - see explanation above, yarn change for stripes is done in the side of piece. When piece measures 10 cm, dec from WS inside 1 edge st towards mid front as follows: 1 st every 6th row 2 times in total, 1 st every 4th row 4-4-4-5-5-5 times in total. AT THE SAME TIME when piece measures 16-17-18-19-20-21 cm, cast off sts for sleeve as follows: Cast off 0-0-3-4-2-2 sts 1 time, then cast off 5 sts every other row 5-5-4-4-4-4 times in total = 40-44-46-48-52-56 sts after all cast offs. Remember BUTTONHOLES - see explanation above. Work pattern until piece measures 20-21-22-23-24-25 cm, adjust so that next row is worked from RS with Nepal. Section 1 Row 1: Slip the first 2 sts loosely over on to right needle, pull yarn behind the 2 sts - READ TIP 1 - see explanation above, work the remaining sts on row, turn piece. Row 2: Work back but do not work the last 2 sts slipped, turn piece. Row 3: Slip the first 2 sts loosely over on to right needle, pull yarn behind the 2 sts, work the remaining sts on row, turn piece. Row 4: Work back but do not work the last 4 sts slipped, turn piece. Continue like this by working 2 sts less for every other row until 2 rows have been worked over the last 2 sts. Cut the yarn. Then work 1 stripe over all sts with 1st row from RS. Section 2 READ ALL OF THE FOLLOWING SECTION BEFORE CONTINUING – WORK SHORT ROWS AND DEC AT THE SAME TIME. SHORT ROWS: Row 1: Work until 2 sts remain, turn piece. Row 2: Work back. Row 3: Work until 4 sts remain, turn piece. Row 4: Work back. Continue like this with 2 sts less for every other row until 2 sts remain on right needle. DECREASE: Work 3-3-3-2-2-2 stripes. Then dec at beg of next stripe as follows: K 2 tog, repeat dec every other stripe (= every 4th row) 6-7-8-8-8-10 times in total, then dec 0-1-0-0-0-0 times on next stripe = 34-36-38-40-44-46 sts. Section 3 READ ALL OF THE FOLLOWING SECTION BEFORE CONTINUING – WORK SHORT ROWS AND INC AT THE SAME TIME. SHORT ROWS: Row 1: Work the first 4 sts, turn piece. Row 2: Work back over these 4 sts, turn piece. Row 3: Work the first 6 sts, turn piece. Row 4: Work back over these 6 sts, turn piece. Continue like this with 2 sts more for every other row - repeat until 1 stripe has been worked over all sts. INCREASE: Work 2 stripes. Then inc at beg of next stripe as follows: Work 2 sts in first st, repeat inc every other stripe (= every 4th row) 6-8-8-8-8-10 times in total = 40-44-46-48-52-56 sts. Cut the yarn. Section 4 Slip the first 38-42-44-46-50-54 sts on to right needle. Then work as follows: Row 1 (= RS): Work 2 sts, turn piece. Row 2: Work back over the 2 sts, turn piece. Row 3: Slip 2 sts from right needle on to left needle, work the 4 sts, turn piece. Row 4: Work back over the 4 sts. Continue like this with 2 sts more for every other row until all sts have been slipped on to same needle and 1 stripe has been worked over all sts. Bottom part of jacket: Now work pattern. When piece measures 60-62-64-66-68-70 cm, inc in the side as follows: Work 2 sts in first st from RS 4 times in total every 4 cm = 44-48-50-52-56-60 sts. Work until piece measures 78-80-82-84-86-88 cm, adjust so that last stripe is with Nepal and loosely cast off with Nepal. LEFT FRONT PIECE: Cast on and work as right front piece but reversed, collar beg from RS, do not dec for buttonholes - yarn change in stripes is done mid front. Work until piece measures 20-21-22-23-24-25 cm, adjust so that next row is worked from RS with Nepal. Section 5 SHORT ROWS: Row 1: Work until 2 sts remain, turn piece. Row 2: Work back. Row 3: Work until 4 sts remain, turn piece. Row 4: Work back. Continue like this by working 2 sts less for every other row until the last 2 sts have been worked back and forth. Work one stripe over all sts. Section 6 READ ALL OF THE FOLLOWING SECTION BEFORE CONTINUING – WORK SHORT ROWS AND DEC AT THE SAME TIME. Row 1: Slip the first 2 sts loosely on to right needle, pull yarn behind the 2 sts - REMEMBER TIP 1 - see explanation above, work the remaining sts on row, turn piece. Row 2: Work back but do not work the last 2 sts slipped, turn piece. Row 3: Slip the first 2 sts loosely over on to right needle, pull yarn behind the 2 sts, work the remaining sts on row, turn piece. Row 4: Work back but do not work the last 4 sts, turn piece. Continue like this with 2 sts less for every other row until 2 sts remain on left needle. Cut the yarn. DECREASE: Work 3-3-3-2-2-2 stripes. Then dec at the end of next stripe as follows: K 2 tog, repeat dec every other stripe (= every 4th row) 6-7-8-8-8-10 times in total, then dec 0-1-0-0-0-0 times on next stripes = 34-36-38-40-44-46 sts. Section 7 READ ALL OF THE FOLLOWING SECTION BEFORE CONTINUING – WORK SHORT ROWS AND INC AT THE SAME TIME. The first 32-34-36-38-42-44 sts are on the right needle. Then work as follows: Row 1: Slip 2 sts from right needle on to left needle, work the 4 sts, turn piece. Row 2: Work back over the 4 sts. Row 3: Slip 2 sts from right needle on to left needle, work the 6 sts, turn piece. Row 4: Work back over the 6 sts. Continue like this with 2 sts more for every other row until all sts have been slipped on to same needle and 1 stripe has been worked over all sts. INCREASE: Work 2 stripes. Then inc at the end of next stripe as follows: Work 2 sts in last st, repeat inc every other stripe (= every 4th row) 6-8-8-8-8-10 times in total = 40-44-46-48-52-56 sts. Section 8 Row 1: Work the first 2 sts, turn piece. Row 2: Work back over these 2 sts, turn piece. Row 3: Work the first 4 sts, turn piece. Row 4: Work back over these 4 sts, turn piece. Continue like this with 2 sts more for every other row - repeat until 1 stripe has been worked over all sts. Bottom part of jacket: Now work pattern. When piece measures 60-62-64-66-68-70 cm, inc in the side as follows: Work 2 sts in last st from RS 4 times in total every 4 cm = 44-48-50-52-56-60 sts. Work until piece measures 78-80-82-84-86-88 cm, adjust so that last stripe is with Nepal and loosely cast off with Nepal. LEFT BACK PIECE: Work back and forth on circular needle size 8 mm in pattern, change yarn in the side, worked top down. Cast on 49-53-53-55-57-61 sts with Nepal. Work 2 rows (1st row = RS). Then cast on at the end of the next 2 rows from RS for neck as follows: 1 st 1 time and 7-7-7-8-8-8 sts 1 time = 57-61-61-64-66-70 sts. When piece measures 16-17-18-19-20-21 cm, cast off sts for sleeve as follows: Cast off 0-0-3-4-2-2 sts 1 time, then cast off 5 sts every other row 5-5-4-4-4-4 times in total = 32-36-38-40-44-48 sts. Work pattern until piece measures 20-21-22-23-24-25 cm, adjust so that next row is worked from RS with Nepal. Work Section 1 – see RIGHT FRONT PIECE. Then work 4-3-4-3-4-3 stripes over all sts. AT THE SAME TIME inc 1 st every other stripe at beg of row from RS, and dec 1 st at the end of row from RS. This is done to get the correct angle on piece. Section 9 READ ALL OF THE FOLLOWING SECTION BEFORE CONTINUING – WORK SHORT ROWS AND DEC AT THE SAME TIME. SHORT ROWS: Row 1: Work until 2 sts remain, turn piece. Row 2: Work back. Row 3: Work until 4 sts remain, turn piece. Row 4: Work back. Continue like this with 2 sts less for every other row until 2 sts remain on right needle. DECREASE: Work 1-0-0-2-0-0 stripes. Then dec at beg of next stripe as follows: K 2 tog, repeat dec every other stripe (= every 4th row) 4-6-6-6-6-8 times in total = 28-30-32-34-38-40 sts. Section 10 READ ALL OF THE FOLLOWING SECTION BEFORE CONTINUING – WORK SHORT ROWS AND INC AT THE SAME TIME. SHORT ROWS: Row 1: Work the first 4 sts, turn piece. Row 2: Work back over these 4 sts, turn piece. Row 3: Work the first 6 sts, turn piece. Row 4: Work back over these 6 sts, turn piece. Continue like this with 2 sts more for every other row - repeat until 1 stripe has been worked over all sts. INCREASE: Work 2 stripes. Then inc at beg of next stripe as follows: Work 2 sts in first st, repeat inc every other stripe (= every 4th row) 4-6-6-6-6-8 times in total = 32-36-38-40-44-48 sts. Cut the yarn. Then work 4 stripes over all sts. AT THE SAME TIME inc 1 st every other stripe at beg of row from RS, and dec 1 st at the end of row from RS. This is done to get the correct angle on piece. Cut the yarn. Work Section 4 – see RIGHT FRONT PIECE. Bottom part of jacket: Now work pattern. When piece measures 60-62-64-66-68-70 cm, inc in the side as follows: Work 2 sts in first st from RS 4 times in total every 4 cm = 36-40-42-44-48-52 sts. Work until piece measures 78-80-82-84-86-88 cm, adjust so that last stripe is with Nepal and loosely cast off with Nepal. RIGHT BACK PIECE: Cast on and work as left back piece but reversed - change yarn for stripes mid back. Work until piece measures 20-21-22-23-24-25 cm, adjust so that next row is worked from RS with Nepal. Work Section 5 – see LEFT FRONT PIECE. Then work 4-3-4-3-4-3 stripes over all sts. AT THE SAME TIME dec 1 st every other stripe at beg of row from RS, and inc 1 st at the end of row from RS. This is done to get the correct angle on piece. Section 11 READ ALL OF THE FOLLOWING SECTION BEFORE CONTINUING – WORK SHORT ROWS AND DEC AT THE SAME TIME. Row 1: Slip the first 2 sts loosely on to right needle, pull yarn behind the 2 sts - REMEMBER TIP 1, work the remaining sts on row, turn piece. Row 2: Work back but do not work the last 2 sts slipped, turn piece. Row 3: Slip the first 2 sts loosely on to right needle, pull yarn behind the 2 sts, work the remaining sts on row, turn piece. Row 4: Work back but do not work the last 4 sts, turn piece. Continue like this with 2 sts less for every other row until 2 sts remain on right needle. Cut the yarn. DECREASE: Work 1-0-0-2-0-0 stripes. Then dec at the end of next stripe as follows: K 2 tog, repeat dec every other stripe (= every 4th row) 4-6-6-6-6-8 times in total = 28-30-32-34-38-40 sts. Section 12 READ ALL OF THE FOLLOWING SECTION BEFORE CONTINUING – WORK SHORT ROWS AND INC AT THE SAME TIME. The first 26-28-30-32-36-38 sts are on the right needle. Then work as follows: Row 1 (= RS): Slip 2 sts from right needle on to left needle, work the 4 sts, turn piece. Row 2: Work back over the 4 sts. Row 3: Slip 2 sts from right needle on to left needle, work the 6 sts, turn piece. Row 4: Work back over the 6 sts. Continue like this with 2 sts more for every other row until all sts have been slipped on to same needle and 1 stripe has been worked over all sts. INCREASE: Work 2 stripes. Then inc at the end of next stripe as follows: Work 2 sts in last st, repeat inc every other stripe (= every 4th row) 4-6-6-6-6-8 times in total = 32-36-38-40-44-48 sts. Then work 4 stripes over all sts. AT THE SAME TIME dec 1 st every other stripe at beg of row from RS, and inc 1 st at the end of row from RS. This is done to get the correct angle on piece. Work Section 8 – see LEFT FRONT PIECE. Bottom part of jacket: Now work pattern. When piece measures 60-62-64-66-68-70 cm, inc in the side as follows: Work 2 sts in last st 4 times in total every 4 cm = 36-40-42-44-48-52 sts. Work until piece measures 78-80-82-84-86-88 cm, adjust so that last stripe is with Nepal and loosely cast off with Nepal. ASSEMBLY: Sew right back piece to left back piece mid back. Sew shoulder and side seams. Sew the collar tog mid back and sew it to the neckline at the back. RIGHT CUFF: Worked back and forth on circular needle. Pick up 42-44-46-50-52-54 sts on circular needle size 8 mm around the sleeve with Nepal. Piece is worked in pattern. Cast off when piece measures 17-16-16-15-13-11 cm, adjust to cast off with Nepal. LEFT CUFF: Pick up and work as right cuff. ASSEMBLY: Sew cuff seams tog. Sew the buttons on to left front piece. |
|||||||
Diagram explanations |
|||||||
|
|||||||
 |
|||||||
Have you finished this pattern?Tag your pictures with #dropspattern #northernlightsjacket or submit them to the #dropsfan gallery. Do you need help with this pattern?You'll find 20 tutorial videos, a Comments/Questions area and more by visiting the pattern on garnstudio.com. © 1982-2026 DROPS Design A/S. We reserve all rights. This document, including all its sub-sections, has copyrights. Read more about what you can do with our patterns at the bottom of each pattern on our site. |
|||||||


With over 40 years in knitting and crochet design, DROPS Design offers one of the most extensive collections of free patterns on the internet - translated to 17 languages. As of today we count 324 catalogues and 12290 patterns translated into English (UK/cm). 12290
We work hard to bring you the best knitting and crochet have to offer, inspiration and advice as well as great quality yarns at incredible prices! Would you like to use our patterns for other than personal use? You can read what you are allowed to do in the Copyright text at the bottom of all our patterns. Happy crafting!
Post a comment to pattern DROPS 158-17
We would love to hear what you have to say about this pattern!
If you want to leave a question, please make sure you select the correct category in the form below, to speed up the answering process. Required fields are marked *.