
Popular categories
Looking for a yarn?


Comments / Questions (53)
![]() Elle wrote:
Elle wrote:
I följande stycke, kan jag bara hitta att det ökas 4 maskor. Ändå säger texten att det ökas med 6 maskor. VAR ska de sista 2 m ökas?? VARV 8: Sätt en markör i den 2:a, 5:e, 7:e(= den mittersta m), 9:e och 12:e m. Sedan ökas det så här: öka 1 m efter de 2 första markörerna, 1 m på varje sida av den mittersta m, och 1 m före de 2 sista markörerna (6 nya m på 1 v med ökning) = 19 m.
04.11.2025 - 09:39DROPS Design answered:
Hej Elle Det ökas såhär på varv 8: öka 1 m efter var av de 2 första markörerna (= 2 ökade m), 1 m på varje sida av den mittersta m (= 2 ökade m), och 1 m före var av de 2 sista markörerna (= 2 ökade m) - totalt 6 nya m på 1 v med ökning. Mvh DROPS Design
19.11.2025 - 12:29
![]() Bianca wrote:
Bianca wrote:
Ich brauche bitte Hilfe bei Ärmel- und Halsausschnitten: in der Erklärung steht "gleichzeitig auf der rechten Seite für das Armloch und auf der linken Seite gegen die untere Kante..." abnehmen. Verstehe ich leider nicht. Wie sollen die Seitenteile aussehen, wenn Arm- & Halsausschnitt nicht auf derselben Seite gestrickt werden? Bzw. was ist die untere Kante? Vielen Dank
22.01.2024 - 14:00DROPS Design answered:
Liebe Bianca, beim linken Vorderteil sollen Sie am Anfang einer Hin-Reihe für das Armausschnitt abketten (rechte Seite) und am Anfang einer Rückreihe für das untere Kante abketten (linke Seite). Wenn Alle Maschen abgekettet sind, ketten Sie noch für den Hals am Anfang jeder 2. Rückreihe (in jeder 4. Reihe) ab. Viel Spaß beim stricken!
23.01.2024 - 07:10
![]() Zana Rita wrote:
Zana Rita wrote:
Hello, the Hungarian version of the pattern does not belong to this cardigan. Would you please provide the proper one? Thank you very much.
09.01.2024 - 18:24DROPS Design answered:
Thanks for your feedback, Hungarian pattern has been entirely reviewed and edited. Happy knitting!
19.01.2024 - 08:11
![]() Horváth Andrea wrote:
Horváth Andrea wrote:
Üdvözletem! Próbálom magyarul. :-D Az ujjak leírását nem találom a mintában és szerintem a gallér leírása sem passzol a képhez. Ezekben szeretnék segítségek kérni, mert nagyon tetszik a minta és meg szeretném kötni. Előre is Köszönöm! Mosolygós napot kívánok! Andrea
22.11.2023 - 12:41
![]() Horváth Andrea wrote:
Horváth Andrea wrote:
Helllo! Unfortunatelly I din't find the pattern of arms. Please help me, because I want to knit it. Thanks, Andrea
20.11.2023 - 14:06DROPS Design answered:
Dear Andrea, you will find the explanation for sleeves after back piece and before assembly, ie in the UK-pattern, are you reading another language? Feel free to ask your question in your language so that we can help you further. Thanks for your comprehension. Happy knitting!
21.11.2023 - 08:43
![]() Daniela wrote:
Daniela wrote:
Ich verstehe die Maschenaufnahme nicht. Was ist eine Mittmasche und wo nehme ich die weiteren Maschen auf re und li. Nehme ich nach der 2. 5. und 7. auf oder zwischen den Maschen?
23.10.2023 - 08:49DROPS Design answered:
Liebe Daniela, mit "Mittmasche" soll man die mittlere Masche verstehen, die Zunahmen stricken Sie genauso wie beschrieben bis 8. Reihe, dann nehmen Sie so zu: je 1 Masche nach den 2 ersten Markierungen + 1 Masche beidseitig von der mittleren Masche + je 1 Masche vor den 2 letzten Markierungen = 6 Maschen in jeder Hinreihe so zunehmen. Viel Spaß beim stricken!
23.10.2023 - 10:17
![]() Annegret wrote:
Annegret wrote:
Die Vivaldi gibt es ja leider nicht mehr. Welche Wolle kann ich nehmen, um den schönen Mohair-Effekt zu bekommen, den die Mischung aus Delight und Vivaldi hatte? Wenn ich alternativ nur Delight nehme, wie viel benötige ich denn dann und welche Nadelstärke empfehlen Sie?
29.02.2016 - 11:09DROPS Design answered:
Liebe Annegret, als Ersatz für Vivaldi können Sie bei diesem Modell gut die Brushed Alpaca Silk nehmen.
29.02.2016 - 14:55
![]() Margret Schaloske wrote:
Margret Schaloske wrote:
Leider bin ich von der Farbe02 enttäuscht,da darin kein Erika zu sehen ist,also,nicht ins violett gehend,sondern nur Brauntöne von hell bis Pflaume siehe dazu Modell Weste.Möchte die Wolle deshalb als Umtausch kostenfrei zurücksenden! Bitte Rückinfo,und freundl. Gruss Margret schaloske,
10.06.2013 - 11:17
![]() DROPS Design NL wrote:
DROPS Design NL wrote:
Ja, zeker: BOORDSTEEKRAND: Brei een boordsteekrand langs de hele opening van het vest. Dwz, ook langs het achterpand.
26.01.2012 - 11:19
![]() Anita Berendsen wrote:
Anita Berendsen wrote:
De boordsteekrand moet die ook langs de onderkant van het achterpand worden gebreid? Uit de tekening kan ik het niet halen.
26.01.2012 - 10:46
|
|
Dusk#duskcardigan |
|
|
|
|
Knitted DROPS jacket in ”Delight” and “Vivaldi”. Size: S - XXL.
DROPS 133-14 |
|
|
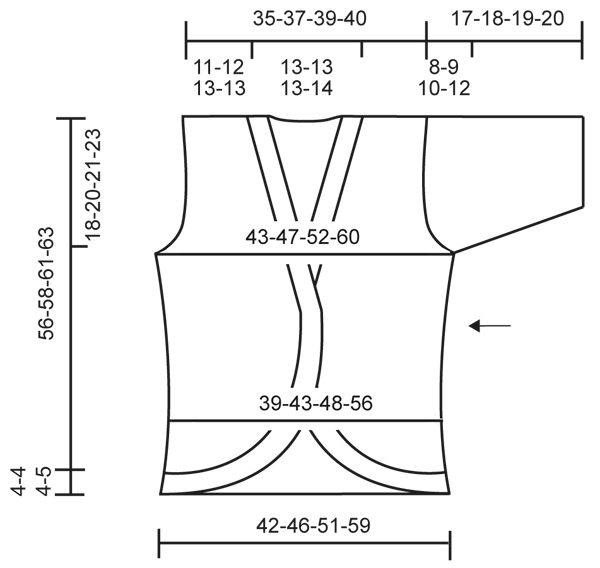
KNITTING TIP: Half circle on front piece: It is very important that the knitting tension is correct both in height and width otherwise the half circle on front piece will not have the right shape. If more rows are worked vertically on 10 cm than what is stated, compensate by working a couple of rows without inc evenly in the circle. DECREASE TIP: Back piece: Dec 1 st in each side as follows: K 2, slip 1 st as if to K, K 1, psso, work until 4 sts remain on needle, K tog the next 2 sts, K 2. INCREASE TIP: Front piece: Inc 1 st by getting the thread between 2 sts from previous row - K this st twisted, i.e. work in back loop of st instead of front to avoid holes. Rib: Inc 1 st by getting the thread between 2 sts from previous row - P this st twisted, i.e. work in back loop of st instead of front to avoid holes. GARTER ST (back and forth on needle): K all rows. BUTTON HOLES: 1 button hole = cast off 2 sts and cast on 2 new sts on next row over these sts. -------------------------------------------------------- LEFT FRONT PIECE: Worked back and forth on circular needle. Work sideways from the side to mid front. Cast on 3 sts on circular needle size 6 mm with 1 thread Delight and 1 thread Vivaldi (= 2 threads). Row 1 and then every other row (= WS): P all sts. Row 2 (= RS): K all sts while at the same time inc 1 st on each side of 2nd st (= the middle st) - See increase tip above = 5 sts (2 new sts). Row 4: K all sts while at the same time inc 1 st after 1st st on row, 1 st on each side of middle st and 1 st before the last st = 9 sts (4 new sts). Row 6: K 2, inc 1 st, K 2, inc 1 st, K 1, inc 1 st, K 2, inc 1 st and K the last 2 sts = 13 sts (4 new sts). Row 8: Insert a marker in the 2nd, 5th, 7th (= middle st), 9th and 12th st. Continue to inc as follows: Inc 1 st after each of the first 2 markers, 1 st on each side of middle st, and 1 st before each of the last 2 markers (6 new sts on 1 row with inc) = 19 sts. REMEMBER THE KNITTING TENSION! Continue to inc 6 sts on every row from RS like this until 34-34-36-38 rows have been worked - See knitting tip above = 97-97-103-109 sts on needle, and piece measures approx. 18-18-19-20 cm from cast on edge measured in st direction. One half circle has been worked. ARMHOLE AND NECKLINE: Continue in stocking st over all sts - At the same time cast off for armhole in the right side and towards bottom edge in the left side (seen from RS) on every other row as follows: SIZE S: For armhole: 3 sts 1 time, 2 sts 1 time and 1 st 2 times. Towards bottom edge: 10 sts 2 times and 46 sts 1 time. SIZE M: For armhole: 3 sts 1 time, 2 sts 2 times and 1 st 2 times. Towards bottom edge: 7 sts 1 time, 6 sts 1 time, 5 sts 1 time, 4 sts 1 time and 41 sts 1 time. SIZE L: For armhole: 3 sts 1 time, 2 sts 3 times and 1 st 2 times. Towards bottom edge: 7 sts 1 time, 6 sts 1 time, 4 sts 2 times, 3 sts 1 time and 42 sts 1 time. SIZE XL/XXL: For armhole: 3 sts 2 times, 2 sts 3 times and 1 st 4 times. Towards bottom edge: 10 sts 1 time, 8 sts 1 time, 6 sts 1 time, 4 sts 1 time, 3 sts 2 times, 2 sts 2 times and 33 sts 1 time. All sizes: After all cast offs are done there are 24-25-26-22 sts on needle. Continue to dec towards the neckline on every 4th row as follows: 1 st 7-7-7-3 times = 17-18-19-19 sts remain on shoulder. When height of armhole measures 18-20-21-23 cm, cast off the remaining sts. RIGHT FRONT PIECE: Work as left front piece but with cast offs in the opposite side. BACK PIECE: Worked back and forth on circular needle. Cast on 65-71-78-90 sts (incl 1 edge st in each side) on circular needle size 6 mm with 1 thread Delight and 1 thread Vivaldi and work in stocking st. When piece measures 8 cm, dec 1 st in each side - Read decrease tip above. Repeat dec when piece measures 16 cm = 61-67-74-86 sts. When piece measures 20-21-22-23 cm, inc 1 st in each side. Repeat inc every 6 cm a total of 3 times = 67-73-80-92 sts. When piece measures 38-38-40-40 cm, cast off for armholes at beg of every row in each side as follows: 3 sts 1-1-1-2 times, 2 sts 1-2-3-3 times and 1 st 2-2-2-4 times = 53-55-58-60 sts. When piece measures 54-56-59-61 cm, cast off the middle 17-17-18-20 sts for neck and finish each shoulder separately. Continue to dec 1 st on next row towards the neck = 17-18-19-19 sts remain on each shoulder. When piece measures 56-58-61-63 cm, cast off all sts. SLEEVE: Worked back and forth on circular needle. Cast on 44-50-56-62 sts (incl 1 edge st in each side) on circular needle size 5 mm with 1 thread Delight and 1 thread Vivaldi. On 1st row (= RS) work rib as follows: 1 edge st in garter st, * K 3, P 3 *, repeat from *-* and finish with 1 edge st in garter st. Work rib for 4-4-4-4 cm, then change to needle size 6 mm and work 2 rows in stocking st. On next row from RS, inc 1 st inside 1 edge st in each side of piece. Repeat inc on every other row a total of 3-3-2-3 times = 50-56-60-68 sts. When piece measures 9-9-9-8 cm (shorter measurements in the largest size because of broader shoulder width), cast off for sleeve cap in each side on every other row as follows: 3 sts 1 time, 2 sts 2 times and then 1 st until piece measures 14-15-16-17 cm. Then cast off in each side on every other row 2 sts 2 times and 3 sts 1 time. Cast off the remaining sts, piece measures approx. 17-18-19-20 cm. ASSEMBLY: Sew the shoulder seams. Sew in sleeves. Sew sleeve and side seams in one inside 1 edge st. RIB: Work rib around the entire opening on jacket. Knit up from RS approx. 396 to 420 sts on circular needle size 5 mm with 1 thread Delight and 1 thread Vivaldi as follows: Knit up along right front piece, back of neck, down along left front piece and along bottom edge (approx. 20 sts on 10 cm - total no of sts can be divided by 6). NOTE: Make sure to knit up enough sts along the rounded edge in each side at the front so that the rib is not too tight. Then K 1 round. On next round, work rib as follows: * K 3, P 3 *, repeat from *-*. When rib measures approx. 2-2-2-3 cm, cast off for 2 button holes evenly on left front band (at top of circle). When rib measures 3-3-3-4 cm, inc as follows: * K 3, P 3, inc 1 st * - Read increase tip above, repeat from *-*. When rib (K 3/P 4) measures 4-4-4-5 cm, loosely cast off with K over K and P over P. Sew the buttons on to the right front band. |
|
 |
|
Have you finished this pattern?Tag your pictures with #dropspattern #duskcardigan or submit them to the #dropsfan gallery. Do you need help with this pattern?You'll find 15 tutorial videos, a Comments/Questions area and more by visiting the pattern on garnstudio.com. © 1982-2026 DROPS Design A/S. We reserve all rights. This document, including all its sub-sections, has copyrights. Read more about what you can do with our patterns at the bottom of each pattern on our site. |


With over 40 years in knitting and crochet design, DROPS Design offers one of the most extensive collections of free patterns on the internet - translated to 17 languages. As of today we count 324 catalogues and 12290 patterns translated into English (UK/cm). 12290
We work hard to bring you the best knitting and crochet have to offer, inspiration and advice as well as great quality yarns at incredible prices! Would you like to use our patterns for other than personal use? You can read what you are allowed to do in the Copyright text at the bottom of all our patterns. Happy crafting!
Post a comment to pattern DROPS 133-14
We would love to hear what you have to say about this pattern!
If you want to leave a question, please make sure you select the correct category in the form below, to speed up the answering process. Required fields are marked *.