
Popular categories
Looking for a yarn?


Comments / Questions (163)
![]() Yoanna Fridell wrote:
Yoanna Fridell wrote:
Hej jag förstår inte hur jag ska räkna ut vilken stl jag ska välja?? Strecket som går över bysten menar att jag ska ha stl L vilket är absurt?! Jag är stl 34-36 i vanliga fall. Eller är det under bysten jag ska gå efter när jag mäter?
11.01.2015 - 17:20DROPS Design answered:
Hej Yoanna. Du skal maale lige hen over brystet. I str L er omkredsen paa denne model er 94 cm. Den maa gerne sidde lidt stramt over brystet som det ses paa billedet. Kontroleer ogsaa laengden total, skulderbredde og aermelaengde. God fornöjelse
12.01.2015 - 16:23
![]() Patricia Matthews wrote:
Patricia Matthews wrote:
Thank you so much for your prompt reply. How do you exactly block it with pins?
07.10.2014 - 18:44DROPS Design answered:
Dear Mrs Matthews, gently lay the piece to your blocking goals, and use rust-proof pins to hold the knitted piece - use as many as necessary taking care that edge are straight. Remember your DROPS store will give you more tips & advices. Happy knitting!
08.10.2014 - 09:53
![]() Patricia Matthews wrote:
Patricia Matthews wrote:
Have knitted this -absolutely love it but I have the same problem with it rolling up. I lay it on damp towel after washing and lay a damp towel on top ensuring the garter stitch edge is laying correctly. Initially after drying the problem has disappeared but it soon reappears. Please help.
04.10.2014 - 10:46DROPS Design answered:
Dear Mr Matthews, avoid drying on a surface that absorbs moisture - you can block it with pins to keep it in place until it is dried. Do not hesitate to contact your DROPS store for any tips & advice. Happy knitting!
04.10.2014 - 17:59
![]() Thera Van Dijk wrote:
Thera Van Dijk wrote:
Een in ribbelsteek gebreide rand gaat altijd krullen als je het niet perst of stoomt. tegenwoordig vervang ik zo'n rand door een in gerstekorrel gebreide rand. Mijn ervaring is dat die minder krult.
14.03.2014 - 20:19Lukacs Tünde wrote:
The garter st of the back piece keeps rolling upward. The same thing happened to the pattern 123-39, although I used a different thread (thicker). Can you tell me why? Thank you! Tünde
31.07.2013 - 12:55DROPS Design answered:
Dear Tünde, you can block it flat with pins if necessary to avoid rolling. Happy knitting!
31.07.2013 - 14:36
![]() Regina Lörtscher wrote:
Regina Lörtscher wrote:
Hej Det gäller mönster 131-8. Jag fundera om det blir ett fel på slutet från stickning. På framkanten se man på bilden det är man har stickat runt 4 eller 5 varf. men i mönster skriva ni inget. Jag menar från framme upp till kråge och ner till andra sidan framkanten. Eller? hälsningen Regina
04.04.2013 - 15:24DROPS Design answered:
Nej, det är bara att föja beskrivningen. Lycka till!
05.04.2013 - 11:42
![]() Anni Mård wrote:
Anni Mård wrote:
Ohjeessa sanotaan:jatka neulomalla sileää neuletta,lukuun ottamatta 1 ainaoikeinneulottu REUNAS kummassakin reunassa. Mitä tarkoitetaan tuolla sanalla reunas?onko se vain yksi silmukka?
14.01.2013 - 08:50DROPS Design answered:
Reunas, eli reunasilmukka tarvitaan sauman ompelemiseen (esim. sivusaumat, hihasaumat). Tällä silmukalla voit neuloa esim. ainaoikeaa tai sileää neuletta.
14.01.2013 - 16:32
![]() W. Vos - Van Zanten wrote:
W. Vos - Van Zanten wrote:
Goedemiddag, Ik ben deze vest aan het breien, de achterpand is af. Nu ben ik bezig de voorpand aan het breien. Nu vraag ik me af of de teltekenig alleen is voor de heengaande naald of ook voor de teruggaande naald? Als ik namelijk voor heen en terug brei is het namelijk erg kort. Klopt dit? Met vriendelijke groeten, W. Vos-van Zanten Ps. Ik vindt deze vest erg mooi. Bedankt!!!
10.01.2013 - 13:30DROPS Design answered:
Zowel de heen- als de teruggaande nld worden weergegeven op de teltekening. Eerste rij is de heengaande nld, lees van rechts naar links. Tweede rij is de terugg nld, lees van links naar rechts en zo voort.
10.01.2013 - 21:46
![]() Rita wrote:
Rita wrote:
Hallo Corneel ik heb dit vest ook gemaakt,ziet er mooier uit op foto dan eenmaal gebreid. Als je het aandoet is het precies of je gaat vliegen,die krul gaat er niet uit.
24.10.2012 - 18:35
![]() Corneel wrote:
Corneel wrote:
Ik heb dit vest net klaar en in elkaar gezet. De zijnaad onderaan krult alleen erg en is geen mooi gezicht. Wat kan ik daar aan doen? Persen wil ik niet, dan gaat de fut uit het breiwerk
24.10.2012 - 17:35DROPS Design answered:
Hoi Corneel (en Rita). Je kan dit breiwerk wel stomen / persen. Leg een nat thee- of handdoek tussen het breiwerk en strijkijzer en pers/stoom de rand plat. Het werkt - wij hebben hetzelfde gedaan als met de model op de foto. Veel plezier mee.
25.10.2012 - 09:55
|
|||||||||||||
Medieval#medievaljacket |
|||||||||||||
 |
 |
||||||||||||
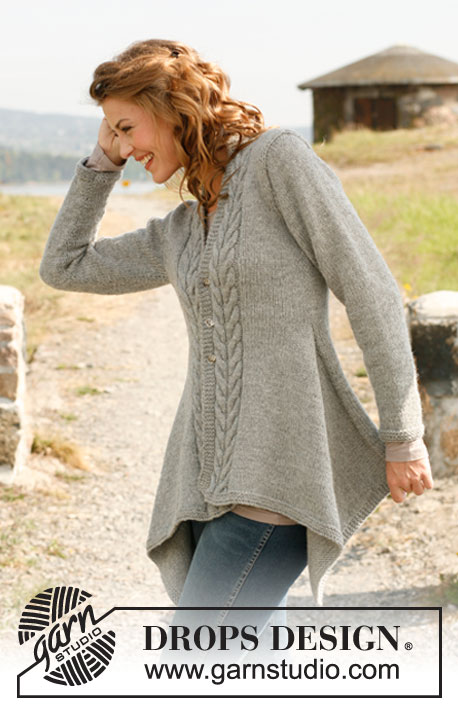
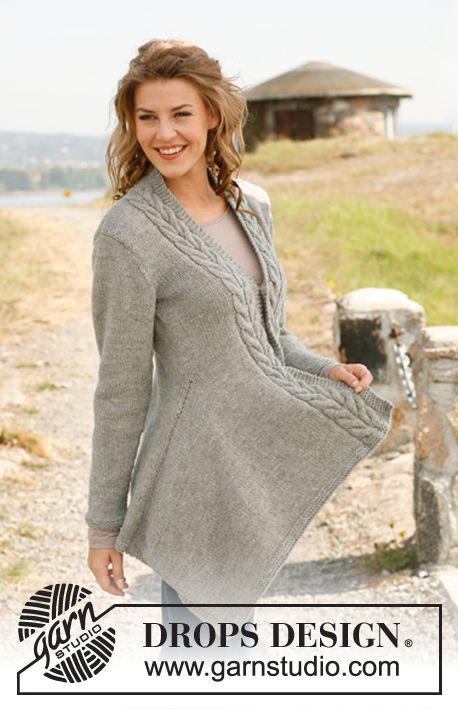
Knitted DROPS asymmetric jacket with cables in "Nepal". Size: S - XXXL.
DROPS 131-8 |
|||||||||||||
|
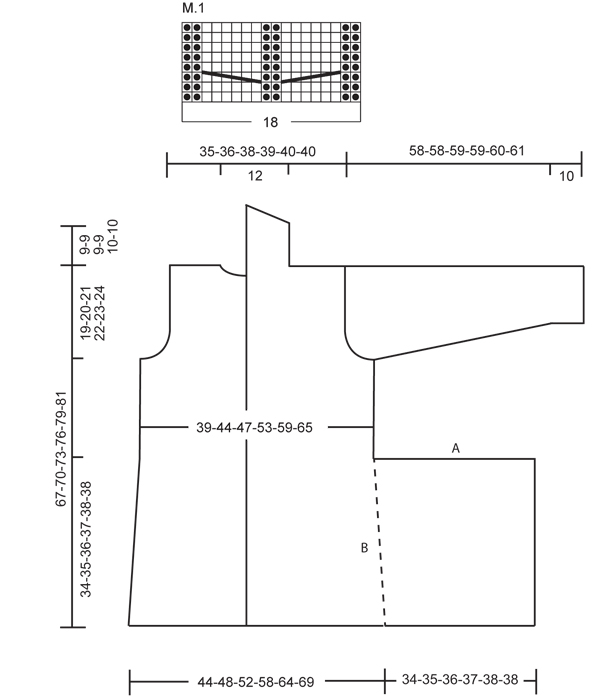
GARTER ST (back and forth on needle): K all rows. DECREASE TIP (applies to back piece): All dec are done from RS. Dec 1 st in each side as follows: Work 2 sts, slip 1 st as if to K, K 1, psso. Work until 4 sts remain on needle, K the next 2 sts tog, work the last 2 sts. PATTERN: See diagram M.1 (the diagram shows the pattern from RS) BUTTON HOLES: Cast off for 3 button holes on right front band. 1 BUTTON HOLE = cast off 4th st from edge and cast on 1 new st on next row over this st. Cast off for button holes when piece measures approx.: SIZE S: 26, 33, 40 cm SIZE M: 27, 34, 41 cm SIZE L: 29, 36, 43 cm SIZE XL: 30, 37, 44 cm SIZE XXL: 32, 39, 46 cm SIZE XXXL: 33, 40, 47 cm -------------------------------------------------------- BACK PIECE: Worked back and forth on circular needle. Cast on 76-84-90-100-110-120 sts (incl 1 edge st in garter st in each side) on circular needle size 5 mm with Nepal. Work 6 rows in garter st - See explanation above. Then work in stocking st with 1 edge st in garter st in each side (1st row = RS). When piece measures 10 cm, dec 1 st in each side - Read decrease tip above. Repeat dec every 6-7-7-8-8-8 cm a total of 4 times = 68-76-82-92-102-112 sts. REMEMBER THE KNITTING TENSION! Insert a marker in edge st in each side when piece measures 34-35-36-37-38-38 cm (= markers for assembly). When piece measures 48-50-52-54-56-57 cm, cast off for armholes in each side on every other row as follows: 3 sts 1 time, 2 sts 0-1-2-3-5-7 times and 1 st 1-2-2-4-4-5 times = 60-62-64-66-68-68 sts. When piece measures 65-68-71-74-77-79 cm, cast off the middle 18 sts for neck and finish each shoulder separately. Dec 1 st on next row from neck = 20-21-22-23-24-24 sts remain on each shoulder. Cast off when piece measures 67-70-73-76-79-81 cm. LEFT FRONT PIECE: Worked back and forth on circular needle. Cast on 104-110-116-122-128-134 sts on circular needle size 5 mm. Work 6 rows in garter st, work next row (= RS) as follows: 4 sts in garter st (= bottom edge), work in stocking st until 22 sts remain on needle, work diagram M.1 (= 18 sts), and finish with 4 sts in garter st (= band sts mid front). Work like this until piece measures 34-35-36-37-38-38 cm, then cast off the first 57-59-62-63-64-65 sts from RS = 47-51-54-59-64-69 sts. Continue with diagram M.1 and band sts mid front as before. When piece measures 48-50-52-54-56-57 cm, cast off for armhole in the side as on back piece = 43-44-45-46-47-47 sts. When piece measures 67-70-73-76-79-81 cm, cast off the first 20-21-22-23-24-24 sts from RS for shoulder in all sizes = 23 sts remain for collar in all sizes. Work next row from RS as follows: 1 edge st in garter st, diagram M.1 and finish with 4 sts in garter st. Work like this until collar measures 9 cm measured from the shoulder. Now cast off the first 7 sts at beg of the next 2 rows from RS, then loosely cast off the remaining 9 sts. RIGHT FRONT PIECE: Work as on left front piece but reversed and with button holes on band - Read explanation above. SLEEVE: Worked back and forth on circular needle. Cast on 36-38-38-40-42-44 sts (incl 1 edge st in each side) on circular needle size 5 mm. Work 6 rows in garter st (1st row = RS), then work in stocking st until finished measurements. When piece measures 10 cm, inc 1 st in each side. Repeat inc every 5½-4½-4-3½-3-3 cm a total of 7-8-9-10-11-11 times = 50-54-56-60-64-66 sts. When piece measures 47 cm in all sizes, cast off for sleeve cap in each side on every other row as follows: 3 sts 1 time, 2 sts 1-2-2-2-2-2 times, 1 st 2-1-2-3-4-5 times. When piece measures 53-53-54-54-55-56 cm, cast off in each side on every other row as follows: 1 st 2 times, 2 sts 2 times and 3 sts 1 time = 18-20-20-22-24-24 sts. Loosely cast off all sts. Now piece measures approx. 58-58-59-59-60-61 cm. Knit another sleeve. ASSEMBLY: Sew the shoulder seams. Sew collar tog mid back and sew on to back of neck inside 1 edge st. Sew in sleeves. Sew the side seams inside 1 edge st as follows: Sew A (= cast off edge on front piece) against B (= side of back piece) - see chart. NOTE! Adjust so that cast off edge on each front piece is sewn up to marker on back piece, then continue side seam as before inside 1 edge st and sew sleeve seams in one. Sew the buttons on to the left front band. |
|||||||||||||
Diagram explanations |
|||||||||||||
|
|||||||||||||
 |
|||||||||||||
Have you finished this pattern?Tag your pictures with #dropspattern #medievaljacket or submit them to the #dropsfan gallery. Do you need help with this pattern?You'll find 14 tutorial videos, a Comments/Questions area and more by visiting the pattern on garnstudio.com. © 1982-2026 DROPS Design A/S. We reserve all rights. This document, including all its sub-sections, has copyrights. Read more about what you can do with our patterns at the bottom of each pattern on our site. |
|||||||||||||


With over 40 years in knitting and crochet design, DROPS Design offers one of the most extensive collections of free patterns on the internet - translated to 17 languages. As of today we count 324 catalogues and 12290 patterns translated into English (UK/cm). 12290
We work hard to bring you the best knitting and crochet have to offer, inspiration and advice as well as great quality yarns at incredible prices! Would you like to use our patterns for other than personal use? You can read what you are allowed to do in the Copyright text at the bottom of all our patterns. Happy crafting!
Post a comment to pattern DROPS 131-8
We would love to hear what you have to say about this pattern!
If you want to leave a question, please make sure you select the correct category in the form below, to speed up the answering process. Required fields are marked *.