
Popular categories
Looking for a yarn?


Comments / Questions (163)
![]() Anja wrote:
Anja wrote:
Liebes Drops Team, ich hätte um ein Haar Geld für eure Anleitung bezahlt, da diese auf etsy angeboten wird - ohne Urheberrechtsverweis, sogar euer Bild wurde verwendet. Ich finde das wirklich dreist. Die Verkäuferin nennt sich carolrosa und der Artikel wird "Knitting Pattern Asymetrical Jacket - Ladies Longline Cardigan Sweater" genannt.
30.12.2025 - 19:34DROPS Design answered:
Liebe Anja, herzlichen Dank für den Hinweis! Wir gehen dem nach. Ihnen weiterhin viel Spaß mit unseren kostenlosen Anleitungen!
24.02.2026 - 18:03
![]() Hanna Matter wrote:
Hanna Matter wrote:
Ich arbeite am Modell 131-8. Wie genau muss ich den Kragen zusammennähen ? Wo gehört der hin? Danke!
08.01.2024 - 22:59DROPS Design answered:
Liebe Frau Matter, in diesem Video zeigen wir, wie man so einen einfachen Schalkragen strickt, hier stricken Sie Zopf wie zuvor. Am Ende nähen Sie die abgeketteten Maschen vom beiden Schalkragen zusammen, und dann den Kragen am Halsausschnitt. Viel Spaß beim fertigstellen!
09.01.2024 - 07:56
![]() Catarina Samuelsson wrote:
Catarina Samuelsson wrote:
Hej, Jag skall börja avmaskning för ärmhålet på bakstycket. Vid tidigare avmaskning så uppmanar ni att man skall läsa Minskningstips som gäller bakstycket men där står inte hur man skall göra när man maskar av t.ex 3 maskor i varje sida. Jag förstår inte hur jag skall göra.
07.11.2023 - 19:06DROPS Design answered:
Hei Catarina. Når du skal felle av til ermhull, feller du av som vanlig. Første gang feller du av 3 masker. Se hjelpevideoen: Luk af - retsiden, om du er usikker på hvordan det felles. Neste gang fra retten feller du av 2 masker (husk å se antaller ganger i den størrelsen du strikker etter, 0-1-2-3-5-7 ganger), og deretter felles det av 1 maske ( 1-2-2-4-4-5 ganger). mvh DROPS Design
13.11.2023 - 10:25
![]() Trish wrote:
Trish wrote:
I have just started the cabling and don't understand the pattern chart. The image of the jacket appears to show a continuous cable, but the pattern chart shows only one row of cabling (row 3) followed by 5 rows of normal stocking stitch. Should the cable pattern be repeated every RS row?
05.11.2023 - 11:45DROPS Design answered:
Dear Trish, when working a cable you work several straight (normal stocking stitch) rows and one row where you actually cable. The row with cable will create the necessary shape for the rest of the rows; you don't need to cable stitches every other row for this pattern. Happy knitting!
05.11.2023 - 19:49
![]() Tami Williams wrote:
Tami Williams wrote:
After seeing another person share someone selling this design on eBay from the UK, I also see another Drops pattern from the same seller. I wonder just how many copyrighted designs they have in their store. Same for the Etsy seller... just saying.
12.03.2023 - 22:08
![]() Tami Williams wrote:
Tami Williams wrote:
I have been trying to let you know that this design is listed for sale. But I cannot seem to make that happen. If you would like more information, please email me.
12.03.2023 - 22:03
![]() DIANE WREN wrote:
DIANE WREN wrote:
Just wanted you to know that someone is selling this on Ebay and is charging for photocopies of your pattern. They call it LC005 KNITTING PATTERN LADIES SWING JACKET WITH SHAPED HEM IN ARAN SIZES 28 - 62 They even used your original photos. I do not appear to be able to send links in this box to the actual item but here is the Ebay number 264294164130
24.09.2022 - 00:31
![]() Lesley wrote:
Lesley wrote:
Can you tell me the size in cm of the pattern S-M-L-XL-XXL-XXXL please. Currently, I do not know which size to knit. Thank you
02.02.2022 - 20:50DROPS Design answered:
Hi Lesley, You will find a measurements chart for all the sizes at the bottom of the pattern. Happy knitting!
03.02.2022 - 07:22
![]() Christina Nilsson wrote:
Christina Nilsson wrote:
Hej! Var inne på ”Etsy..com” och hittade där denna beskrivning, samma foto dessutom, men man sålde det för 16.11 kronor. Tyckte detta var märkligt så jag beslöt mig för att signalera det till er.
19.01.2022 - 00:03DROPS Design answered:
Hej Christina. Tack för info, det ska vi undersöka! Alla våra mönster är gratis och får inte tas betalt för. Mvh DROPS Design
21.01.2022 - 10:54
![]() Patti Warcup wrote:
Patti Warcup wrote:
Hi. I have just finished this beautiful pattern but the arms don’t fit onto the main piece of the garment. I have been over and over the pattern and cannot see where I have gone wrong. The arm shoulder seam would be out by about 2” too narrow on both sides. Help!
25.03.2021 - 15:42DROPS Design answered:
Dear Mrs Warcup, pin the sleeve along the armhole so that the cast off stitches on sleeve match the cast off stitches on body, the whole top of sleeve should now match the armhole. Hope this will help.
25.03.2021 - 16:22
|
|||||||||||||
Medieval#medievaljacket |
|||||||||||||
 |
 |
||||||||||||
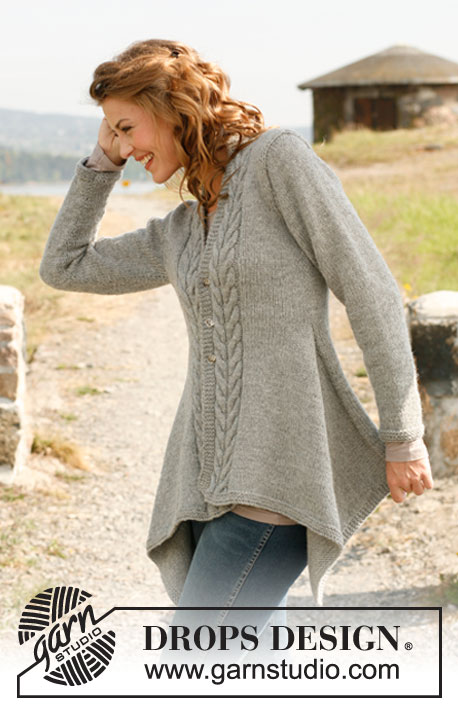
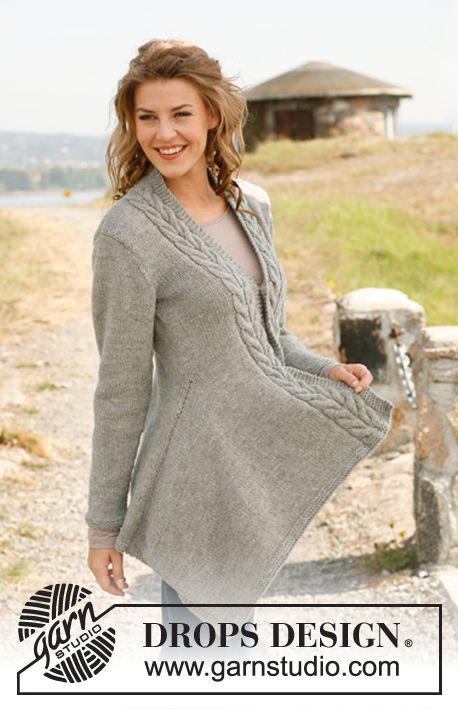
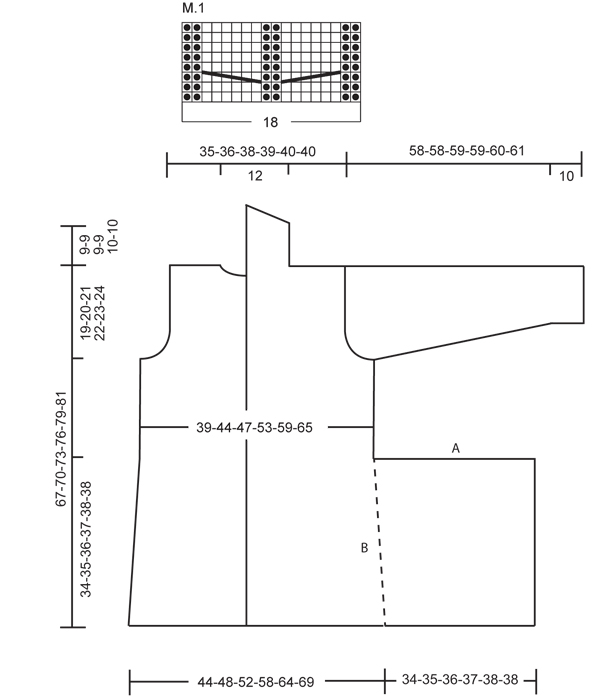
Knitted DROPS asymmetric jacket with cables in "Nepal". Size: S - XXXL.
DROPS 131-8 |
|||||||||||||
|
GARTER ST (back and forth on needle): K all rows. DECREASE TIP (applies to back piece): All dec are done from RS. Dec 1 st in each side as follows: Work 2 sts, slip 1 st as if to K, K 1, psso. Work until 4 sts remain on needle, K the next 2 sts tog, work the last 2 sts. PATTERN: See diagram M.1 (the diagram shows the pattern from RS) BUTTON HOLES: Cast off for 3 button holes on right front band. 1 BUTTON HOLE = cast off 4th st from edge and cast on 1 new st on next row over this st. Cast off for button holes when piece measures approx.: SIZE S: 26, 33, 40 cm SIZE M: 27, 34, 41 cm SIZE L: 29, 36, 43 cm SIZE XL: 30, 37, 44 cm SIZE XXL: 32, 39, 46 cm SIZE XXXL: 33, 40, 47 cm -------------------------------------------------------- BACK PIECE: Worked back and forth on circular needle. Cast on 76-84-90-100-110-120 sts (incl 1 edge st in garter st in each side) on circular needle size 5 mm with Nepal. Work 6 rows in garter st - See explanation above. Then work in stocking st with 1 edge st in garter st in each side (1st row = RS). When piece measures 10 cm, dec 1 st in each side - Read decrease tip above. Repeat dec every 6-7-7-8-8-8 cm a total of 4 times = 68-76-82-92-102-112 sts. REMEMBER THE KNITTING TENSION! Insert a marker in edge st in each side when piece measures 34-35-36-37-38-38 cm (= markers for assembly). When piece measures 48-50-52-54-56-57 cm, cast off for armholes in each side on every other row as follows: 3 sts 1 time, 2 sts 0-1-2-3-5-7 times and 1 st 1-2-2-4-4-5 times = 60-62-64-66-68-68 sts. When piece measures 65-68-71-74-77-79 cm, cast off the middle 18 sts for neck and finish each shoulder separately. Dec 1 st on next row from neck = 20-21-22-23-24-24 sts remain on each shoulder. Cast off when piece measures 67-70-73-76-79-81 cm. LEFT FRONT PIECE: Worked back and forth on circular needle. Cast on 104-110-116-122-128-134 sts on circular needle size 5 mm. Work 6 rows in garter st, work next row (= RS) as follows: 4 sts in garter st (= bottom edge), work in stocking st until 22 sts remain on needle, work diagram M.1 (= 18 sts), and finish with 4 sts in garter st (= band sts mid front). Work like this until piece measures 34-35-36-37-38-38 cm, then cast off the first 57-59-62-63-64-65 sts from RS = 47-51-54-59-64-69 sts. Continue with diagram M.1 and band sts mid front as before. When piece measures 48-50-52-54-56-57 cm, cast off for armhole in the side as on back piece = 43-44-45-46-47-47 sts. When piece measures 67-70-73-76-79-81 cm, cast off the first 20-21-22-23-24-24 sts from RS for shoulder in all sizes = 23 sts remain for collar in all sizes. Work next row from RS as follows: 1 edge st in garter st, diagram M.1 and finish with 4 sts in garter st. Work like this until collar measures 9 cm measured from the shoulder. Now cast off the first 7 sts at beg of the next 2 rows from RS, then loosely cast off the remaining 9 sts. RIGHT FRONT PIECE: Work as on left front piece but reversed and with button holes on band - Read explanation above. SLEEVE: Worked back and forth on circular needle. Cast on 36-38-38-40-42-44 sts (incl 1 edge st in each side) on circular needle size 5 mm. Work 6 rows in garter st (1st row = RS), then work in stocking st until finished measurements. When piece measures 10 cm, inc 1 st in each side. Repeat inc every 5½-4½-4-3½-3-3 cm a total of 7-8-9-10-11-11 times = 50-54-56-60-64-66 sts. When piece measures 47 cm in all sizes, cast off for sleeve cap in each side on every other row as follows: 3 sts 1 time, 2 sts 1-2-2-2-2-2 times, 1 st 2-1-2-3-4-5 times. When piece measures 53-53-54-54-55-56 cm, cast off in each side on every other row as follows: 1 st 2 times, 2 sts 2 times and 3 sts 1 time = 18-20-20-22-24-24 sts. Loosely cast off all sts. Now piece measures approx. 58-58-59-59-60-61 cm. Knit another sleeve. ASSEMBLY: Sew the shoulder seams. Sew collar tog mid back and sew on to back of neck inside 1 edge st. Sew in sleeves. Sew the side seams inside 1 edge st as follows: Sew A (= cast off edge on front piece) against B (= side of back piece) - see chart. NOTE! Adjust so that cast off edge on each front piece is sewn up to marker on back piece, then continue side seam as before inside 1 edge st and sew sleeve seams in one. Sew the buttons on to the left front band. |
|||||||||||||
Diagram explanations |
|||||||||||||
|
|||||||||||||
 |
|||||||||||||
Have you finished this pattern?Tag your pictures with #dropspattern #medievaljacket or submit them to the #dropsfan gallery. Do you need help with this pattern?You'll find 14 tutorial videos, a Comments/Questions area and more by visiting the pattern on garnstudio.com. © 1982-2026 DROPS Design A/S. We reserve all rights. This document, including all its sub-sections, has copyrights. Read more about what you can do with our patterns at the bottom of each pattern on our site. |
|||||||||||||


With over 40 years in knitting and crochet design, DROPS Design offers one of the most extensive collections of free patterns on the internet - translated to 17 languages. As of today we count 324 catalogues and 12290 patterns translated into English (UK/cm). 12290
We work hard to bring you the best knitting and crochet have to offer, inspiration and advice as well as great quality yarns at incredible prices! Would you like to use our patterns for other than personal use? You can read what you are allowed to do in the Copyright text at the bottom of all our patterns. Happy crafting!
Post a comment to pattern DROPS 131-8
We would love to hear what you have to say about this pattern!
If you want to leave a question, please make sure you select the correct category in the form below, to speed up the answering process. Required fields are marked *.