
Popular categories
Looking for a yarn?


Comments / Questions (71)
![]() Jenny wrote:
Jenny wrote:
Hej
25.04.2026 - 16:48
![]() Manon wrote:
Manon wrote:
Si je veux tricoter avec un seul fils au lieu de 2, quelle taille dois-je choisir?
17.03.2026 - 08:16DROPS Design answered:
Bonjour Manon, choisissez plutôt un fil plus épais comme une laine du groupe de fils C et calculez ici la nouvelle quantité; ou bien consultez les modèles correspondant à la tension choisie ici. Bon tricot!
17.03.2026 - 15:34
![]() Magda wrote:
Magda wrote:
Bestaat het patroon met gewone breinaalden dus geen rondbreinaald?
11.03.2026 - 17:08DROPS Design answered:
Dag Magda,
Om een patroon aan te passen om op rechte naalden te breien hebben we een instructie gemaakt. Deze vind je hier.
11.03.2026 - 19:33
![]() Astrid wrote:
Astrid wrote:
Bonjour, quelles sont les couleurs de fils choisies sur la photo du modèle ? Merci.
11.03.2026 - 13:46DROPS Design answered:
Bonjour Astrid, c'est la version Alpaca + Kid-Silk qui est présentée en photo - retrouvez les références des couleurs et les quantités correspondantes sous l'onglet "Explications" en haut de page. Bon tricot!
11.03.2026 - 16:03
![]() Helisi wrote:
Helisi wrote:
As many others noted there seems to be a mistake in the pattern about the front- and backrows of the shoulder when it comes to the german short rows. I don‘t really get why you don‘t acknowledge this and correct it.
08.03.2026 - 10:42DROPS Design answered:
Dear Helisi, in this video we show how to work the short rows for this pattern, could this help? Happy knitting!
09.03.2026 - 09:28
![]() Dorthe wrote:
Dorthe wrote:
Hvordan minskes maskeantallet til skuldrene ?
06.03.2026 - 20:32DROPS Design answered:
Hei Dorthe. I oppskriften under Høyre skulder og Venstre skulder er det forklart hvor ofte det skal felles masker fra halsen, slik at det blir mindre masker til skuldrene. mvh DROPS Design
23.03.2026 - 13:43
![]() Gwen wrote:
Gwen wrote:
Bonjour Pouvez vous me dire combien de pelotes dois je commander pour une taille M avec la laine Drops Alpaga et kid Silk
04.03.2026 - 18:30DROPS Design answered:
Bonjour Gwen, retrouvez les quantités ainsi que les tailles, l'échantillon et autres infos sous l'onglet "Explications" en haut de page, autrement dit, en taille M, il vous faudra 200 g Alpaca/50 g la pelote = 4 pelotes + 100 g Kid-Silk/25 g la pelote = 4 pelotes. Bon tricot!
05.03.2026 - 10:41
![]() Aline G wrote:
Aline G wrote:
Bonjour, je suis en train de tricoter ce modele mais j\'ai un soucis avec les biais des epaules, celui de l\'epaule droite semble bien orienté mais celui de la gauche semble inversé du coup le tricot n\'est pas du tout symétrique au niveau de l\'encolure...help !! je peux envoyer une photo si besoin!
23.02.2026 - 15:27DROPS Design answered:
Bonjour Aline, notez que le 1er rang de l'épaule gauche se tricote sur l'envers, les rangs raccourcis vont donc se commencer sur l'envers (au lieu de sur l'endroit pour l'épaule droite). Retrouvez comment tricoter les épaules puis le dos dans cette vidéo. Bon tricot!
24.02.2026 - 09:34
![]() Chantal LEONE wrote:
Chantal LEONE wrote:
Quelle couleur de fil silk assortie alpaga noisette ? Merci
27.01.2026 - 10:22DROPS Design answered:
Bonjour Mme Leone, il existe plusieurs variantes en fonction du résultat souhaité; votre magasin saura vous conseiller, même par mail ou téléphone, l'alternative la plus proche de ce que vous souhaitez. Bon tricot!
28.01.2026 - 08:25
![]() Inger Eide wrote:
Inger Eide wrote:
For 40 år siden strikket jeg en vest med blafmønster. Har mistet oppskriften. Kan noen hjelpe meg med å finne den igjen? Har foto, men vet ikke hvor jeg kan laste det opp.
24.01.2026 - 13:02DROPS Design answered:
Hei Inger. Mener du bladmønster? Vi har ingen steder å laste opp et bilde, men du kan bruke vår søkemotor. Klikk på Gratis Oppskrifter og velg hvilket plagg det er (genser, jakke Dame, herre osv). Klikk deretter på de ulike valgene på venstre side. Scroll nedover og velg STRIKKE. Deretter kan du velg under Filter og da kanskje spesielt under Struktur og bladmønster. Eller se igjennom de første katalogene vi har på nett, ettersom vi har holdt på i litt over 40 år. mvh DROPS Design
26.01.2026 - 13:09
|
|
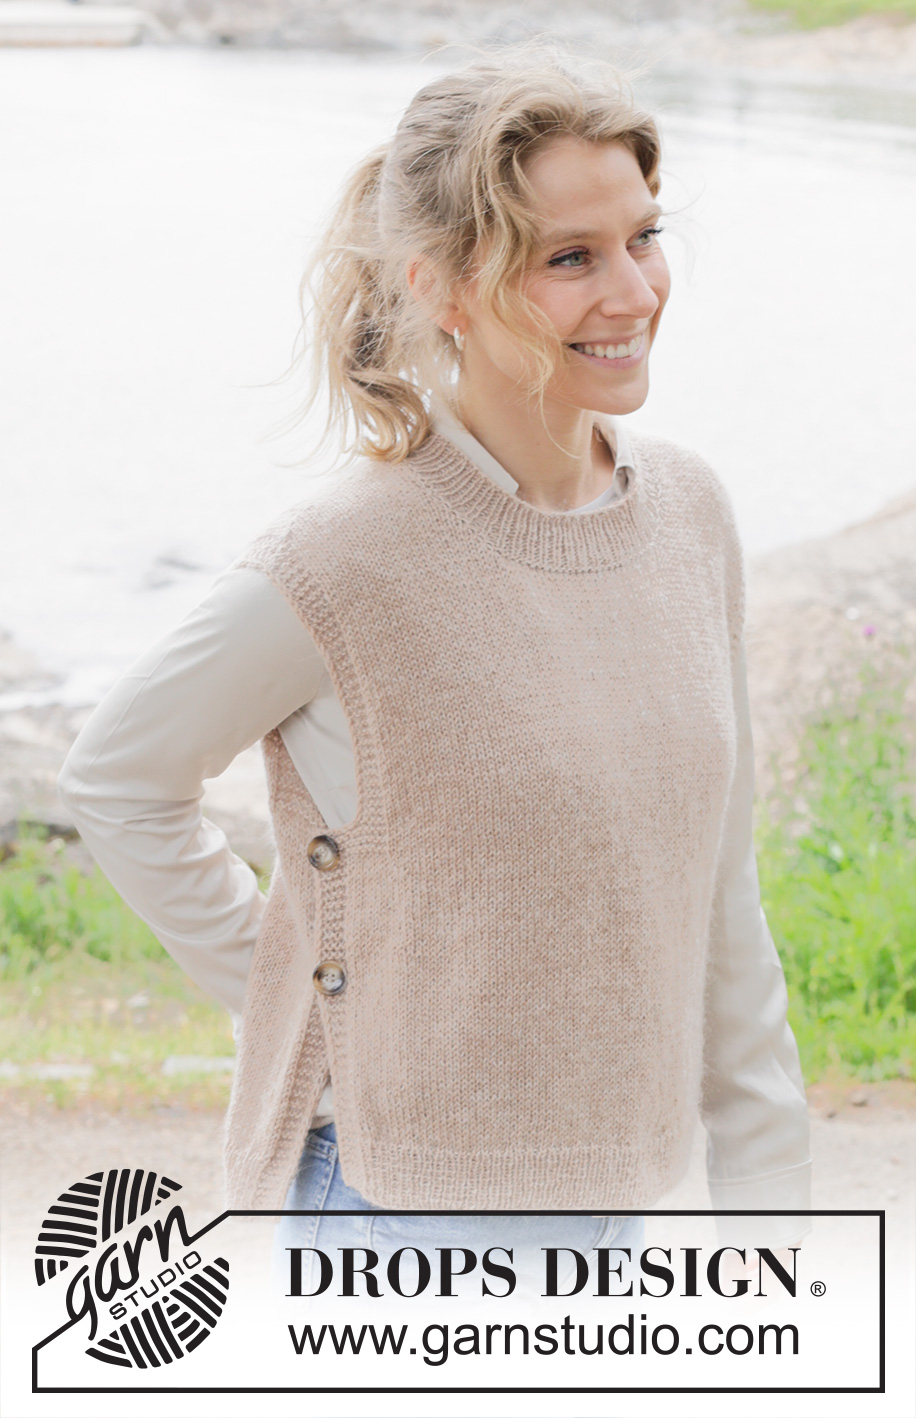
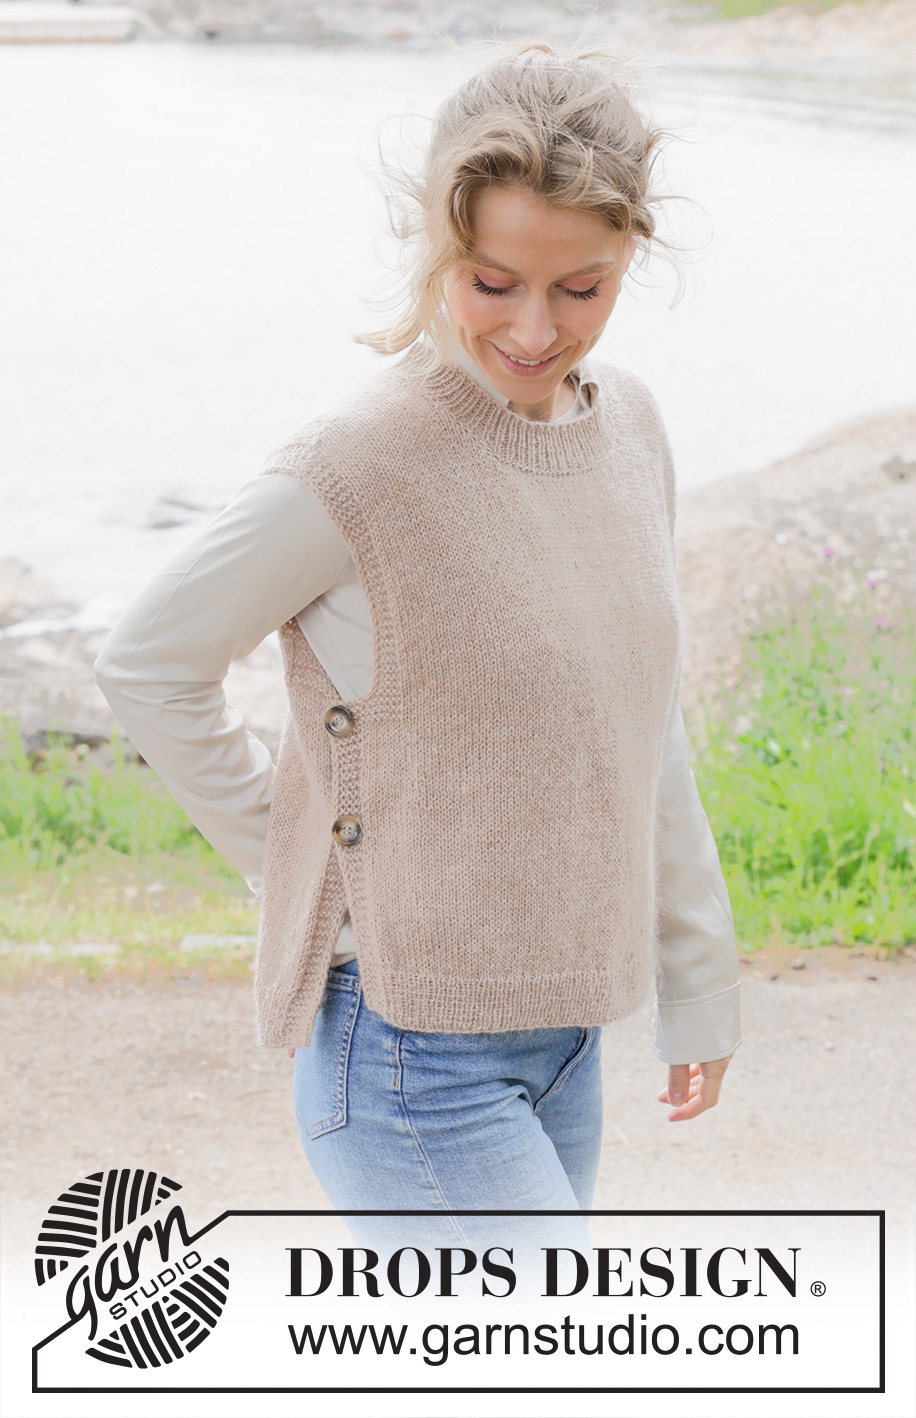
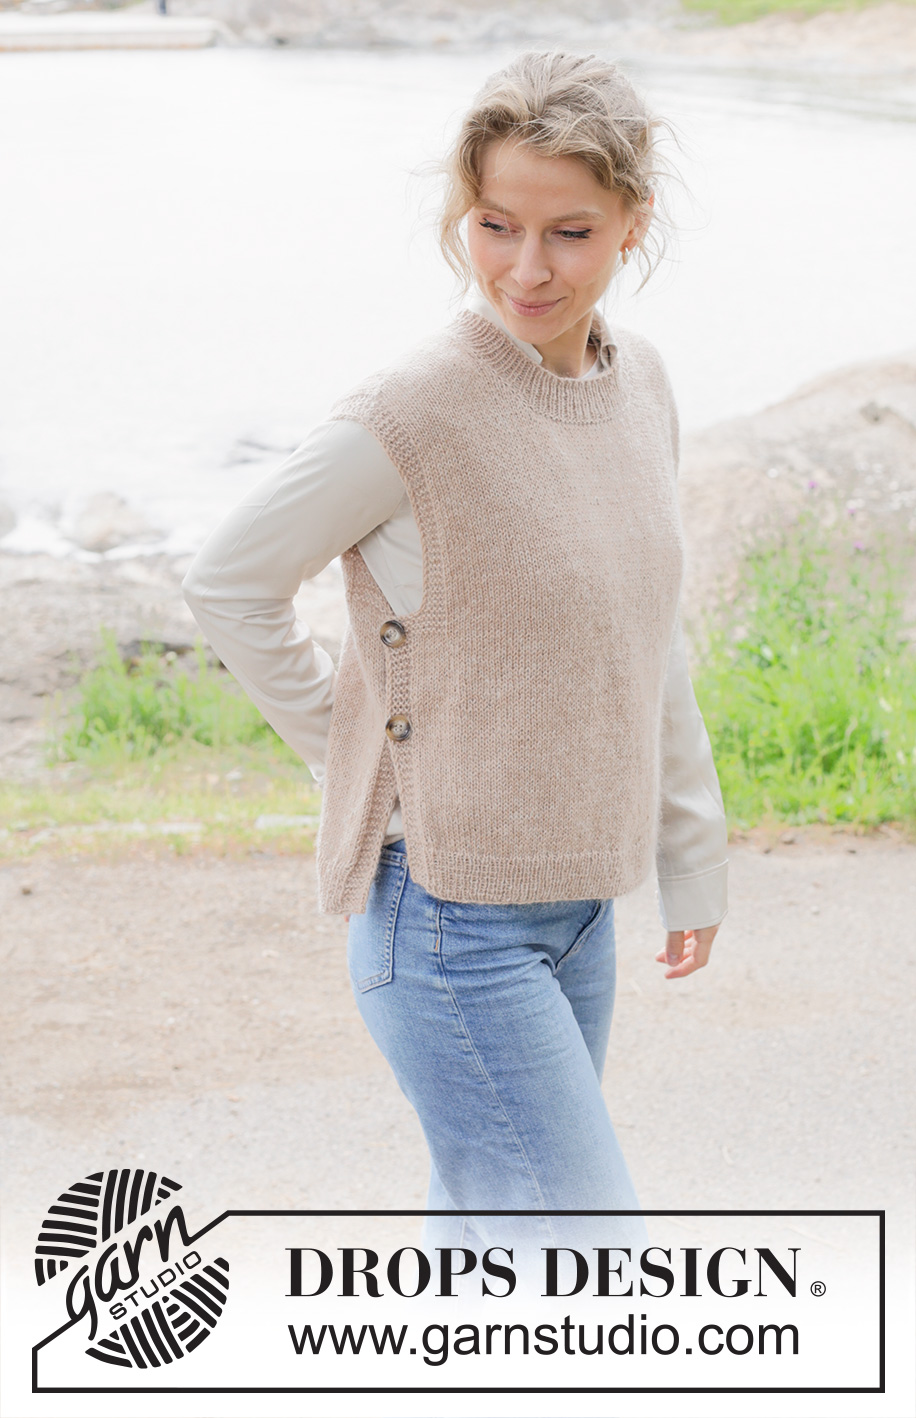
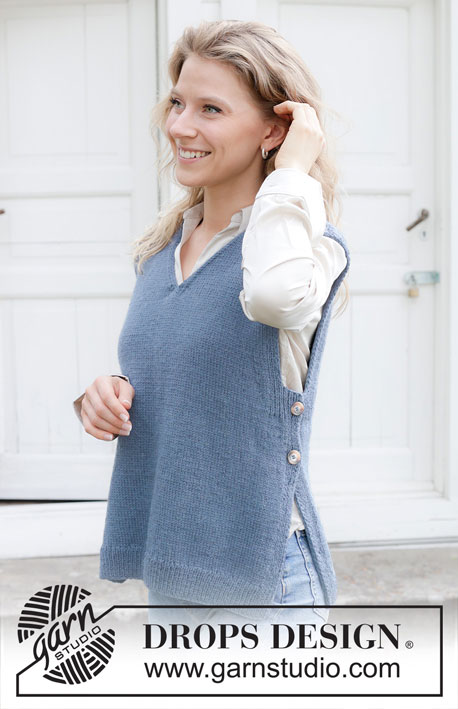
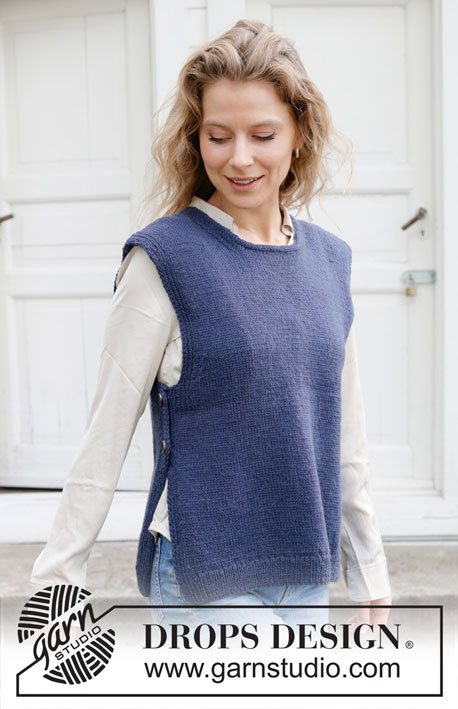
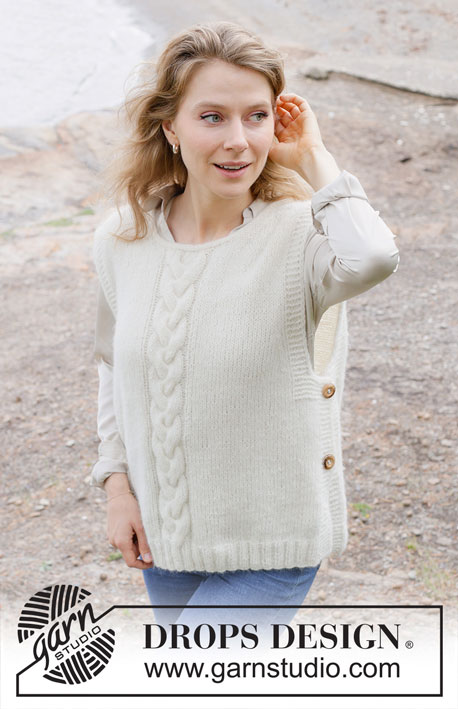
Driftwood Vest#driftwoodvest |
|
 |
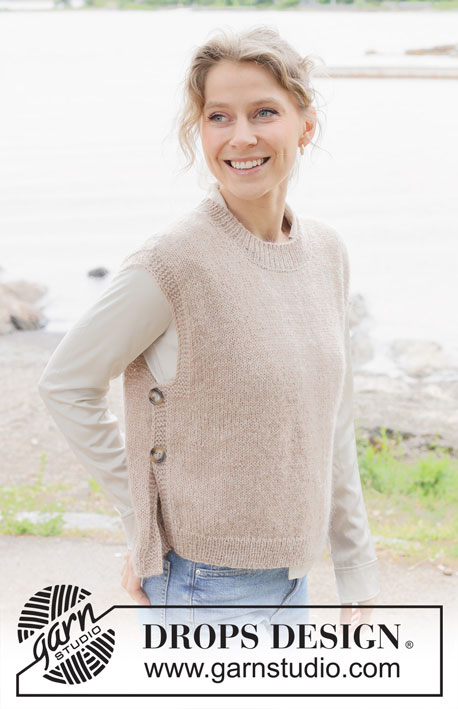 |
Knitted vest in DROPS Alpaca and DROPS Kid-Silk or DROPS Flora and DROPS Kid-Silk. The piece is worked with diagonal shoulders. Sizes S - XXXL.
DROPS 255-9 |
|
|
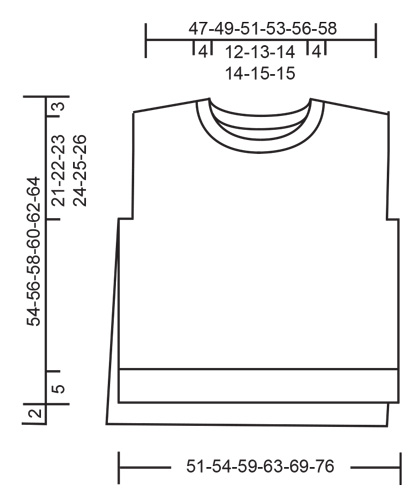
------------------------------------------------------- EXPLANATIONS FOR THE PATTERN: ------------------------------------------------------- BANDS WITH I-CORD BEGINNING OF ROW: Slip 1 stitch purl-wise with strand in front, knit 1, work 4 garter stitches. END OF ROW: Work until there are 6 stitches left on the row, work 4 garter stitches, slip 1 stitch purl-wise with strand in front, knit 1. Work in the same way from both the right and wrong side. GARTER STITCH (worked back and forth): Knit all rows, from both the right and wrong side. 1 ridge in height = knit 2 rows. BUTTONHOLES: Work the buttonholes on both bands from the right side. ROW 1 (right side): Knit together the 4th and 5th stitch from the edge, make 1 yarn over, work until there are 5 stitches left on the row, make 1 yarn over, knit 2 together and finish the band as before. ROW 2 (wrong side): Work both bands as before, knitting the yarn overs to leave holes. The first set of buttonholes is worked when the piece measures 19-20-21-22-23-24 cm, the second set when the piece measures 28-29-30-31-32-33 cm. KNITTING TIP: When working short rows, there will be a slight hole after each turn. The holes can be closed by tightening the strand or working the technique German Short Rows as follows: Slip the first stitch purl-wise, lay the strand over the right needle and tighten well at the back (2 loops on the needle which are knitted together on the next row). ------------------------------------------------------- START THE PIECE HERE: ------------------------------------------------------- VEST - SHORT OVERVIEW OF THE PIECE: The piece is worked back and forth. The front piece is worked bottom up to the neckline, then the diagonal shoulders are worked separately. The shoulders are joined before working the back piece, top down. The back piece is longer than the front piece. Stitches are knitted up around the neckline before working the neck. FRONT PIECE: Cast on 113-119-129-139-151-165 stitches with circular needle size 3 mm, and 1 strand DROPS Alpaca and 1 strand DROPS Kid-Silk (= 2 strands), or 1 strand DROPS Flora and 1 strand DROPS Kid-Silk (= 2 strands). Work rib, starting from the wrong side as follows: Work 6 stitches according to BANDS WITH I-CORD – read description above, work rib (purl 1, knit 1) until there are 7 stitches left, purl 1 and 6 stitches according to bands with I-cord. Work the rib and the bands with I-cord for 5 cm. Change to circular needle size 4.5 mm. Work 1 row of stocking stitch with the bands as before. AT THE SAME TIME decrease 15-15-17-19-21-23 stitches evenly on the first row (do not decrease across the bands) = 98-104-112-120-130-142 stitches. Continue with stocking stitch and 6 band-stitches as before on each side – remember the BUTTONHOLES and remember to maintain the knitting tension. When the piece measures 28-29-30-31-32-33 cm, continue as follows: Work 6 band-stitches as before, 7-8-10-12-15-19 GARTER STITCHES – read description above, work stocking stitch until there are 13-14-16-18-21-25 stitches left, 7-8-10-12-15-19 garter stitches and 6 band-stitches as before. When the piece measures 30-31-32-33-34-35 cm, cast off on each side for the armholes as follows: ROW 1: Knit 2 together (= 1 stitch decreased), cast off 6-7-9-11-14-18 stitches, work as before to end of row = 91-96-102-108-115-123 stitches. ROW 2: Knit 2 together (= 1 stitch decreased), cast off 6-7-9-11-14-18 stitches, work as before until there are 6 stitches left, work 6 band-stitches as before = 84-88-92-96-100-104 stitches. Continue with stocking stitch back and forth and 6 band-stitches as before on each side. When the piece measures 46-47-48-49-50-51 cm, work from the right side, placing AT THE SAME TIME the middle 24-24-26-26-28-28 stitches on a thread for the neckline and finishing each shoulder separately. RIGHT SHOULDER (when garment is worn): = 30-32-33-35-36-38 stitches. The first row = wrong side. Continue with stocking stitch and the band as before. AT THE SAME TIME cast off for the neckline as follows: Cast off the first stitch from the neck every 2nd row 5-6-5-5-5-5 times, then every 4th row 1-1-2-2-2-2 times = 24-25-26-28-29-31 shoulder-stitches. Continue with stocking stitch and the band as before. When the piece measures 51-53-55-57-59-61 cm, read KNITTING TIP, then work RIGHT DIAGONAL SHOULDER as described below, with the first row from the right side. RIGHT DIAGONAL SHOULDER: Work short rows with turning stitches/German Short Rows as follows: ROW 1 (= right side): Work 22-23-24-26-27-29 stitches as before, turn, ROW 2 (= wrong side): Slip the first stitch purl-wise, with strand in front, tighten the strand over the right needle (2 loops on the needle) and work to end of row as before. Continue like this back and forth, with fewer stitches worked each time. ROW 3: Work 20-21-22-24-25-27 stitches from the right side as before, turn ROW 4: Work in the same way as row 2 ROW 5: Work 18-19-20-22-23-25 stitches from the right side as before, turn ROW 6: Work in the same way as row 2 ROW 7: Work 15-16-16-18-19-21 stitches from the right side as before, turn ROW 8: Work in the same way as row 2 ROW 9: Work 12-13-12-14-15-16 stitches from the right side as before, turn ROW 10: Work in the same way as row 2 ROW 11: Work 9-10-8-10-11-11 stitches from the right side as before, turn ROW 12: Work in the same way as row 2 ROW 13: Work 5-6-4-6-7-6 stitches from the right side as before, turn ROW 14: Work in the same way as row 2 Now increase the shoulder towards the neck: Increase 1 stitch by casting on 1 stitch at the end of each row by the neck. Increase like this every 2nd row a total of 4 times = 28-29-30-32-33-35 stitches. The last row is from the wrong side. Cut the strand and work the left shoulder. LEFT SHOULDER (when garment is worn): = 30-32-33-35-36-38 stitches. The first row is from the wrong side. Continue with stocking stitch and the band as before. AT THE SAME TIME cast off for the neckline as follows: Cast off the first stitch from the neck every 2nd row 5-6-5-5-5-5 times, then every 4th row 1-1-2-2-2-2 times = 24-25-26-28-29-31 shoulder-stitches. Continue with stocking stitch and the band as before. When the piece measures 51-53-55-57-59-61 cm (remember KNITTING TIP), work LEFT DIAGONAL SHOULDER as described below, with the first row from the wrong side. LEFT DIAGONAL SHOULDER: Work short rows with turning stitches/German Short Rows as follows: ROW 1 (= wrong side): Work 22-23-24-26-27-29 stitches as before, turn, ROW 2 (= right side): Slip the first stitch purl-wise, with strand in front, tighten the strand over the right needle (2 loops on the needle) and work to end of row as before. Continue like this back and forth, with fewer stitches worked each time. ROW 3: Work 20-21-22-24-25-27 stitches from the wrong side as before, turn ROW 4: Work in the same way as row 2 ROW 5: Work 18-19-20-22-23-25 stitches from the wrong side as before, turn ROW 6: Work in the same way as row 2 ROW 7: Work 15-16-16-18-19-21 stitches from the wrong side as before, turn ROW 8: Work in the same way as row 2 ROW 9: Work 12-13-12-14-15-16 stitches from the wrong side as before, turn ROW 10: Work in the same way as row 2 ROW 11: Work 9-10-8-10-11-11 stitches from the wrong side as before, turn ROW 12: Work in the same way as row 2 ROW 13: Work 5-6-4-6-7-6 stitches from the wrong side as before, turn ROW 14: Work in the same way as row 2 Insert 1 marker outermost on the shoulder (= mid-top of shoulder); the piece is now measured from here! Now increase the shoulder by the neck: Increase 1 stitch by casting on 1 stitch at the end of each row by the neck. Increase like this every 2nd row a total of 4 times = 28-29-30-32-33-35 stitches. The new stitches are worked in stocking stitch and the last row is from the wrong side. Now the shoulders are joined for the back piece. BACK PIECE: Begin from the right side on the left shoulder, with the next row from the right side, work the left shoulder-stitches as before, then cast on 28-30-32-32-34-34 stitches for the neckline and work the right shoulder-stitches from the right side = 84-88-92-96-100-104 stitches. Continue back and forth with stocking stitch and the bands as before until the piece measures 21-22-23-24-25-26 cm from the marker on the shoulder. Cast on 7-8-10-12-15-19 new stitches for the armholes on each side as follows: ROW 1: Work 6 band-stitches, stocking stitch until there are 6 stitches left, work 6 garter stitches and cast on 7-8-10-12-15-19 stitches = 91-96-102-108-115-123 stitches. ROW 2: Work 6 band-stitches, work 7-8-10-12-15-19 garter stitches, stocking stitch until there are 6 stitches left, work 6 garter stitches and cast on 7-8-10-12-15-19 stitches = 98-104-112-120-130-142 stitches. Continue as follows: Work 6 band-stitches, 7-8-10-12-15-19 garter stitches, stocking stitch until there are 13-14-16-18-21-25 stitches left, work garter stitch until there are 6 stitches left, finish with 6 band-stitches. When the piece measures 23-24-25-26-27-28 cm from the marker on the shoulder, continue with stocking stitch and 6 band stitches on each side until the piece measures 48-50-52-54-56-58 cm from the marker. Change to circular needle size 3 mm and work the next row from the right side as follows: Work the 6 band-stitches, work rib (knit 1, purl 1) until there are 6 stitches left, AT THE SAME TIME increase 15-15-17-19-21-23 stitches evenly spaced, work the 6 band-stitches = 113-119-129-139-151-165 stitches. Continue this rib for 5 cm. Cast off with knit from the right side. The back piece measures 53-55-57-59-61-63 cm from the marker on the shoulder. Due to the diagonal shoulders, the length from the top of the shoulder is approx. 54-56-58-60-62-64 cm on the front piece and 56-58-60-62-64-66 cm on the back piece. NECK: Using circular needle size 3 mm and 1 strand of each quality (= 2 strands). Start from the right side on the right shoulder and knit up approx. 108 to 126 stitches around the neckline, including the stitches on the thread – the stitch count must be divisible by 2. Purl 1 round, then knit 1 round. Work rib in the round (knit 1, purl 1) for 3½ cm. Change to circular needle size 4.5 mm and cast off a little loosely. ASSEMBLY: Sew the buttons onto each side of the back piece. |
|
 |
|
Have you finished this pattern?Tag your pictures with #dropspattern #driftwoodvest or submit them to the #dropsfan gallery. Do you need help with this pattern?You'll find 27 tutorial videos, a Comments/Questions area and more by visiting the pattern on garnstudio.com. © 1982-2026 DROPS Design A/S. We reserve all rights. This document, including all its sub-sections, has copyrights. Read more about what you can do with our patterns at the bottom of each pattern on our site. |
|


With over 40 years in knitting and crochet design, DROPS Design offers one of the most extensive collections of free patterns on the internet - translated to 17 languages. As of today we count 324 catalogues and 12290 patterns translated into English (UK/cm). 12290
We work hard to bring you the best knitting and crochet have to offer, inspiration and advice as well as great quality yarns at incredible prices! Would you like to use our patterns for other than personal use? You can read what you are allowed to do in the Copyright text at the bottom of all our patterns. Happy crafting!
Post a comment to pattern DROPS 255-9
We would love to hear what you have to say about this pattern!
If you want to leave a question, please make sure you select the correct category in the form below, to speed up the answering process. Required fields are marked *.