
Popular categories
Looking for a yarn?


Comments / Questions (23)
![]() Line wrote:
Line wrote:
Je ne compte pas l'explication du "Raglan". Est-ce que l'on augmente avant le marqueur ou après. Est-ce que on augmente avant pour le dos devant et après pour les manches ? Merci de me donner le lien pour le vidéo.
07.09.2024 - 17:57DROPS Design answered:
Bonjour Line, les augmentations du raglan se font soit avant + après, soit avant/ soit après les 2 mailles jersey (le marqueur se trouve entre ces 2 mailles) des raglans; vous allez ainsi augmenter après le fil marqueur + avant le fil marqueur au début des manches, du dos et du devant, mais vous augmentez à un rythme différent pour le devant/le dos et pour les manches, autrement dit, vous augmentez d'abord alternativement 8 mailles (dos, devant et manches) et 4 mailles (dos et devant seulement) puis vous augmenterez 8 mailles (dos, devant et manches) en fonction de la taille. Bon tricot!
09.09.2024 - 09:45
![]() Natalia wrote:
Natalia wrote:
Hola quería saber si hay video tutorial paso a paso para tejer
15.05.2024 - 17:36DROPS Design answered:
Hola Natalia, todos los videos relevantes para realizar esta labor están indicados en el encabezado videos al inicio del patrón. No hay un tutorial completo paso a paso para este patrón.
19.05.2024 - 23:11
![]() Sia wrote:
Sia wrote:
Det står att man ska öka mellan andra och tredje markören ( framstycke ) och sedan mellan tredje och första markören ( bakstycke ). Dock så är väl bakstycket mellan fjärde och första markören?
22.04.2024 - 19:45DROPS Design answered:
Hej Sia, du har højre ærme mellem 1. og 2. mærke - forstykket mellem 2. og 3. mærke - venstre ærme mellem 3. og 4. mærke - rygstykket mellem 4. og 1.mærke. Tak for info, det er opdateret :)
23.04.2024 - 14:42
![]() Berit Heggeseth wrote:
Berit Heggeseth wrote:
Hvordan får jeg tak i oppskriften, ser den er gratis men får ikke lastet den ned. Har bestilt garn hos dere.
05.04.2024 - 07:40DROPS Design answered:
Hej Berit, jo den ligger online på nettet, så du går bare ind på selve opskriften. Du kan også klikke på symbolet for printer og laste den ned som pdf eller skrive ud hvis du hellere vil det :)
05.04.2024 - 10:48
![]() Juna wrote:
Juna wrote:
Voor de raglanmeerdering: ik vermoed dat je de omslag gewoon moet breien anders krijg je geen gaatje en dat is wel de bedoeling toch?
28.03.2024 - 16:25
![]() Leli wrote:
Leli wrote:
Ich liebe diesen Pulli. Er ist so hübsch. Kann es kaum erwarten ihn zu stricken!!
26.03.2024 - 20:22
![]() Henny Wijgerse wrote:
Henny Wijgerse wrote:
Van bomull lin heb ik 600 gram nodig voor een truitje, garengroep C. Maar ik kan ook garengroep a + a gebruiken. Hoeveel bollen heb ik dan nodig van a + a , want dat brei ik dan met 2 draden.
25.03.2024 - 16:11DROPS Design answered:
Dag Henny,
Om dit te berekenen ga je uit van de looplengte. Dus je berekent eerst de totale looplengte (het benodigde aantal bollen X de looplengte per bol). Deze looplengte doe je keer 2, omdat je voor categorie A 2 draden nodig hebt. Dan deel je dat getal door de looplengte van het garen met categorie A.
27.03.2024 - 13:23
![]() Gianna Bernardi wrote:
Gianna Bernardi wrote:
Mi piace molto usare le vs spiegazioni 💐 grazie
25.03.2024 - 08:11
![]() Karin wrote:
Karin wrote:
Light breeze
21.01.2024 - 18:36
![]() Laura wrote:
Laura wrote:
Österlen
19.01.2024 - 09:09
|
|
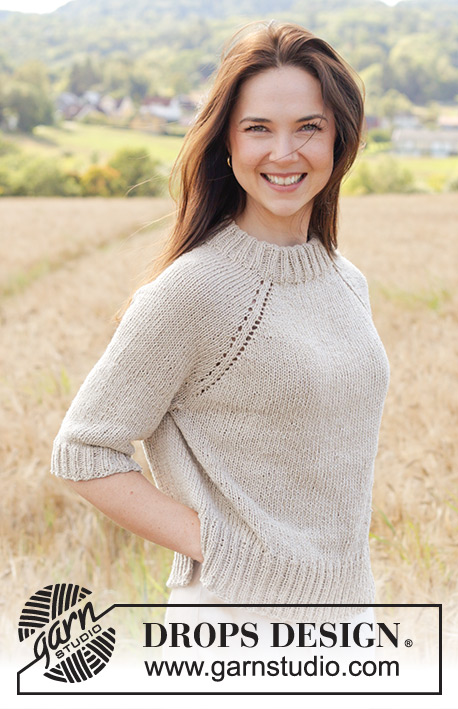
Sand Valley#sandvalleysweater |
|
 |
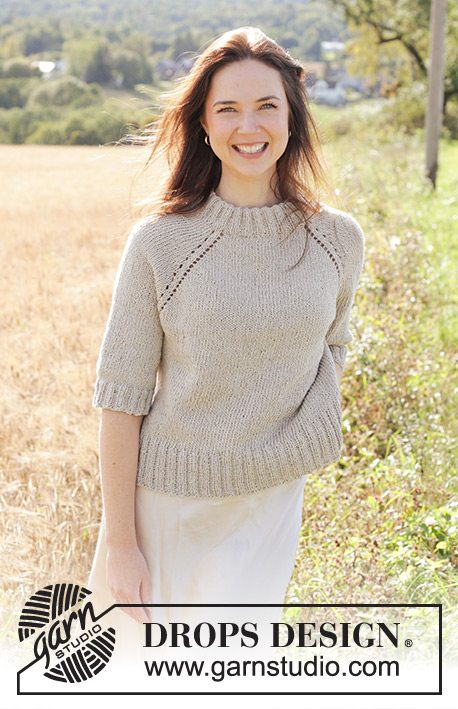 |
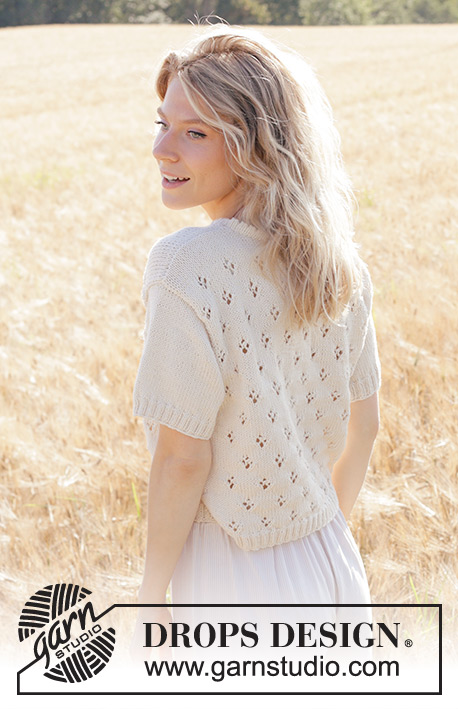
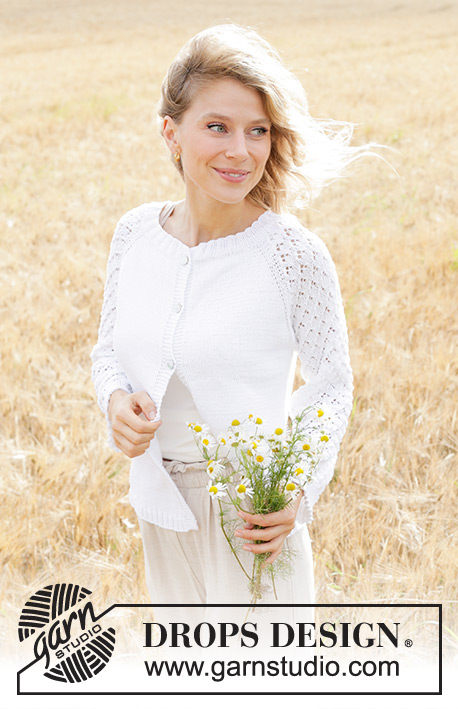
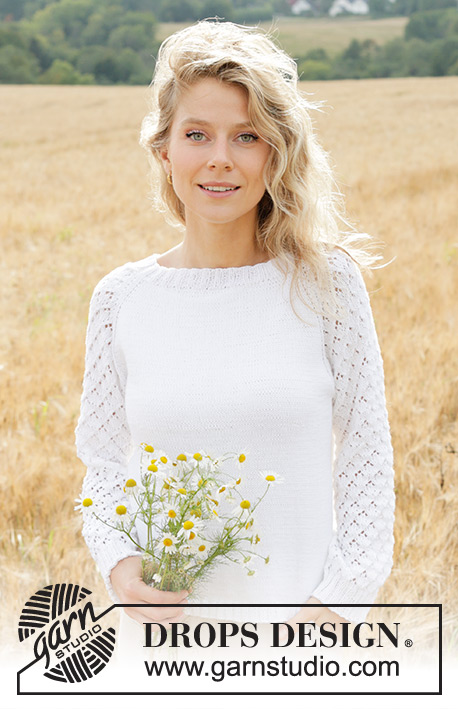
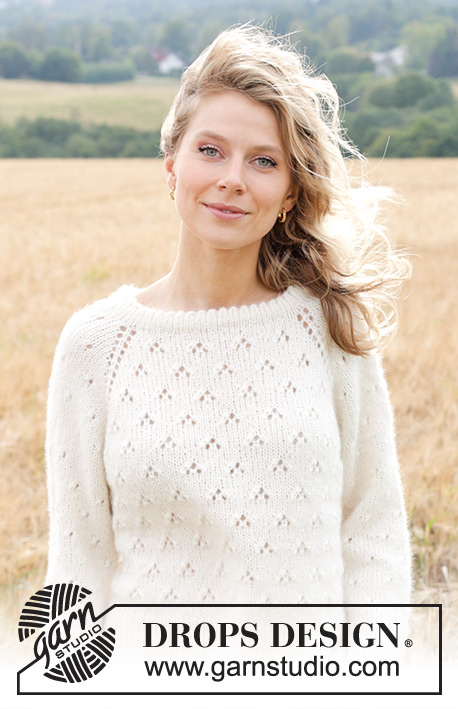
Knitted jumper in DROPS Bomull-Lin or DROPS Paris. The piece is worked top down in stocking stitch with double neck, raglan, ¾-length sleeves and split in sides with I-cord. Sizes XS - XXL.
DROPS 248-12 |
|
|
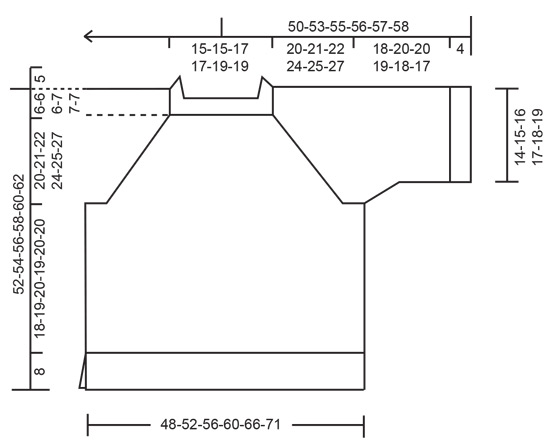
------------------------------------------------------- EXPLANATIONS FOR THE PATTERN: ------------------------------------------------------- INCREASE TIP: Increase 1 stitch by making 1 yarn over, which is worked twisted on the next round to avoid a hole. RAGLAN: Increase 1 stitch before/after 2 knitted stitches in each transition between body and sleeves (marker-thread sits between these 2 stitches). Increase 1 stitch by making 1 yarn over, which is knitted on the next round (= hole). I-CORD: FIRST 2 STITCHES: Worked as follows on every row: Slip 1 stitch purl-wise with yarn in front, knit 1. LAST 2 STITCHES: Worked as follows on every row: Work until there are 2 stitches left on the row, slip 1 stitch purl-wise with yarn in front, knit 1. DECREASE TIP: Decrease 1 stitch on each side of the marker-thread as follows: Work until there are 3 stitches left before the marker-thread, knit 2 together, knit 2 (marker-thread sits between these 2 stitches), slip 1 stitch knit-wise, knit 1 and pass the slipped stitch over the knitted stitch (2 stitches decreased). ------------------------------------------------------- START THE PIECE HERE: ------------------------------------------------------- JUMPER – SHORT OVERVIEW OF THE PIECE: The pattern uses both long and short circular needles; start with the length which fits the number of stitches and change when necessary. The neck and yoke are worked in the round with circular needle, from back right shoulder, top down. The yoke is divided for body and sleeves and the body is continued in the round with circular needle while the sleeves wait. The body is divided for the split in each side and the front and back pieces finished separately, back and forth. The sleeves are worked in the round. The neck is folded double to the wrong side and sewn down. NECK: Cast on 96-96-104-112-120-120 stitches with circular needle size 5 mm. Change to circular needle size 3.5 mm (casting-on with a larger needle size makes the cast-on edge elastic). Knit 1 round. Work rib as follows: * Knit 1, purl 2, knit 1 *, work from *-* to end of round. Continue this rib for 11 cm. The neck is folded double to the wrong side to finish. Insert 1 marker. The yoke is measured from here. YOKE: Change to circular needle size 5 mm. Insert 4 marker-threads as follows, without working the stitches. The threads are used when increasing for raglan: Insert marker-thread-1 at the beginning of the round, count 20-20-20-24-24-24 stitches (right sleeve), insert marker-thread-2 before the next stitch, count 28-28-32-32-36-36 stitches (front piece), insert marker-thread-3 before the next stitch, count 20-20-20-24-24-24 stitches (left sleeve), insert marker-thread-4 before the next stitch – there are 28-28-32-32-36-36 stitches left on the round after marker-thread-4 (back piece). Knit 1 round and increase 2-6-6-6-6-8 stitches evenly between marker-threads-2 and -3 (front piece) and increase 2-6-6-6-6-8 stitches evenly between marker-threads-4 and -1 (back piece) – read INCREASE TIP = 100-108-116-124-132-136 stitches. Continue with stocking stitch AT THE SAME TIME as you increase for RAGLAN – read description above. REMEMBER THE KNITTING TENSION! Increase for raglan every 2nd round on the front and back pieces and every 4th round on the sleeves (the first increase is on each side of all 4 marker-threads, the next increase only the front and back pieces). Increase like this a total of 22-20-20-24-24-26 times on the front and back pieces and 11-10-10-12-12-13 times on the sleeves = 232-228-236-268-276-292 stitches. Continue increasing every 2nd round but now increase on each side of all 4 marker-threads 0-3-4-2-4-4 times (both on the front and back pieces and on the sleeves) = 232-252-268-284-308-324 stitches. After the last increase the yoke measures 20-21-22-24-25-27 cm from the marker. Now divide for the body and sleeves: Place the first 42-46-48-52-56-58 stitches on 1 thread for the sleeve (stitches between marker-threads-1 and -2), cast on 8-8-10-12-14-16 stitches (in side under sleeve), knit 74-80-86-90-98-104 (front piece), place the next 42-46-48-52-56-58 stitches on 1 thread for the sleeve (stitches between marker-threads-3 and -4), cast on 8-8-10-12-14-16 stitches (in side under sleeve), knit the last 74-80-86-90-98-104 stitches (back piece). The body and sleeves are finished separately. The piece is now measured from here. BODY: = 164-176-192-204-224-240 stitches. Insert 1 marker-thread in each side of the body – in the middle of the 8-8-10-12-14-16 cast-on stitches under each sleeve. Allow the threads to follow your work onwards; they are used to mark the split in each side. Work to the first marker-thread and start the round here. Continue with stocking stitch in the round until the body measures 18-19-20-19-20-20 cm from the division. Divide at both marker-threads for the split and finish each piece separately, back and forth. FRONT PIECE: = 82-88-96-102-112-120 stitches. Knit 1 row from the right side and increase 36-38-38-44-46-50 stitches evenly spaced – remember INCREASE TIP = 118-126-134-146-158-170 stitches. Change to circular needle size 3.5 mm. Work as follows from the wrong side: 2 edge stitches in I-CORD – read description above, * purl 2, knit 2 *, work from *-* until there are 4 stitches left, purl 2 and 2 edge stitches in I-cord. Continue this rib back and forth for 8 cm. Cast off. The jumper measures approx. 52-54-56-58-60-62 cm from the shoulder. BACK PIECE: Work in the same way as the front piece. SLEEVES: Place the 42-46-48-52-56-58 stitches from the thread on the one side of the piece on short circular needle/double pointed needles size 5 mm and knit up 1 stitch in each of the 8-8-10-12-14-16 stitches cast on under the sleeve = 50-54-58-64-70-74 stitches. Insert a marker-thread in the middle of the 8-8-10-12-14-16 stitches under the sleeve. Start at the marker-thread and work stocking stitch in the round. When the sleeve measures 2 cm from the division, decrease 2 stitches under the sleeve – read DECREASE TIP. Decrease like this every 4th round a total of 1-1-2-3-4-5 times = 48-52-54-58-62-64 stitches. Work until the sleeve measures 18-20-20-19-18-17 cm from the division. There is 4 cm left. Try the jumper on and work to desired length before the rib. Knit 1 round and increase 8-8-10-10-10-12 stitches evenly spaced = 56-60-64-68-72-76 stitches. Change to double pointed needles size 3.5 mm. Work rib (knit 2, purl 2) for 4 cm. Cast off a little loosely. The sleeve measures approx. 22-24-24-23-22-21 cm from the division. ASSEMBLY: Fold the neck double to the inside and sew down. To avoid the neck being tight and rolling outwards, it is important that the seam is elastic. |
|
 |
|
Have you finished this pattern?Tag your pictures with #dropspattern #sandvalleysweater or submit them to the #dropsfan gallery. Do you need help with this pattern?You'll find 30 tutorial videos, a Comments/Questions area and more by visiting the pattern on garnstudio.com. © 1982-2026 DROPS Design A/S. We reserve all rights. This document, including all its sub-sections, has copyrights. Read more about what you can do with our patterns at the bottom of each pattern on our site. |
|


With over 40 years in knitting and crochet design, DROPS Design offers one of the most extensive collections of free patterns on the internet - translated to 17 languages. As of today we count 324 catalogues and 12290 patterns translated into English (UK/cm). 12290
We work hard to bring you the best knitting and crochet have to offer, inspiration and advice as well as great quality yarns at incredible prices! Would you like to use our patterns for other than personal use? You can read what you are allowed to do in the Copyright text at the bottom of all our patterns. Happy crafting!
Post a comment to pattern DROPS 248-12
We would love to hear what you have to say about this pattern!
If you want to leave a question, please make sure you select the correct category in the form below, to speed up the answering process. Required fields are marked *.