
Popular categories
Looking for a yarn?


Comments / Questions (35)
![]() Gitte wrote:
Gitte wrote:
Hej, jeg forstår ikke helt at når man har strikket de to forstykkker sammen øverst, står der at man skal strikke 13 cm perlestrik. Men på billederne af trøjen, går den direkte over i mønsteret, uden at der er perlestrik først. Dvs. trøjen bliver så meget længere end på billedet..? Tak!
10.11.2024 - 15:50DROPS Design answered:
Hei Gitte. Du skal strikke perlestrikk til arbeidet måler 13 cm (fra der du plukket opp masker til forstykket, ikke fra der du satte sammen forstykkene). Det vil da stemme med bildet. mvh DROPS Design
18.11.2024 - 09:05
![]() Mylene MADELAINE wrote:
Mylene MADELAINE wrote:
Bonjour, ce modèle est gratuit mais une boutique en ligne sur Etsy le vend 4,52 € et dit \"conçu elle-même\": Il s\'agit de GranniesWoolyB : womans-textured-aran-cable-zig-zag . EST-CE LEGAL ?
21.10.2024 - 16:19
![]() Mylene MADELAINE wrote:
Mylene MADELAINE wrote:
Bonjour, ce modèle est gratuit mais une boutique en ligne sur Etsy le vend 4,52 € et dit "conçu elle-même: Il s'agit de GranniesWoolyB : womans-textured-aran-cable-zig-zag EST-CE LEGAL ?
21.10.2024 - 16:17
![]() Eva He wrote:
Eva He wrote:
Kan man sticka denna superfina tröja på vanliga stickor istället för rundstickor? Och hur gör man då? Älskar att sticka men inte med just rundstickor:-( … vet att det är väldigt populärt nu men jag tycker det blir väldigt klumpigt. Tack på förhand :-)
08.10.2024 - 10:59DROPS Design answered:
Hej Eva. Det ska gå fint att sticka denna fram och tillbaka. Då stickar du fram och tillbaka istället för runt när du kommer till "Fram- & bakstycke". Tänk bara på att lägga upp en kantmaska som du kan sy ihop styckena i sen. Du kan läsa mer om vad du ska tänka på här. Mvh DROPS Design
08.10.2024 - 14:07
![]() Mirjam Mastromonaco wrote:
Mirjam Mastromonaco wrote:
Hej! Storleksguide med färdiga mått?
06.10.2024 - 21:44DROPS Design answered:
Hej Mirjam. Du hittar en måttskiss med plaggets mått i samtliga storlekar i cm längst ner på mönstret. Mvh DROPS Design
08.10.2024 - 14:27
![]() Marthe Aasmundseth wrote:
Marthe Aasmundseth wrote:
Hvilken vanskelighetsgrad har denne genseren?
17.04.2024 - 14:31DROPS Design answered:
Hej Marthe, den er ikke så vanskelig, vi har videoer som viser nøjagtig hvordan man gør de forskellige moment :)
18.04.2024 - 11:41
![]() FONT wrote:
FONT wrote:
Bonjour Comment puis-je imprimer les explications ? Merci
17.03.2024 - 17:20DROPS Design answered:
Bonjour Mme Font, cliquez sur l'icône "imprimante" juste au-dessus de la partie Explications Une nouvelle fenêtre va s'ouvrir, réglez les paramètres de votre imprimante pour lancer l'impression. Bon tricot!
18.03.2024 - 09:27
![]() Kirstin wrote:
Kirstin wrote:
Guten Tag, Ich versteh nicht wie ich die Ärmel anstricken soll, bzw. wie lang der waagerechte Rand ist, wo keine Maschen aufgenommen werden sollen. Vielen Dank für die Hilfe. Kirstin
05.03.2024 - 10:32DROPS Design answered:
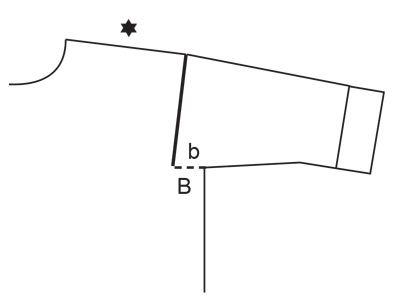
Liebe Kirstin, die Maschen für die Ärmel werden am Armausschnitt aufgefassen, dh nach den abgeketteten Maschen für das Armloch am Vorder bzw Rückenteil bis die abgekettenen Maschen für das Armloch am Rücken- bzw Vorderteil, aber nicht in den Maschen die für das Armloch abegkettet wurden. Die ersten 1-1-2-2-3-4 cm werden in Reihen gestrickt und danach am Armausschntt (siehe b und B) angenäht. Viel Spaß beim Stricken!
05.03.2024 - 15:33
![]() Sarina wrote:
Sarina wrote:
Beste, Dit is de eerste keer dat ik met een patroon brei... Moet ik bij Patroon lijf de telpatronen A1 en A2 achtereenvolgens breien over 1 priem dus 6 steken R van A1 en dan 4 steken R van A2 of op 1 priem A1 herhalen en op de volgende priem A2 herhalend breien? Alvast bedankt
24.02.2024 - 17:44DROPS Design answered:
Dag Sarina,
Je breit eerst patroon A.1 en dit patroon herhaal je over de breedte over de hele naald. Wanneer je patroon A.1 in de hoogte hebt gebreid, dan brei je patroon A.2, enzovoort.
25.02.2024 - 10:32
![]() Victoria wrote:
Victoria wrote:
How many cms do I knit for the neck please? Many thanks, really enjoying knitting this garment :)
16.01.2024 - 14:49DROPS Design answered:
Hi Victoria, The rib on the neck is worked for 9 cm. Happy crafting!
17.01.2024 - 08:13
|
||||||||||||||||
Ice Tide#icetidesweater |
||||||||||||||||
 |
 |
|||||||||||||||
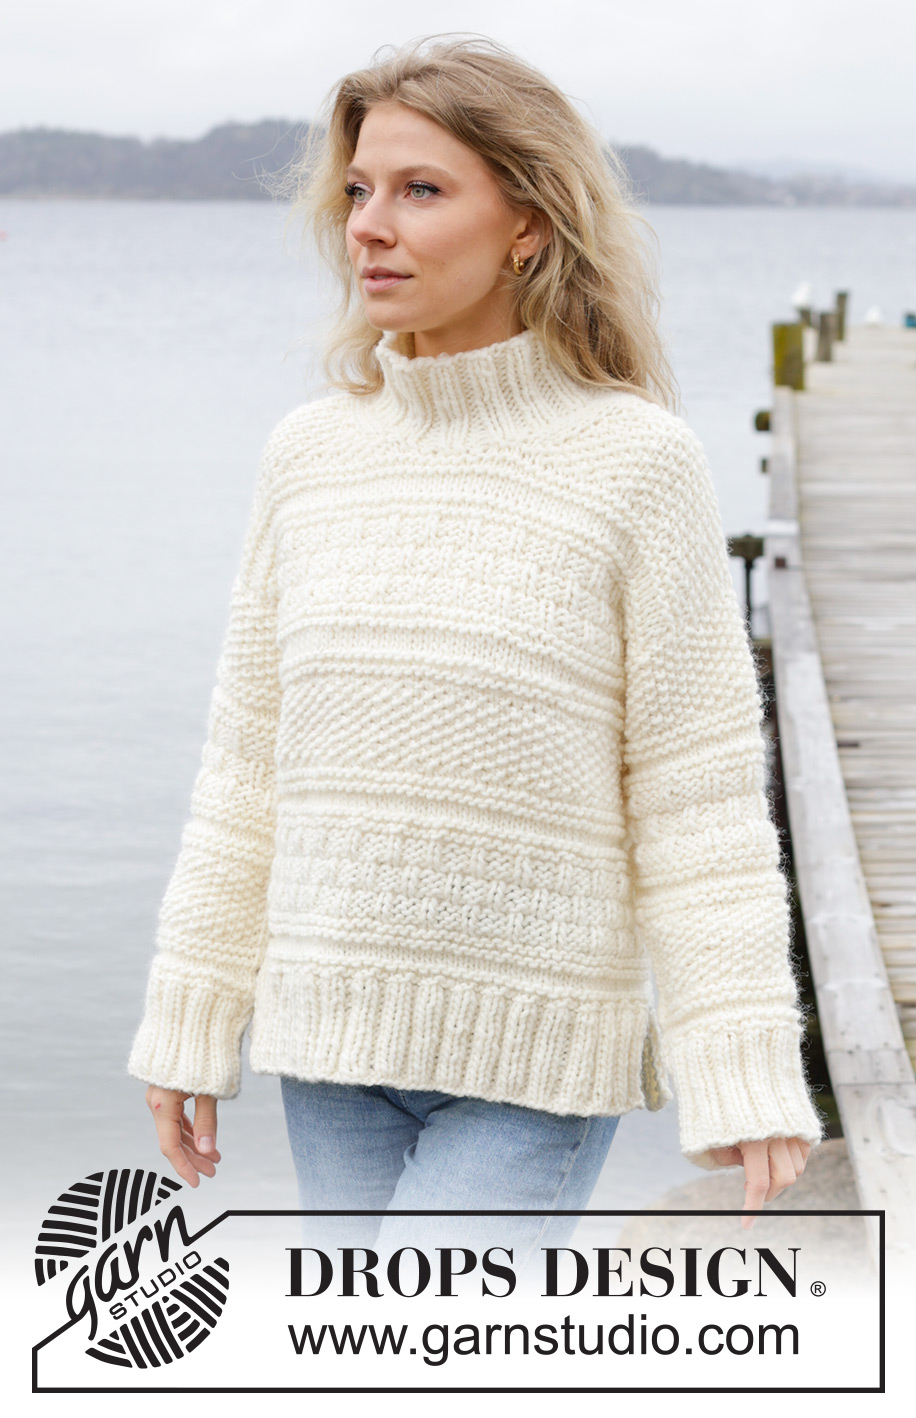
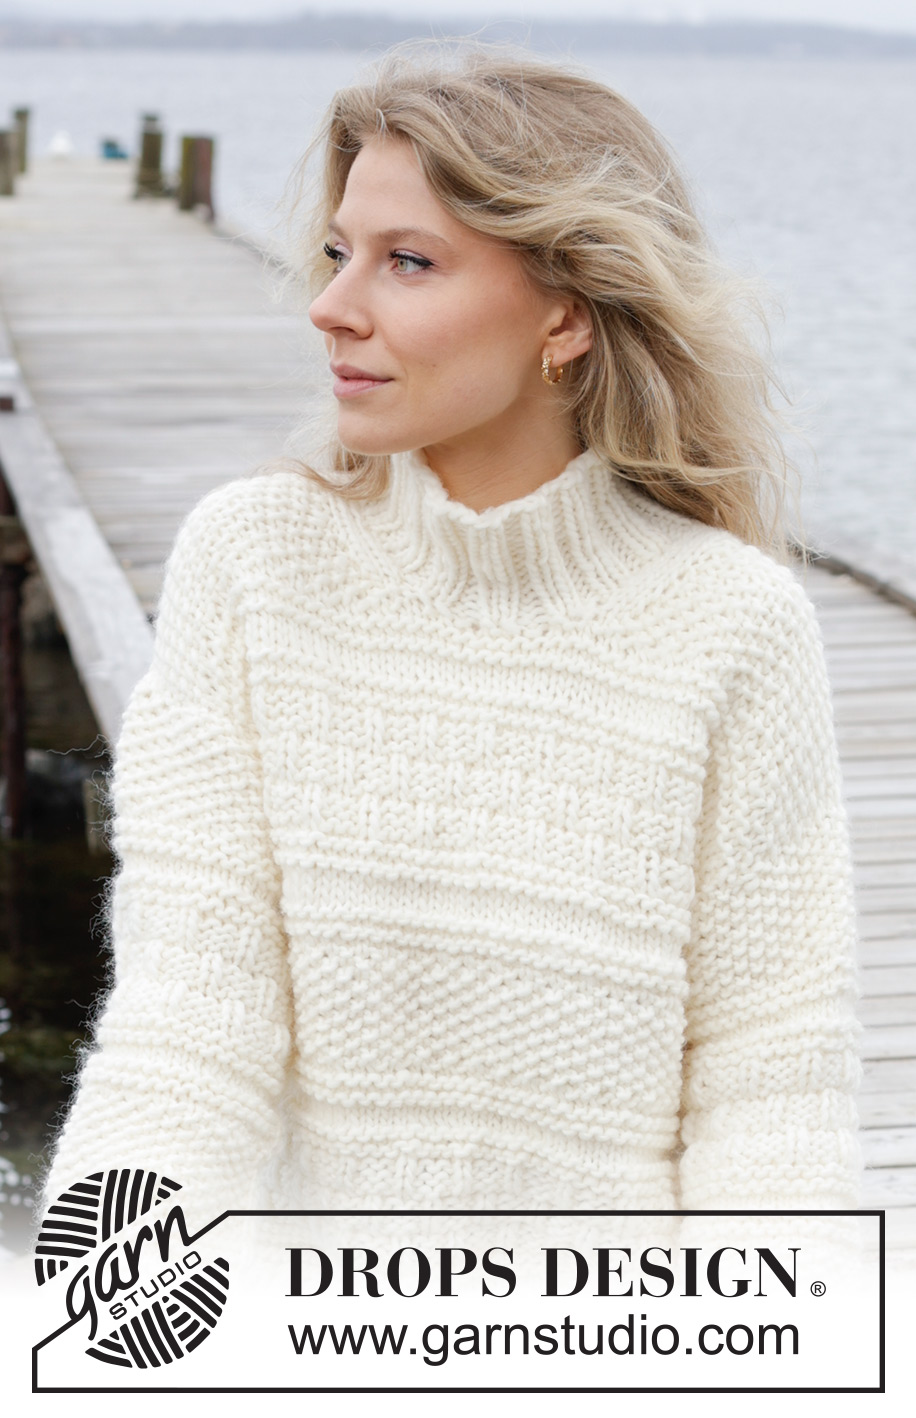
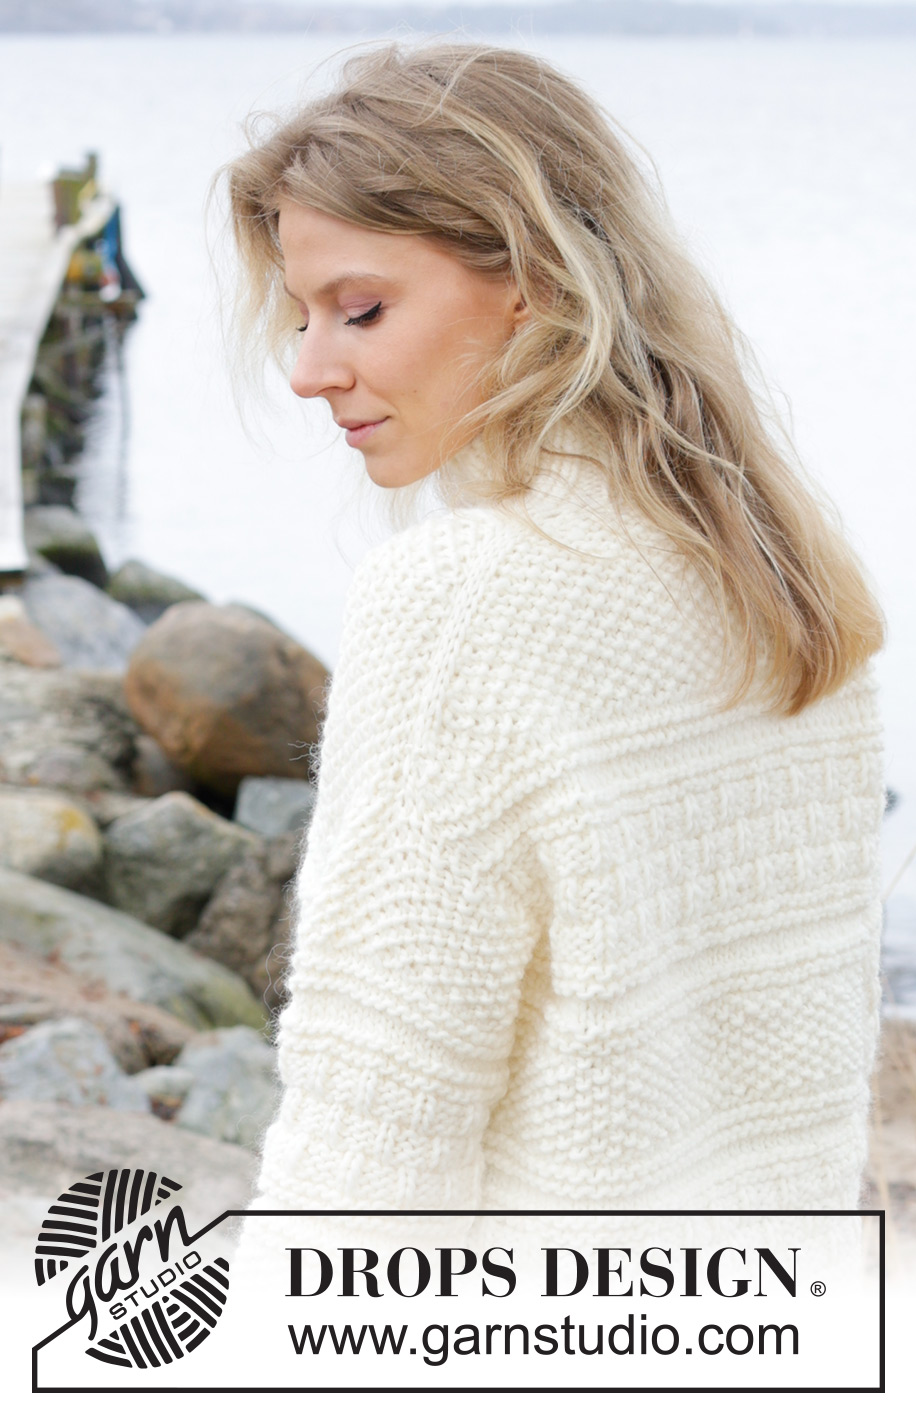
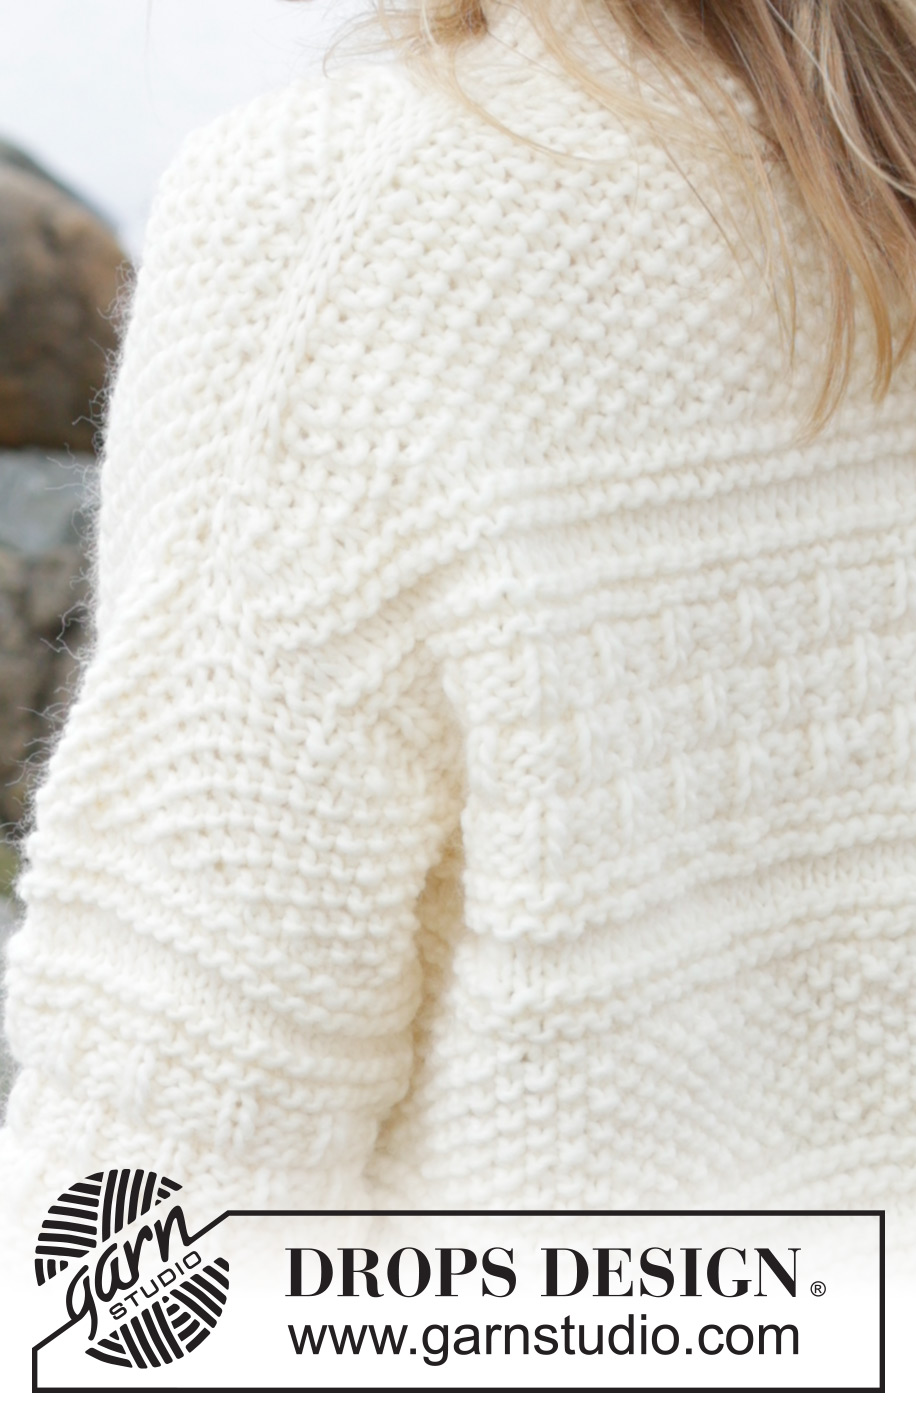
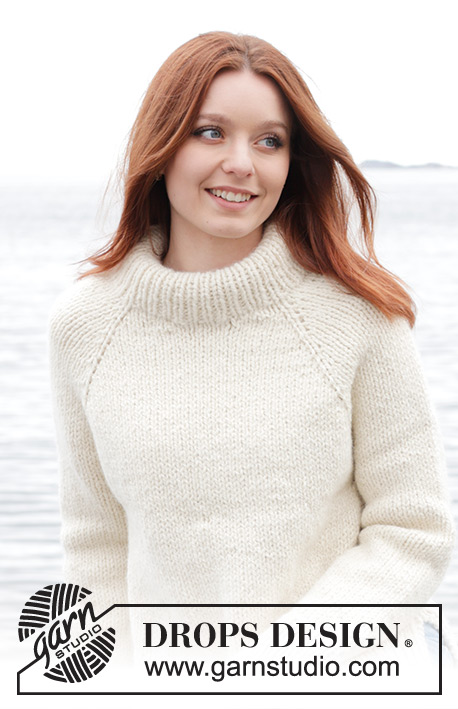
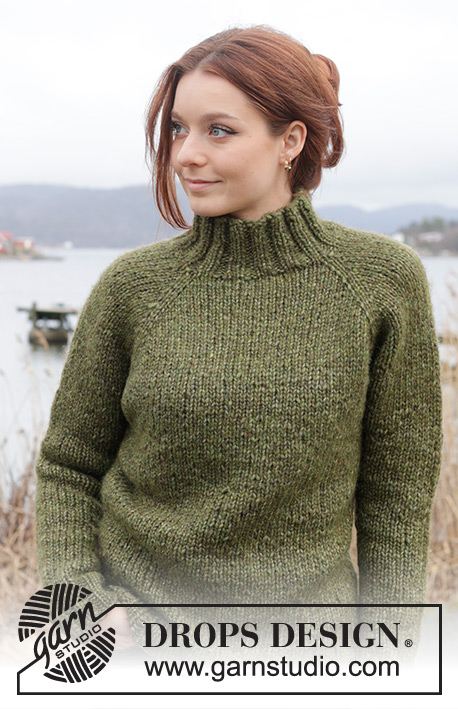
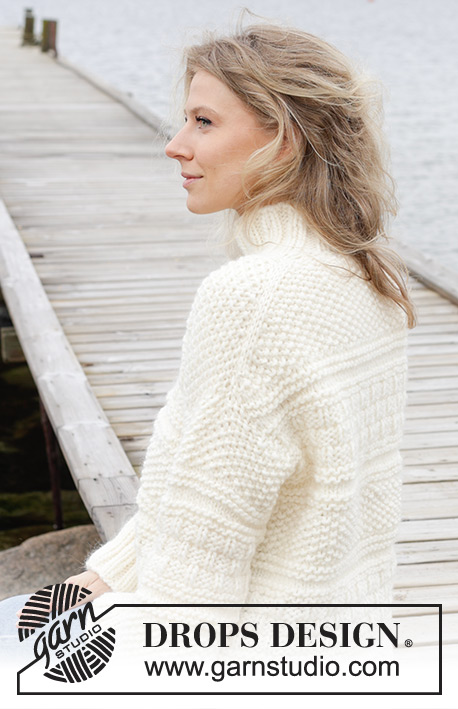
Knitted jumper in DROPS Snow. The piece is worked top down with European/diagonal shoulders, relief pattern and high neck. Sizes XS - XXL.
DROPS 243-10 |
||||||||||||||||
|
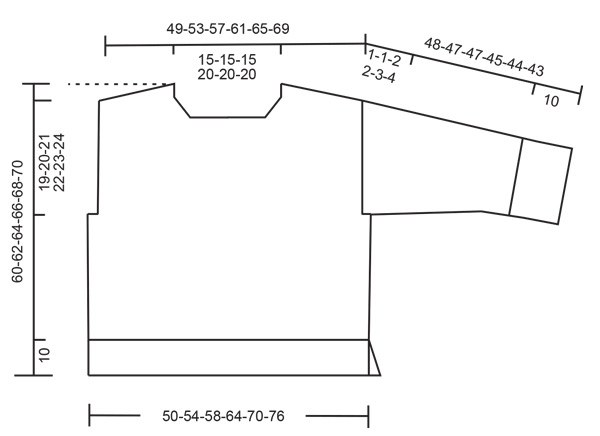
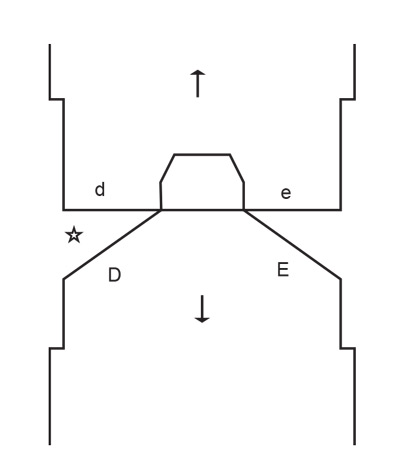
------------------------------------------------------- EXPLANATIONS FOR THE PATTERN: ------------------------------------------------------- GARTER STITCH (worked back and forth): Knit all rows. 1 ridge = knit 2 rows. INCREASE TIP FROM THE RIGHT SIDE: Increase towards the left AFTER MARKER: Use left needle to pick up yarn between 2 stitches from row below, pick up yarn from the front and knit in the stitch loop that is on the back of the needle. Increase towards the right BEFORE MARKER: Use left needle to pick up yarn between 2 stitches from row below, pick up yarn from the back and knit in the stitch loop that is on the front side of the needle. INCREASE TIP FROM THE WRONG SIDE: Increase towards the right AFTER MARKER: Use left needle to pick up yarn between 2 stitches from row below, pick up yarn from the back and purl in the stitch loop that is on the front side of the needle. Increase towards the left BEFORE MARKER: Use left needle to pick up yarn between 2 stitches from row below, pick up yarn from the front and purl in the stitch loop that is on the back side of the needle. MOSS STITCH (worked in the round): Round 1: * Kit 1, purl 1 *, work from *-*. Round 2: Knit over purl and purl over knit. Repeat round 2 onwards. MOSS STITCH (worked back and forth): Row 1: * Knit 1. purl 1 *, work from *-*. Row 2: Knit over purl and purl over knit. Repeat row 2 onwards. PATTERN: See diagrams A.1 and A.2. The diagrams show all rows in the pattern from the right side. PATTERN BODY: Work A.1. Work A.2. When working back and forth, finish the row with the first stitch in A.2 so the pattern is symmetrical. Work A.1. Work moss stitch for 8-8-8-9-10-12 cm. Work A.1. Work A.2. Work A.1. The piece now measures approx. 50-52-54-56-58-60 cm from the shoulder (measured down the front, by the neck). PATTERN SLEEVES: Work moss stitch for 8-8-7-7-6-6 cm. Work A.1. Work A.2. Work A.1. Work moss stitch until the piece measures 30-29-29-27-26-25 cm. Work A.1. The piece now measures approx. 38-37-37-35-34-33 cm. DECREASE TIP (for sleeves): Decrease 1 stitch on each side of the marker-thread as follows: Work until there are 3 stitches left before the marker-thread, knit 2 together, knit 2 (marker-thread sits between these 2 stitches), slip 1 stitch knit-wise, knit 1 and pass the slipped stitch over the knitted stitch. ------------------------------------------------------- START THE PIECE HERE: ------------------------------------------------------- JUMPER – SHORT OVERVIEW OF THE PIECE: The top of the back piece is worked back and forth with circular needle until the armholes are finished from the top down. Stitches are knitted up along the shoulders for the front piece and cast on for the neck. When the armholes are finished on the front piece, front and back piece are joined and the body worked in the round with circular needle. Then the body is divided for the split and the front and back pieces finished separately. Stitches are knitted up around the armholes for the sleeves, which are first worked back and forth then in the round with short circular needle/double pointed needles. The neck is worked to finish. BACK PIECE: Cast on 17-17-17-21-21-21 stitches with circular needle size 9 mm and DROPS Snow. Purl 1 row from the wrong side. Insert 1 marker inside 3 stitches on each side. Allow them to follow you work onwards. Work MOSS STITCH back and forth – see description above, with 3 stitches in each side in stocking stitch. AT THE SAME TIME increase AFTER the marker at the beginning of the row and BEFORE the marker at the end of the row – read INCREASE TIP FROM RIGHT SIDE. On the next row (wrong side) increase in the same way – read INCREASE TIP FROM WRONG SIDE. Continue working and increase from both the right and wrong side a total of 16-18-20-20-22-24 times = 49-53-57-61-65-69 stitches. The piece is now measured from here! REMEMBER THE KNITTING TENSION! Continue the moss stitch for a further 4-3-2-1-1-2 cm. Now work PATTERN BODY – read description above, until the piece measures 14-15-16-16-17-18 cm, down the armhole. Cut the strand, place the stitches on a stitch holder. FRONT PIECE: Start on the left shoulder (when the garment is worn). Knit up 16-18-20-20-22-24 stitches inside 1 stitch along the shoulder on the back piece (1 stitch in each row along the shoulder). Work as follows from the wrong side: 13-15-17-17-19-21 stitches in moss stitch (start with knit 1), 3 stocking stitches. Continue this pattern for 6 cm. Increase for the neck at the beginning of each row from the right side (increasing after 3 stitches mid-front - remember INCREASE TIP FROM RIGHT SIDE. Increase 1 stitch 4 times. The increased stitches are worked into the moss stitch = 20-22-24-24-26-28 stitches. Work back from the wrong side. Cut the strand, place the stitches on a stitch holder and work the right shoulder as described below. Knit up 16-18-20-20-22-24 stitches inside 1 stitch along the right back shoulder Work as follows from the wrong side: 3 stocking stitches, 13-15-17-17-19-21 stitches in moss stitch (start with purl 1). Continue this pattern for 6 cm. Increase for the neck at the end of each row from the right side (increasing before 3 stitches mid-front - remember INCREASE TIP FROM RIGHT SIDE. Increase 1 stitch 4 times. The increased stitches are worked into the moss stitch = 20-22-24-24-26-28 stitches. Work back from the wrong side. Work the next row as follows from the right side: Moss stitch over the 20-22-24-24-26-28 stitches on the right front piece, cast on 9-9-9-13-13-13 stitches for the neck, moss stitch as before over the 20-22-24-24-26-28 stitches from the left front piece = 49-53-57-61-65-69 stitches. Continue the moss stitch until the piece measures 14-13-12-13-13-14 cm. Work PATTERN BODY until the piece measures 24-25-26-28-29-30 cm, measured down the armhole. Finish on the same row in the pattern as the back piece. The front and back pieces are now joined for the body. BODY: Work pattern as before over the 49-53-57-61-65-69 stitches on the front piece, cast on 1-1-1-3-5-7 stitches (= side), work the 49-53-57-61-65-69 stitches on the back piece as before, cast on 1-1-1-3-5-7 stitches = 100-108-116-128-140-152 stitches. Continue the pattern in the round until the piece measures 50-52-54-56-58-60 cm, measured from the top of the shoulder on the front piece. The pattern now should be finished. Divide the front and back pieces for a split in each side. Place the 50-54-58-64-70-76 stitches from the back piece on a stitch holder. FRONT PIECE: Change to circular needle size 8 mm. Knit 1 row from the right side and increase 22-22-26-28-30-32 stitches evenly spaced = 72-76-84-92-100-108 stitches. Work as follows from the wrong side: 1 GARTER STITCH – read description above, * purl 2, knit 2 *, work from *-* until there are 3 stitches left, purl 2 and 1 garter stitch. Work this rib back and forth for 10 cm. Cast off. The jumper measures approx. 60-62-64-66-68-70 cm from the top of the shoulder. BACK PIECE: Place the stitches on circular needle size 8 mm and work in the same way as the front piece. LEFT SLEEVE: Using circular needle size 9 mm, knit up from the right side 24-25-26-28-29-30 stitches from the bottom of the armhole up the front piece to the shoulder and 14-15-16-16-17-18 stitches from the shoulder down the back piece = 38-40-42-44-46-48 stitches round the armhole. Work PATTERN SLEEVE back and forth, until the sleeve measures 1-1-2-2-3-4 cm. Now join the sleeve on short circular needle/double pointed needles and finish the sleeve in the round. Insert 1 marker-thread at the beginning of the round (mid-under sleeve). Allow the thread to follow your work onwards. Start at the sleeve and continue the pattern in the round. When the sleeve measures 3-3-4-4-5-6 cm from where the stitches were picked up, decrease 2 stitches mid-under the sleeve – read DECREASE TIP. Decrease like this every 11-11-11-7-7-7 cm a total of 3-3-3-4-4-4 times = 32-34-36-36-38-40 stitches. Continue working until the sleeve measures 38-37-37-35-34-33 cm. Approx. 10 cm left. Try the jumper on and work to desired length before the rib. Knit 1 round and increase 12-14-16-16-18-16 stitches evenly spaced = 44-48-52-52-56-56 stitches. Change to double pointed needles size 8 mm. Work rib (knit 2, purl 2) for 10 cm. Cast off a little loosely. The sleeve measures approx. 48-47-47-45-44-43 cm. RIGHT SLEEVE: Work in the same way as the left sleeve but knit up 14-15-16-16-17-18 stitches from the bottom of the armhole up the back piece to the shoulder and 24-25-26-28-29-30 stitches down the front piece. Sew the bottom of the armhole – see sketch. NECK: Start on one shoulder and knit up, inside 1 edge stitch, 48 to 64 stitches round the neckline with short circular needle size 8 mm. Stitch count must be divisible by 4. Work rib in the round (knit 2, purl 2) for 9 cm. Cast off a little loosely. |
||||||||||||||||
Diagram explanations |
||||||||||||||||
|
||||||||||||||||
 |
||||||||||||||||
 |
||||||||||||||||
 |
||||||||||||||||
 |
||||||||||||||||
Have you finished this pattern?Tag your pictures with #dropspattern #icetidesweater or submit them to the #dropsfan gallery. Do you need help with this pattern?You'll find 34 tutorial videos, a Comments/Questions area and more by visiting the pattern on garnstudio.com. © 1982-2026 DROPS Design A/S. We reserve all rights. This document, including all its sub-sections, has copyrights. Read more about what you can do with our patterns at the bottom of each pattern on our site. |
||||||||||||||||


With over 40 years in knitting and crochet design, DROPS Design offers one of the most extensive collections of free patterns on the internet - translated to 17 languages. As of today we count 324 catalogues and 12290 patterns translated into English (UK/cm). 12290
We work hard to bring you the best knitting and crochet have to offer, inspiration and advice as well as great quality yarns at incredible prices! Would you like to use our patterns for other than personal use? You can read what you are allowed to do in the Copyright text at the bottom of all our patterns. Happy crafting!
Post a comment to pattern DROPS 243-10
We would love to hear what you have to say about this pattern!
If you want to leave a question, please make sure you select the correct category in the form below, to speed up the answering process. Required fields are marked *.