
Popular categories
Looking for a yarn?


Comments / Questions (35)
![]() Elisabet wrote:
Elisabet wrote:
Hej! Lite svårt för mig inser jag. När sätter man ihop fram och bakstycke?
28.03.2026 - 18:08DROPS Design answered:
Hej Elisabet, det gør du når du har strikket til ned under ærmerne. Det er ikke så svært, se de videoer vi har lavet, så du kan se hvordan man gør :)
09.04.2026 - 10:59
![]() Cobie wrote:
Cobie wrote:
Het telpatroon krijg ik echt niet voor elkaar!!!!!!
11.11.2025 - 14:41
![]() Valerie wrote:
Valerie wrote:
Bonjour, Pour le début devant gauche, dois je tricoter 6cm de point de riz et ensuite seulement faire les augmentations, ou je dois faire les augmentations dès le départ et ensuite tricoter jusqu'à avoir 6cm? Merci
27.06.2025 - 08:23DROPS Design answered:
Bonjour Valérie, vous tricotez d'abord 6 cm (pour l'épaule) puis vous commencez à augmenter pour l'encolure. Bon tricot!
27.06.2025 - 09:10
![]() Diane Kerner wrote:
Diane Kerner wrote:
When finishing front and back to pattern piece do you continue with the 3 stockinette stitches do you continue all the way down to rib section or do the Al. And A2 in those stitches so there is no 3 stockinette stitches?
21.03.2025 - 23:56DROPS Design answered:
Dear Diane, when you start the PATTERN for the BODY you no longer work the 3 stockinette stitches; they are worked into the pattern/charts. Happy knitting!
23.03.2025 - 20:49
![]() Henriëtte wrote:
Henriëtte wrote:
"Brei nu in patroon LIJF – lees beschrijving hierboven, tot het werk 14-15-16-16-17-18 cm meet, naar beneden over het armsgat" moet ik dan het hele rugpand meten of alleen het patroon?
22.02.2025 - 18:31DROPS Design answered:
Dag Henriëtte,
Je meet het werk vanaf de schouder naar beneden aan de kant waar het armsgat zit, dus waar de schouder het laagst is.
23.02.2025 - 19:11
![]() Henriëtte wrote:
Henriëtte wrote:
Hoe meet ik het rugpand? De gehele lengte tot het armgat of alleen het patroon a1 en a2?
22.02.2025 - 18:09DROPS Design answered:
Dag Henriëtte,
Het gaat om de hele lengte, maar wel aan de kant gemeten van het armsgat. Zie ook het antwoord op je andere vraag.
23.02.2025 - 19:12
![]() Carmen Delia Van Bockel wrote:
Carmen Delia Van Bockel wrote:
Gracias por la respuesta. Me ha quedado muy Claro
22.12.2024 - 21:08
![]() Carmen Delia Van Bockel wrote:
Carmen Delia Van Bockel wrote:
Hola. Antes de empezar quisiera saber si la explicación tejido " en redondo" o "ida y vuelta" significa que es lo mismo. El mismo patrón tejido en cualquiera de las dos formas...gracias. El modelo es precioso.
20.12.2024 - 20:07DROPS Design answered:
Hola Carmen, tejido en redondo o de ida y vuelta quiere decir que tienes que trabajar el patrón de forma diferente cuando trabajas en redondo y cuando trabajas de ida y vuelta. Al trabajar en redondo trabajas siempre por el lado derecho, por lo que trabajas los puntos como se tienen que ver por el lado derecho. Pero cuando trabajas de ida y vuelta trabajas en filas por el lado derecho o por el lado revés. Para conseguir el mismo patrón de puntos que cuando trabajas en redondo, los puntos en las filas por el lado revés tienen que trabajarse al contrario. Por eso escribimos las dos formas en las explicaciones; usarás una u otra según la sección del patrón que estés trabajando.
22.12.2024 - 19:45
![]() Gitte wrote:
Gitte wrote:
Hei, jeg skjønner ikke helt at når du har strikkt de to forstykkene sammen øverst, så står det at du må strikke 13 cm perlestikk. Men på bildene av genseren går den rett inn i mønsteret, uten perlestrikk først. Det vil si genseren blir mye lengre enn på bildet..? Takk!
14.11.2024 - 12:16DROPS Design answered:
Hei Gitte. Ta en titt på vårt forrige svar til deg. mvh DROPS Design
18.11.2024 - 14:18
![]() Gitte wrote:
Gitte wrote:
Hej, som som en bruger har bemærket i 2023, er der fejl i opskriften: man skal starte med ret, ikke vrang i perlestrikken på højre forside, ellers går det ikke op når den sættes sammen med venstre. Mvh Gitte
10.11.2024 - 15:51
|
||||||||||||||||
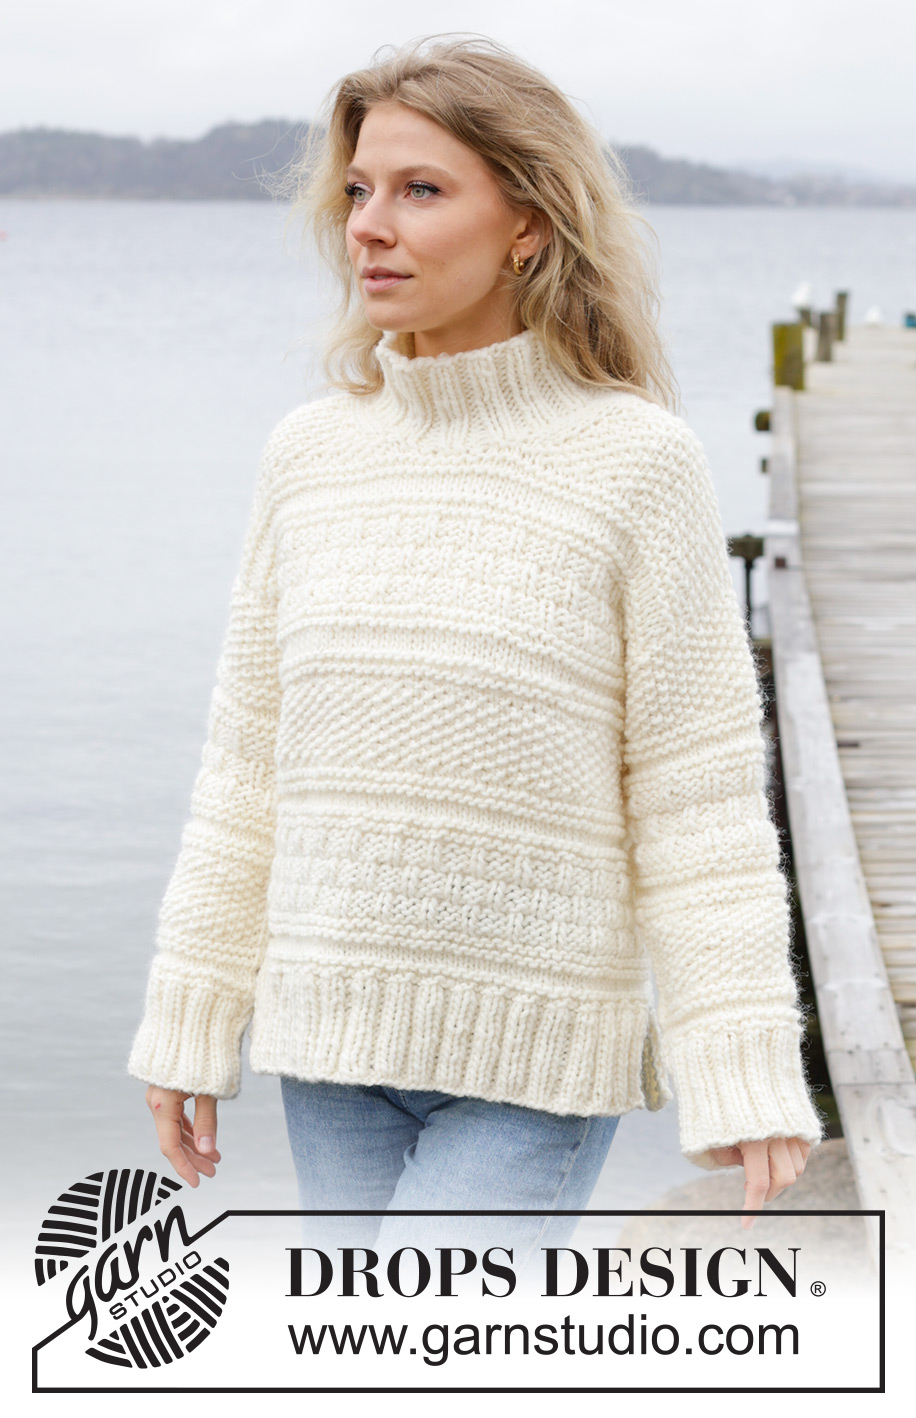
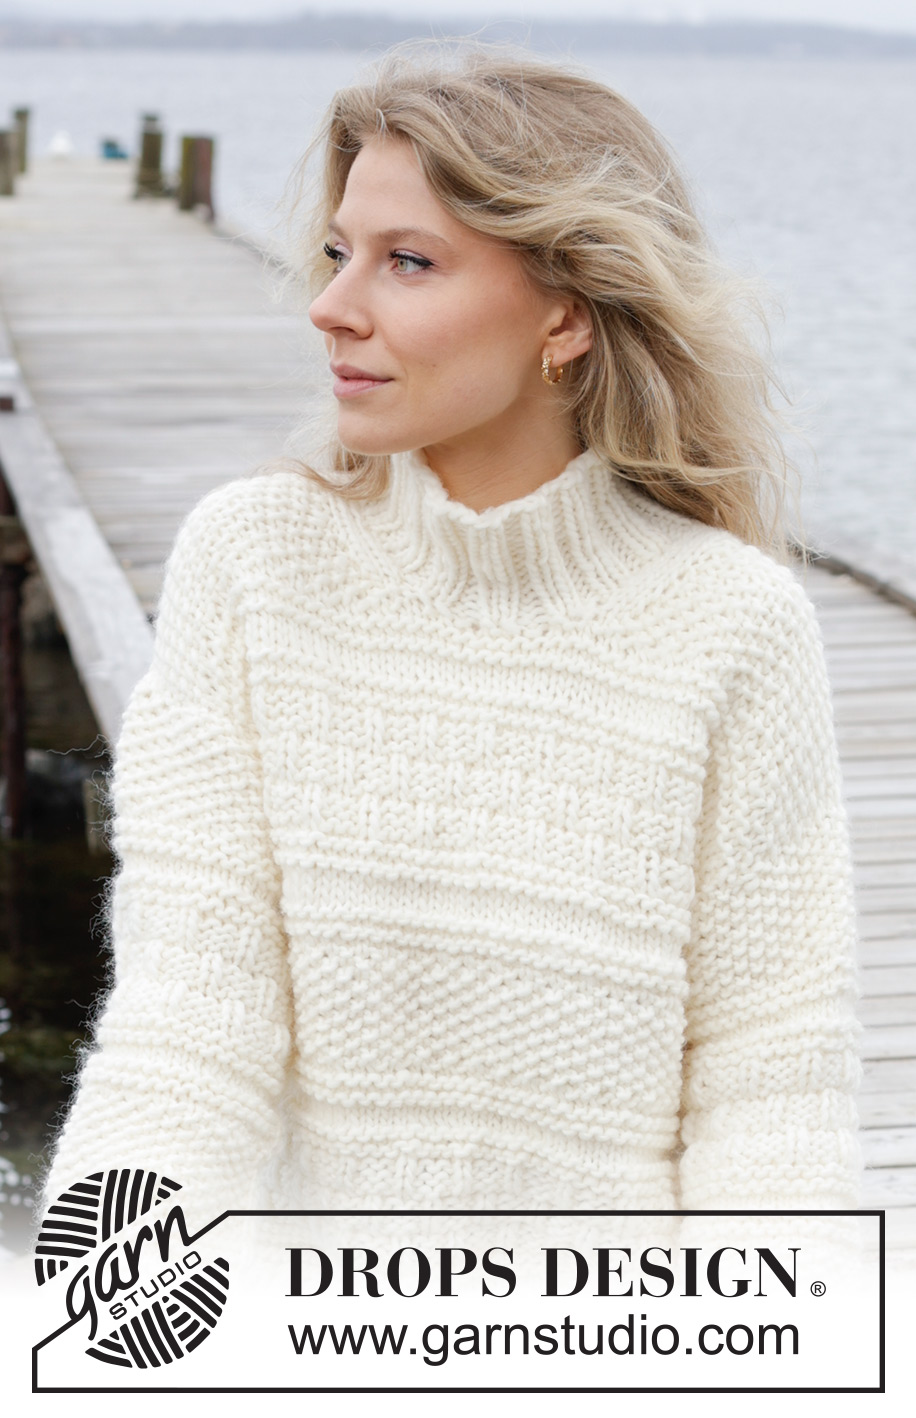
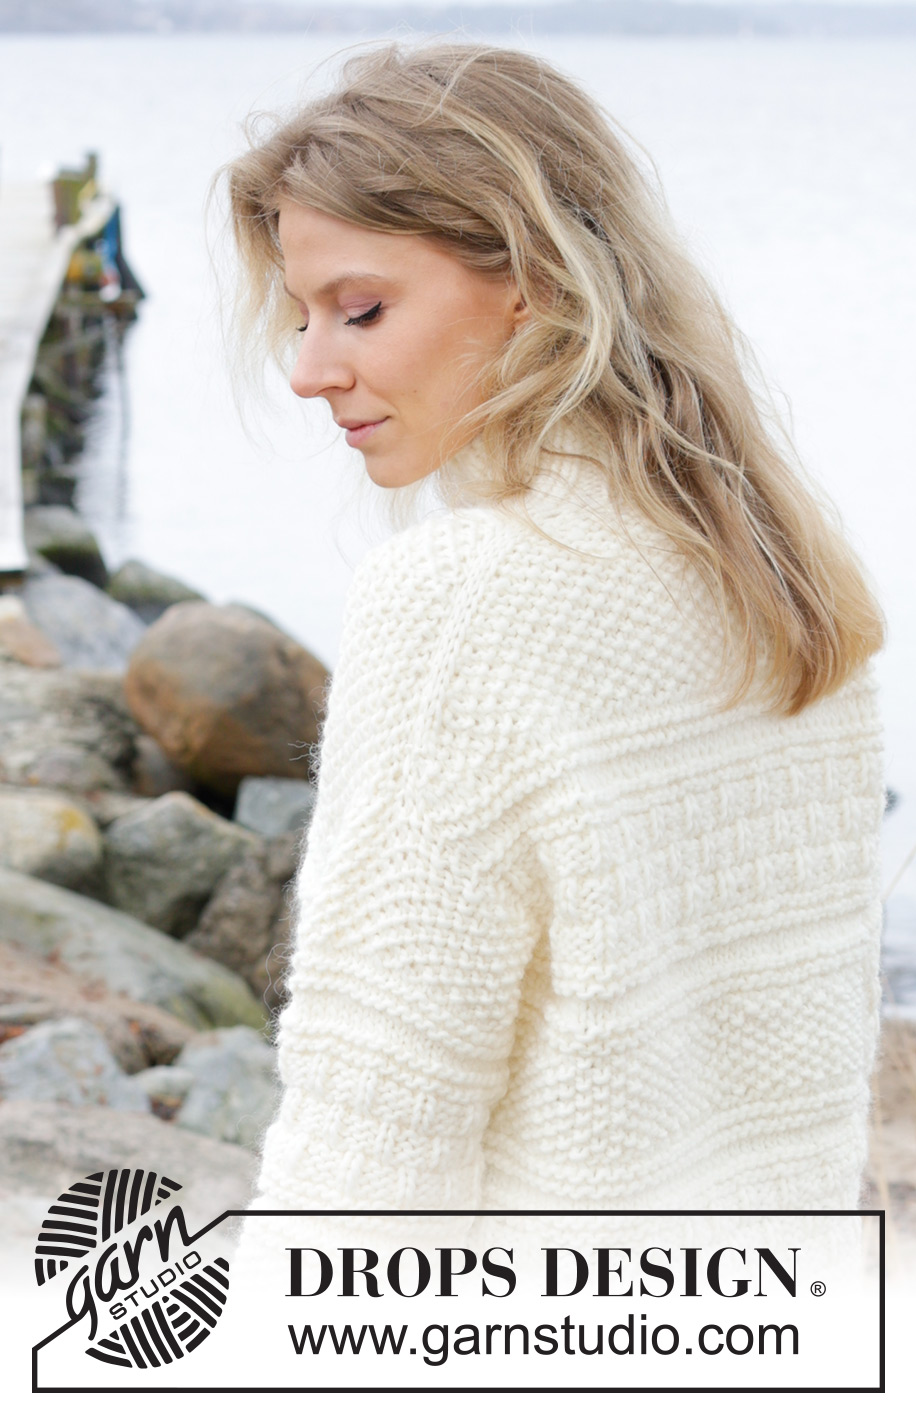
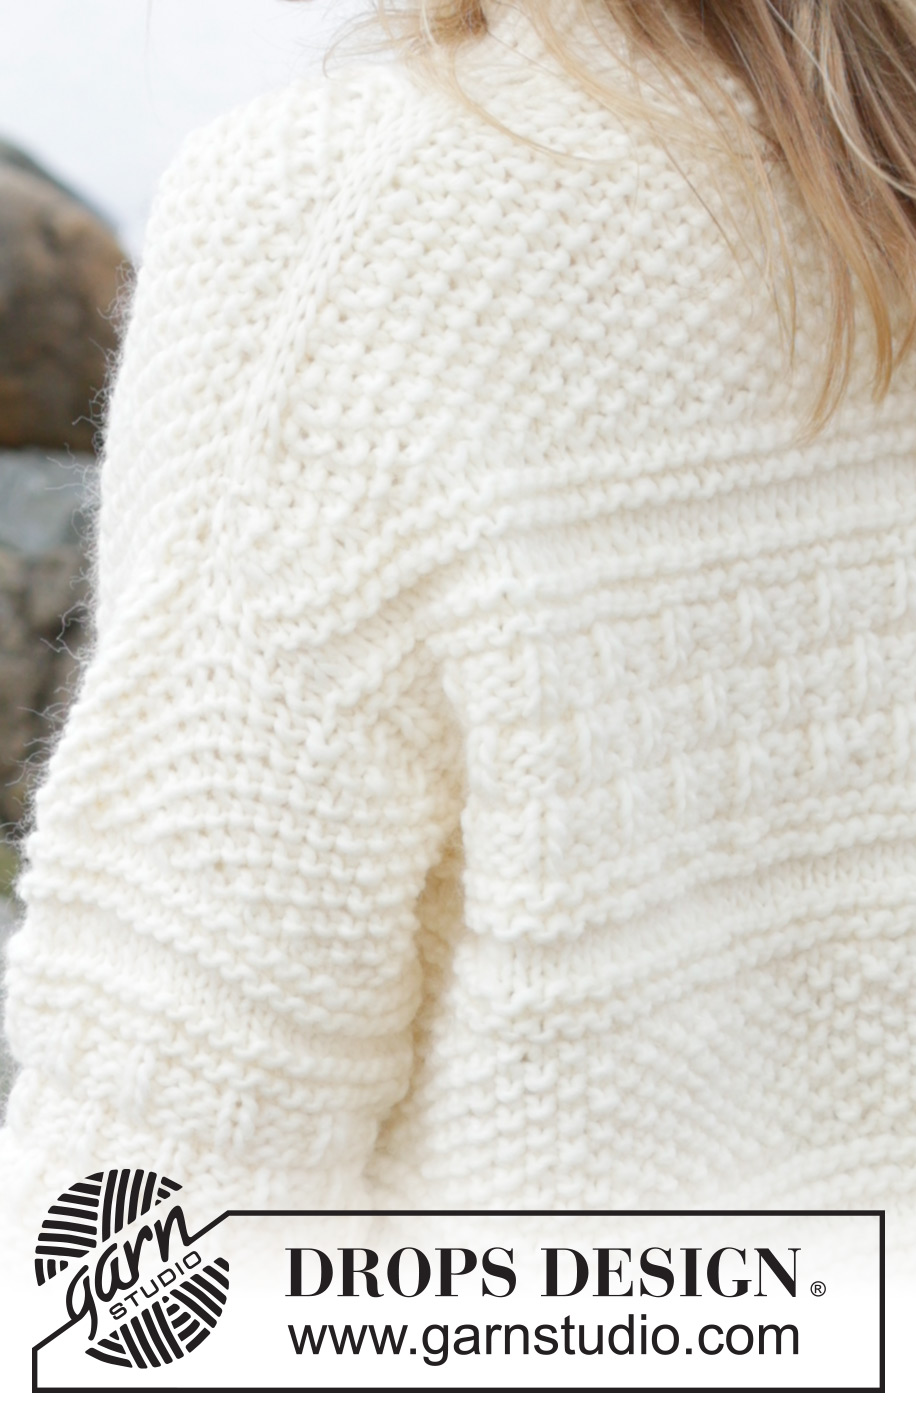
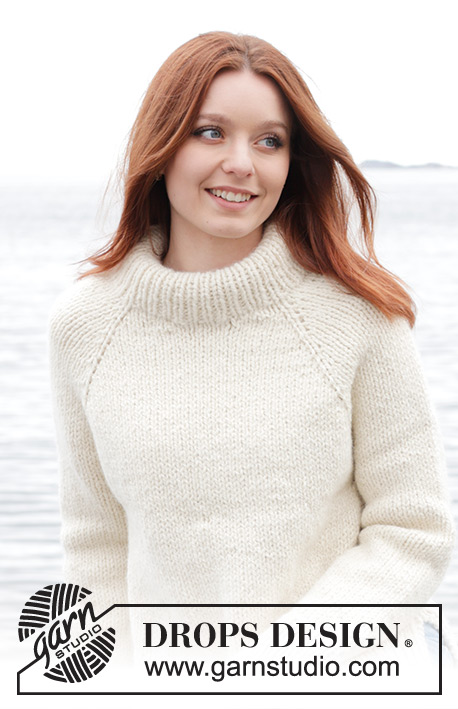
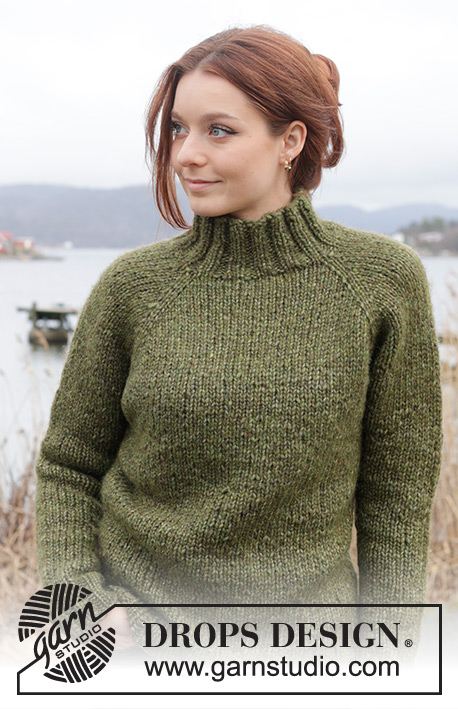
Ice Tide#icetidesweater |
||||||||||||||||
 |
 |
|||||||||||||||
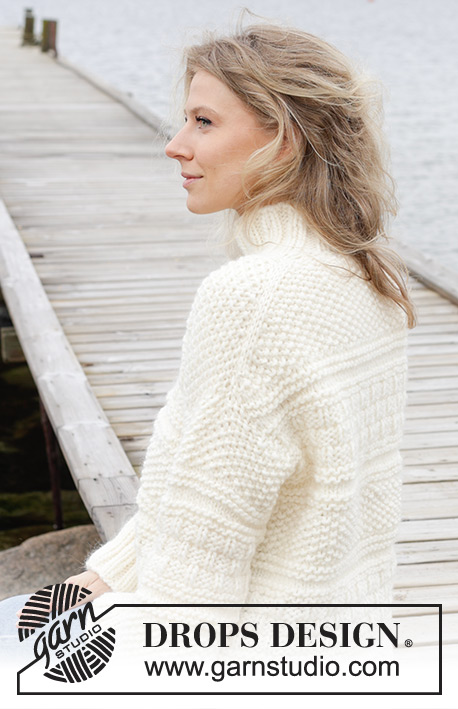
Knitted jumper in DROPS Snow. The piece is worked top down with European/diagonal shoulders, relief pattern and high neck. Sizes XS - XXL.
DROPS 243-10 |
||||||||||||||||
|
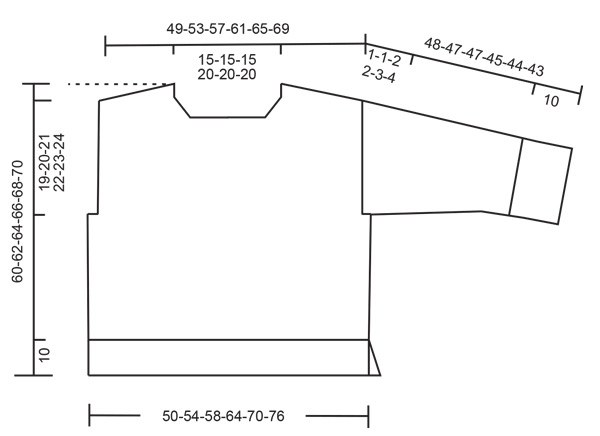
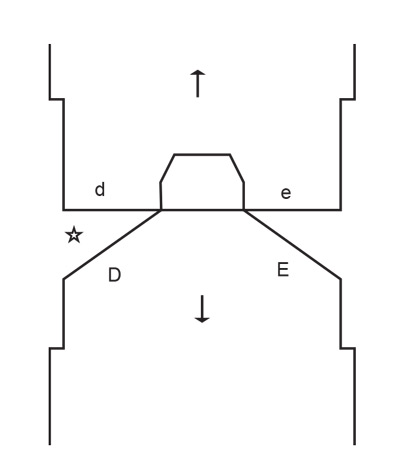
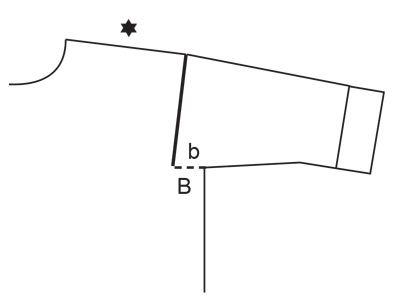
------------------------------------------------------- EXPLANATIONS FOR THE PATTERN: ------------------------------------------------------- GARTER STITCH (worked back and forth): Knit all rows. 1 ridge = knit 2 rows. INCREASE TIP FROM THE RIGHT SIDE: Increase towards the left AFTER MARKER: Use left needle to pick up yarn between 2 stitches from row below, pick up yarn from the front and knit in the stitch loop that is on the back of the needle. Increase towards the right BEFORE MARKER: Use left needle to pick up yarn between 2 stitches from row below, pick up yarn from the back and knit in the stitch loop that is on the front side of the needle. INCREASE TIP FROM THE WRONG SIDE: Increase towards the right AFTER MARKER: Use left needle to pick up yarn between 2 stitches from row below, pick up yarn from the back and purl in the stitch loop that is on the front side of the needle. Increase towards the left BEFORE MARKER: Use left needle to pick up yarn between 2 stitches from row below, pick up yarn from the front and purl in the stitch loop that is on the back side of the needle. MOSS STITCH (worked in the round): Round 1: * Kit 1, purl 1 *, work from *-*. Round 2: Knit over purl and purl over knit. Repeat round 2 onwards. MOSS STITCH (worked back and forth): Row 1: * Knit 1. purl 1 *, work from *-*. Row 2: Knit over purl and purl over knit. Repeat row 2 onwards. PATTERN: See diagrams A.1 and A.2. The diagrams show all rows in the pattern from the right side. PATTERN BODY: Work A.1. Work A.2. When working back and forth, finish the row with the first stitch in A.2 so the pattern is symmetrical. Work A.1. Work moss stitch for 8-8-8-9-10-12 cm. Work A.1. Work A.2. Work A.1. The piece now measures approx. 50-52-54-56-58-60 cm from the shoulder (measured down the front, by the neck). PATTERN SLEEVES: Work moss stitch for 8-8-7-7-6-6 cm. Work A.1. Work A.2. Work A.1. Work moss stitch until the piece measures 30-29-29-27-26-25 cm. Work A.1. The piece now measures approx. 38-37-37-35-34-33 cm. DECREASE TIP (for sleeves): Decrease 1 stitch on each side of the marker-thread as follows: Work until there are 3 stitches left before the marker-thread, knit 2 together, knit 2 (marker-thread sits between these 2 stitches), slip 1 stitch knit-wise, knit 1 and pass the slipped stitch over the knitted stitch. ------------------------------------------------------- START THE PIECE HERE: ------------------------------------------------------- JUMPER – SHORT OVERVIEW OF THE PIECE: The top of the back piece is worked back and forth with circular needle until the armholes are finished from the top down. Stitches are knitted up along the shoulders for the front piece and cast on for the neck. When the armholes are finished on the front piece, front and back piece are joined and the body worked in the round with circular needle. Then the body is divided for the split and the front and back pieces finished separately. Stitches are knitted up around the armholes for the sleeves, which are first worked back and forth then in the round with short circular needle/double pointed needles. The neck is worked to finish. BACK PIECE: Cast on 17-17-17-21-21-21 stitches with circular needle size 9 mm and DROPS Snow. Purl 1 row from the wrong side. Insert 1 marker inside 3 stitches on each side. Allow them to follow you work onwards. Work MOSS STITCH back and forth – see description above, with 3 stitches in each side in stocking stitch. AT THE SAME TIME increase AFTER the marker at the beginning of the row and BEFORE the marker at the end of the row – read INCREASE TIP FROM RIGHT SIDE. On the next row (wrong side) increase in the same way – read INCREASE TIP FROM WRONG SIDE. Continue working and increase from both the right and wrong side a total of 16-18-20-20-22-24 times = 49-53-57-61-65-69 stitches. The piece is now measured from here! REMEMBER THE KNITTING TENSION! Continue the moss stitch for a further 4-3-2-1-1-2 cm. Now work PATTERN BODY – read description above, until the piece measures 14-15-16-16-17-18 cm, down the armhole. Cut the strand, place the stitches on a stitch holder. FRONT PIECE: Start on the left shoulder (when the garment is worn). Knit up 16-18-20-20-22-24 stitches inside 1 stitch along the shoulder on the back piece (1 stitch in each row along the shoulder). Work as follows from the wrong side: 13-15-17-17-19-21 stitches in moss stitch (start with knit 1), 3 stocking stitches. Continue this pattern for 6 cm. Increase for the neck at the beginning of each row from the right side (increasing after 3 stitches mid-front - remember INCREASE TIP FROM RIGHT SIDE. Increase 1 stitch 4 times. The increased stitches are worked into the moss stitch = 20-22-24-24-26-28 stitches. Work back from the wrong side. Cut the strand, place the stitches on a stitch holder and work the right shoulder as described below. Knit up 16-18-20-20-22-24 stitches inside 1 stitch along the right back shoulder Work as follows from the wrong side: 3 stocking stitches, 13-15-17-17-19-21 stitches in moss stitch (start with purl 1). Continue this pattern for 6 cm. Increase for the neck at the end of each row from the right side (increasing before 3 stitches mid-front - remember INCREASE TIP FROM RIGHT SIDE. Increase 1 stitch 4 times. The increased stitches are worked into the moss stitch = 20-22-24-24-26-28 stitches. Work back from the wrong side. Work the next row as follows from the right side: Moss stitch over the 20-22-24-24-26-28 stitches on the right front piece, cast on 9-9-9-13-13-13 stitches for the neck, moss stitch as before over the 20-22-24-24-26-28 stitches from the left front piece = 49-53-57-61-65-69 stitches. Continue the moss stitch until the piece measures 14-13-12-13-13-14 cm. Work PATTERN BODY until the piece measures 24-25-26-28-29-30 cm, measured down the armhole. Finish on the same row in the pattern as the back piece. The front and back pieces are now joined for the body. BODY: Work pattern as before over the 49-53-57-61-65-69 stitches on the front piece, cast on 1-1-1-3-5-7 stitches (= side), work the 49-53-57-61-65-69 stitches on the back piece as before, cast on 1-1-1-3-5-7 stitches = 100-108-116-128-140-152 stitches. Continue the pattern in the round until the piece measures 50-52-54-56-58-60 cm, measured from the top of the shoulder on the front piece. The pattern now should be finished. Divide the front and back pieces for a split in each side. Place the 50-54-58-64-70-76 stitches from the back piece on a stitch holder. FRONT PIECE: Change to circular needle size 8 mm. Knit 1 row from the right side and increase 22-22-26-28-30-32 stitches evenly spaced = 72-76-84-92-100-108 stitches. Work as follows from the wrong side: 1 GARTER STITCH – read description above, * purl 2, knit 2 *, work from *-* until there are 3 stitches left, purl 2 and 1 garter stitch. Work this rib back and forth for 10 cm. Cast off. The jumper measures approx. 60-62-64-66-68-70 cm from the top of the shoulder. BACK PIECE: Place the stitches on circular needle size 8 mm and work in the same way as the front piece. LEFT SLEEVE: Using circular needle size 9 mm, knit up from the right side 24-25-26-28-29-30 stitches from the bottom of the armhole up the front piece to the shoulder and 14-15-16-16-17-18 stitches from the shoulder down the back piece = 38-40-42-44-46-48 stitches round the armhole. Work PATTERN SLEEVE back and forth, until the sleeve measures 1-1-2-2-3-4 cm. Now join the sleeve on short circular needle/double pointed needles and finish the sleeve in the round. Insert 1 marker-thread at the beginning of the round (mid-under sleeve). Allow the thread to follow your work onwards. Start at the sleeve and continue the pattern in the round. When the sleeve measures 3-3-4-4-5-6 cm from where the stitches were picked up, decrease 2 stitches mid-under the sleeve – read DECREASE TIP. Decrease like this every 11-11-11-7-7-7 cm a total of 3-3-3-4-4-4 times = 32-34-36-36-38-40 stitches. Continue working until the sleeve measures 38-37-37-35-34-33 cm. Approx. 10 cm left. Try the jumper on and work to desired length before the rib. Knit 1 round and increase 12-14-16-16-18-16 stitches evenly spaced = 44-48-52-52-56-56 stitches. Change to double pointed needles size 8 mm. Work rib (knit 2, purl 2) for 10 cm. Cast off a little loosely. The sleeve measures approx. 48-47-47-45-44-43 cm. RIGHT SLEEVE: Work in the same way as the left sleeve but knit up 14-15-16-16-17-18 stitches from the bottom of the armhole up the back piece to the shoulder and 24-25-26-28-29-30 stitches down the front piece. Sew the bottom of the armhole – see sketch. NECK: Start on one shoulder and knit up, inside 1 edge stitch, 48 to 64 stitches round the neckline with short circular needle size 8 mm. Stitch count must be divisible by 4. Work rib in the round (knit 2, purl 2) for 9 cm. Cast off a little loosely. |
||||||||||||||||
Diagram explanations |
||||||||||||||||
|
||||||||||||||||
 |
||||||||||||||||
 |
||||||||||||||||
 |
||||||||||||||||
 |
||||||||||||||||
Have you finished this pattern?Tag your pictures with #dropspattern #icetidesweater or submit them to the #dropsfan gallery. Do you need help with this pattern?You'll find 34 tutorial videos, a Comments/Questions area and more by visiting the pattern on garnstudio.com. © 1982-2026 DROPS Design A/S. We reserve all rights. This document, including all its sub-sections, has copyrights. Read more about what you can do with our patterns at the bottom of each pattern on our site. |
||||||||||||||||


With over 40 years in knitting and crochet design, DROPS Design offers one of the most extensive collections of free patterns on the internet - translated to 17 languages. As of today we count 324 catalogues and 12290 patterns translated into English (UK/cm). 12290
We work hard to bring you the best knitting and crochet have to offer, inspiration and advice as well as great quality yarns at incredible prices! Would you like to use our patterns for other than personal use? You can read what you are allowed to do in the Copyright text at the bottom of all our patterns. Happy crafting!
Post a comment to pattern DROPS 243-10
We would love to hear what you have to say about this pattern!
If you want to leave a question, please make sure you select the correct category in the form below, to speed up the answering process. Required fields are marked *.