
Popular categories
Looking for a yarn?


Comments / Questions (28)
![]() Steph wrote:
Steph wrote:
I just watched Garnstudio’s 3 part YouTube video tutorial for diagonal shoulders but I’m still confused on how to get started since it’s my first time working a diagonal shoulder. I have placed the middle section on a line of thread like instructed. and the other shoulder on a separate line of thread however in the Garnstudio 3 part video on YouTube for working a diagonal shoulders is worked across in one piece. Am I missing something?
25.09.2025 - 01:51
![]() Dominique wrote:
Dominique wrote:
Bonjour Est-il possible de tricoter le corps jusqu'aux emmanchures en circulaire?
12.09.2025 - 12:15DROPS Design answered:
Bonjour Dominique, bien sur. Rappelez-vous que vous avez les fentes sur les cotes (ils sont tricotes en allers retours). Vous pouvez omettre les fentes et faire le pull classique. Bon tricot!
12.09.2025 - 12:21
![]() Sonya wrote:
Sonya wrote:
Thanks for your very quick reply and your helpful advise. Can't wait to start knitting this sweater. 😊
13.08.2025 - 23:42
![]() Sonya wrote:
Sonya wrote:
Hi I would like to use Drops Paris cotton yarn for the Tip of the Iceberg Sweater. I knitted a test gauge using 5.5mm needles and surprisingly its an exact match. Does this mean I can use Paris or are there other factors I don't know about that will affect the overall finish of the sweater? Thanks Sonya
13.08.2025 - 11:57DROPS Design answered:
Dear Sonya, as long as you get the correct tension in width you can use DROPS Paris instead of the both yarns required here; if you don't get the same number of rows you might have to adjust the pattern to match your own tension. Happy knitting!
13.08.2025 - 14:26
![]() Hennie Cramer wrote:
Hennie Cramer wrote:
Hoe moet je de teruggaande naald breien als je de mouw op een rondbreinaald breit?
11.08.2025 - 22:13DROPS Design answered:
Dag Hennie,
Bij het telpatroon staat aangegeven hoe je de open vakjes en de zwarte vakjes breit aan zowel de goede als de verkeerde kant.
18.08.2025 - 10:28
![]() Hennie Cramer wrote:
Hennie Cramer wrote:
De mindering aan de hals in het voorpand staat nergens in de beschrijving? Ik heb voor deschouder in het voorpand na de de steken voor de hals 33 steken ,terwijl de schouder van het achterpand 28 steken heefthoe kan dat??
16.06.2025 - 17:37DROPS Design answered:
Dag Hennie,
In de paragraaf over de HALS, na de paragraaf over het voorpand staat dat je een aantal keren moet minderen voor de hals.
16.06.2025 - 21:44
![]() Hennie Cramer wrote:
Hennie Cramer wrote:
Hoe krijg ik een diagonale lijn in de schouders van het achterpand? Wordt er maar één steek gehinderd voor de hals in het achterpand?
08.06.2025 - 14:50DROPS Design answered:
Dag Hennie,
Er wordt inderdaad maar 1 steek geminderd op het achterpand voor de hals, waardoor je aan de achterkant eigenlijk geen diagonale lijn ziet naast de halsboord.
10.06.2025 - 19:59
![]() Hennie Cramer wrote:
Hennie Cramer wrote:
De mindering voor de hals achter (31 st.) aan de linkerkant? Wordt er slechts 1 st. voor de hals van beide schouders gehinderd?
07.06.2025 - 16:15DROPS Design answered:
Dag Hennie,
Ja, inderdaad, slechts 1 steek, zowel aan de rechterkant en de linker kant, vlak naast waar je de middelste steken hebt afgekant.
10.06.2025 - 19:52
![]() Hennie Cramer wrote:
Hennie Cramer wrote:
Geen beschrijving van de"kop" van de mouw?
04.03.2025 - 10:39DROPS Design answered:
Dag Hennie,
Het laatste deel van de mouw wordt heen en weer gebreid. Dit wordt de kop van de mouw genoemd, maar is eigenlijk geen kop, omdat er geen ronding wordt gemaakt. Bij het in elkaar zetten van het werk wordt het laatste stukje a.h.w. een stukje in het pand geschoven (zie tekening)
06.03.2025 - 19:50
![]() Hennie Cramer wrote:
Hennie Cramer wrote:
Naai de zijnadendicht aan de binnenkant van de kantsteek- begin aan de onderkant van de arm en brei naar beneden tot aan de boord voor zijsplit Hoe kan dit :eerst dichtdraaien en daarna de zijkant breien?
10.02.2025 - 18:11DROPS Design answered:
Dag Hennie,
Je naait de zijnaden dicht vanaf de armsgaten naar beneden en je laat de onderste 9 cm open, zodat je een split hebt van 9 cm. Deze 9 cm komt overeen met de hoogte van de boord.
11.02.2025 - 20:54
|
|||||||||||||||||||
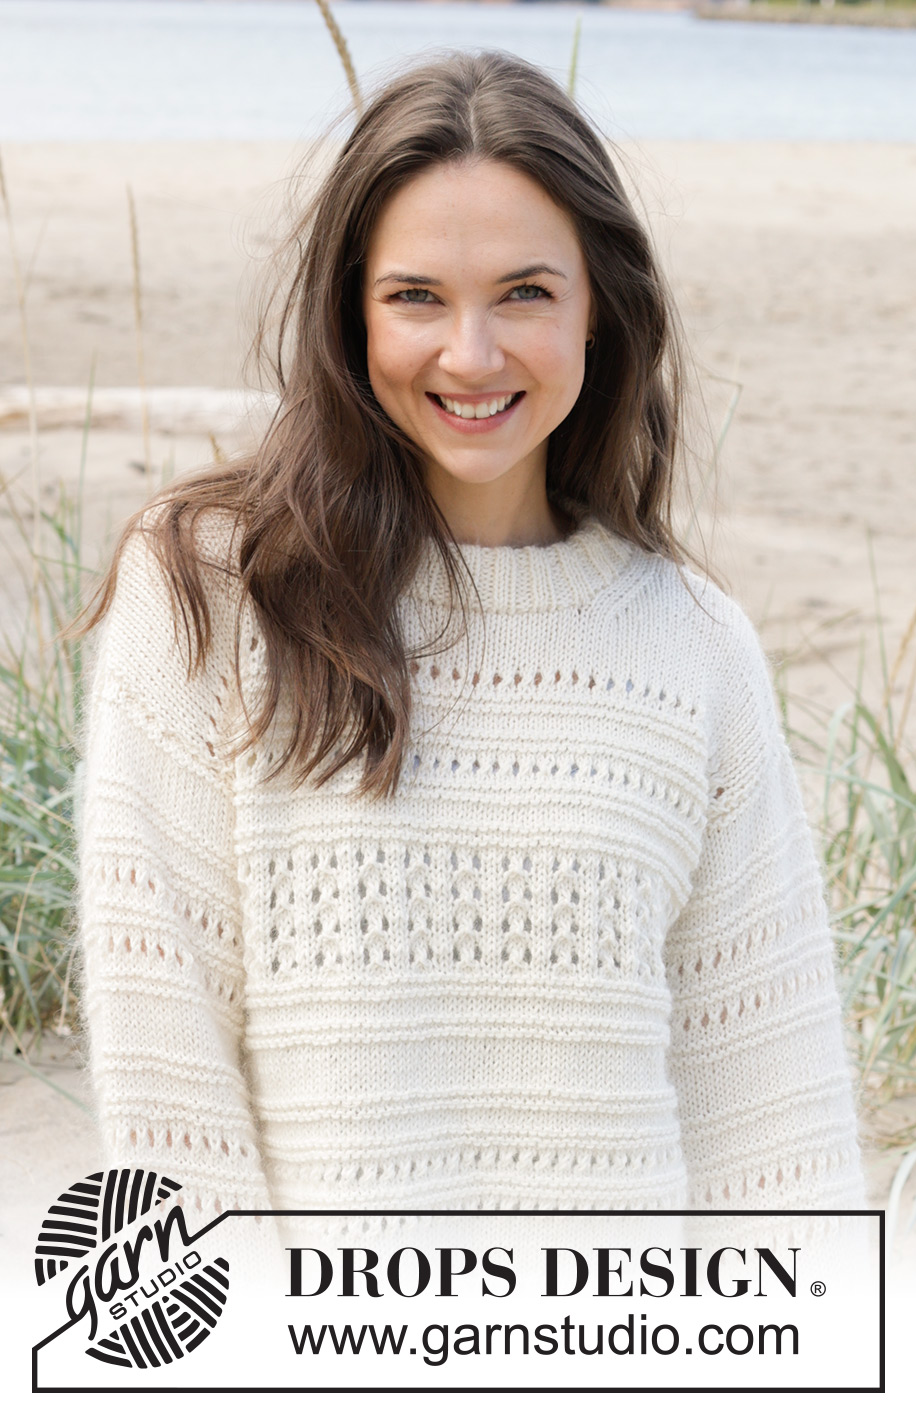
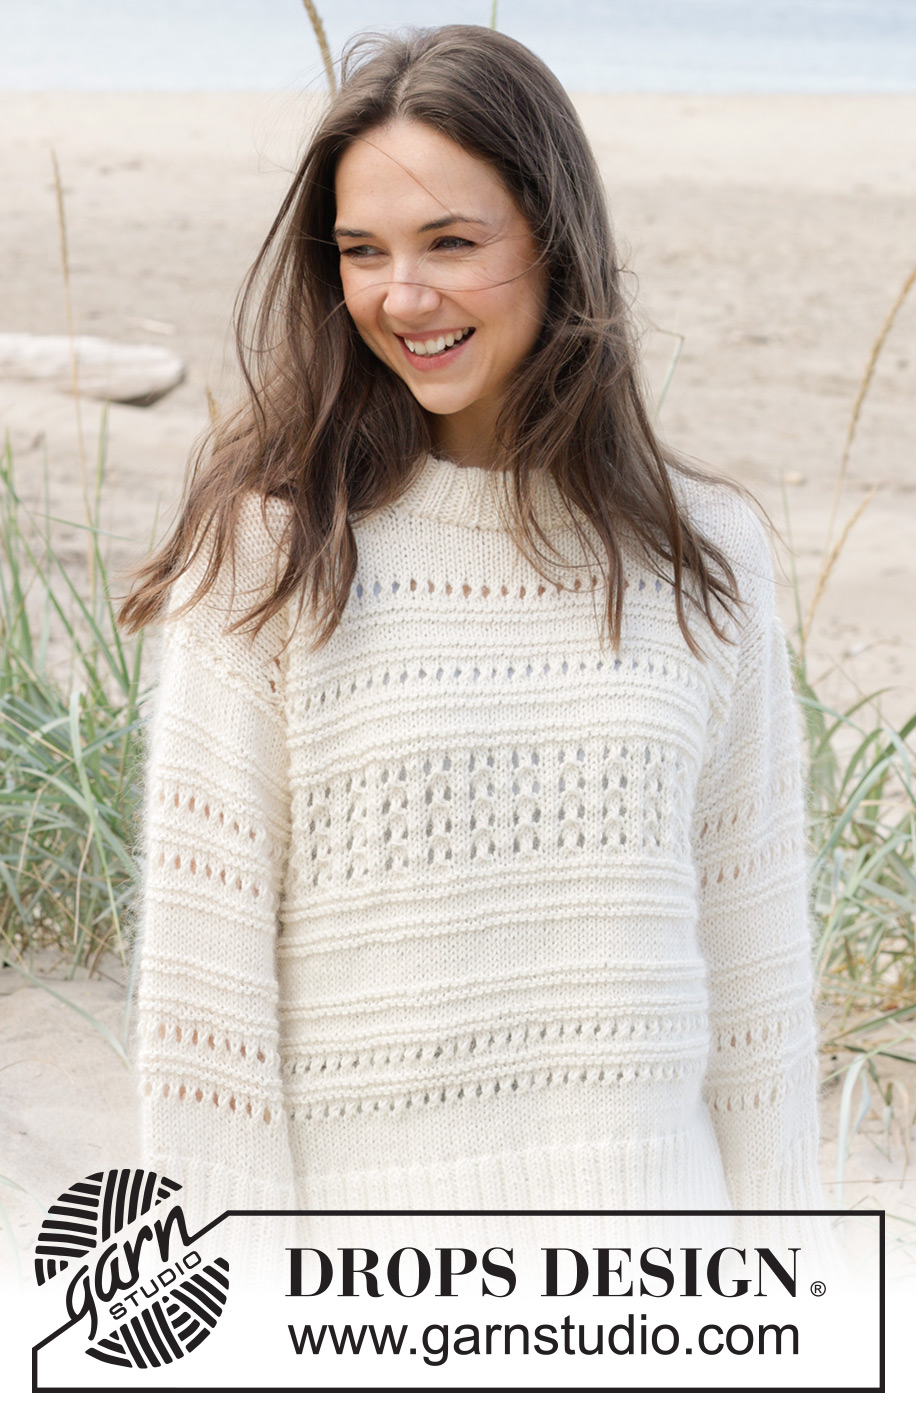
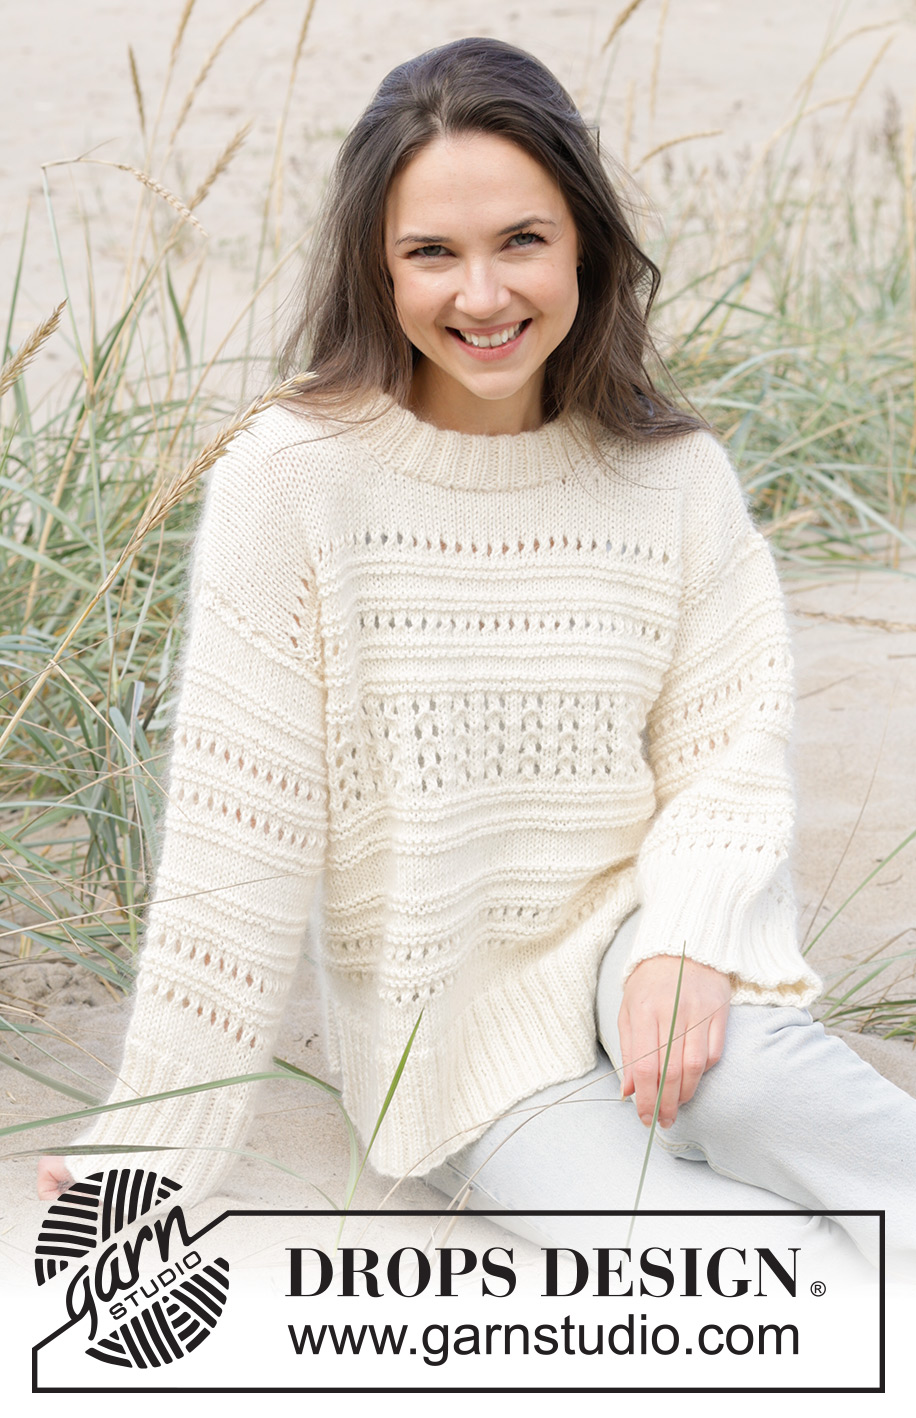
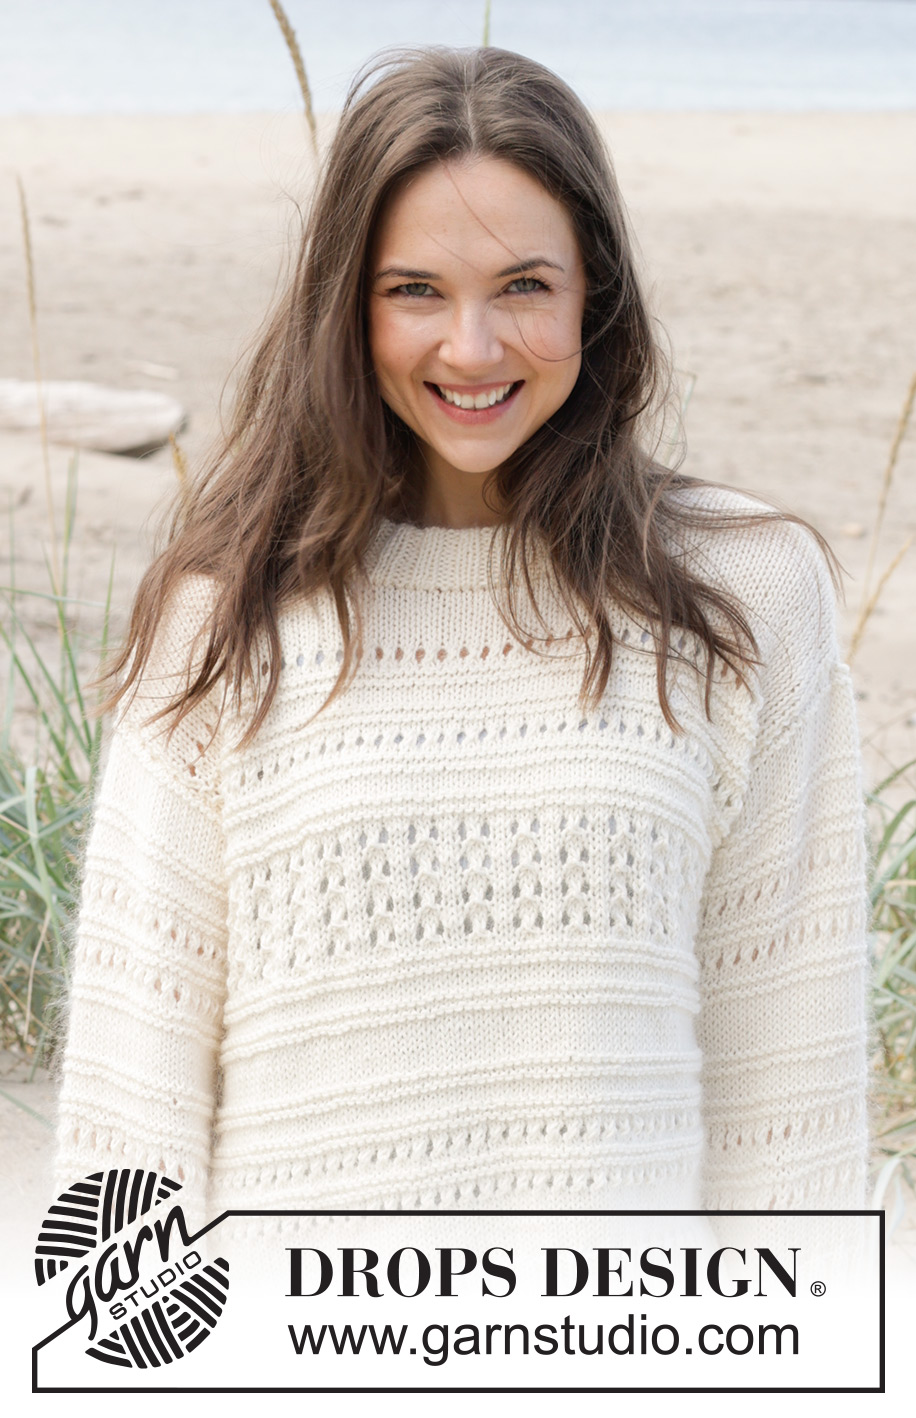
Tip of the Iceberg#tipoftheicebergsweater |
|||||||||||||||||||
 |
 |
||||||||||||||||||
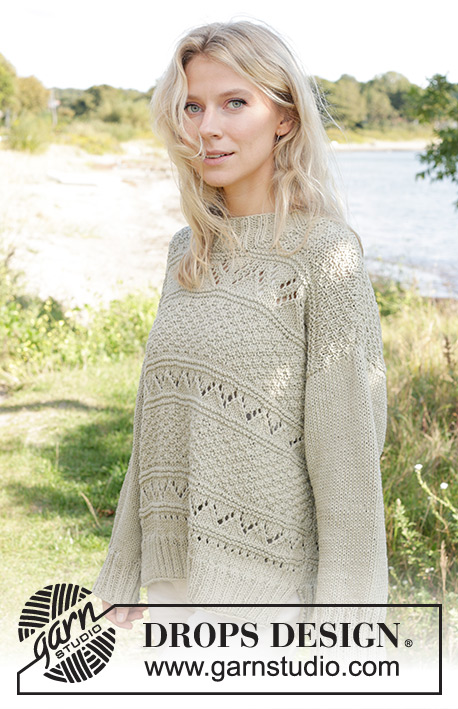
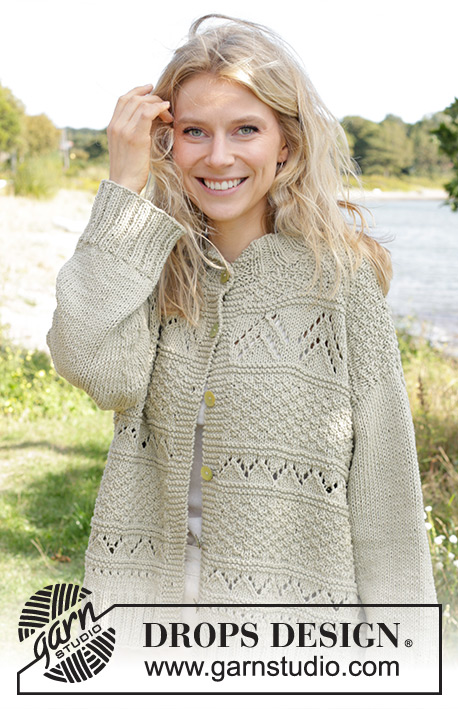
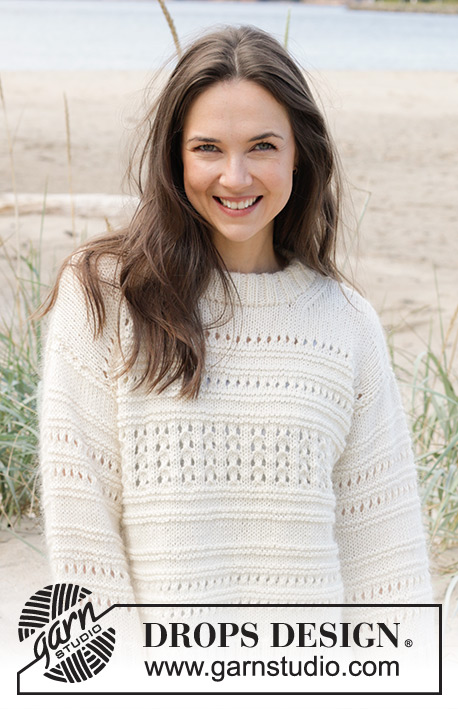
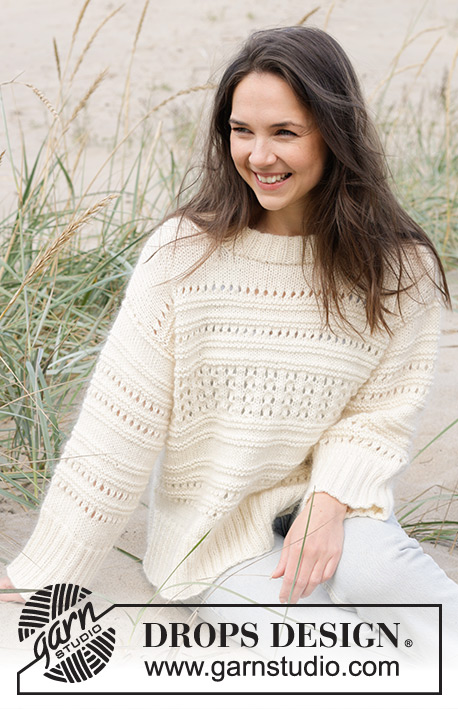
Knitted jumper in DROPS Cotton Merino or DROPS Sky and DROPS Kid-Silk. The piece is worked bottom up, with relief-pattern, lace pattern and splits in the sides. Sizes S - XXXL.
DROPS 239-1 |
|||||||||||||||||||
|
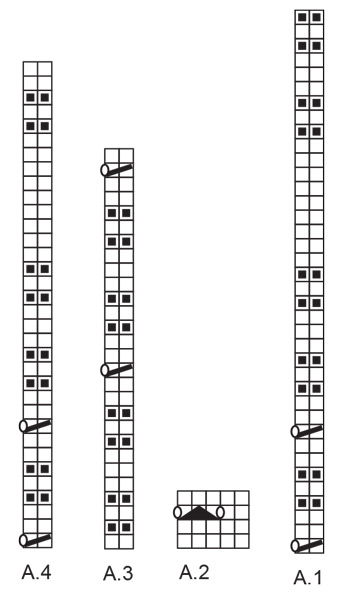
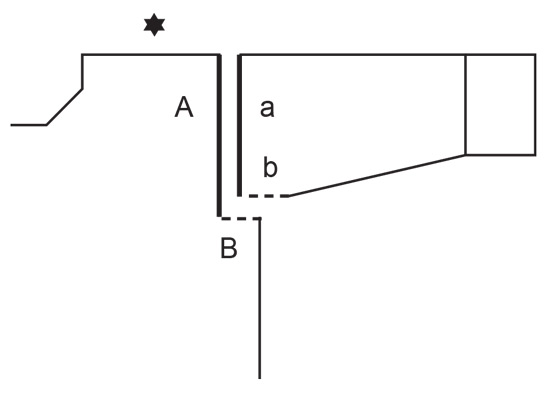
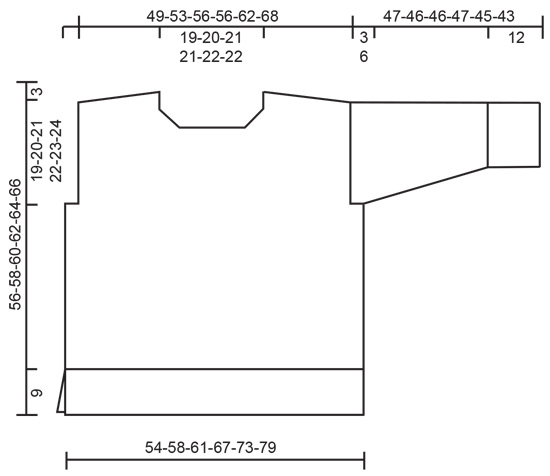
------------------------------------------------------- EXPLANATIONS FOR THE PATTERN: ------------------------------------------------------- RIDGE/GARTER STITCH (worked back and forth): Knit all rows. 1 ridge = knit 2 rows. PATTERN: See diagrams A.1 to A.4. The diagrams show all rows in the pattern from the right side. DECREASE TIP (for neck): All decreases are worked from the right side: BEGINNING OF ROW (working from the neck): 1 edge stitch in garter stitch, knit 2, slip 1 stitch as if to knit, knit 1 and pass the slipped stitch over the knitted stitch. END OF ROW (working towards the neck): Work until there are 5 stitches left, knit 2 together, knit 2 and 1 edge stitch in garter stitch. INCREASE TIP (for sleeves): Increase 1 stitch on each side of the marker-stitch by making 1 yarn over. On the next round work the yarn overs twisted to avoid holes, then work the new stitches into the pattern. ------------------------------------------------------- START THE PIECE HERE: ------------------------------------------------------- JUMPER – SHORT OVERVIEW OF THE PIECE: The back and front pieces are worked separately, back and forth on circular needle, bottom up. The sleeves are worked in the round with double pointed needles/short circular needle, bottom up as far as the sleeve cap, which is then finished back and forth. The neck is worked after the piece has been sewn together. BACK PIECE: Cast on 122-134-138-150-166-178 stitches with circular needle size 4 mm and 1 strand of each quality (2 strands). Purl 1 row from the wrong side. Work the next row as follows from the right side: 2 stitches in GARTER STITCH – read description above, * knit 2, purl 2 *, work from *-* until there are 4 stitches left, knit 2 and 2 stitches in garter stitch. Continue this rib for 9 cm. Knit 1 row from the right side and decrease 35-42-41-43-49-51 stitches evenly spaced, in addition cast on 1 stitch at the beginning and end of this row (edge stitches) = 89-94-99-109-119-129 stitches. Change to circular needle size 5.5 mm. Work stocking stitch with 1 edge stitch in garter stitch on each side. REMEMBER THE KNITTING TENSION! When the piece measures 12-12-13-13-14-14 cm, start the pattern as well as decreasing for the armholes, neck and diagonal shoulders. Read sections PATTERN, ARMHOLES, NECK and DIAGONAL SHOULDERS before continuing. PATTERN: Work the first row as follows from the right side: 1 edge stitch in garter stitch, work A.1 until there is 1 stitch left, 1 edge stitch in garter stitch - NOTE: On each row with lace pattern where the pattern does not fit (applies to all sizes apart from M), knit the last stitch before the edge stitch). Continue this pattern. When A.1 is finished, work as follows: 1 edge stitch in garter stitch, work A.2 until there are 3 stitches left, 2 stitches in stocking stitch, 1 edge stitch in garter stitch. Continue this pattern until A.2 has been worked 4-4-4-5-5-6 times in height. After A.2, work as follows from the right side: 1 edge stitch in garter stitch, work A.3 until there is 1 stitch left, 1 edge stitch in garter stitch. When A.3 is finished the piece measures approx. 47-47-48-50-51-53 cm from the cast-on edge. Continue with stocking stitch and 1 edge stitch in garter stitch on each side to finished length. ARMHOLES: When the piece measures 34-35-36-37-38-39 cm from the cast-on edge, cast off 5-5-5-10-10-10 stitches at the beginning of the next 2 rows = 79-84-89-89-99-109 stitches. NECK: When the piece measures 53-55-57-59-61-63 cm, cast off the middle 29-30-31-31-33-33 stitches for the neck and finish each shoulder separately. Decrease 1 stitch for the neck on the next row from the right side – read DECREASE TIP = 24-26-28-28-32-37 stitches on the shoulder. DIAGONAL SHOULDERS: AT THE SAME TIME, when the piece measures 53-55-57-59-61-63 cm, place stitches on a thread for the diagonal shoulders (work the stitches first to avoid having to cut the strand). Place stitches on a thread from the side as follows: 8-9-9-9-11-12 stitches 2 times, then the remaining 8-8-10-10-10-13 stitches. When all the stitches are on the thread, place them back on circular needle size 5.5 mm. Work 1 row of stocking stitch; to avoid a hole in the transition between stitches being placed on the thread, pick up the strand between 2 stitches and work it twisted together with the first stitch on the left needle. Cast off. Work the other shoulder in the same way. FRONT PIECE: Cast on and work in the same way as the back piece, until A.3 is finished in height – remember to cast off for the armholes. There are 79-84-89-89-99-109 stitches and the piece measures approx. 47-47-48-50-51-53 cm from the cast-on edge. Continue with stocking stitch and 1 edge stitch in garter stitch on each side. When the piece measures 49-50-51-53-54-56 cm, place the middle 23-24-23-23-23-23 stitches on a thread for the neck and finish each shoulder separately. Read sections NECK and DIAGONAL SHOULDERS before continuing. NECK: Decrease 1 stitch for the neck on each row from the right side – remember DECREASE TIP, 4-4-5-5-6-6 times. DIAGONAL SHOULDERS: AT THE SAME TIME, when the piece measures 53-55-57-59-61-63 cm, place stitches on a thread for the diagonal shoulders (work the stitches first to avoid having to cut the strand). Place stitches on a thread from the side as follows: 8-9-9-9-11-12 stitches 2 times, then the remaining 8-8-10-10-10-13 stitches. When all the stitches are on the thread, place them back on circular needle size 5.5 mm. Work 1 row of stocking stitch; to avoid a hole in the transition between stitches being placed on the thread, pick up the strand between 2 stitches and work it twisted together with the first stitch on the left needle. Cast off. Work the other shoulder in the same way. SLEEVES: Cast on 72-76-76-80-84-84 stitches with double pointed needles size 4 mm and 1 strand of each quality (2 strands). Knit 1 round, then work rib (knit 2, purl 2) in the round for 12 cm. Knit 1 round and decrease 21-23-21-23-27-25 stitches evenly spaced = 51-53-55-57-57-59 stitches. Insert 1 marker in the last stitch on the round. Allow the marker to follow your work onwards – it is used when increasing under the sleeve. Change to double pointed needles size 5.5 mm and work stocking stitch. When the piece measures 14 cm, increase 2 stitches under the sleeve – read INCREASE TIP. Increase like this every 6½-5-5-4-3-2½ cm a total of 5-6-6-7-8-9 times = 61-65-67-71-73-77 stitches. AT THE SAME TIME when the sleeve measures 20-19-19-20-18-16 cm, work A.4 on the whole round – NOTE: The last stitch on the round follows the pattern with knit/purl but not with a hole. Work A.4 two times in height. If the finished length is not reached after working A.4, continue with stocking stitch. AT THE SAME TIME when the sleeve measures 44-43-43-41-39-37 cm, work the sleeve cap back and forth, from mid-under the sleeve, continuing the pattern. Cast off when the sleeve measures 47-46-46-47-45-43 cm. ASSEMBLY: Sew the shoulder seams inside the cast-off edge. Sew the side seams inside the 1 edge stitch – start at the bottom of the armhole and work down to the rib (leaving 9 cm split). Sew the sleeve cap to the armhole inside the 1 edge stitch, then sew together the bottom of the armhole – see sketch. DOUBLE NECK: Start at one shoulder seam and knit up from the right side (inside the 1 edge stitch, using short circular needle size 4 mm and 1 strand of each quality) 88-92-100-100-104-104 stitches including the stitches from the thread in front. The stitch-count should be divisible by 4. Work rib in the round (purl 2, knit 2) for 9 cm. Cast off with knit over knit and purl over purl, making 1 yarn over after each 4th stitch which is then cast off as a normal stitch. Fold the neck double to the inside and sew down. To avoid the neck being tight and rolling outwards, it is important that the seam is elastic. |
|||||||||||||||||||
Diagram explanations |
|||||||||||||||||||
|
|||||||||||||||||||
 |
|||||||||||||||||||
 |
|||||||||||||||||||
 |
|||||||||||||||||||
Have you finished this pattern?Tag your pictures with #dropspattern #tipoftheicebergsweater or submit them to the #dropsfan gallery. Do you need help with this pattern?You'll find 37 tutorial videos, a Comments/Questions area and more by visiting the pattern on garnstudio.com. © 1982-2026 DROPS Design A/S. We reserve all rights. This document, including all its sub-sections, has copyrights. Read more about what you can do with our patterns at the bottom of each pattern on our site. |
|||||||||||||||||||


With over 40 years in knitting and crochet design, DROPS Design offers one of the most extensive collections of free patterns on the internet - translated to 17 languages. As of today we count 324 catalogues and 12290 patterns translated into English (UK/cm). 12290
We work hard to bring you the best knitting and crochet have to offer, inspiration and advice as well as great quality yarns at incredible prices! Would you like to use our patterns for other than personal use? You can read what you are allowed to do in the Copyright text at the bottom of all our patterns. Happy crafting!
Post a comment to pattern DROPS 239-1
We would love to hear what you have to say about this pattern!
If you want to leave a question, please make sure you select the correct category in the form below, to speed up the answering process. Required fields are marked *.