
Popular categories
Looking for a yarn?


Comments / Questions (44)
![]() Emily wrote:
Emily wrote:
Wie viel Laufmeter benötigt man für diese Anleitung? Würde es gern mit einem dickeren Garn stricken, dafür nicht zweifädig, weiß aber nicht ob sich das mit der Lauflänge ausgeht und ich finde keine Angaben im Internet zur Drops Delight, da sie ein Auslaufmodelle ist
26.02.2026 - 14:03DROPS Design answered:
Liebe Emily, Sie können sich an der Lauflänge von Brushed Alpaca Silk orientieren - wenn Sie nur einfädig stricken wollen, brauchen Sie nur die einfache Lauflänge. Sie ist für Brushed Alpaca Silk 140 m pro 25 g - Sie müssten selbst ausrechnen, wie viel Sie benötigen, da Sie keine Größe angegeben haben, die Sie stricken möchten. Teilen Sie dazu die angegebenen Gramm durch 25 und multiplizieren Sie das Ergebnis mit der Lauflänge des anderen Garns, dann erhalten Sie die Menge an Knäueln, die Sie benötigen. Unsere nicht mehr erhältlichen Garne finden Sie im Übrigen unter "Auslaufqualitäten", auch mit Lauflänge (Delight = 175 m pro 50 g). Viel Spaß beim Stricken!
27.02.2026 - 09:34
![]() Ann Redant wrote:
Ann Redant wrote:
De garensoort Delight is uit het assortiment. Welke Drops garensoort leunt het dichtst aan bij Delight? Ik vind de kleurencombinatie van het patroon heel mooi. Welke kleurencombinatie in de aangeraden garensoort leunt het dichtst aan bij de kleuren van het patroon? Alvast bedankt voor een antwoord.
24.02.2026 - 15:47DROPS Design answered:
Dag Ann,
We hebben momenteel geen garen in de collectie die deze kleuren vervangen en dus hetzelfde effect creëren. Wel zijn er bijvoorbeeld garens met meerdere kleuren van DROPS Fabel (deze valt ook in categorie A), alleen de overgangen van de kleuren zijn veel abrupter dan met Delight.
Met de garenvervanger, waarvan een link staat onder de materialenlijst bij ieder patroon, kun je vervangend garen vinden voor je project. De benodigde hoeveelheid wordt dan ook gelijk aangegeven.
24.02.2026 - 21:48
![]() Kerstin wrote:
Kerstin wrote:
I do not understand the sizing. What size is extra large in either inches or centimeters please? Thank you
06.01.2026 - 11:02DROPS Design answered:
Hi Kerstin, There is a size chart at the bottom of the pattern, with all the measurements for the different sizes. If you want inches, you need to use the US English version (change the language by using the drop box to the right of the photo). Otherwise, measurements are in cms. Regards, Drops Team.
07.01.2026 - 07:02
![]() Pia wrote:
Pia wrote:
Hej, jag stickar denna fina kofta med förstår inte hur jag ska göra med kragen på framstyckena. Jag har läser instruktionerna och tittar på bilden i beskrivningen men förstår ändå inte. Finns det mer inhpende förklaring på hur man gör eller kanske en film? Tack på förhand!
26.12.2025 - 16:00DROPS Design answered:
Hei Pia. Vi har dessverre ingen video, men når kragen strikkes, strikkes det forkortede pinner, slik at kragen formes. Ta gjerne en titt på den generelle videoen på hvordan man strikker forkortede pinner: her. mvh DROPS Design
26.01.2026 - 07:57
![]() Wilna wrote:
Wilna wrote:
Hallo, kan ik dit vest ook op gewone breinaalden maken? Daar heb ik alle diktes van. Wat is de reden dat het met een rond breinaald moet? Er wordt gewoon heen en weer gebreid. Of zijn er in het achterpand teveel steken? Ik hoor het graag.
22.12.2025 - 00:44DROPS Design answered:
Dag Wilna,
Dit patroon kan inderdaad ook met rechte naalden gebreid worden. De reden dat rondbreinaalden geadviseerd worden is omdat de hoeveelheid steken beter op de naald passen.
22.12.2025 - 20:15
![]() Gisela wrote:
Gisela wrote:
Hallo, es geht um das Einstricken der ersten Taschenhälfte. Beim rechten Vorderteil liegen 2 Maschen zwischen Rand und Tasche, beim linken Vorderteil liegen 3 Maschen zwischen Tasche und Rand. Das bedeutet, dass die Taschenöffnung rechts 2 Maschen vom Rand entfernt ist und die linke Taschenöffnung 3 Maschen. Warum? Vielen Dank im voraus.
01.11.2025 - 13:09
![]() Susan Joan Gibb wrote:
Susan Joan Gibb wrote:
The directions do not indicate how to achieve the stripe pattern of blue/green and the off-white areas. Where do the changes occcur? Thank you.
12.02.2025 - 15:19DROPS Design answered:
Dear Mrs Gibb, stripes were automatically worked through the yarn Delight - as this yarn is now discontinued, you can use the yarn converter to see alternatives and new amount of yarn, to keep same kind of effect, try Fabel. Happy knitting!
12.02.2025 - 16:20
![]() Birgit wrote:
Birgit wrote:
Ich habe eine Frage zum Kragen. Ich verstehe zur Zeit noch nicht, wie die im Modell gezeichnete Schräge in der Mitte entsteht. Wie strickt man weiter, wenn die 8 cm an der schmalsten Kragenstelle erreicht wurden? Ich danke schon jetzt für die Hilfe.
20.12.2024 - 23:04DROPS Design answered:
Liebe Birgit, nach 8 cm ketten Sie die Maschen ab; die andere Seite vom Schalkragen wird genauso gestrickt dann beide Seiten zusammengenäht und endlich am Halsausschnitt angenäht. In diesem Video zeigen wir, wie man so einen Schlakragen (im Video ohne verkürzten Reihen) strickt. Viel Spaß beim Stricken!
02.01.2025 - 09:31
![]() Belinda wrote:
Belinda wrote:
De wol drops delight voor dit patroon is niet meer verkrijgbaar. Welk garen is gelijkaardig en hoeveel heb ik dan nodig voor een maat large.
24.10.2024 - 13:18DROPS Design answered:
Dag Belinda,
Je kunt ieder garen gebruiken in garengroep A. Om de hoeveelheid te weten kun je de garenvervanger gebruiken. Hiervan staat een link vlak onder de lijst met materialen bij het patroon. Helaas is er niet een garen met vergelijkbare kleurovergangen erin.
24.10.2024 - 21:15
![]() Birgit wrote:
Birgit wrote:
Ich verstehe noch nicht ganz einen Punkt. Es steht in der Anleitung, dass man z.B. 119 Maschen Rippenmuster strickt, 12 cm. Dann steht, in der Hinreihe rechts stricken und dabei 41 Maschen abnehmen. Das verstehe ich nicht, denn der Schnitt sieht gerade aus und das ist ja fast 1/3 der ausgenommenen Maschen. Können Sie mir bitte helfen beim Verständnis? Vielen Dank.
22.10.2024 - 12:39DROPS Design answered:
Liebe Birgit, man braucht für die gleiche Breite mehr Maschen für Bündchen mit der Nadeln Nr 5 als fürs Glattrechts mit der Nadelnd Nr7, deshalb muss man nach Bündchen abnehmen - da die untere Kante soll die Arbeit nicht in der Breite zusammenziehen. Viel Spaß beim Stricken!
22.10.2024 - 13:49
|
||||||||||
Forest Whispers#forestwhisperssweater |
||||||||||
 |
 |
|||||||||
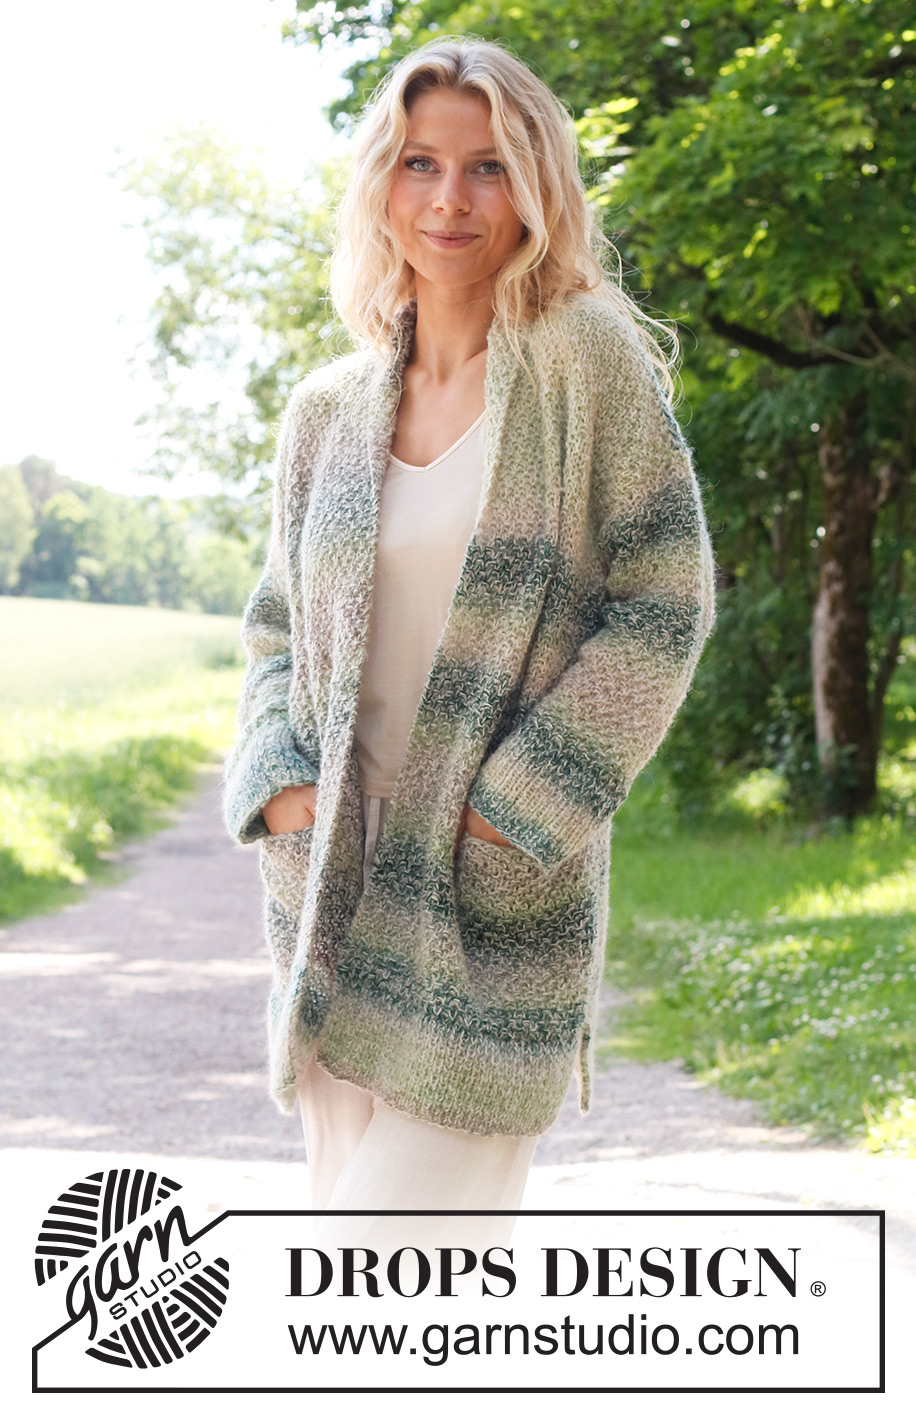
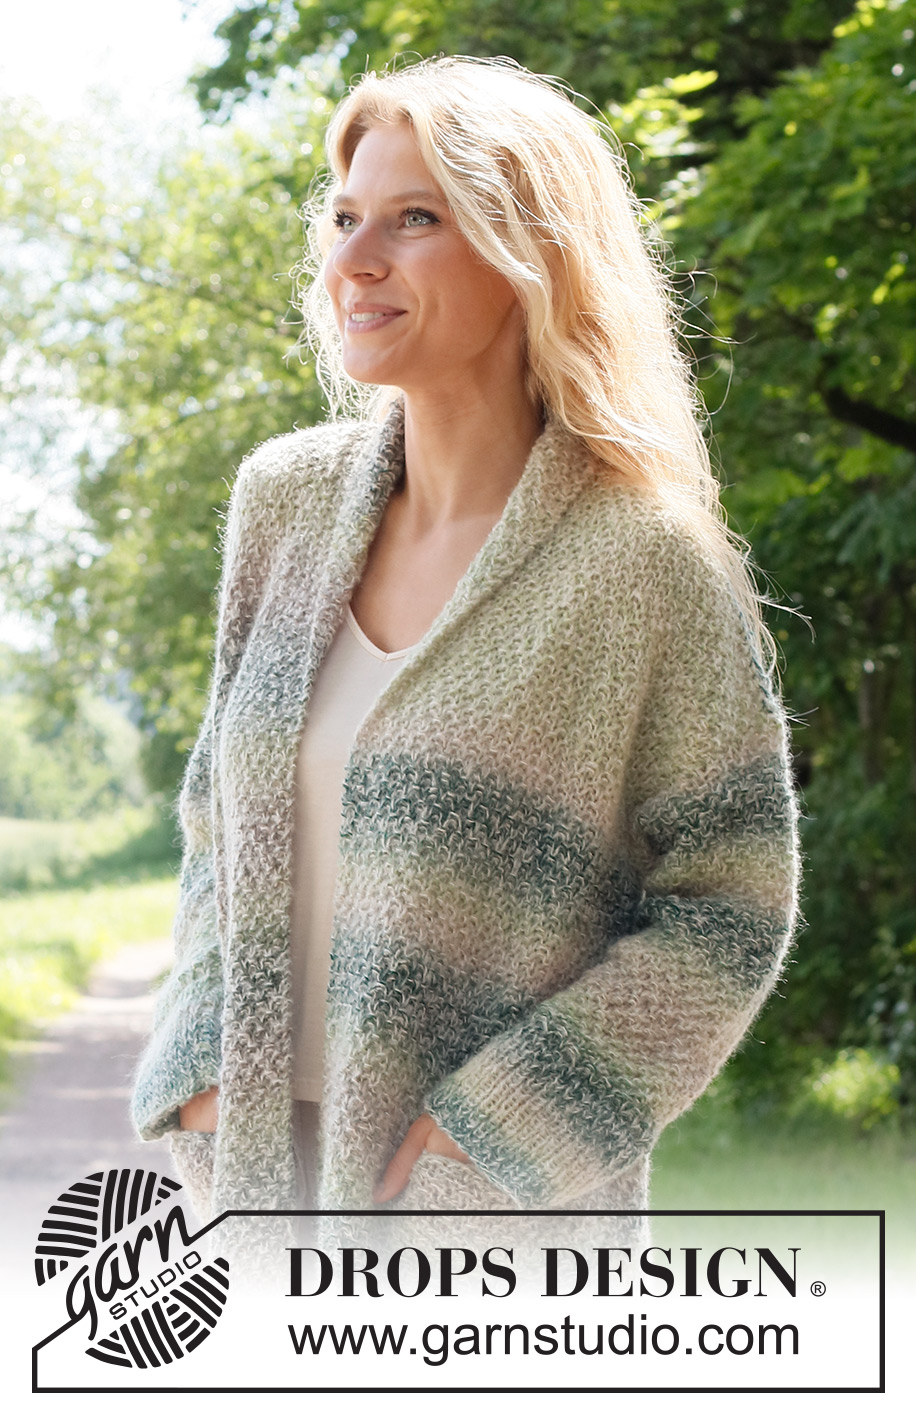
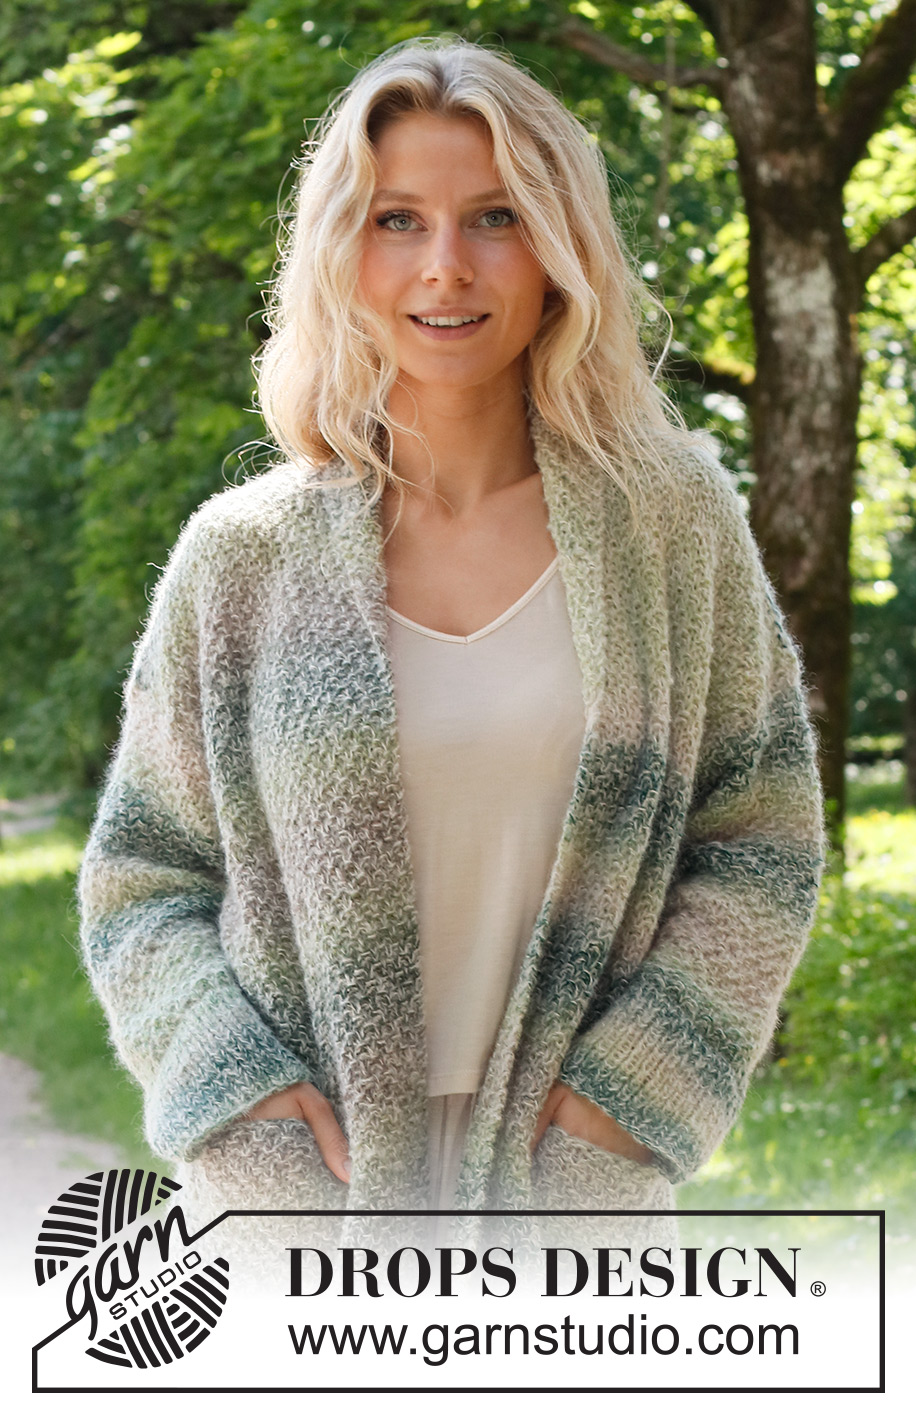
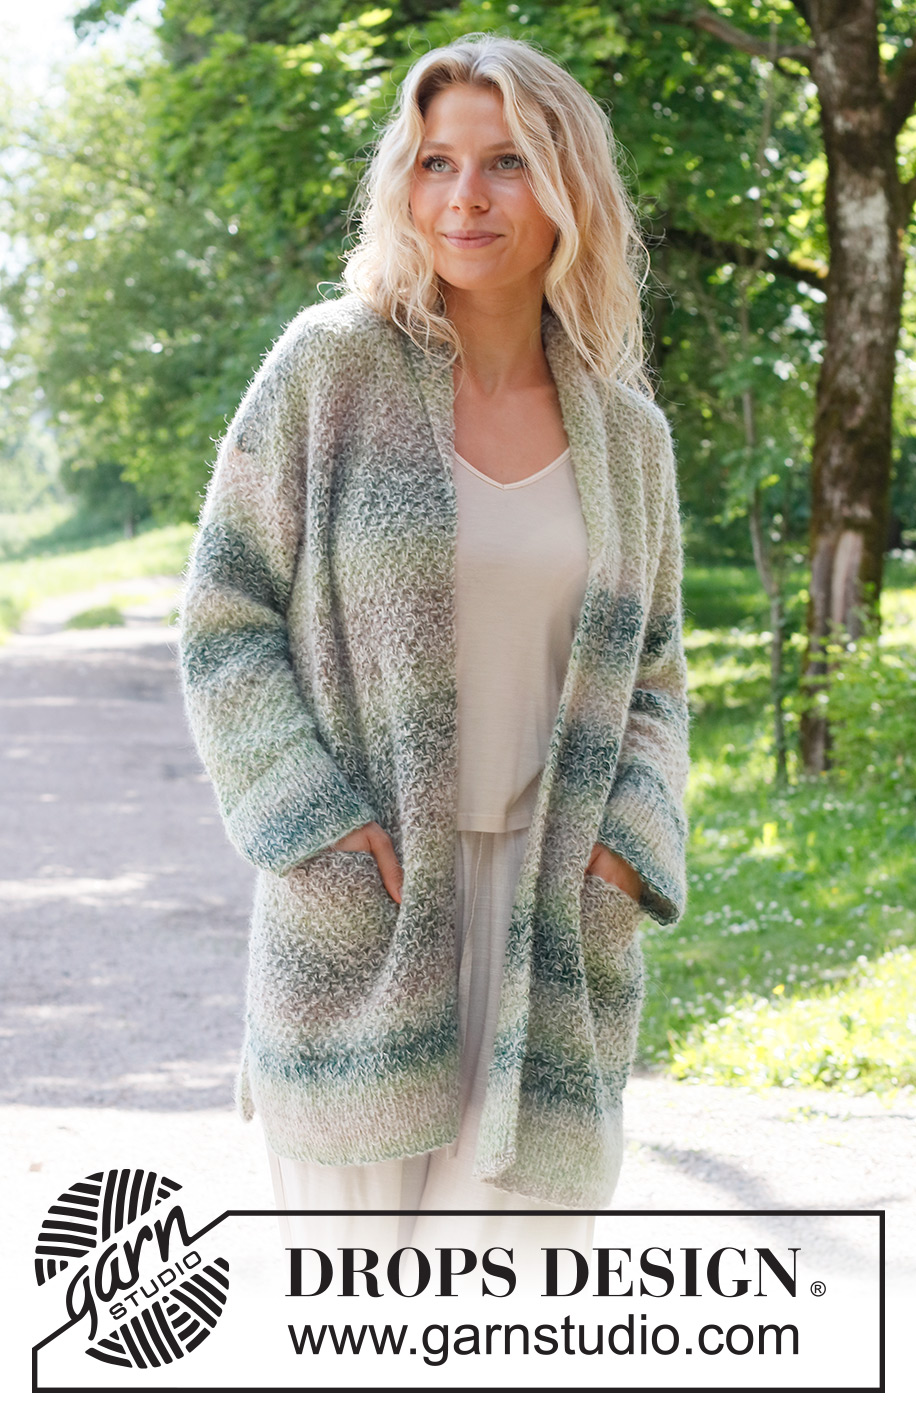
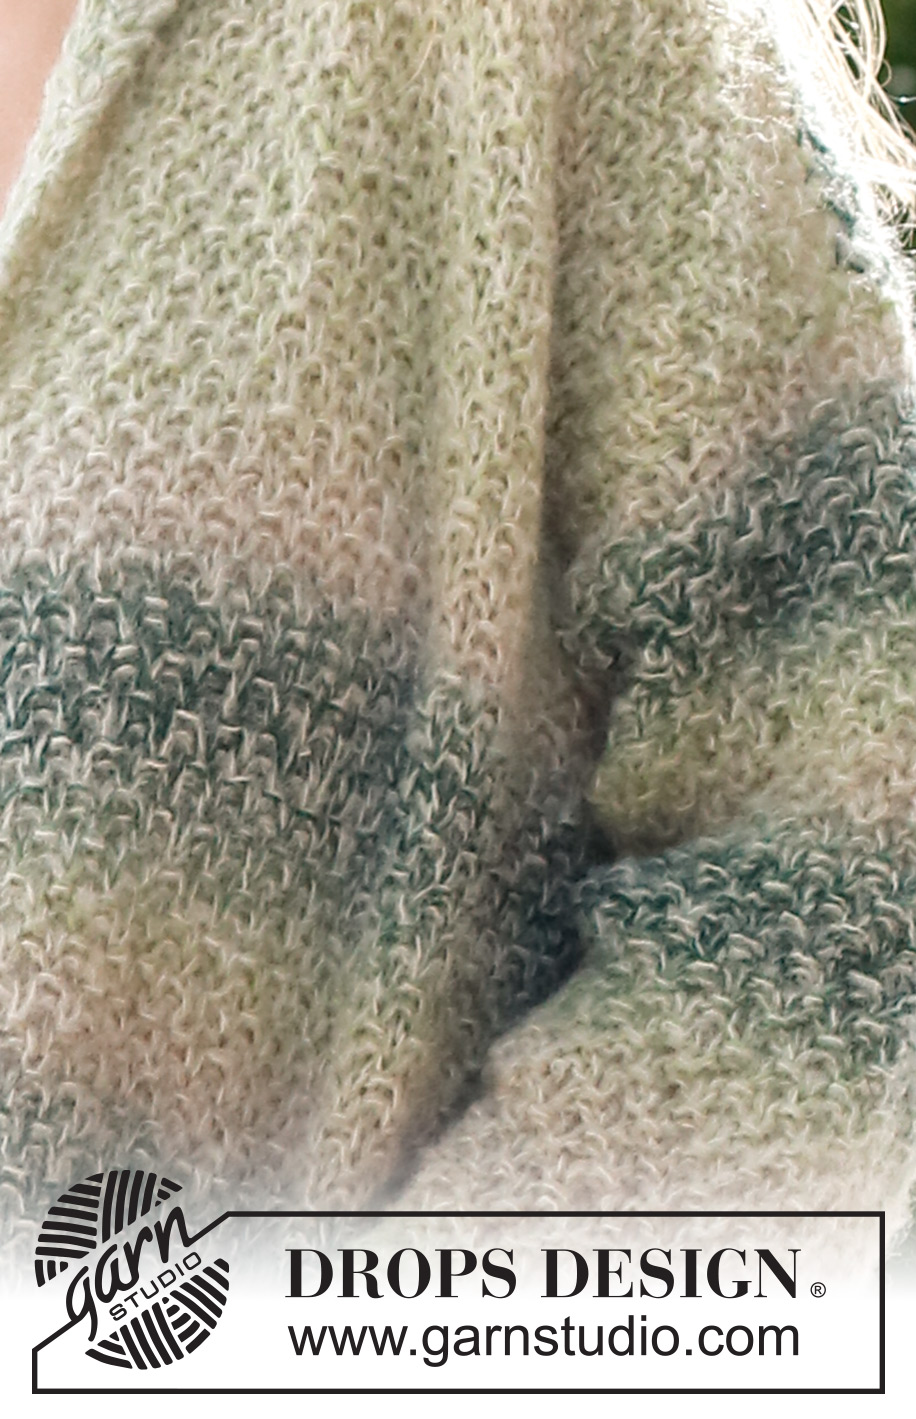
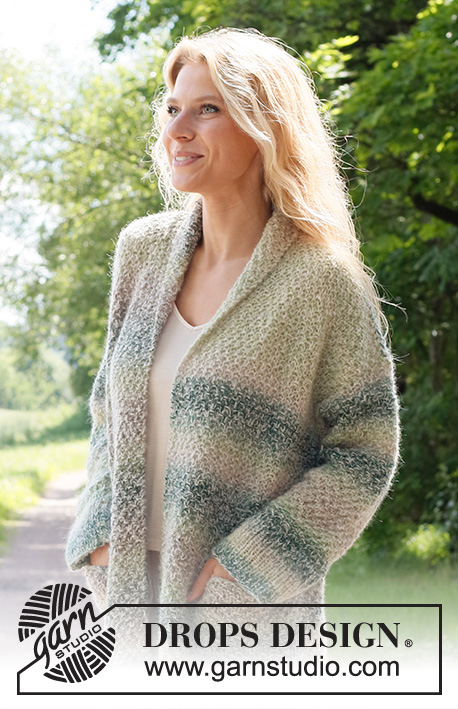
Knitted jacket in DROPS Delight and DROPS Brushed Alpaca Silk. The piece is worked bottom up with moss stitch, shawl collar, pockets and split in the sides. Sizes S - XXXL.
DROPS 230-45 |
||||||||||
|
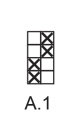
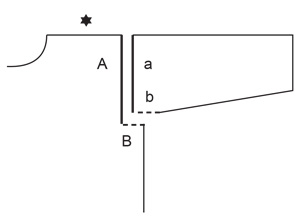
------------------------------------------------------- EXPLANATIONS FOR THE PATTERN: ------------------------------------------------------- RIDGE/GARTER STITCH (worked back and forth): Knit all rows. 1 ridge = knit 2 rows. PATTERN: See diagram A.1. The diagram shows all rows in the pattern from the right side. DECREASE TIP (evenly spaced): To work out how to decrease evenly, count the total number of stitches on needle (e.g. 103 stitches) minus the edge stitches (e.g. 2 stitches) and divide the remaining stitches by the number of decreases to be made (e.g. 37) = 2.7. In this example decrease by knitting approx.. every 2nd and every 3rd stitch together. INCREASE TIP (sleeves): Increase 1 stitch inside the 1 edge stitch on each side by making 1 yarn over. On the next row work the yarn overs twisted to avoid holes. Then work the new stitches into A.1. KNITTING TIP: So the pattern fits, there is 1 more stitch between the pocket and the side on the left front piece than on the right front piece. CASTING-OFF TIP: To avoid the cast-off edge being tight you can cast off with a larger size needle. If the edge is still tight, make 1 yarn over after approx. each 4th stitch at the same time as casting off; the yarn overs are cast off as normal stitches. ------------------------------------------------------- START THE PIECE HERE: ------------------------------------------------------- JACKET – SHORT OVERVIEW OF THE PIECE: The piece is worked in sections, back and forth, then sewn together. BACK PIECE: Cast on 103-109-119-129-141-153 stitches (including 1 edge stitch on each side) with circular needle size 5 mm and 1 strand of each quality (= 2 strands). Work the first row from the right side as follows: 1 edge stitch in GARTER STITCH – read description above, * knit 1, purl 1 *, work from *-* until there are 2 stitches left, knit 1 and 1 edge stitch in garter stitch. Continue this rib for 12 cm. Knit 1 row from the right side where you decrease 37-39-41-45-49-53 stitches evenly spaced – read DECREASE TIP, cast on 1 stitch at the end of the row (= edge stitch). Change to circular needle size 7 mm. Work 1 edge stitch in garter stitch, purl to the end of the row and then cast on 1 stitch (= edge stitch) = 68-72-80-86-94-102 stitches. Continue with A.1 and 1 edge stitch in garter stitch on each side. REMEMBER THE KNITTING TENSION! When the piece measures 50-51-52-53-54-55 cm, cast off 2-2-4-5-6-8 stitches at the beginning of the next 2 rows = 64-68-72-76-82-86 stitches. Continue A.1 with 1 edge stitch in garter stitch on each side. When the piece measures 68-70-72-74-76-78 cm, cast off the middle 10-10-10-12-12-12 stitches for the neck and finish each shoulder separately. Then cast off 1 stitch on the next row from the neck = 26-28-30-31-34-36 stitches on the shoulder. Cast off when the piece measures 70-72-74-76-78-80 cm – read CASTING-OFF TIP. Work the other shoulder in the same way. POCKETS: Cast on 24 stitches with circular needle size 7 mm and 1 strand of each quality (= 2 strands). Work stocking stitch with 1 edge stitch in garter stitch on each side. When the pocket measures 7 cm, continue with A.1 and 1 edge stitch in garter stitch on each side. When the pocket measures 16 cm, cast off 1 stitch at the beginning of the next 2 rows = 22 stitches – adjust so the last row worked is the first row in A.1 (this is important so the pattern matches the jacket). Place the stitches on an extra needle. Work 3 more pocket-pieces in the same way = 4 pockets-pieces. RIGHT FRONT PIECE: Cast on 73-77-81-91-97-103 stitches (including 1 edge stitch on each side) with circular needle size 5 mm and 1 strand of each quality (= 2 strands). Work the next row from the right side: 1 edge stitch in garter stitch,* knit 1, purl 1* work from *-* until there are 2 stitches left, knit 1 and 1 edge stitch in garter stitch. Continue this rib for 12 cm. Knit 1 row from the right side where you decrease 27-29-29-35-37-39 stitches evenly spaced and cast on 1 stitch at the end of the row (= edge stitch). Change to circular needle size 7 mm. Work 1 edge stitch in garter stitch and purl to the end of the row = 47-49-53-57-61-65 stitches. Work A.1 with 1 edge stitch in garter stitch on each side. When the piece measures 31 cm – adjust so the next row to be worked is the first row in A.1 (to match the pocket), work the next row from the right side as follows: Work the first 23-25-27-27-29-31 stitches, insert a marker, work the next 22 stitches, insert a marker (= 1 marker on each side of the pocket opening), work the last 2-2-4-8-10-12 stitches. Work back from the wrong side as follows: Work to the first marker. Work each stitch on one pocket-piece together with each stitch on the front piece, at the same time as you cast off as follows (make sure the inner pocket is wrong side to wrong side on the front piece and the pattern matches in A.1): Work the first stitch on the pocket-piece together with the first stitch on the opening and cast this stitch off. Repeat across the pocket, working together the stitches and then casting them off. Now work to the end of the row. Remove the markers. Turn and work as far as the pocket, work the 22 stitches on a second pocket-piece from the right side, then work to the end of the row = 47-49-53-57-61-65 stitches. There are now 2 pocket-pieces on the front piece which will be sewn together later. Continue A.1 with 1 edge stitch in garter stitch on each side until the piece measures 50-51-52-53-54-55 cm. Now cast off 2-2-4-5-6-8 stitches at the beginning of the next row from the wrong side = 45-47-49-52-55-57 stitches. Continue A.1 with 1 edge stitch in garter stitch on each side. When the piece measures 70-72-74-76-78-80 cm, cast off the first 26-28-30-31-34-36 stitches on the next row from the wrong side for the shoulder. Work the last 19-19-19-21-21-21 stitches as follows for the collar: ROW 1 (right side): Work the first 11-11-11-13-13-13 stitches as before, knit the last 8 stitches. ROW 2 (wrong side): Knit the first 8 stitches, work the last 11-11-11-13-13-13 stitches as before. ROW 3: Work the first 11-11-11-13-13-13 stitches as before, turn. ROW 4: Work as before over the 11-11-11-13-13-13 stitches. Repeat rows 1 to 4 until the collar measures 7-7-7-8-8-8 cm at the shortest point (towards the shoulder). Cast off – remember CASTING-OFF TIP. LEFT FRONT PIECE: Cast on 73-77-81-91-97-103 stitches (including 1 edge stitch on each side) with circular needle size 5 mm and 1 strand of each quality (= 2 strands). Work the next row from the right side: 1 edge stitch in garter stitch,* knit 1, purl 1* work from *-* until there are 2 stitches left, knit 1 and 1 edge stitch in garter stitch. Continue this rib for 12 cm. Knit 1 row from the right side where you decrease 27-29-29-35-37-39 stitches evenly spaced and cast on 1 stitch at the end of the row (= edge stitch). Change to circular needle size 7 mm. Purl to the end of the row and work 1 edge stitch in garter stitch (= edge stitch) = 47-49-53-57-61-65 stitches. Work A.1 with 1 edge stitch in garter stitch on each side. When the piece measures 31 cm – adjust so the next row to be worked is the first row in A.1 (to match the pocket), work the next row from the right side as follows: Work the first 3-3-5-9-11-13 stitches – read KNITTING TIP, insert a marker, work the next 22 stitches, insert a marker (= 1 marker on each side of the pocket opening), work the last 22-24-26-26-28-29 stitches. Work back from the wrong side as follows: Work to the first marker. Work each stitch on the pocket-piece together with each stitch on the front piece, at the same time as you cast off as follows (make sure the pocket-piece is wrong side to wrong side on the front piece and the pattern matches in A.1): Work the first stitch on the pocket-piece together with the first stitch on the opening and cast this stitch off. Repeat across the pocket, working together the stitches and then casting them off. Now work to the end of the row. Remove the markers. Turn and work as far as the pocket, work the 22 stitches on a second pocket-piece from the right side, then work to the end of the row = 47-49-53-57-61-65 stitches. There are now 2 pocket-pieces on the front piece which will be sewn together later. Continue A.1 with 1 edge stitch in garter stitch on each side until the piece measures 50-51-52-53-54-55 cm. Now cast off 2-2-4-5-6-8 stitches at the beginning of the next row from the right side = 45-47-49-52-55-57 stitches. Continue A.1 with 1 edge stitch in garter stitch on each side. When the piece measures 70-72-74-76-78-80 cm, cast off the first 26-28-30-31-34-36 stitches on the next row from the right side for the shoulder. Work the last 19-19-19-21-21-21 stitches as follows for the collar: ROW 1 (wrong side): Work the first 11-11-11-13-13-13 stitches as before, knit the last 8 stitches. ROW 2 (right side): Knit the first 8 stitches, work the last 11-11-11-13-13-13 stitches as before. ROW 3: Work the first 11-11-11-13-13-13 stitches as before, turn. ROW 4: Work as before over the 11-11-11-13-13-13 stitches. Repeat rows 1 to 4 until the collar measures 7-7-7-8-8-8 cm at the shortest point (towards the shoulder). Cast off – remember CASTING-OFF TIP. SLEEVES: Cast on 54-58-58-60-60-64 stitches (including 1 edge stitch on each side) with circular needle size 5 mm and 1 strand of each quality (= 2 strands). Work the next row from the right side: 1 edge stitch in garter stitch,* knit 1, purl 1* work from *-* until there is 1 stitch left, 1 edge stitch in garter stitch. Continue this rib for 10 cm. Knit 1 row where you decrease 16-18-18-18-18-20 stitches evenly spaced = 38-40-40-42-42-44 stitches. Change to circular needle size 7 mm. Purl 1 row with 1 edge stitch in garter stitch on each side. Now work A.1 with 1 edge stitch in garter stitch on each side. When the sleeve measures 12 cm, increase 1 stitch inside the 1 edge stitch on each side – read INCREASE TIP. Increase like this every 4½-4½-3-3-2½-2 cm a total of 7-7-9-9-10-11 times = 52-54-58-60-62-66 stitches. Continue working until the sleeve measures 44-44-42-41-39-37 cm. Insert 1 marker in each side – mark the bottom of the armhole. Continue working until the sleeve measures 46-46-45-45-43-43 cm. Cast off - remember CASTING-OFF TIP. Work the other sleeve in the same way. ASSEMBLY: Sew the shoulder seams inside the cast-off edge – make sure the seam is not tight. Sew the sleeve seams, leaving a split of 2-2-3-4-4-6 cm at the top. Sew the split to the bottom of the armhole. Then sew the sleeve to the body – see illustration. Sew the side seams inside the 1 edge stitch down to the top of the rib (= 12 cm split left on each side). Sew the collar together mid-back and then sew the collar to the neck-line. Lay the pocket-pieces together and sew around the edges. |
||||||||||
Diagram explanations |
||||||||||
|
||||||||||
 |
||||||||||
 |
||||||||||
 |
||||||||||
Have you finished this pattern?Tag your pictures with #dropspattern #forestwhisperssweater or submit them to the #dropsfan gallery. Do you need help with this pattern?You'll find 26 tutorial videos, a Comments/Questions area and more by visiting the pattern on garnstudio.com. © 1982-2026 DROPS Design A/S. We reserve all rights. This document, including all its sub-sections, has copyrights. Read more about what you can do with our patterns at the bottom of each pattern on our site. |
||||||||||


With over 40 years in knitting and crochet design, DROPS Design offers one of the most extensive collections of free patterns on the internet - translated to 17 languages. As of today we count 324 catalogues and 12290 patterns translated into English (UK/cm). 12290
We work hard to bring you the best knitting and crochet have to offer, inspiration and advice as well as great quality yarns at incredible prices! Would you like to use our patterns for other than personal use? You can read what you are allowed to do in the Copyright text at the bottom of all our patterns. Happy crafting!
Post a comment to pattern DROPS 230-45
We would love to hear what you have to say about this pattern!
If you want to leave a question, please make sure you select the correct category in the form below, to speed up the answering process. Required fields are marked *.