
Popular categories
Looking for a yarn?


Comments / Questions (20)
![]() NZINA wrote:
NZINA wrote:
Bonjour je ne comprends pas la séparation manches/dos et devants. Pourquoi n'y a-t-il pas de vidéo pour cette étape ? Merci de bien vouloir m'aider et bonne journée.
24.11.2025 - 10:24DROPS Design answered:
Bonjour Nzina, retrouvez ici, en vidéo, à partir du time code 7:00 ou bien ici, en photos, à partir de la photo 9, comment on va diviser le dos/le devant et les manches. Bon tricot!
24.11.2025 - 14:38
![]() NZINA wrote:
NZINA wrote:
Bonjour, je me retrouve avec 33 mailles après avoir suivi votre réponse. Je ne comprends pourquoi. Merci de m'éclairer. A très bientôt. Autre question : les augmentations manches marteau doivent elles être faites sur touts les rangs ? Merci pour votre réponse.
21.11.2025 - 13:39DROPS Design answered:
Bonjour Nzina, suivez attentivement le détail des mailles du diagramme à l'aide de la légende, vous allez diminuer 2 x 1 m (au début et à la fin de A.1) + 2 x 2 m (le triangle noir) + faire 6 jetés pour compenser ces diminutions. Entraînez-vous éventuellement sur un échantillon auparavant. On doit effectivement augmenter tous les tours pour les épaules/les manches marteau. Bon tricot!
21.11.2025 - 16:11
![]() NZINA wrote:
NZINA wrote:
Bonjour, je me retrouve avec 33 mailles après avoir suivi votre réponse. Je ne comprends pourquoi. Merci de m'éclairer. A très bientôt.
20.11.2025 - 14:48DROPS Design answered:
Bonjour, ceci doit vous donner 31 mailles: : (2 m ens à l'end (= 1 m), 2 m end (= 1 m), 1 jeté (= 1 m), 1 m end (= 1 m), 1 jeté (= 1 m), 2 m end (= 2 m), glissez 1 m, tricotez 2 m ens à l'end, passez la m glissée par-dessus la m tricotée (= 1 m), 5 m end (= 5m), 1 jeté (=1 m), 1 m end (= 1 m), 1 jeté (= 1 m), 5 m end (= 5 m), glissez 1 m, tricotez 2 m ens à l'end, passez la m glissée par-dessus la m tricotée (= 1 m), 2 m end (= 2 m), 1 jeté (= 1 m), 1 m end (= 1 m), 1 jeté (= 1 m), 2 m end (= 1 m), glissez 1 m l'end, 1 m end, passez la m glissée par-dessus la m tricotée (=1 m)) soit 1+2+1+1+1+2+1+5+1+1+1+5++1+2+1+1+1+2+1=31. Bon tricot!
20.11.2025 - 16:58
![]() NZINA wrote:
NZINA wrote:
Bonjour je suis en train de tricoter ce modèle pour la taille 5/6 mais je ne comprends pas le diagramme A1 où il faut faire 2 jetés entre 2 mailles . Merci de me bien vouloir me répondre. A bientôt.
19.11.2025 - 16:58DROPS Design answered:
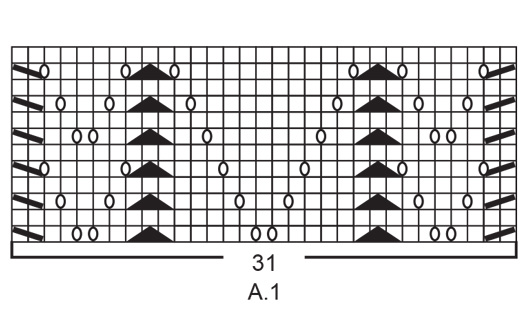
Bonjour Mme Nzina, les jetés doivent être faits entre 2 mailles tricotées elles même comme indiqué dans le diagramme, autrement dit, tricotez le 1er rang de A.1 ainsi: (2 m ens à l'end, 2 m end, 1 jeté, 1 m end, 1 jeté, 2 m end, glissez 1 m, tricotez 2 m ens à l'end, passez la m glissée par-dessus la m tricotée, 5 m end, 1 jeté, 1 m end, 1 jeté, 5 m end, glissez 1 m, tricotez 2 m ens à l'end, passez la m glissée par-dessus la m tricotée, 2 m end, 1 jeté, 1 m end, 1 jeté, 2 m end, glissez 1 m l'end, 1 m end, passez la m glissée par-dessus la m tricotée). Bon tricot!
20.11.2025 - 08:48
![]() Linda Nandlall wrote:
Linda Nandlall wrote:
I am really struggling to get correct stitch count with the diagram, I seem to be losing stitches somewhere Should I be doing more YO. I am knitting 1YO per 0 Is that correct.
05.07.2025 - 08:05DROPS Design answered:
Dear Linda, each "0" symbol corresponds to 1 yarn over. So you have 6 yarn overs in each lace pattern row. At the same time, you have 6 decreases on these same rows: the 2 black triangles correspond to 2 decreases each, while the diagonal lines are one decrease each. So you should have the same number of increases and decreases in each row and the number of stitches should remain the same. Happy knitting!
06.07.2025 - 20:32
![]() Kaisa Koivusalo wrote:
Kaisa Koivusalo wrote:
Ja vielä, kun tuossa kaarrokkeen lisäyksissä merkki kiinnitetään silmukkaan, niin siirretäänkö sitä merkkiä sitä mukaa ylemmäksi kun työ ja lisäykset etenee, vai jääkö se paikoilleen?
11.02.2025 - 22:30DROPS Design answered:
Kyllä, voit siirtää merkit ylemmäksi, jotta lisäyskohdat erottuvat paremmin.
24.02.2025 - 18:56
![]() Kaisa wrote:
Kaisa wrote:
"Siirrä nyt kaikki merkit siten, että jokainen merkki on silmukassa (eikä 2 silmukan välissä)." Mihin päin niitä merkkejä siirretään? Onko 1. merkki siis kierroksen ensimmäisessä silmukassa? Missäs 3. merkki? Ja siirtyykö kierroksen aloituskohta työn edetessä kun silmukoita lisätään?
11.02.2025 - 22:20DROPS Design answered:
Merkit kiinnitetään siten, että ne ovat etukappaleen/takakappaleen keskimmäisten 36-36-34-42-34-40 silmukan kummallakin puolella. Kerroksen vaihtumiskohta ei siirry.
24.02.2025 - 18:54
![]() Kirsten Stenander wrote:
Kirsten Stenander wrote:
Jeg i flere år haft glæde af jeres opskrifter og printet dem efter behov. Nu kan jeg mere. Der kommer kun blanke sider ud. Jeg har kontaktet HP & Appel og vi har prøvet flere muligheder, men stadig ikke sider med print på. Jeg er blevet anbefalet at spørge jer, da jeg sagtens kan print andre ting. Kan I hjælpe mig?
12.12.2024 - 14:04DROPS Design answered:
Hei Kirsten. Ja, det hørtes merkelig ut. Vi har ingen problemer med å printe ut. Når du printer ut, trykker du på print ut ikonet (øverst til høyre) eller ctrl+P? (velg ikonet når du skal skrive ut). Har du prøvd å kopier oppskriften (teksten) og så lime det inn i et word doc og så skrive ut? mvh DROPS Design
16.12.2024 - 09:17
![]() Alex wrote:
Alex wrote:
I love the pattern “Sweet begonia” especially the central panel. Do you have any similar pattern for an adult in top-down, 8ply, with that lovely central panel please?
04.12.2023 - 07:25DROPS Design answered:
Dear Alex, find all our jumpers worked top down with lace pattern here - add filters such as tension to refine your search. Happy knitting!
04.12.2023 - 08:34
![]() Olivia Bellira wrote:
Olivia Bellira wrote:
Bonjour. Je vous ai écrit une question au sujet de l\'augmentation au niveau de l\'empiècement pour la taille 9/10 ans mais après avoir relu attentivement le patron il n\'y a pas d\'erreurs. Désolée
19.10.2022 - 22:52
|
||||||||||||||||||||||||||||
Sweet Begonia#sweetbegoniasweater |
||||||||||||||||||||||||||||
 |
 |
|||||||||||||||||||||||||||
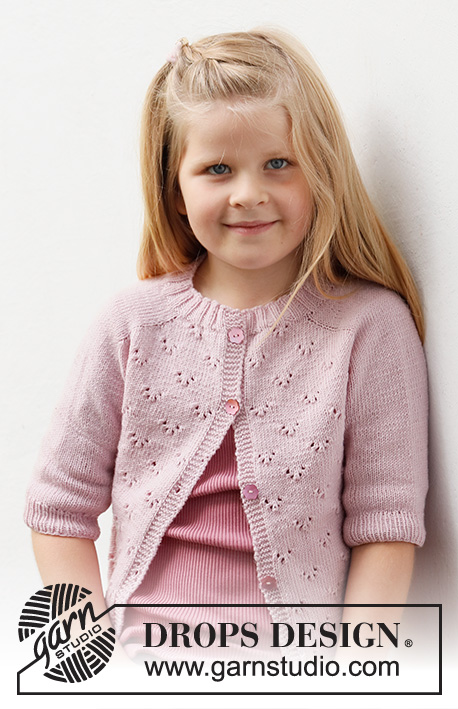
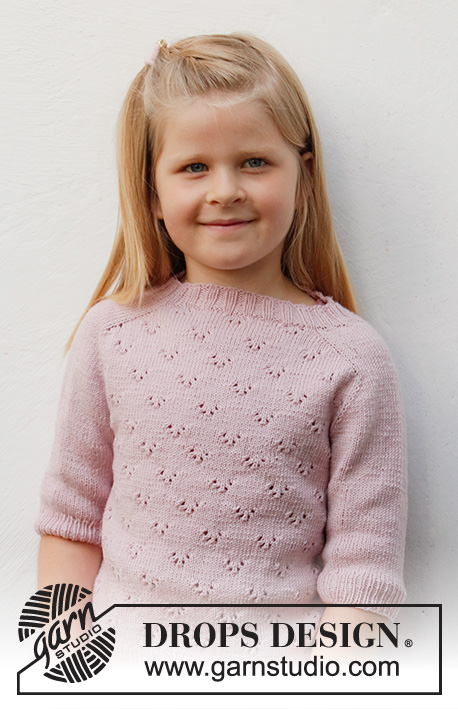
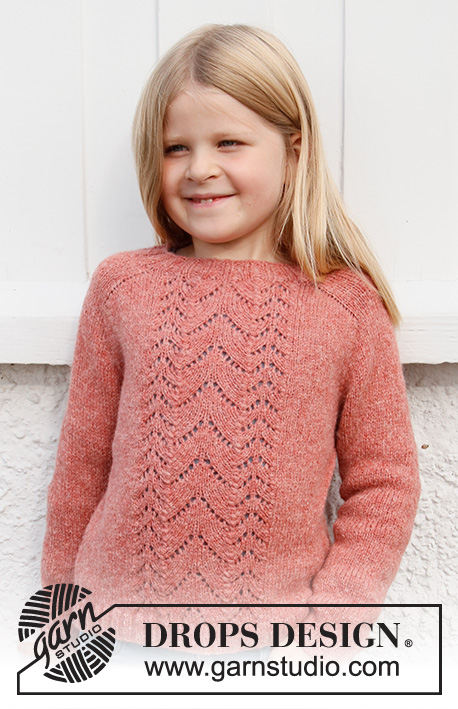
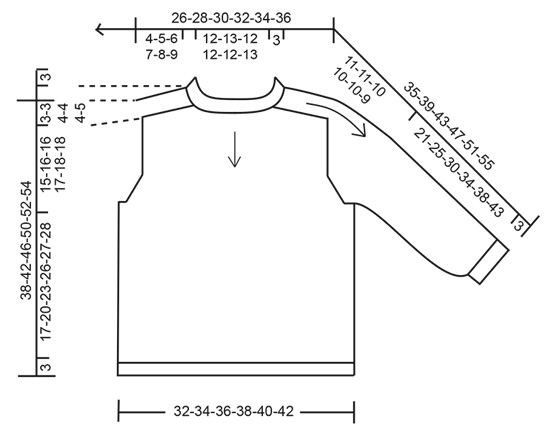
Knitted jumper for children in DROPS Sky. The piece is worked top down, with lace pattern and saddle-shoulders. Sizes 3 – 14 years.
DROPS Baby & Children 38-20 |
||||||||||||||||||||||||||||
|
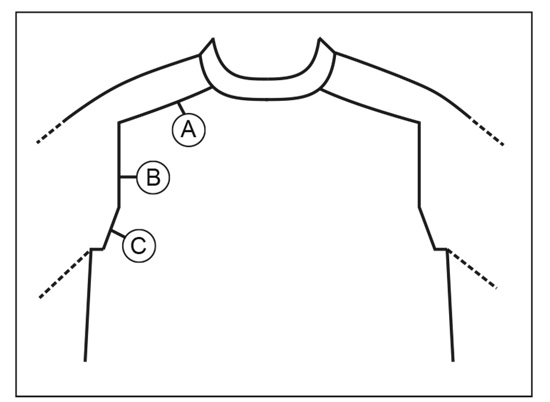
------------------------------------------------------- EXPLANATIONS FOR THE PATTERN: ------------------------------------------------------- PATTERN: See diagram A.1. INCREASE TIP-1 (evenly spaced): To work out how to increase evenly, count the total number of stitches on the needle (e.g. 76 stitches) and divide by the number of increases to be made (e.g. 14) = 5.4. In this example, increase by making 1 yarn over after alternately each 5th and 6th stitch (approx.). On the next round work the yarn overs twisted to avoid holes. INCREASE TIP-2 (for saddle shoulders, sleeves and yoke): BEFORE MARKER: The new stitch twists to the right. Use the left needle to pick up the strand between 2 stitches from the previous round, pick up the back strand and knit in the front loop. AFTER MARKER: The new stitch twists to the left. Use the left needle to pick up the strand between 2 stitches from the previous round, pick up the front strand and knit in the back loop. DECREASE TIP (for sleeves): Start 3 stitches before the marker thread, knit 2 together, knit 2 (marker thread sits between these 2 stitches), slip 1 stitch as if to knit, knit 1 and pass the slipped stitch over the knitted stitch (2 stitches decreased). CASTING-OFF TIP: To avoid the cast-off edge being tight you can cast off with a larger size needle. If the edge is still tight, make 1 yarn over after approx. each 6th stitch at the same time as casting off; the yarn overs are cast off as normal stitches. ------------------------------------------------------- START THE PIECE HERE: ------------------------------------------------------- JUMPER – SHORT OVERVIEW OF THE PIECE: The neck and yoke are worked in the round with circular needle from the right shoulder and top down. Stitches are increased for the shoulders, then for the sleeves and finally for the yoke. The yoke is divided for the body and sleeves and the body continued in the round. The sleeves are worked in the round with double pointed needles, top down. NECK: Cast on 76-80-80-84-84-88 stitches with short circular needle size 3 mm and Sky. Knit 1 round. Then work rib in the round (knit 2, purl 2) for 3 cm. When the rib is finished, knit 1 round where you increase 14-14-18-22-22-22 stitches evenly spaced – read INCREASE TIP-1 = 90-94-98-106-106-110 stitches. Knit 1 round (yarn overs knitted twisted). YOKE: Change to circular needle size 4 mm. Insert 1 marker after the first 30-31-33-36-36-38 stitches (= approx. mid front) – the yoke is measured from this marker! In addition, insert 4 other markers as described below – without working the stitches and each marker inserted between 2 stitches. The markers are used when increasing for the shoulders and should be of a different colour to the marker on the neck. Marker 1: Insert the marker before the first stitch on the round (= back of right shoulder when the garment is worn). Marker 2: Count 14-14-16-18-18-20 stitches from marker 1 (= shoulder), insert marker before the next stitch. Marker 3: Count 31-33-33-35-35-35 stitches from marker 2 (= front piece), insert marker before the next stitch. Marker 4: Count 14-14-16-18-18-20 stitches from marker 3 (= shoulder), insert marker before the next stitch. There are 31-33-33-35-35-35 stitches left on the round after marker 4 (= back piece). Allow these markers to follow your work onwards; they are used when increasing. SADDLE SHOULDERS: Read the whole of the next section before continuing – the pattern and the increases both begin on the first round! PATTERN: Work stocking stitch to 0-1-1-2-2-2 stitches past marker 2, work A.1 (= 31 stitches mid front), stocking stitch to the end of the round. Continue with stocking stitch and the pattern – A.1 is repeated in height. INCREASE FOR SHOULDERS: AT THE SAME TIME on the first round increase 4 stitches for the saddle shoulders as follows: Increase BEFORE markers 1 and 3 and AFTER markers 2 and 4 – read INCREASE TIP-2. You are only increasing on the front and back pieces, the number of sleeve stitches remains the same. Continue with stocking stitch and pattern and increase like this every round a total of 12-14-16-20-22-26 times = 138-150-162-186-194-214 stitches. REMEMBER THE KNITTING TENSION! After the last increase the piece measures approx. 4-5-6-7-8-9 cm from the marker on the neck. Now increase for the sleeves as described below. INCREASE FOR SLEEVES: Continue with stocking stitch and pattern. AT THE SAME TIME, on the next round increase for the sleeves as follows: Increase AFTER markers 1 and 3 and increase BEFORE markers 2 and 4 – remember INCREASE TIP-2. You are only increasing on the sleeves and the number of stitches on the front and back pieces remains the same. Increase like this every 2nd round a total of 11-11-9-12-8-10 times = 182-194-198-234-226-254 stitches. The piece measures approx. 12-13-12-16-14-16 cm from the marker on the neck. Now increase for the yoke as described below. INCREASE FOR YOKE: Move each marker so they are inserted in a stitch (instead of between 2 stitches). There should be 36-36-34-42-34-40 stitches between markers 1 and 2 and 36-36-34-42-34-40 stitches between markers 3 and 4. On the next round increase both before and after all the marker- stitches – remember INCREASE TIP-2. You are now increasing on both the front and back pieces and on the sleeves. Increase like this every 2nd round a total of 4-4-5-1-4-2 times = 214-226-238-242-258-270 stitches. When all the increases are finished, the piece measures approx. 15-16-16-16-17-18 cm from the marker on the neck. Continue working without further increases until the piece measures 15-16-16-17-18-18 cm from the marker on the neck – finish the round when there are still 1-2-3-3-5-5 stitches left on the round. Now divide the yoke for the body and sleeves as follows: Place the first 46-48-50-50-52-54 stitches on a thread for the sleeve, cast on 6-6-6-8-8-8 stitches (= in side under the sleeve), work 61-65-69-71-77-81 stitches in stocking stitch and lace pattern as before (= front piece), place the next 46-48-50-50-52-54 stitches on a thread for the sleeve, cast on 6-6-6-8-8-8 stitches (= in side under the sleeve) and work the last 61-65-69-71-77-81 stitches in stocking stitch (= back piece). Body and sleeves are finished separately. THE PIECE IS NOW MEASURED FROM HERE. BODY: = 134-142-150-158-170-178 stitches. Continue with stocking stitch and A.1 in the round as before, until the piece measures 17-20-23-26-27-28 cm from the division. There is approx. 3 cm left to finished length; try the jumper on and continue to desired length. Now increase the number of stitches on the next round as follows (this is done to avoid the rib being tight): Knit 1 round and increase 30-30-30-34-34-38 stitches evenly spaced = 164-172-180-192-204-216 stitches. Change to circular needle size 3 mm and work rib (knit 2, purl 2) for 3 cm. Cast off with knit over knit and purl over purl – read CASTING-OFF TIP! The jumper measures approx. 38-42-46-50-52-54 cm from the shoulder down. SLEEVES: Place the 46-48-50-50-52-54 stitches from the thread on the one side of the piece on double pointed needles size 4 mm and knit up 1 stitch in each of the 6-6-6-8-8-8 stitches cast on under the sleeve = 52-54-56-58-60-62 stitches. Insert a marker thread in the middle of the new stitches under the sleeve. Start the round at the marker thread and work stocking stitch in the round. When the sleeve measures 3 cm from the division, decrease 2 stitches mid-under the sleeve – read DECREASE TIP. Decrease like this every 2½-3-3-3½-4-4 cm a total of 4 times in all sizes = 44-46-48-50-52-54 stitches. Continue working without further decreases until the sleeve measures 21-25-30-34-38-43 cm from the division. There is approx. 3 cm left to finished length; try the jumper on and continue to desired length. Knit 1 round where you decrease 4-6-4-6-4-6 stitches evenly spaced = 40-40-44-44-48-48 stitches. Change to double pointed needles size 3 mm and work rib (knit 2, purl 2) for 3 cm. Cast off with knit over knit and purl over purl – remember CASTING-OFF TIP! The sleeve measures approx. 24-28-33-37-41-46 cm from the division. Work the other sleeve in the same way. |
||||||||||||||||||||||||||||
Diagram explanations |
||||||||||||||||||||||||||||
|
||||||||||||||||||||||||||||
 |
||||||||||||||||||||||||||||
 |
||||||||||||||||||||||||||||
 |
||||||||||||||||||||||||||||
Have you finished this pattern?Tag your pictures with #dropspattern #sweetbegoniasweater or submit them to the #dropsfan gallery. Do you need help with this pattern?You'll find 29 tutorial videos, a Comments/Questions area and more by visiting the pattern on garnstudio.com. © 1982-2026 DROPS Design A/S. We reserve all rights. This document, including all its sub-sections, has copyrights. Read more about what you can do with our patterns at the bottom of each pattern on our site. |
||||||||||||||||||||||||||||


With over 40 years in knitting and crochet design, DROPS Design offers one of the most extensive collections of free patterns on the internet - translated to 17 languages. As of today we count 325 catalogues and 12298 patterns translated into English (UK/cm). 12298
We work hard to bring you the best knitting and crochet have to offer, inspiration and advice as well as great quality yarns at incredible prices! Would you like to use our patterns for other than personal use? You can read what you are allowed to do in the Copyright text at the bottom of all our patterns. Happy crafting!
Post a comment to pattern DROPS Baby & Children 38-20
We would love to hear what you have to say about this pattern!
If you want to leave a question, please make sure you select the correct category in the form below, to speed up the answering process. Required fields are marked *.