
Popular categories
Looking for a yarn?


Comments / Questions (23)
![]() Lindy wrote:
Lindy wrote:
Is it possible to make this with long sleeves please and how would I do that? Thank you!!
30.09.2025 - 14:22
![]() Lorene Frischknecht wrote:
Lorene Frischknecht wrote:
I really like this sweater pattern!
09.11.2024 - 19:24
![]() Lệ Thu Nguyễn wrote:
Lệ Thu Nguyễn wrote:
Yes
10.10.2024 - 01:16
![]() Elisabeth wrote:
Elisabeth wrote:
TUSINDE TAK for hurtig svar så forstår jeg det :)
02.07.2024 - 14:02
![]() Elisabeth Sa wrote:
Elisabeth Sa wrote:
Jeg prøver igen i svarede ikke på mit sidste spørgsmål den er lidt svær at forstå opskriften..jeg er nået til jeg skal strikke forstykker og ryg MEN der står jeg skal 57 masker ind fra hver side ( = ryg og forstykke ???? dvs. der skal være 100 masker i mellem mærketrådene !! Hvor skal jeg måle fra for der skal være 100 masker og hvor skal jeg sætte mærke tråden ??? jeg vil sætte pris på hvis i vil svare mig TAK med venlig hilsen Elisabeth
30.06.2024 - 20:10DROPS Design answered:
Hej Elisabeth, du har 214 masker, tæller fra midt foran og 57 masker ind til siden, sætter et mærke (midt i de 8 nye masker under ærmet), tæller 100 masker, sætter 1 mærke, nu har du 57 masker tilbage i den anden side :)
02.07.2024 - 13:37
![]() Riikka wrote:
Riikka wrote:
Hi! After A3 I have 174 stitches. How can I continue? Should I start the A3 again from the beginning?
10.09.2023 - 11:54DROPS Design answered:
Dear Riikka, work A.3 from the beginning, right on top of the previous A.3. The new stitches are worked in stocking stitch. Use the marker in the center of top of the shoulder as indicated in the chart to center the following repeats of A.3; you will start the chart 11 stitches before the marker. Happy knitting!
10.09.2023 - 20:17
![]() San wrote:
San wrote:
How many ball of yarn, does this pattern need size S or M ?
07.09.2023 - 00:45DROPS Design answered:
Dear San, you will find the requested amount of yarn in each size under the header, so that you need in both S and M 300 g DROPS Sky / 50 g the ball = 6 balls DROPS Sky in both S or M. Happy knitting!
07.09.2023 - 09:20
![]() Ritva wrote:
Ritva wrote:
En osaa jatkaa kun piirros on neulottu. Silmukoita nyt 174. Aloitanko piirroksen alusta vai jatkanko lisäämällä välisilmukoita ja tekemällä reiät suhteessa entisiin
24.08.2023 - 10:51DROPS Design answered:
Hei, piirros aloitetaan alusta ja se neulotaan piirroksen A.3 edellisen mallikerran yläpuolella. Lisätyillä silmukoilla neulotaan sileää neuletta. Katso myös piirroksen merkki (olan keskikohta), laske siitä seuraavan mallikerran alku (aloita 11 silmukkaa ennen merkkiä).
21.09.2023 - 17:09
![]() Lili wrote:
Lili wrote:
Bjr , concernant A1, A2 c'est à faire sur les 7 premier"A1" le 7 dernier "A2" Pour les cotes sur 2cm ? Côtés 1/1 ou je continue A1 tout le long et les 8 dernières A2 Je vous remercie Je suus débute dans le tricot, je sais faire pas mal de points
03.07.2022 - 22:48DROPS Design answered:
Bonjour Lilli, tricotez ainsi, sur l'endroit: A.1 (= 7 mailles endroit), côtes 1 m endroit, 2 m envers jusqu'à ce qu'il reste 8 mailles, tricotez 1 m endroit et terminez par A.2 (= 7 m endroit). Sur l'envers tricotez: A.2 (= 2 m env, 2 m end, 1 m env, 2 m end), tricotez les mailles des côtes comme elles se présentent (= 1 m env/2 m end) jusqu'à ce qu'il reste 8 m, tricotez 1 m env et A.1 (= 2 m end, 1 m env, 2 m end, 2 m env). Répétez ces 2 rangs jusqu'à ce que les côtes mesurent 2 cm. Bon tricot!
04.07.2022 - 08:25
![]() Ewa wrote:
Ewa wrote:
Hej! När A3 är stickad 1 gång på höjden har jag 174m. Hur får jag in de extra m i mönstret då jag ska upprepa A3? Stickas alla nya räta eller ska jag själv lägga in nya hål? /Ewa
13.02.2022 - 12:22DROPS Design answered:
Hej Ewa, du strikker kun det mønster og huller som allerede er i diagrammet, alle de nye udtagninger strikkes i glatstrik. God fornøjelse!
16.02.2022 - 15:30
|
|||||||||||||||||||
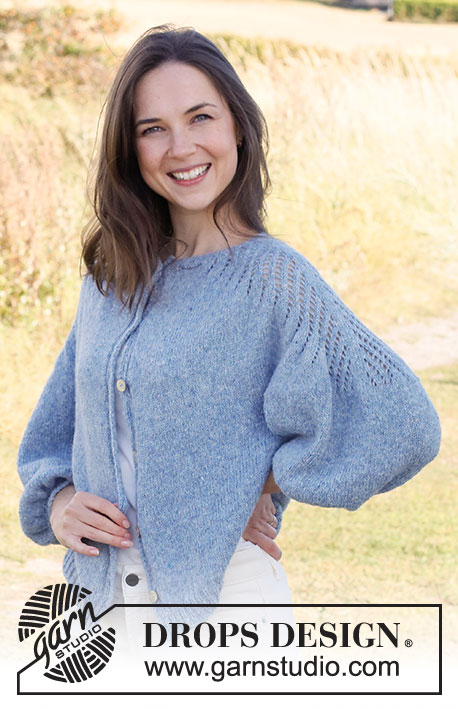
Sapphire Trails Cardigan#sapphiretrailscardigan |
|||||||||||||||||||
 |
 |
||||||||||||||||||
Knitted jacket in DROPS Sky. The piece is worked top down, with lace pattern and ¾-length balloon sleeves. Sizes S - XXXL.
DROPS 222-23 |
|||||||||||||||||||
|
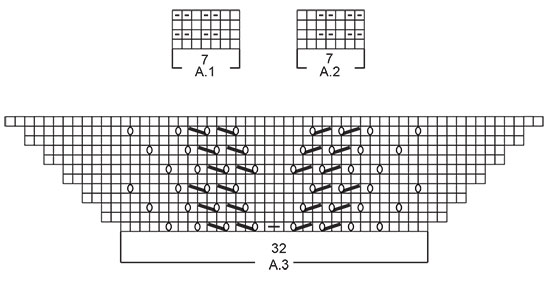
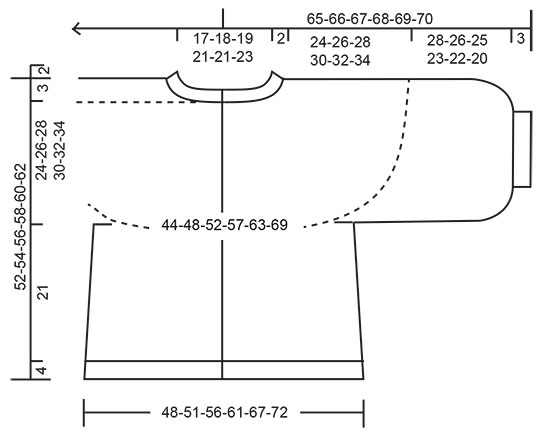
------------------------------------------------------- EXPLANATIONS FOR THE PATTERN: ------------------------------------------------------- PATTERN: See diagrams A.1 to A.3. The diagrams show all rows in the pattern from the right side. INCREASE TIP-1 (evenly spaced): To work out how to increase evenly, count the total number of stitches on the needle (e.g. 111 stitches) minus the bands (e.g. 14 stitches) and divide the remaining stitches by the number of increases to be made (e.g. 15) = 6.5. In this example, increase by making 1 yarn over after alternately each 6th and 7th stitch. Do not increase on the bands. On the next row work the yarn overs twisted to avoid holes. INCREASE TIP-2 (for sides of body): All increases are worked from the right side! Work until there are 2 stitches left before the marker thread, make 1 yarn over, knit 4 (marker thread sits between these 4 stitches) make 1 yarn over. On the next row purl the yarn overs twisted to avoid holes. Then work the new stitches in stocking stitch. BUTTONHOLES: Work buttonholes on the right band (when the garment is worn). Work from the right side when there are 6 stitches left on the row as follows: Make 1 yarn over, knit 2 together and work as before to the end of the row. On the next row (wrong side), knit the yarn over to leave a hole. The first buttonhole is worked when the rib on the neck measures 2 cm. Then work the other 5-5-5-6-6-6 buttonholes with approx. 9-9-9½-8½-8½-9 cm between each one. CASTING-OFF TIP: To avoid the cast-off edge being tight you can cast off with a larger size needle. If the edge is still tight, make 1 yarn over after approx. each 3rd or 6th stitch at the same time as casting off; the yarn overs are cast off as normal stitches. ------------------------------------------------------- START THE PIECE HERE: ------------------------------------------------------- JACKET – SHORT OVERVIEW OF THE PIECE: The neck and yoke are worked back and forth with circular needle from mid front and top down. Stiches are increased on the shoulders in the lace pattern. The yoke is divided for body and sleeves and the body continued back and forth. The sleeves are worked in the round with short circular needle/double pointed needles, top down. NECK: Cast on 111-114-120-126-129-135 stitches (including 7 band stitches on each side towards mid front) with circular needle size 3 mm and Sky. Purl 1 row (= wrong side). The next row is worked as follows from the right side: A.1 over the first 7 stitches, * knit 1, purl 2 *, work from *-* until there are 8 stitches left, knit 1 and finish with A.2 over the last 7 stitches. Continue this rib for 2 cm – remember the BUTTONHOLES on the right band – read description above. When the rib is finished, knit 1 row from the right side where you increase 15-16-14-28-29-27 stitches evenly spaced – read INCREASE TIP-1 = 126-130-134-154-158-162 stitches. Purl 1 row from the wrong side (yarn overs purled twisted). Change to circular needle size 4 mm. Insert 1 marker after the band at the beginning of the row; the yoke is measured from this marker! YOKE: Now work pattern as follows: Work A.1 over the first 7 stitches, stocking stitch over the next 12-13-14-19-20-21 stitches, A.3 over the next 32 stitches, stocking stitch over the next 24-26-28-38-40-42 stitches, A.3 over the next 32 stitches, stocking stitch over the next 12-13-14-19-20-21 stitches and finish with A.2 over the last 7 stitches. Continue this pattern back and forth. REMEMBER THE KNITTING TENSION! When A.3 has been worked 5½-6-6½-6½-7-7½ times in height you have increased 264-288-312-312-336-360 stitches = 390-418-446-466-494-522 stitches on the needle. Continue with stocking stitch (without further increases and working the bands as before) until the piece measures 24-26-28-30-32-34 cm from the marker on the neck. On the next row from the wrong side, divide for the body and sleeves as follows: Work the first 7 stitches as before, stocking stitch over the next 42-46-51-55-60-65 stitches (= front piece), place the next 104-110-114-116-120-124 stitches on a thread for the sleeve, cast on 8-8-8-10-12-14 stitches (= in side under sleeve), stocking stitch over the next 84-92-102-110-120-130 stitches (= back piece), place the next 104-110-114-116-120-124 stitches on a thread for the sleeve, cast on 8-8-8-10-12-14 stitches (= in side under sleeve), stocking stitch over the next 42-46-51-55-60-65 stitches and work the last 7 stitches as before (= front piece). Body and sleeves are finished separately. THE PIECE IS NOW MEASURED FROM HERE. BODY: = 198-214-234-254-278-302 stitches. Insert 1 marker thread 53-57-62-67-73-79 stitches in from each side (= sides). There are 92-100-110-120-132-144 stitches between the marker threads on the back piece. Allow the threads to follow your work onwards; they are used when increasing in the sides. Continue back and forth with stocking stitch and working the bands as before. When the piece measures 4 cm from the division, increase 1 stitch on each side of both marker threads – read INCREASE TIP-2. Increase like this every 4 cm a total of 4 times = 214-230-250-270-294-318 stitches. Continue working until the piece measures 21 cm from the division – adjust so the next row is worked from the right side. There is approx. 4 cm left to finished length; try the jacket on and work to desired length. On the next row increase 23-25-29-33-36-39 stitches evenly spaced = 237-255-279-303-330-357 stitches. Change to circular needle size 3 mm and work back from the wrong side. Now work rib as follows: A.1, * knit 1, purl 2 *, work from *-* until there are 8 stitches left, knit 1, A.2. Continue this rib for 4 cm. Cast off with knit over knit and purl over purl – read CASTING-OFF TIP. The jacket measures approx. 52-54-56-58-60-62 cm from the shoulder down. SLEEVES: Place the 104-110-114-116-120-124 stitches from the thread on the one side of the piece on short circular needle size 4 mm and knit up 1 stitch in each of the 8-8-8-10-12-14 stitches cast on under the sleeve = 112-118-122-126-132-138 stitches. Work stocking stitch in the round until the sleeve measures 28-26-25-23-22-20 cm from the division (shorter measurements in larger sizes due to wider neck and longer yoke). There is approx. 3 cm left to finished length; try the jacket on and work to desired length. On the next round work as follows: Knit 2, knit all stitches together 2 and 2 until there are 2 stitches left on the round (= 54-57-59-61-64-67 stitches decreased), knit the last 2 stitches = 58-61-63-65-68-71 stitches. Knit 1 round where you adjust the number of stitches to 57-60-63-66-69-72 stitches. Change to double pointed needles size 3 mm and work rib (knit 1, purl 2) for 3 cm. Cast off with knit over knit and purl over purl – remember CASTING-OFF TIP. The sleeve measures approx. 31-29-28-26-25-23 cm from the division. Work the other sleeve in the same way. ASSEMBLY: Sew the buttons onto the left band. |
|||||||||||||||||||
Diagram explanations |
|||||||||||||||||||
|
|||||||||||||||||||
 |
|||||||||||||||||||
 |
|||||||||||||||||||
Have you finished this pattern?Tag your pictures with #dropspattern #sapphiretrailscardigan or submit them to the #dropsfan gallery. Do you need help with this pattern?You'll find 22 tutorial videos, a Comments/Questions area and more by visiting the pattern on garnstudio.com. © 1982-2026 DROPS Design A/S. We reserve all rights. This document, including all its sub-sections, has copyrights. Read more about what you can do with our patterns at the bottom of each pattern on our site. |
|||||||||||||||||||


With over 40 years in knitting and crochet design, DROPS Design offers one of the most extensive collections of free patterns on the internet - translated to 17 languages. As of today we count 324 catalogues and 12290 patterns translated into English (UK/cm). 12290
We work hard to bring you the best knitting and crochet have to offer, inspiration and advice as well as great quality yarns at incredible prices! Would you like to use our patterns for other than personal use? You can read what you are allowed to do in the Copyright text at the bottom of all our patterns. Happy crafting!
Post a comment to pattern DROPS 222-23
We would love to hear what you have to say about this pattern!
If you want to leave a question, please make sure you select the correct category in the form below, to speed up the answering process. Required fields are marked *.