
Popular categories
Looking for a yarn?


Comments / Questions (94)
![]() Adela wrote:
Adela wrote:
He estado leyendo el patrón para hacerlo. Si se hicieran vueltas cortas, en la espalda no quedaría mejor la parte delantera sin esa arruga?
22.02.2025 - 11:06DROPS Design answered:
Hola Adela, puedes hacer tus propias modificaciones a la labor, si te parece que el diseño final se ajusta más a lo que quieres. Nosotros no solemos hacer vueltas acortadas en los jerseys de hombros martillo, porque la forma de trabajar los hombros martillo complica el trabajo de la elevación en la espalda, pero puedes hacer tu versión y probar si te queda mejor.
24.02.2025 - 00:06
![]() Martin wrote:
Martin wrote:
Bonjour, Il y a une petite erreur dans le paragraphe " augmentations empiècement " concernant le nombre de mailles des manches pour la taille M . Il y en a 42 et non 40. De base 16 plus 13 augmentations de 2 mailles = (13×2)+16 = 42. Sinon il est très agréable à tricoter pour le moment ! Merci
07.02.2025 - 16:25DROPS Design answered:
Bonjour Martin, c'est exact, il y a bien 42 mailles pour la manche après les augmentations de la manche, mais pour l'empiècement, on va déplacer les marqueurs dans la 1ère maille et dans la dernière maille de la manche, ainsi, il ne reste plus que 40 mailles pour la manche entre les 2 marqueurs. Bon tricot!
10.02.2025 - 12:31
![]() Gerda Torfs wrote:
Gerda Torfs wrote:
Ik versta niet hoe je de steek moet opnemen voor de markeerdraad. Graag een betere uitleg
31.01.2025 - 15:53DROPS Design answered:
Dag Gerda,
In een van de video's (met de titel "Hoe u meerdert voor de zadelschouders") die bij het patroon staan, wordt uitgelegd hoe je dit doet, op ongeveer 1:03.
15.02.2025 - 11:44
![]() Greanecia Jyrwa wrote:
Greanecia Jyrwa wrote:
Hello. May i know the chest size measurements of the finished project.
12.01.2025 - 10:14DROPS Design answered:
Dear Greanecia, the measurements are indicated in the size chart at the end of the pattern. Since the body of the sweater is straight, the chest measurements are the same as the lower edge measurements. You can check how to interpret this chart in the following lesson: https://www.garnstudio.com/lesson.php?id=24&cid=19. Happy knitting!
12.01.2025 - 13:26
![]() Martine wrote:
Martine wrote:
Pouvez-vous s'il-vous-plaît m'aider dans ma recherche d'un modèle similaire à Urban Forest, avec des manches marteau, fil Karisma ou un fil du même groupe ? Ce modèle me plaît beaucoup et je recherche parmis le modèle DROPS homme un modèle avec manches marteau et le fil KARISMA ou du même groupe de fil. Je vous remercie par avance pour votre aide éventuelle.
20.12.2024 - 00:33DROPS Design answered:
Bonjour Martine, retrouvez ici les pulls homme que nous avons avec manches marteau, tricotés avec une laine du groupe de fils B comme Karisma (utilisez le convertisseur si besoin). Bon tricot!
20.12.2024 - 11:29
![]() Martine wrote:
Martine wrote:
Est-ce- que ce modèle Urban forest peut être tricoter avec le fil KARISMA ? Je souhaite réaliser ce modèle en taille L avec le fil KARISMA, est-ce realisable ? Si pas réalisable avec KARISMA, avec quel autre fil traité super Wash ? Merci pour votre réponse.
17.12.2024 - 23:25DROPS Design answered:
Bonjour Martine, ce modèle se tricote en Alaska = laine du groupe C alors que Karisma appartient au groupe de fils B et n'est donc pas ici une alternative; utilisez le convertisseur pour voir les alternatives possibles et les quantités correspondantes. En laine Superwash, vous pouvez utiliser Big Merino (1 fil) ou bien en tricotant avec 2 fils: Baby Merino ou Fabel. Bon tricot!
18.12.2024 - 08:25
![]() Saira wrote:
Saira wrote:
Hello, I am increasing for yoke but i don't understand how to increase on both sides of marker I'm so confused rn kindly share some tips or any vedio so can i understand it clearly. Thank you
29.11.2024 - 06:23DROPS Design answered:
Ho Saira, please watch the video HERE from the start to 2:20, but instead of knit 8 you will make knit 1 (stitch with marker). See INCREASE TIP (before and after marker) as well. Happy knitting!
29.11.2024 - 09:56
![]() Susanne wrote:
Susanne wrote:
Det går inte att se på videon, har tittat 50 ggr
04.11.2024 - 14:18
![]() Susanne Andersson wrote:
Susanne Andersson wrote:
Öka maskor på sadelaxel till ärmarna. 20 masker till ärmarna. När man ökar till ärmarna gör man det utanför dom 20 maskerna? Man ökar ju efter 1: a och 3:e markören. Och före 2:a och 4:e markören. Ska man öka mellan maskorna som markören sitter i?
04.11.2024 - 07:03DROPS Design answered:
Hei Susanne. Ta en titt på hjelpevideoene til hvordan man strikker sadelskulder. Hur man ökar maskor till ärmarna på sadelaxel OG Hur man ökar maskor till sadelaxel . Du finner videoer til høyre / eller under bildene. mbh DROPS Design
04.11.2024 - 13:28
![]() Siv wrote:
Siv wrote:
Skal strikke I large, hva er overvidden. Og hvor lang er ermene fra under erme og ut til handbak. Kan jeg forlenge ermer og bol.
22.10.2024 - 11:27
|
|||||||||||||
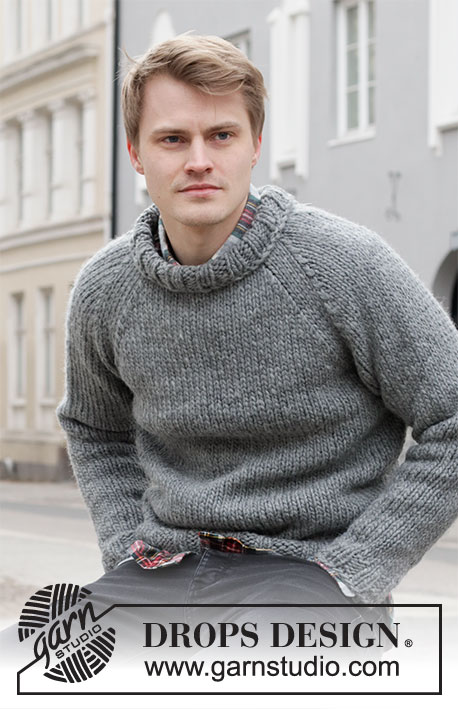
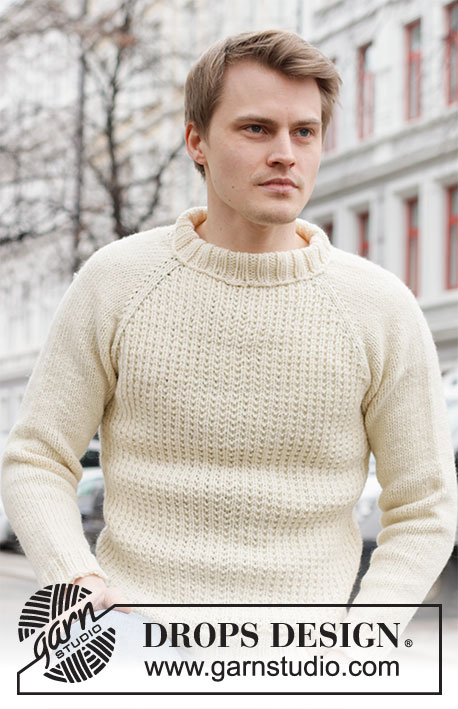
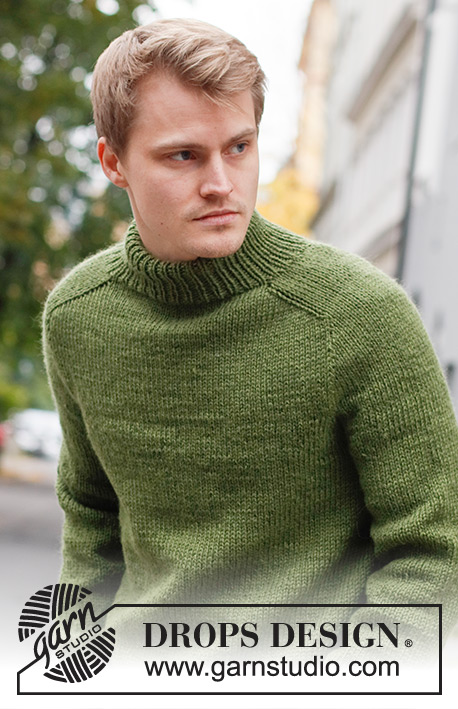
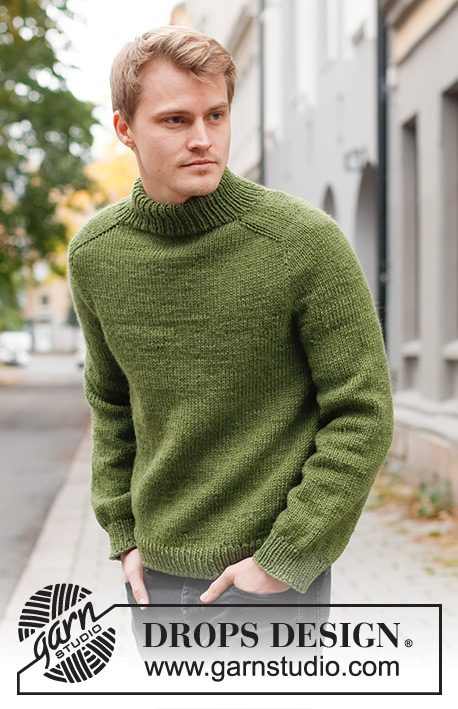
Urban Forest#urbanforestsweater |
|||||||||||||
 |
 |
||||||||||||
Knitted jumper for men in DROPS Alaska. The piece is worked top down, with double neck and saddle shoulders. Sizes S - XXXL.
DROPS 219-16 |
|||||||||||||
|
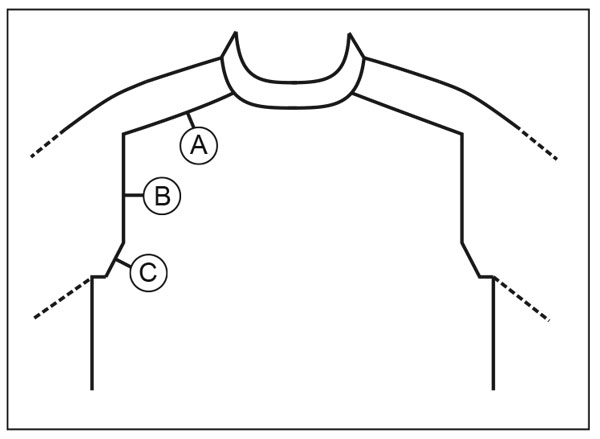
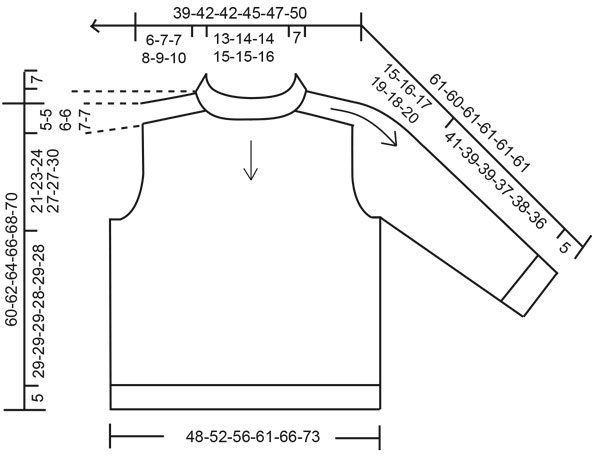
------------------------------------------------------- EXPLANATIONS FOR THE PATTERN: ------------------------------------------------------- INCREASE/DECREASE TIP (evenly spaced): To work out how to increase/decrease evenly, count the total number of stitches on needle (e.g. 78 stitches), and divide by the number of increases/decreases to be made (e.g. 22) = 3.5. In this example, increase by making 1 yarn over after alternately each 3rd and 4th stitch. On the next round work the yarn overs twisted to avoid holes. When decreasing, knit together alternately each 2nd and 3rd stitch and each 3rd and 4th stitch. INCREASE TIP: BEFORE MARKER: The new stitch twists to the right. Use the left needle to pick up the strand between 2 stitches from the previous round; pick up the back strand and knit in the front loop. AFTER MARKER: The new stitch twists to the left. Use the left needle to pick up the strand between 2 stitches from the previous round; pick up the front strand and knit in the back loop. DECREASE TIP (for sleeves): Decrease 1 stitch on either side of the marker thread as follows: Work until there are 3 stitches left before the marker thread, knit 2 together, knit 2 (marker thread sits between these 2 stitches), slip 1 stitch as if to knit, knit 1 and pass the slipped stitch over the knitted stitch. CASTING-OFF TIP: To avoid the cast-off edge being tight you can cast off with a larger size needle. If the edge is still tight, make 1 yarn over after approx. each 4th stitch at the same time as casting off; the yarn overs are cast off as normal stitches. ------------------------------------------------------- START THE PIECE HERE: ------------------------------------------------------- JUMPER – SHORT OVERVIEW OF THE PIECE: The neck and yoke are worked in the round with circular needle, top down from mid back. The yoke is divided for body and sleeves and the body continued in the round with circular needle. The sleeves are worked in the round with short circular needle/double pointed needles, top down. NECK: Cast on 78-82-88-92-98-102 stitches with circular needle size 4 mm and Alaska. Knit 1 round, then work rib (knit 1, purl 1) in the round for 14½ cm. Knit 1 round where you increase 22-22-32-32-34-38 stitches evenly spaced – read INCREASE/DECREASE TIP = 100-104-120-124-132-140 stitches. Change to circular needle size 5 mm. YOKE: Insert a marker at the beginning of the round (= mid-back) – THE PIECE IS MEASURED FROM HERE! In addition, insert 4 new markers as described below – without working the stitches and inserting the markers between 2 stitches. Marker 1: Start mid-back, count 17-18-20-21-21-23 stitches (= ½ back piece), insert marker before the next stitch. Marker 2: Count 16-16-20-20-24-24 stitches from marker 1 (= shoulder), insert marker before the next stitch. Marker 3: Count 34-36-40-42-42-46 stitches from marker 2 (= front piece), insert marker before the next stitch. Marker 4: Count 16-16-20-20-24-24 stitches from marker 3 (= shoulder), insert marker before the next stitch. There are 17-18-20-21-21-23 stitches left on the back piece after marker 4. Allow the markers to follow your work onwards; they are used when increasing for the shoulders. INCREASES FOR SADDLE SHOULDERS: Work stocking stitch in the round. AT THE SAME TIME, on the first round, increase 4 stitches for the shoulders as follows: Increase BEFORE markers 1 and 3 and increase AFTER markers 2 and 4 – read INCREASE TIP. Here you are only increasing on the front and back pieces and the number of shoulder stitches remains the same. Increase like this every round a total of 14-16-16-18-20-22 times = 156-168-184-196-212-228 stitches. REMEMBER THE KNITTING TENSION! After the last increase the piece measures approx. 6-7-7-8-9-10 cm from the marker on the neck. Now increase for the sleeves as follows. INCREASES FOR SLEEVES: Work stocking stitch in the round. AT THE SAME TIME, on the next round, increase 4 stitches for the sleeves as follows: Increase AFTER markers 1 and 3 and increase BEFORE markers 2 and 4 – remember INCREASE TIP. Here you are only increasing on the shoulders and the number of stitches on the front and back pieces remains the same. Increase like this every 2nd round a total of 11-13-13-15-12-12 times = 200-220-236-256-260-276 stitches. The piece should now measure 16-19-19-22-20-21 cm from the marker on the neck. In size S continue working until the piece measures 17 cm. If the length is shorter than the above in sizes M, L, XL, XXL and XXXL, continue to the correct length without further increases. Now increase for the yoke as described below. INCREASES FOR YOKE: Move the 4 markers so each marker sits in the outermost sleeve stitches on each side. There are 36-40-44-48-46-46 stitches between the marker-stitches on each sleeve. On the next round, increase 8 stitches for the yoke by increasing on both sides of all 4 marker-stitches – remember INCREASE TIP. Here you increase on the front and back pieces and on the sleeves; the increased stitches are worked in stocking stitch. Increase like this every 2nd round a total of 4-4-6-6-8-10 times = 232-252-284-304-324-356 stitches. When all the increases are finished, the piece should measure 21-23-24-27-27-30 cm. If the length is shorter than this, continue working to the correct length without further increases. Now divide the yoke for the body and sleeves on the next round as follows: Work the first 35-38-42-45-49-55 stitches (= ½ back piece), place the next 46-50-58-62-64-68 stitches on a thread for the sleeve, cast on 12-12-12-14-14-14 new stitches on the needle (= in side under sleeve), work the next 70-76-84-90-98-110 stitches (= front piece), place the next 46-50-58-62-64-68 stitches on a thread for the sleeve, cast on 12-12-12-14-14-14 new stitches on the needle (= in side under sleeve) and work the last 35-38-42-45-49-55 stitches (= ½ back piece). Body and sleeves are finished separately. THE PIECE IS NOW MEASURED FROM HERE. BODY: = 164-176-192-208-224-248 stitches. Work stocking stitch in the round. When the piece measures 29-29-29-28-29-28 cm from the division, increase 16-18-20-20-22-26 stitches evenly spaced = 180-194-212-228-246-274 stitches. Change to circular needle size 4 mm and work rib (knit 1, purl 1) for 5 cm. Cast off with knit over knit and purl over purl – read CASTING-OFF TIP. The jumper measures approx. 60-62-64-66-68-70 cm from the shoulder down. SLEEVE: Place the 46-50-58-62-64-68 stitches from the thread on the one side of the piece on double pointed needles/short circular needle size 5 mm and knit up 1 stitch in each of the 12-12-12-14-14-14 stitches cast on under the sleeve = 58-62-70-76-78-82 stitches. Insert a marker in the middle of the new stitches under the sleeve. Work stocking stitch in the round. When the sleeve measures 4 cm from the division, decrease 1 stitch on each side of the marker – read DECREASE TIP. Decrease like this every 11-6-3½-3-3-2½ cm a total of 4-6-9-11-11-13 times = 50-50-52-54-56-56 stitches. Continue working until the sleeve measures 41-39-39-37-38-36 cm from the division. Knit 1 round where you decrease 10-8-8-8-10-8 stitches evenly spaced = 40-42-44-46-46-48 stitches. Change to double pointed needles size 4 mm and work rib (knit 1, purl 1) for 5 cm. Cast off with knit over knit and purl over purl – remember CASTING-OFF TIP. Work the other sleeve in the same way. ASSEMBLY: Fold the neck double to the wrong side and sew down. To avoid the neck being tight and rolling outwards, it is important the seam is elastic. |
|||||||||||||
Diagram explanations |
|||||||||||||
|
|||||||||||||
 |
|||||||||||||
 |
|||||||||||||
Have you finished this pattern?Tag your pictures with #dropspattern #urbanforestsweater or submit them to the #dropsfan gallery. Do you need help with this pattern?You'll find 28 tutorial videos, a Comments/Questions area and more by visiting the pattern on garnstudio.com. © 1982-2026 DROPS Design A/S. We reserve all rights. This document, including all its sub-sections, has copyrights. Read more about what you can do with our patterns at the bottom of each pattern on our site. |
|||||||||||||


With over 40 years in knitting and crochet design, DROPS Design offers one of the most extensive collections of free patterns on the internet - translated to 17 languages. As of today we count 324 catalogues and 12290 patterns translated into English (UK/cm). 12290
We work hard to bring you the best knitting and crochet have to offer, inspiration and advice as well as great quality yarns at incredible prices! Would you like to use our patterns for other than personal use? You can read what you are allowed to do in the Copyright text at the bottom of all our patterns. Happy crafting!
Post a comment to pattern DROPS 219-16
We would love to hear what you have to say about this pattern!
If you want to leave a question, please make sure you select the correct category in the form below, to speed up the answering process. Required fields are marked *.