
Popular categories
Looking for a yarn?


Comments / Questions (24)
![]() Linda wrote:
Linda wrote:
The pattern says to start from the right side and knit up 26 stitches along the right edge of the middle section, make sure you knit up on the inside of the edge stitch, continue the pattern as before over the stitches from the extra needle and knit up 26 stitches along the left side of the middle section. does this mean pick up and knit the stitches on the pick up as knit stitches and just patter the middle section?
01.04.2026 - 04:55DROPS Design answered:
Dear Linda, correct, you will knit up the new stitches on each side and work in pattern as before the middle stitches - this should be the row 3 in diagram. Then turn and work as explained from WS (row 4 in diagram). Happy knitting!
07.04.2026 - 15:49
![]() Sarens wrote:
Sarens wrote:
Bonjour, JE veux commencer la cagoule mais j'ai déjà un souci. On commence avec 39 mailles pour la partie centrale et on se retrouve 12 cm plus loin avec 45 mailles alors que je ne vois pas d'augmentation...; Un grand merci de votre réponse
17.12.2025 - 13:30DROPS Design answered:
Bonjour Mme Sarens, à chaque fois que l'on tricote le 1er rang de A.1A et de A.1B, on fait 1 jeté entre les 2 mailles endroit = on va ainsi augmenter 8 x 1 m sur ce rang (= 7 x A.1A + 1 x A.1B), quand on tricote le 3ème rang des diagrammes, on diminue cette maille = on se retrouve de nouveau avec 5 mailles dans chaque A.1A et 2 dans A.1B. Autrement dit, quand vous arrêtez après un rang 2 (après avoir rabattu les m lis de chaque côté), vous avez: 7 x 6 m de A.1A (= 42) + 3 m de A.1B = 45 mailles. Bon tricot!
17.12.2025 - 17:58
![]() Jeannette Carlsen wrote:
Jeannette Carlsen wrote:
Jeg kan ikke få maseantallet til at stemme. 41 masker tages op i høje og venstre side plus de 45 masker på hjælpemiddel, det bliver 127 masker. I opskriften skal der 119. Kan du hjælpe mig?
02.11.2024 - 18:39DROPS Design answered:
Hei Jeannette. Jo, du strikker opp 41 masker langs høyre kant, fortsett mønstret (du strikker nå 3. rad av diagrammet A.1A = 5 masker = 7 rapporter x 5 masker = 35 masker + 3. rad av A.1B = 2 masker = 37 masker) og strikk opp 41 masker langs venstre side på midtpartiet = 41+37+41 = 119 masker. mvh DROPS Design
04.11.2024 - 09:52
![]() Kaija wrote:
Kaija wrote:
I used 75g for size 1/3 - 50g was most definitely not enough for that size either!
03.12.2023 - 22:00
![]() Ulrika wrote:
Ulrika wrote:
Hej! Jag förstår inte instruktionen kring den svarta rutan i mönstret. Det står " ingen maska" men hur gör jag då?
18.09.2023 - 14:49DROPS Design answered:
Hej Ulrika. Du går bara direkt till nästa ruta i diagrammet och stickar kommande maska enligt den rutan istället. Mvh DROPS Design
19.09.2023 - 12:22
![]() Gabriele wrote:
Gabriele wrote:
Inzwischen habe ich es verstanden. :-)
09.09.2023 - 21:32
![]() Gabriele wrote:
Gabriele wrote:
Guten Tag, ich stricke gerade das Mittelstück und habe dafür 34 Maschen angeschlagen. Ich verstehe nicht, warum es nach 11cm Länge nun plötzlich 39 Maschen sein sollen - es werden ja in der Anleitung keinerlei Zunahmen erwähnt? Danke im voraus und beste Grüße
09.09.2023 - 18:10DROPS Design answered:
Liebe Gabriele, über 34 Maschen haben Sie die kleine Zöpfe insgesamt 7 Mal gestrickt, es wird 1 Masche beidseitig abgekettet und bei der 1. Reihe A.1 je 1 Umschlag gemacht, so haben Sie nach der 2. Reihe A.1 = 34-2+7=39 Maschen. Viel Spaß beim stricken!
11.09.2023 - 09:13
![]() Maja wrote:
Maja wrote:
Hej med jer. Jeg skal til at strikke udtagning omkring hullet til hovedet i det sidste trin. Jeg skal lave udtagninger efter at jeg har samlet masker op. Hvordan skal jeg lave dem, når jeg ikke har nogen lænker at lave udtagninger i? Mvh. Maja
30.08.2023 - 20:10DROPS Design answered:
Hei Maja. Ta en titt på denne videoen: Slå nye masker op i kanten af arbejdet mvh DROPS Design
11.09.2023 - 13:08
![]() Berbett wrote:
Berbett wrote:
Bonjour, Merci pour votre dernière réponse. Je bloque au niveau des augmentations : s'agit-il d'augmenter avant puis après les mailles envers sur le même tour, ou faire toutes les augmentations avant les mailles envers sur un tour puis 2 cm plus haut faire les augmentations après. Merci beaucoup.
17.01.2022 - 20:59DROPS Design answered:
Bonjour Berbett, vous augmentez d'abord en faisant 1 jeté au début de chaque section en mailles envers (= avant ces mailles) = soit 4 mailles envers partout, puis 2 cm plus loin, vous allez augmenter en faisant 1 jeté après chaque section en mailles envers (= à la fin de chacune de ces sections) = 5 mailles envers dans chaque section; et enfin encore 1 fois au début de chaque section = 6 mailles envers dans chaque section en mailles envers. Bon tricot!
18.01.2022 - 09:00
![]() Berbett wrote:
Berbett wrote:
Bonjour, Sur le diagramme : après la ligne avec le jeté faut-il tricoter le jeté pour former un trou ou le tricoter à l'envers pour qu'il n'y ait pas de trou ? En montant 29 m et en suivant le diagramme comment arrivé aux 33 m alors qu'il n'y a pas d'augmentations ? Rabattre 1 m au début de et à la fin de ce rang signifie bien : que sur le dernier rang ? Merci d'avance pour votre aide. Pia.
13.01.2022 - 00:15DROPS Design answered:
Bonjour Berbett, ce jeté doit former un trou, cette vidéo montre comment réaliser ce type de torsades. On monte 29 mailles mais on fait des jetés dans le point fantaisie, donc le nombre de mailles va augmenter à chaque fois que l'on tricote les rangs 1 et 2, puis aux rangs 3 et 4, le nombre de mailles sera de nouveau comme avant. Et tout à fait, au dernier rang, rabattez la 1ère maille, tricotez jusqu'à la fin du rang, rabattez la dernière maille, coupez le fil. Bon tricot!
13.01.2022 - 08:45
|
||||||||||||||||
Warm Smiles#warmsmilesbalaclava |
||||||||||||||||
 |
 |
|||||||||||||||
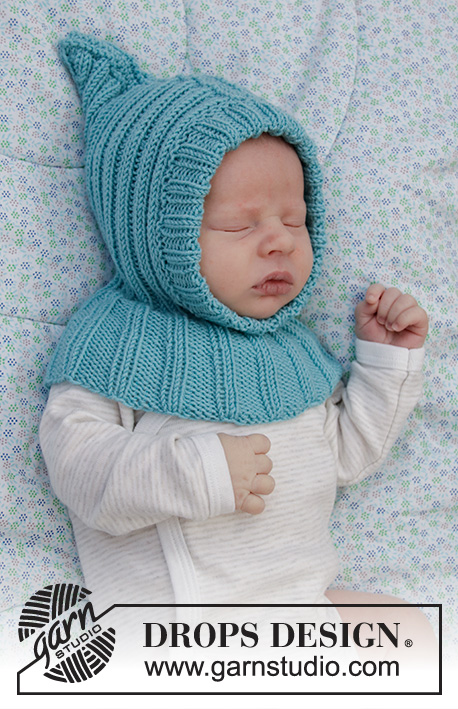
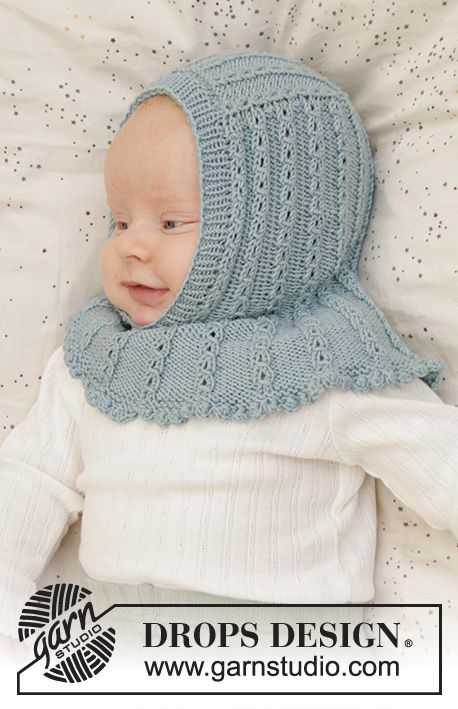
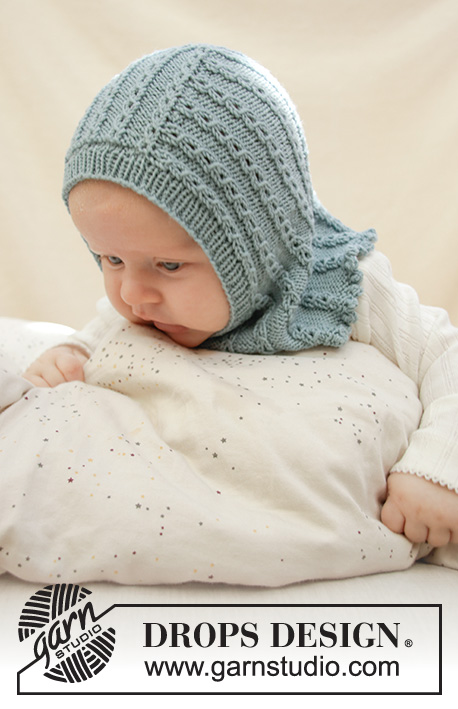
Knitted balaclava with lace pattern for babies in DROPS Baby Merino. Sizes: 0– 2 years
DROPS Baby 33-10 |
||||||||||||||||
|
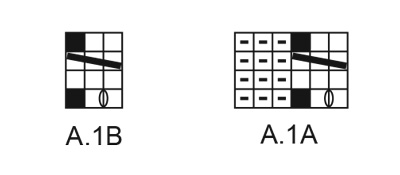
------------------------------------------------------- EXPLANATIONS FOR THE PATTERN: ------------------------------------------------------- RIDGE/GARTER STITCH (worked back and forth): Knit all rows. 1 ridge in height = Knit 2 rows. RIDGE/GARTER STITCH (worked in the round): 1 ridge in height = 2 rounds; Knit 1 round and purl 1 round. PATTERN: See diagram A.1. The diagram shows all rows in the pattern from the right side. INCREASE TIP: Increase 1 stitch by making 1 yarn over; on the next round purl the yarn over twisted to avoid a hole. The first time you increase, make the 1 yarn over before the purled stitches. The next time you increase, make 1 yarn over after the purled stitches. Continue increasing alternately before and after the purled section. ---------------------------------------------------------- START THE PIECE HERE: ------------------------------------------------------- BALACLAVA – SHORT OVERVIEW OF THE PIECE: The piece is worked back and forth with circular needle from mid-top of head and down to the neck. Then it is worked in the round with double pointed needles/short circular needle. BALACLAVA: Cast on 29-29-34-34 (39) stitches (including 1 edge stitch on each side) with circular needle size 3 mm and Baby Merino. Work 1 RIDGE – see description above. The next row is worked as follows from the right side: 1 edge stitch in garter stitch, work A.1A until there are 3 stitches left on the row (= 5-5-6-6 (7) repeats of 5 stitches), A.1B (= 2 stitches) and finish with 1 edge stitch in garter stitch. Continue this pattern until the piece measures approx. 9-10-11-12 (13) cm and cast off 1 stitch at the beginning and end of this row, making sure you finish after row 2 in A.1 so the last row is from the wrong side = 33-33-39-39 (45) stitches on the needle. Insert 1 marker in the piece to measure from. The middle section on top of the balaclava is now finished. Cut the strand and place the stitches on an extra needle. Start from the right side and knit up 26-31-31-36 (41) stitches along the right edge of the middle section (seen from the right side); make sure you knit up on the inside of the edge stitch, continue the pattern as before over the stitches from the extra needle and knit up 26-31-31-36 (41) stitches along the left side of the middle section (seen from the right side) = 79-89-94-104 (119) stitches. The next row is worked as follows, from the wrong side: 1 edge stitch in garter stitch, A.1B (= 2 stitches – start with row 4 in the diagram so the pattern matches the middle section), work A.1A over the next 75-85-90-100 (115) stitches (= 15-17-18-20 (23) repeats of 5 stitches) and finish with 1 edge stitch in garter stitch. Continue this pattern back and forth until the piece measures approx. 10-11-12-13 (14) cm from the marker; finish after row 2 in A.1. Continue the pattern on the next row but at the end of the row cast on 6 new stitches (mid front under the chin) = 85-95-100-110 (125) stitches on the needle. Insert 1 new marker – THE PIECE IS NOW MEASURED FROM HERE! Now continue in the round with double pointed needles, changing to short circular needle when necessary. Continue the pattern in the round over all stitches. When the piece measures 2½-2½-2½-2½ (3) cm from the new marker, increase all purl 3 sections to purl 4 – read INCREASE TIP = approx. 102-114-120-132 (150) stitches (if you are on a yarn-over round in A.1, the yarn overs are not included in the stitch count). Increase like this every 2 cm a total of 3 times (= 6 purl stitches in each purl section) = approx. 136-152-160-176 (200) stitches. When the piece measures 9-10-11-12 (13) cm from the last marker (or to desired length), work 2 RIDGES – see description above – in the round over all stitches. Then cast off with picot as described below. CAST-OFF EDGE WITH PICOT: Cast off from the right side as follows: Knit 1, (* insert the right needle between the next 2 stitches on the left needle, i.e. between the stitches, not through them, make 1 yarn over, pull the yarn over between the stitches and place it on the left needle *, work from *-* 2 more times so there are 3 new stitches on the left needle. ** Knit the first stitch on the left needle, pass the first stitch on the right needle over the last stitch worked **), work from **-** a total of 5 times and repeat from (-) along the whole edge until there is only 1 stitch on the left needle. Cut the strand and pull it through this last stitch. EDGE AROUND OPENING: Knit up approx. 80 to 90 stitches around the opening in front; i.e. around the face (use a crochet hook when knitting up stitches, as this gives you a neat pick-up edge). Divide the stitches onto double pointed needles. Knit 1 round where you increase evenly to 90-110 stitches. Work rib in the round = knit 1 / purl 1 for 2 cm. Loosely cast off with knit over knit and purl over purl. |
||||||||||||||||
Diagram explanations |
||||||||||||||||
|
||||||||||||||||
 |
||||||||||||||||
Have you finished this pattern?Tag your pictures with #dropspattern #warmsmilesbalaclava or submit them to the #dropsfan gallery. Do you need help with this pattern?You'll find 25 tutorial videos, a Comments/Questions area and more by visiting the pattern on garnstudio.com. © 1982-2026 DROPS Design A/S. We reserve all rights. This document, including all its sub-sections, has copyrights. Read more about what you can do with our patterns at the bottom of each pattern on our site. |
||||||||||||||||


With over 40 years in knitting and crochet design, DROPS Design offers one of the most extensive collections of free patterns on the internet - translated to 17 languages. As of today we count 324 catalogues and 12290 patterns translated into English (UK/cm). 12290
We work hard to bring you the best knitting and crochet have to offer, inspiration and advice as well as great quality yarns at incredible prices! Would you like to use our patterns for other than personal use? You can read what you are allowed to do in the Copyright text at the bottom of all our patterns. Happy crafting!
Post a comment to pattern DROPS Baby 33-10
We would love to hear what you have to say about this pattern!
If you want to leave a question, please make sure you select the correct category in the form below, to speed up the answering process. Required fields are marked *.