
Popular categories
Looking for a yarn?


Comments / Questions (53)
![]() Anna wrote:
Anna wrote:
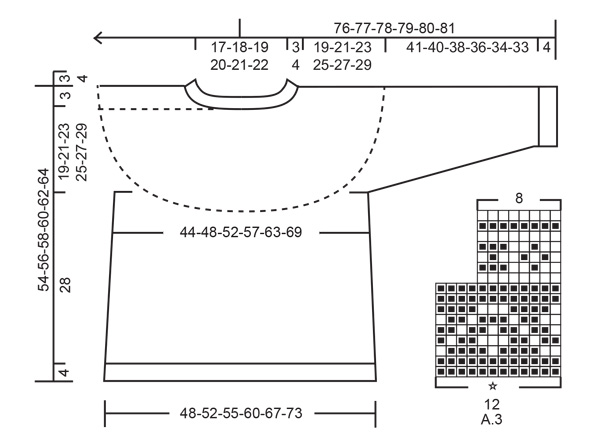
Hallo, ich komme am Ende des Ärmels nicht weiter. In Größe M soll man nach den Abnahme 54 Maschen Auf der Nadel haben. Das habe ich auch, aber das Muster A3 soll nun angestrickt werden und passt mit einem Rapport von 12 Maschen doch nicht an die 54. Wo liegt mein Fehler?
16.10.2025 - 23:12DROPS Design answered:
Liebe Anna, der Mustersatz geht nicht mit den 12 Maschen auf, aber ein halber Mustersatz passt noch in die Runde. Zählen Sie ab der Masche mit dem weißen Stern ab, wo das Muster an der unteren Ärmelmitte beginnt (der Rundenbeginn ist ja an der unteren Ärmelmitte. Sie haben dann insgesamt 4,5 Mustersätze in der Runde. Und dann viel Spaß beim Tragen dieses tollen Pullovers! :-)
21.10.2025 - 22:43
![]() Monique wrote:
Monique wrote:
Mi potete spiegare come evitare lo scalino a ogni inizio giro quando c'è il cambio colore
12.10.2025 - 14:35
![]() Judy wrote:
Judy wrote:
Tension : I can only get 8cm with 24 stitches using 3mm needles and 9cm using 3.75mm needles and it doesn't look good with that size needle. If I used 3.5mm and 3mm needles and worked a size larger would that work?
30.08.2025 - 17:59DROPS Design answered:
Dear Judy, have you worked the swatch with both stocking stitch and the Nordic pattern? Because the Nordic pattern usually requires a bigger needle size, to avoid having tight strands on the wrong side of the piece. If the gauge still doesn't match then yes, you could try working a bigger size. Happy knitting!
31.08.2025 - 19:00
![]() Amandine wrote:
Amandine wrote:
Bonjour, comment tricoter le jacquard en rond sans demarcation quand on a qu'un seul rang de couleur ? Je n'ai pas trouvé de vidéo sur le sujet. En vous remerciant .
02.04.2025 - 20:49DROPS Design answered:
Bonjour Amandine, on peut parfois utiliser la technique des rayures en rond (cf vidéo), mais en fonction du motif, ça ne fonctionne pas toujours, dans ces cas là, vous pouvez essayer de resserrer légèrement les fils au niveau du début/de la fin des tours pour les rapprocher le plus possible. Cette démarcation sera ainsi un peu moins visible. Bon tricot!
03.04.2025 - 08:42
![]() Marie Francoise wrote:
Marie Francoise wrote:
Bonjour, puis je remplacer la laine drops alpaca préconisée pour ce modèle, avec la laine drops nord sans faire de modification ? Merci Cordialement Marie Francoise
22.01.2025 - 09:19DROPS Design answered:
Bonjour Marie-Françoise, tout à fait, calculez la nouvelle quantité correspondante ici (sensiblement la même car les fils ont approximativement le même métrage). Bon tricot!
22.01.2025 - 16:13
![]() Lindsay Dunseith wrote:
Lindsay Dunseith wrote:
My previous comment refers. I've just realised that A3 is at the bottom of the sleeve and not on the yoke! Apologies.
10.01.2025 - 14:01
![]() Lindsay Dunseith wrote:
Lindsay Dunseith wrote:
I don't understand how A3 works. It suggests an extra part of the pattern on the sleeves, but the picture does not show this.
10.01.2025 - 13:18DROPS Design answered:
Hi Lindsay, happy to see that you have solved the problem. Happy knitting!
10.01.2025 - 15:18
![]() Christelle MAURICIA wrote:
Christelle MAURICIA wrote:
Bonjour Quel nombre de pelote faut il acheter svp je ne vois pas la réponse dans le descriptif ? merci
20.12.2024 - 19:34DROPS Design answered:
Bonjour Christelle ! Le nombre de pelotes dépend de la taille que vous tricotez - voir les chiffres de consommation : TAILLES : S - M - L - XL - XXL - XXXL FOURNITURES : DROPS ALPACA de Garnstudio (appartient au groupe de fils A) 300-350-350-400-450 g coloris 7323, brume maritime 50-50-100-100-100-100 g coloris 100, naturel DROPS Alpaca est fourni en pelotes de 50 g, il faut donc diviser par 50 pour obtenir le nombre de pelotes. Bon tricot!
29.12.2024 - 11:53
![]() Julia wrote:
Julia wrote:
Many thanks for your prompt reply. However my question refers to the sleeve not the body. My query was regarding the fact that I have 60 stitches which is divisible by 12 but not by 8 so the second half of A3 ends with an 4 stitches which I don't know how to knit.
12.04.2024 - 08:42DROPS Design answered:
Dear Julia, that's right, but you have to center A.3 mid over sleeve, in this lesson we explain how to do, this means A.3 will not fit in the round, but the stitch with the star in A.3 should be mid on top of sleeve. Happy knitting!
12.04.2024 - 12:39
![]() Julia wrote:
Julia wrote:
I am rather confused by A3. I have 60 stitches which is divisible by 12 but not by 8. Do I just do 7 repeats plus 4 stitches before the next round?
11.04.2024 - 23:02DROPS Design answered:
Hi Julia, You originally have 178 stitches in your size, before starting the yoke. You then increase 60 stitches by making yarn overs evenly spaced on the round (increase tip 1). Remember to knit these yarn overs twisted (through the back loop) on the next round to avoid holes. After the increases you have 238 stitches. As stated in the text, pattern A.1 doesn't fit until you have increased at arrow 2 in the diagram but this doesn't matter, as you are working complete rounds of each colour. Happy knitting!
12.04.2024 - 06:34
|
|||||||||||||
Scent of Pine#scentofpinesweater |
|||||||||||||
 |
 |
||||||||||||
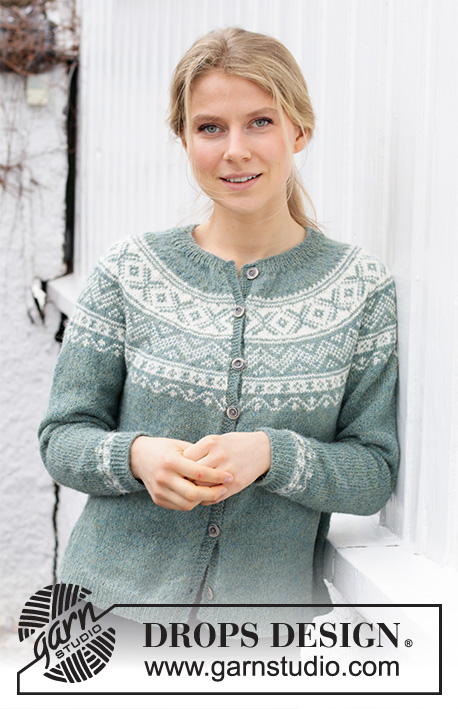
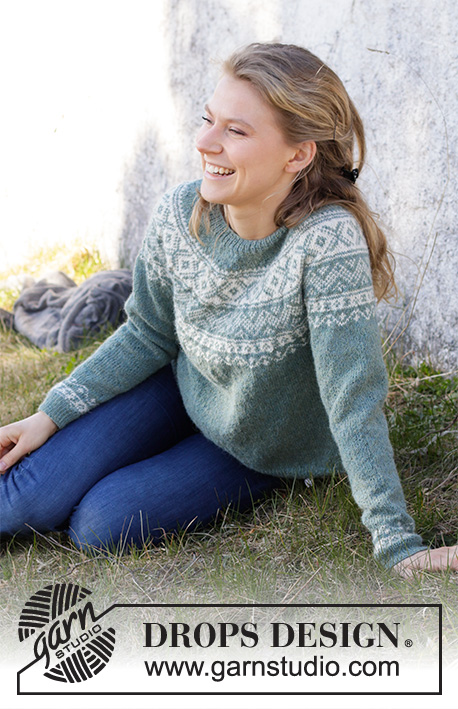
Knitted jumper in DROPS Alpaca. The piece is worked top down with round yoke and Nordic pattern on the yoke and on the bottom of the sleeves. Sizes S - XXXL.
DROPS 215-8 |
|||||||||||||
|
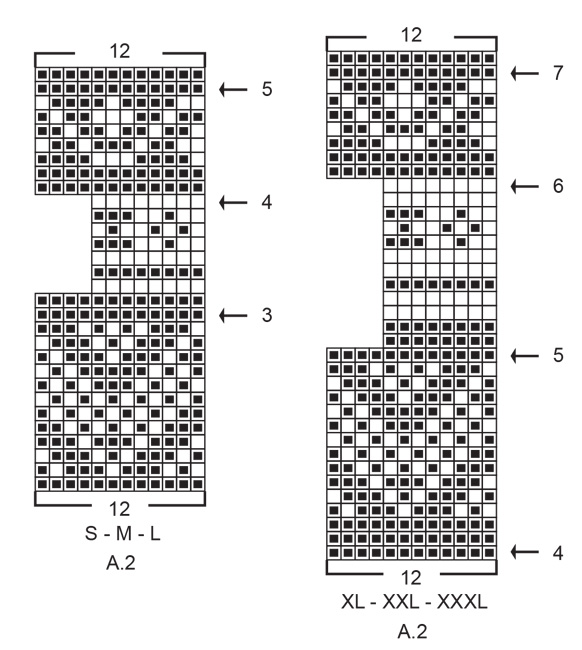
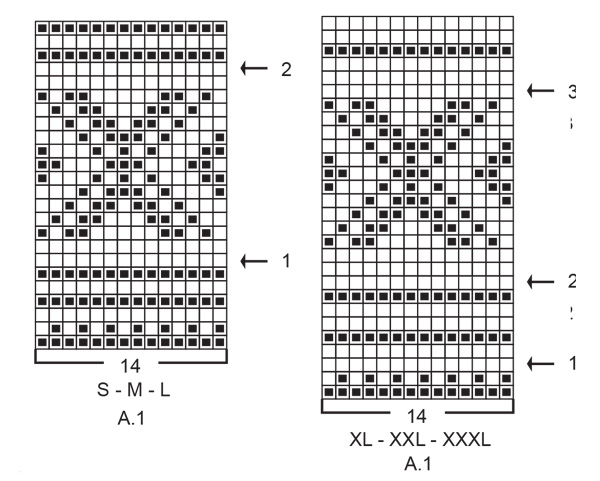
------------------------------------------------------- EXPLANATIONS FOR THE PATTERN: ------------------------------------------------------- INCREASE TIP-1 (evenly spaced): To work out how to increase evenly, count the total number of stitches on the needle (e.g. 110 stitches) divide by the number of increases to be made (e.g. 36) = 3. In this example, increase by making 1 yarn over after each 3rd stitch. On the next round knit the yarn overs twisted to avoid holes. PATTERN: See diagrams A.1 to A.3. Choose diagram for your size (applies to A.1 and A.2). The whole pattern is worked in stocking stitch. KNITTING TIP: To avoid the knitting tension becoming tighter when working pattern it is important that the strands at the back are not tight. Use a size larger needle when working pattern if this is a problem. ELEVATION (back of neck): So the jumper is slightly higher at the back of the neck when working the yoke, you can work an elevation as described here. Skip this section if you do not want an elevation. Insert a marker at the beginning of the round (mid-back). Start from the right side with sea fog and knit 14-15-16-16-17-18 stitches past the marker, turn, tighten strand and purl 28-30-32-32-34-36 stitches back. Turn, tighten the strand and knit 42-45-48-48-51-54 stitches, turn, tighten strand and purl 56-60-64-64-68-72 stitches back. Turn, tighten the strand and knit 70-75-80-80-85-90 stitches, turn, tighten strand and purl 84-90-96-96-102-108 stitches back. Turn, tighten the strand and knit to mid-back. Then work YOKE as described in the text. INCREASE TIP-2 (for sides of body): Increase 1 stitch on each side of the marker thread as follows: Work until there are 2 stitches left before the marker thread, make 1 yarn over, knit 4 (marker thread sits between these 4 stitches) make 1 yarn over (= 2 stitches increased at each marker thread). On the next round knit the yarn overs twisted to avoid holes. Then work the new stitches in stocking stitch. DECREASE TIP (for mid under sleeve): Decrease 1 stitch on either side of the stitch with the marker as follows: Work until there are 2 stitches left before the stitch with the marker, knit 2 together, knit the stitch with the marker, slip 1 stitch as if to knit, knit 1 and pass the slipped stitch over the knitted stitch (= 2 stitches decreased). CASTING-OFF TIP: To avoid the cast-off edge being tight you can cast off with a larger size needle. If the edge is still tight, make 1 yarn over after approx. each 6th stitch at the same time as casting off; the yarn overs are cast off as normal stitches. ------------------------------------------------------- START THE PIECE HERE: ------------------------------------------------------- JUMPER – SHORT OVERVIEW OF THE PIECE: The neck and yoke are worked in the round with circular needle, top down from mid back. The yoke is divided for the body and sleeves and the body continued in the round with circular needle. The sleeves are worked in the round with short circular needle/double pointed needles, top down. NECK: Cast on 110-114-120-124-128-134 stitches with short circular needle size 2.5 mm and sea fog. Knit 1 round. Then work rib in the round (= knit 1, purl 1) for 3-3-3-4-4-4 cm. Knit 1 round where you increase 36-38-40-42-42-44 stitches evenly spaced – read INCREASE TIP-1 = 146-152-160-166-170-178 stitches on the needle. Change to circular needle size 3 mm and knit 1 round (yarn overs knitted twisted). Insert 1 marker in the middle of the round (= mid-front); the yoke is measured from this marker! Now you can work an ELEVATION in the back of the neck – read description above. If you do not want an elevation, go straight to YOKE. YOKE: Read the whole of this section before continuing! Work stocking stitch in the round with sea fog. When the piece measures 1½-2-2-3-3-3 cm from the marker on the neck, increase 50-52-54-56-58-60 stitches evenly spaced = 196-204-214-222-228-238 stitches. When the piece measures 2-3-3-4-4-5 cm from the marker on the neck start the pattern by working A.1 in the round, AT THE SAME TIME as you increase stitches on each round marked with an arrow as described below. Remember INCREASE TIP-1 and be aware that the 14 stitches in the pattern do not fit until after increasing on the row with arrow-1 (S, M, and L) and arrow-2 (XL, XXL and XXXL). Read KNITTING TIP and work A.2 when A.1 has been completed in height. S, M and L: Arrow-1: Increase 42-48-52 stitches evenly spaced = 238-252-266 stitches (there is now room for 17-18-19 repeats of A.1 with 14 stitches). Arrow-2: Increase 50-48-58 stitches evenly spaced = 288-300-324 stitches (there is now room for 24-25-27 repeats of A.1 with 12 stitches). Arrow-3: Increase 40-44-52 stitches evenly spaced = 328-344-376 stitches (there is now room for 41-43-47 repeats of A.2 with 8 stitches). Arrow-4: Increase 8-16-20 stitches evenly spaced = 336-360-396 stitches (there is now room for 28-30-33 repeats of A.2 with 12 stitches). Arrow-5: Increase 4-12-4 stitches evenly spaced = 340-372-400 stitches. Finish A.2. XL, XXL and XXXL: Arrow-1: Increase 30-40-50 stitches evenly spaced = 252-268-288 stitches. Arrow-2: Increase 28-40-48 stitches evenly spaced = 280-308-336 stitches (there is now room for 20-22-24 repeats of A.1 with 14 stitches). Arrow-3: Increase 28-32-36 stitches evenly spaced = 308-340-372 stitches. Arrow-4: Increase 28-32-36 stitches evenly spaced = 336-372-408 stitches (there is now room for 28-31-34 repeats of A.2 with 12 stitches). Arrow-5: Increase 56-60-64 stitches evenly spaced = 392-432-472 stitches (there is now room for 49-54-59 repeats of A.2 with 8 stitches, Arrow-6: Increase 40-36-32 stitches evenly spaced = 432-468-504 stitches (there is now room for 36-39-42 repeats of A.2 with 12 stitches). Arrow-7: Increase 8-8-8 stitches evenly spaced = 440-476-512 stitches. Finish A.2. ALL SIZES: When A.2 has been completed the piece measures approx. 19-20-20-24-24-25 cm from the marker on the neck. Continue with stocking stitch and sea fog (size S: only continue working if the piece measures less than 19 cm when A.2 has been completed). When the piece measures 19-21-23-25-27-29 cm from the marker on the neck, divide the yoke for the body and sleeves as follows from mid back: Work 50-55-58-64-71-78 stitches in stocking stitch (= ½ back piece), place the next 70-76-84-92-96-100 stitches on 1 thread for the sleeve, cast on 6-6-8-8-10-10 new stitches on the needle (= in side under sleeve), work 100-110-116-128-142-156 stitches in stocking stitch (= front piece), place the next 70-76-84-92-96-100 stitches on 1 thread for the sleeve, cast on 6-6-8-8-10-10 new stitches on the needle (= in side under sleeve) and work the remaining 50-55-58-64-71-78 stitches in stocking stitch (= ½ back piece). Body and sleeves are finished separately. THE PIECE IS NOW MEASURED FROM HERE! BODY: = 212-232-248-272-304-332 stitches. Insert 1 marker thread in each side of the body, in the middle of the 6-6-8-8-10-10 stitches cast on under each sleeve; allow the threads to follow your work onwards, they will be used when increasing in the sides. Work stocking stitch over the back piece as far as the first marker thread. This is now the beginning of the round. Continue in the round with stocking stitch and sea fog. When the piece measures 5 cm from the division, increase 1 stitch on each side of both marker threads – read INCREASE TIP-2 (= 4 stitches increased). Increase like this every 6 cm a total of 4 times in height = 228-248-264-288-320-348 stitches. Continue working until the piece measures 28 cm from the division. There is approx. 4 cm to finished length; you can try the jumper on and work to desired length. Knit 1 round where you increase 56-60-64-70-78-86 stitches evenly spaced = 284-308-328-358-398-434 stitches (this is done to avoid the rib being tight). Change to circular needle size 2.5 mm and work rib (= knit 1, purl 1) for 4 cm. Cast off with knit over knit and purl over purl – read CASTING-OFF TIP! The jumper measures approx. 54-56-58-60-62-64 cm from the shoulder down. SLEEVE: Place the 70-76-84-92-96-100 stitches from the thread on the one side of the piece on double pointed needles/short circular needle size 3 mm and knit up 1 stitch in each of the 6-6-8-8-10-10 stitches cast on under the sleeve = 76-82-92-100-106-110 stitches. Now insert 2 markers in the piece (without working the stitches). Start mid under the sleeve in the middle of the 6-6-8-8-10-10 stitches and insert 1 marker in the first stitch after the middle, count 37-40-45-49-52-54 stitches, insert 1 marker in the next stitch = 37-40-45-49-52-54 left on the round after the marker. The marker under the sleeve is used when decreasing, the one on top of the sleeve is used to find the beginning of the pattern. Allow the markers to follow your work onwards. Start under the sleeve with the stitch with the marker and work stocking stitch in the round with sea fog. When the piece measures 3-3-3-3-2-2 cm from the division, decrease 2 stitches under the sleeve – read DECREASE TIP. Decrease like this every 3-2½-2-1½-1½-1 cm a total of 12-14-17-20-22-23 times = 52-54-58-60-62-64 stitches. Work until the sleeve measures 36-35-33-31-29-28 cm from the division. There is approx. 9 cm to finished length; you can try the jumper on and work to desired length; be aware that in some sizes, the decreases under the sleeve are not yet finished. NOTE: Shorter measurements in larger sizes due to wider neck and longer yoke. Now work A.3 (count out from the marker on top of the sleeve to where the pattern starts – the stitch marked with a star in A.3 matches the stitch with the marker). When A.3 has been completed, the sleeve measures approx. 41-40-38-36-34-33 cm from the division. The rest of the sleeve is worked with sea fog. Knit 1 round where you increase 12-12-14-14-16-16 stitches evenly spaced = 64-66-72-74-78-80 stitches. Change to double pointed needles size 2.5 mm and work rib (= knit 1, purl 1) for 4 cm. Cast off with knit over knit and purl over purl – remember CASTING-OFF TIP. The sleeve measures approx. 45-44-42-40-38-37 cm from the division. Work the other sleeve in the same way. |
|||||||||||||
Diagram explanations |
|||||||||||||
|
|||||||||||||
 |
|||||||||||||
 |
|||||||||||||
 |
|||||||||||||
Have you finished this pattern?Tag your pictures with #dropspattern #scentofpinesweater or submit them to the #dropsfan gallery. Do you need help with this pattern?You'll find 29 tutorial videos, a Comments/Questions area and more by visiting the pattern on garnstudio.com. © 1982-2026 DROPS Design A/S. We reserve all rights. This document, including all its sub-sections, has copyrights. Read more about what you can do with our patterns at the bottom of each pattern on our site. |
|||||||||||||


With over 40 years in knitting and crochet design, DROPS Design offers one of the most extensive collections of free patterns on the internet - translated to 17 languages. As of today we count 324 catalogues and 12290 patterns translated into English (UK/cm). 12290
We work hard to bring you the best knitting and crochet have to offer, inspiration and advice as well as great quality yarns at incredible prices! Would you like to use our patterns for other than personal use? You can read what you are allowed to do in the Copyright text at the bottom of all our patterns. Happy crafting!
Post a comment to pattern DROPS 215-8
We would love to hear what you have to say about this pattern!
If you want to leave a question, please make sure you select the correct category in the form below, to speed up the answering process. Required fields are marked *.