
Popular categories
Looking for a yarn?


Comments / Questions (53)
![]() Anne wrote:
Anne wrote:
Tere, kuidas soovitate kohandada passe mustrit XXL suurusel, kui töö tuleb liiga pikk - kampsun on lühikesele kogukale inimesele kitsaste õlgadega, aga väga suure rinnaümbermõõduga. Kas on mõeldav jätta ära mõned ühevärvilised read A.1 ja A.2 diagrammidel?
31.03.2026 - 10:24DROPS Design answered:
Tere Anne! Ma soovitaks parem jagada töö kehaosaks ja varrukateks varem (proovige selga; ajage eraldi pikad ringvardad varrukasilmustesse, et saaks selga proovides töö korralikult laiali paigutada. Või ajage silmustesse jämedam lõng, et proovides silmused jooksma ei läheks.) Muster ei pruugi varem osadeks jagades külgedel enam klappida, aga see ei jää varrukate all näha. Head kudumist!
09.04.2026 - 14:27
![]() Sarah wrote:
Sarah wrote:
Where can I find out what the sizes are? TIA Sarah
21.02.2026 - 18:57DROPS Design answered:
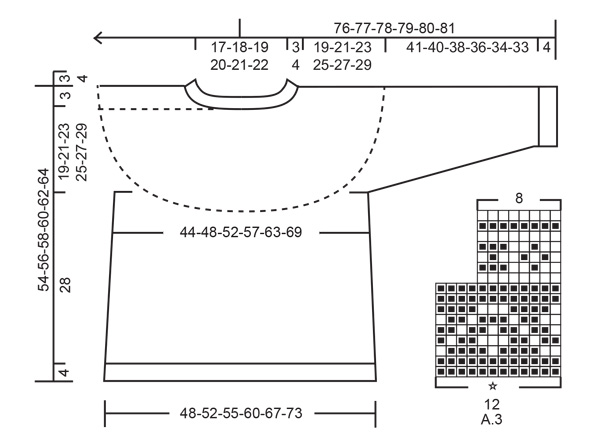
Hi Sarah, if you scroll all the way down the pattern page to Diagram section, you'll find a jumper schema with measurements on the very bottom. Happy knitting!
23.02.2026 - 03:06
![]() Larissa wrote:
Larissa wrote:
Beim Ärmel in Größe XXL soll ich 62 Maschen haben und oben mit dem Mustersatz beginnen. Dieser hat erst 12 Maschen und später 8 Maschen. Was beides nicht in die 62 Maschen passt. Ein Anfang des Mustersatzes oben auf dem Ärmel macht überhaupt keinen Sinn, wenn er eh nicht passt. Schade des es in der Anleitung nicht richtig geschrieben wurde.
11.02.2026 - 21:41DROPS Design answered:
Liebe Larissa, der Mustersatz geht an der unteren Ärmelmitte nicht auf. Damit aber das Muster symmetrisch wird und Sie einen Mustersatz mittig an der oberen Ärmelmitte haben, zählen Sie ab dem oberen Markierer ab. Außerdem müssten die Abnahmen an der unteren Ärmelmitte in Ihrer Größe noch nicht beendet sein, wenn Sie mit A.3 beginnen (beachten Sie die Ärmellänge von 29 cm, wenn A.3 beginnt), sodass der Mustersatz dadurch sowieso unterbrochen würde. Viel Spaß beim Weiterstricken!
16.02.2026 - 22:05
![]() Monika wrote:
Monika wrote:
Toller Pullover! Nun bin ich auf ein Problem gestoßen. Ich stricke den Pullover in der Größe L. Nach dem Stricken von Muster A.1 + A.2 ist mein Pullover nach der Halsblende (1 rechts, 1 links) ung. 27 cm lang statt 20 cm wie in der Anleitung beschrieben. Oder ist bei Ende der Halsblende das Ende der einfarbigen Passe gemeint? Momentan bin ich in der 8. Reihe von A.2. Wie ich die Anleitung verstehe, wird die Arbeit für den Beginn der Ärmel nach dem Muster geteilt? Oder liege ich da falsch?
19.01.2026 - 05:22DROPS Design answered:
Liebe Monika, stimmt Ihre Maschenprobe? Dh haben Sie 32 Reihen = 210 cm? die 54 Reihen A.1+A.2 sollen so ca 17 cm messen + 2 cm vor A.1 sollen die Passe ca 19 cm nach der Halskante sein. Kann das Ihnen helfen? Viel Spaß beim Stricken!
20.01.2026 - 08:37
![]() Britta wrote:
Britta wrote:
Wie kann man durch die Zunahme gewellte Stellen wieder glatt bekommen? Vielen Dank schon mal im voraus.
08.01.2026 - 19:39DROPS Design answered:
Liebe Britta, Sie können den Pullover nach dem Fertigstellen leicht anfeuchten, vorsichtig in Form ziehen und liegend trocknen lassen, dann sollte sich die Unregelmäßigkeiten geben. Viel Spaß beim Weiterstricken!
13.01.2026 - 09:43
![]() Danielle wrote:
Danielle wrote:
J’aimerais savoir s’il a de l’aisance d’inclus dans les grandeurs mentionnées Et combien cm d’aisance est il inclus. Merci
07.01.2026 - 21:48DROPS Design answered:
Bonjour Danielle, découvrez ici comment trouver votre taille et ainsi décider de l'aisance qui vous convient. Bon tricot!
08.01.2026 - 09:43
![]() Danielle wrote:
Danielle wrote:
.bonjour Je ne vois pas de mention aisance. La mesure inscrite terminé comprend combien d’aisance. Merci
03.01.2026 - 19:16
![]() Michele wrote:
Michele wrote:
Bonjour, j’envisage de faire ce pull en taille S , le patron indique. 48 cm pour le devant . Il est indiqué. 100. Mailles pour Bonjour, j’envisage de faire ce pull mais j.ai un souci ´. Il est indiqué 24 mailles = 10 cm Le devant doit faire 48 cm taille S , or nous avons 100 mailles ce qui donne 42 cm !! Je vous remercie par avance Cordialement comme il y a 24 mailles pour 10 cm
02.01.2026 - 18:25DROPS Design answered:
Bonjour Michele, apres la division pour le dos/devant et les manches, vous allez augmenter quelques mailles sur les cotes. Pour la taille S vous auriez 228 mailles pour le dos/devant (114 mailles pour le dos et le meme pour le devant). 114/24=4,75, env. 48 cm. Bon tricot!
05.01.2026 - 08:58
![]() Christine wrote:
Christine wrote:
Ich liebe das weiche und leichte Alpakagarn und habe dieses Modell vorletztes Jahr gestrickt. Leider musste ich nun feststellen, dass sich mein Lieblingpullover nach häufigem Tragen in den letzten zwei Wintern unter den Achseln fast komplett durchgescheuert hat. Mit welchem Garn könnte ich die Alpakawolle künftig verstricken, um sie robuster zu machen, bzw welche Alpaka-Mischgarne von Drops sind weniger empfindlich gegen Durchscheuern als das reine Alpkagarn?
15.11.2025 - 20:17
![]() Holly wrote:
Holly wrote:
Where can I find the finished measurements to decide what size to knit? Thank you!
26.10.2025 - 20:33DROPS Design answered:
Hi Holly, There is a size chart at the bottom of the pattern, with all the measurements for the different sizes. Regards, Drops Team.
27.10.2025 - 06:58
|
|||||||||||||
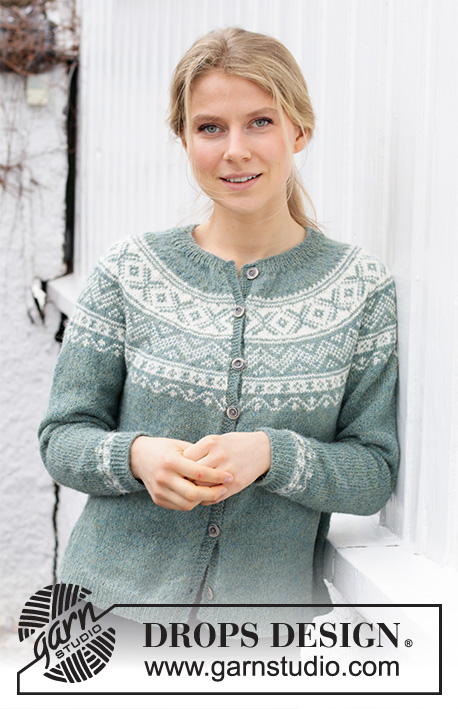
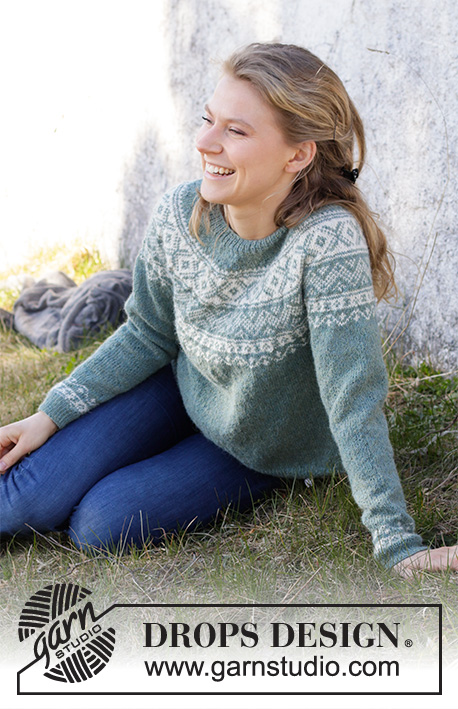
Scent of Pine#scentofpinesweater |
|||||||||||||
 |
 |
||||||||||||
Knitted jumper in DROPS Alpaca. The piece is worked top down with round yoke and Nordic pattern on the yoke and on the bottom of the sleeves. Sizes S - XXXL.
DROPS 215-8 |
|||||||||||||
|
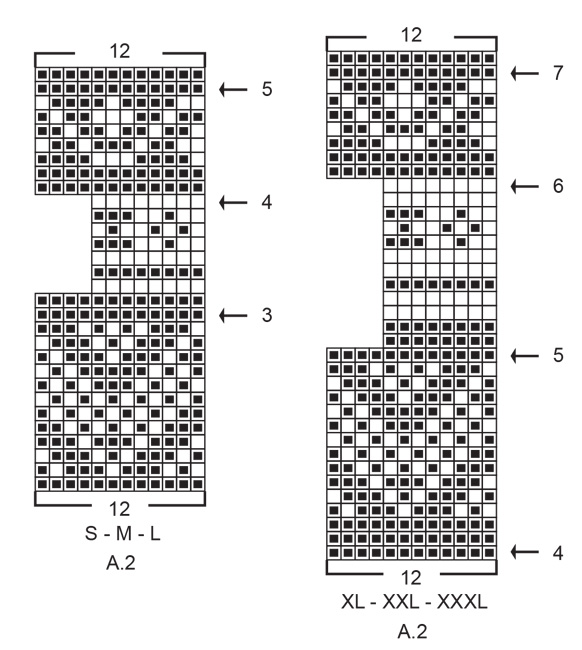
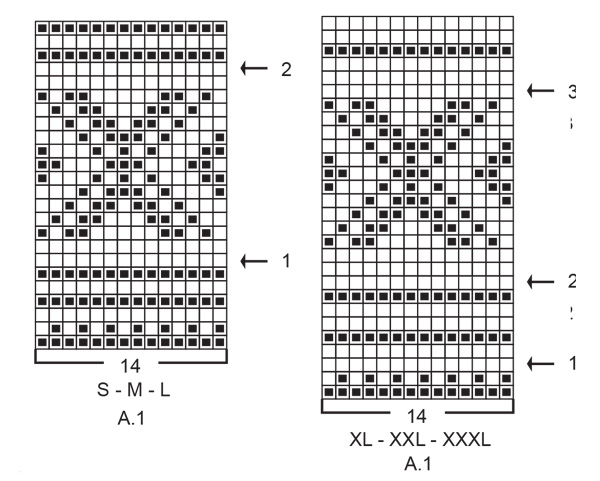
------------------------------------------------------- EXPLANATIONS FOR THE PATTERN: ------------------------------------------------------- INCREASE TIP-1 (evenly spaced): To work out how to increase evenly, count the total number of stitches on the needle (e.g. 110 stitches) divide by the number of increases to be made (e.g. 36) = 3. In this example, increase by making 1 yarn over after each 3rd stitch. On the next round knit the yarn overs twisted to avoid holes. PATTERN: See diagrams A.1 to A.3. Choose diagram for your size (applies to A.1 and A.2). The whole pattern is worked in stocking stitch. KNITTING TIP: To avoid the knitting tension becoming tighter when working pattern it is important that the strands at the back are not tight. Use a size larger needle when working pattern if this is a problem. ELEVATION (back of neck): So the jumper is slightly higher at the back of the neck when working the yoke, you can work an elevation as described here. Skip this section if you do not want an elevation. Insert a marker at the beginning of the round (mid-back). Start from the right side with sea fog and knit 14-15-16-16-17-18 stitches past the marker, turn, tighten strand and purl 28-30-32-32-34-36 stitches back. Turn, tighten the strand and knit 42-45-48-48-51-54 stitches, turn, tighten strand and purl 56-60-64-64-68-72 stitches back. Turn, tighten the strand and knit 70-75-80-80-85-90 stitches, turn, tighten strand and purl 84-90-96-96-102-108 stitches back. Turn, tighten the strand and knit to mid-back. Then work YOKE as described in the text. INCREASE TIP-2 (for sides of body): Increase 1 stitch on each side of the marker thread as follows: Work until there are 2 stitches left before the marker thread, make 1 yarn over, knit 4 (marker thread sits between these 4 stitches) make 1 yarn over (= 2 stitches increased at each marker thread). On the next round knit the yarn overs twisted to avoid holes. Then work the new stitches in stocking stitch. DECREASE TIP (for mid under sleeve): Decrease 1 stitch on either side of the stitch with the marker as follows: Work until there are 2 stitches left before the stitch with the marker, knit 2 together, knit the stitch with the marker, slip 1 stitch as if to knit, knit 1 and pass the slipped stitch over the knitted stitch (= 2 stitches decreased). CASTING-OFF TIP: To avoid the cast-off edge being tight you can cast off with a larger size needle. If the edge is still tight, make 1 yarn over after approx. each 6th stitch at the same time as casting off; the yarn overs are cast off as normal stitches. ------------------------------------------------------- START THE PIECE HERE: ------------------------------------------------------- JUMPER – SHORT OVERVIEW OF THE PIECE: The neck and yoke are worked in the round with circular needle, top down from mid back. The yoke is divided for the body and sleeves and the body continued in the round with circular needle. The sleeves are worked in the round with short circular needle/double pointed needles, top down. NECK: Cast on 110-114-120-124-128-134 stitches with short circular needle size 2.5 mm and sea fog. Knit 1 round. Then work rib in the round (= knit 1, purl 1) for 3-3-3-4-4-4 cm. Knit 1 round where you increase 36-38-40-42-42-44 stitches evenly spaced – read INCREASE TIP-1 = 146-152-160-166-170-178 stitches on the needle. Change to circular needle size 3 mm and knit 1 round (yarn overs knitted twisted). Insert 1 marker in the middle of the round (= mid-front); the yoke is measured from this marker! Now you can work an ELEVATION in the back of the neck – read description above. If you do not want an elevation, go straight to YOKE. YOKE: Read the whole of this section before continuing! Work stocking stitch in the round with sea fog. When the piece measures 1½-2-2-3-3-3 cm from the marker on the neck, increase 50-52-54-56-58-60 stitches evenly spaced = 196-204-214-222-228-238 stitches. When the piece measures 2-3-3-4-4-5 cm from the marker on the neck start the pattern by working A.1 in the round, AT THE SAME TIME as you increase stitches on each round marked with an arrow as described below. Remember INCREASE TIP-1 and be aware that the 14 stitches in the pattern do not fit until after increasing on the row with arrow-1 (S, M, and L) and arrow-2 (XL, XXL and XXXL). Read KNITTING TIP and work A.2 when A.1 has been completed in height. S, M and L: Arrow-1: Increase 42-48-52 stitches evenly spaced = 238-252-266 stitches (there is now room for 17-18-19 repeats of A.1 with 14 stitches). Arrow-2: Increase 50-48-58 stitches evenly spaced = 288-300-324 stitches (there is now room for 24-25-27 repeats of A.1 with 12 stitches). Arrow-3: Increase 40-44-52 stitches evenly spaced = 328-344-376 stitches (there is now room for 41-43-47 repeats of A.2 with 8 stitches). Arrow-4: Increase 8-16-20 stitches evenly spaced = 336-360-396 stitches (there is now room for 28-30-33 repeats of A.2 with 12 stitches). Arrow-5: Increase 4-12-4 stitches evenly spaced = 340-372-400 stitches. Finish A.2. XL, XXL and XXXL: Arrow-1: Increase 30-40-50 stitches evenly spaced = 252-268-288 stitches. Arrow-2: Increase 28-40-48 stitches evenly spaced = 280-308-336 stitches (there is now room for 20-22-24 repeats of A.1 with 14 stitches). Arrow-3: Increase 28-32-36 stitches evenly spaced = 308-340-372 stitches. Arrow-4: Increase 28-32-36 stitches evenly spaced = 336-372-408 stitches (there is now room for 28-31-34 repeats of A.2 with 12 stitches). Arrow-5: Increase 56-60-64 stitches evenly spaced = 392-432-472 stitches (there is now room for 49-54-59 repeats of A.2 with 8 stitches, Arrow-6: Increase 40-36-32 stitches evenly spaced = 432-468-504 stitches (there is now room for 36-39-42 repeats of A.2 with 12 stitches). Arrow-7: Increase 8-8-8 stitches evenly spaced = 440-476-512 stitches. Finish A.2. ALL SIZES: When A.2 has been completed the piece measures approx. 19-20-20-24-24-25 cm from the marker on the neck. Continue with stocking stitch and sea fog (size S: only continue working if the piece measures less than 19 cm when A.2 has been completed). When the piece measures 19-21-23-25-27-29 cm from the marker on the neck, divide the yoke for the body and sleeves as follows from mid back: Work 50-55-58-64-71-78 stitches in stocking stitch (= ½ back piece), place the next 70-76-84-92-96-100 stitches on 1 thread for the sleeve, cast on 6-6-8-8-10-10 new stitches on the needle (= in side under sleeve), work 100-110-116-128-142-156 stitches in stocking stitch (= front piece), place the next 70-76-84-92-96-100 stitches on 1 thread for the sleeve, cast on 6-6-8-8-10-10 new stitches on the needle (= in side under sleeve) and work the remaining 50-55-58-64-71-78 stitches in stocking stitch (= ½ back piece). Body and sleeves are finished separately. THE PIECE IS NOW MEASURED FROM HERE! BODY: = 212-232-248-272-304-332 stitches. Insert 1 marker thread in each side of the body, in the middle of the 6-6-8-8-10-10 stitches cast on under each sleeve; allow the threads to follow your work onwards, they will be used when increasing in the sides. Work stocking stitch over the back piece as far as the first marker thread. This is now the beginning of the round. Continue in the round with stocking stitch and sea fog. When the piece measures 5 cm from the division, increase 1 stitch on each side of both marker threads – read INCREASE TIP-2 (= 4 stitches increased). Increase like this every 6 cm a total of 4 times in height = 228-248-264-288-320-348 stitches. Continue working until the piece measures 28 cm from the division. There is approx. 4 cm to finished length; you can try the jumper on and work to desired length. Knit 1 round where you increase 56-60-64-70-78-86 stitches evenly spaced = 284-308-328-358-398-434 stitches (this is done to avoid the rib being tight). Change to circular needle size 2.5 mm and work rib (= knit 1, purl 1) for 4 cm. Cast off with knit over knit and purl over purl – read CASTING-OFF TIP! The jumper measures approx. 54-56-58-60-62-64 cm from the shoulder down. SLEEVE: Place the 70-76-84-92-96-100 stitches from the thread on the one side of the piece on double pointed needles/short circular needle size 3 mm and knit up 1 stitch in each of the 6-6-8-8-10-10 stitches cast on under the sleeve = 76-82-92-100-106-110 stitches. Now insert 2 markers in the piece (without working the stitches). Start mid under the sleeve in the middle of the 6-6-8-8-10-10 stitches and insert 1 marker in the first stitch after the middle, count 37-40-45-49-52-54 stitches, insert 1 marker in the next stitch = 37-40-45-49-52-54 left on the round after the marker. The marker under the sleeve is used when decreasing, the one on top of the sleeve is used to find the beginning of the pattern. Allow the markers to follow your work onwards. Start under the sleeve with the stitch with the marker and work stocking stitch in the round with sea fog. When the piece measures 3-3-3-3-2-2 cm from the division, decrease 2 stitches under the sleeve – read DECREASE TIP. Decrease like this every 3-2½-2-1½-1½-1 cm a total of 12-14-17-20-22-23 times = 52-54-58-60-62-64 stitches. Work until the sleeve measures 36-35-33-31-29-28 cm from the division. There is approx. 9 cm to finished length; you can try the jumper on and work to desired length; be aware that in some sizes, the decreases under the sleeve are not yet finished. NOTE: Shorter measurements in larger sizes due to wider neck and longer yoke. Now work A.3 (count out from the marker on top of the sleeve to where the pattern starts – the stitch marked with a star in A.3 matches the stitch with the marker). When A.3 has been completed, the sleeve measures approx. 41-40-38-36-34-33 cm from the division. The rest of the sleeve is worked with sea fog. Knit 1 round where you increase 12-12-14-14-16-16 stitches evenly spaced = 64-66-72-74-78-80 stitches. Change to double pointed needles size 2.5 mm and work rib (= knit 1, purl 1) for 4 cm. Cast off with knit over knit and purl over purl – remember CASTING-OFF TIP. The sleeve measures approx. 45-44-42-40-38-37 cm from the division. Work the other sleeve in the same way. |
|||||||||||||
Diagram explanations |
|||||||||||||
|
|||||||||||||
 |
|||||||||||||
 |
|||||||||||||
 |
|||||||||||||
Have you finished this pattern?Tag your pictures with #dropspattern #scentofpinesweater or submit them to the #dropsfan gallery. Do you need help with this pattern?You'll find 29 tutorial videos, a Comments/Questions area and more by visiting the pattern on garnstudio.com. © 1982-2026 DROPS Design A/S. We reserve all rights. This document, including all its sub-sections, has copyrights. Read more about what you can do with our patterns at the bottom of each pattern on our site. |
|||||||||||||


With over 40 years in knitting and crochet design, DROPS Design offers one of the most extensive collections of free patterns on the internet - translated to 17 languages. As of today we count 324 catalogues and 12290 patterns translated into English (UK/cm). 12290
We work hard to bring you the best knitting and crochet have to offer, inspiration and advice as well as great quality yarns at incredible prices! Would you like to use our patterns for other than personal use? You can read what you are allowed to do in the Copyright text at the bottom of all our patterns. Happy crafting!
Post a comment to pattern DROPS 215-8
We would love to hear what you have to say about this pattern!
If you want to leave a question, please make sure you select the correct category in the form below, to speed up the answering process. Required fields are marked *.