
Popular categories
Looking for a yarn?






























Comments / Questions (236)
 Jaime wrote:
Thank you so much!❤️
03.10.2026 - 13:38
Jaime wrote:
“On next round knit yarn overs twisted to avoid holes. Then work the new stitches in stockinette stitch. “ The new stitches refer to the front and back side of the garment right? When we do the first round of increase for the yoke, do we still knit over knit and pearl over pearl? Then the next round on we knit the front and back side. The sleeves we still knit over knit and pearl over pearl. Right? Thanks in advance.
30.09.2026 - 07:28DROPS Design answered:
Hi Jaime, Yes, the front and back pieces are now worked in stocking stitch, the sleeves are continued in rib. Regards, Drops Team.
01.10.2026 - 07:05
 Euka wrote:
Zajímavý top - vesta, pleteno na zakázku snachy.
17.09.2026 - 19:11
 Catherine wrote:
I'm struggling with the look of the increase row before switching to the smaller needles for the bottom ribbing. Should there be a knit row after the increase row but before starting the ribbing? If so, which needle size should be used? Thanks - it looks great on and I'm anxious to wear it!!
05.09.2026 - 05:33DROPS Design answered:
Hi Catherine, You can of course knit a round and increase on this knitted round. If you wish to increase on the first round of rib, the finished effect is best if you increase above stitches which are then purled in the rib, so the knitted stitches follow on neatly from the body. Regards, Drops Team.
05.09.2026 - 06:25
 Lise wrote:
Pour tricoter ce joli chandail, grandeur small, est-il préférable de prendre les aiguilles circulaires 40cm . Merci
01.09.2026 - 21:30DROPS Design answered:
Bonjour Lise, en taille S vous aurez besoin des deux aiguilles de 40 cm et de 80 cm dans chacune des tailles, sauf si vous tricotez en magic loop, alors vous pourrez utiliser seulement une aiguille de 80 cm dans chaque taille. Bon tricot!
02.09.2026 - 17:49
 Andrea Frögli wrote:
Hallo Ich dachte, ich versuchs nochmal, habe im Februar schon 3x frisch angefangen. Ich mache Grüsse M, starte also mit 118 Maschen. Nach der 1. Rheie re ist beschrieben, wie man die folgenden M stricken muss, das ergibt aber nur 116 M (9/39/20/39/9). Wo sind die 2 fehlenden Maschen und wie werden die gestrickt? Vielen Dank für eine Antwort Andrea
30.08.2026 - 13:56DROPS Design answered:
Liebe Frau Frögli, so sollen die Runde/Maschen aussehen: 9 M Bündchen + 1 M re + 1 M re + 36 M Bündchen + 1 M li, 1 M re (Ärmel), 1 M re, 26 M Bündchen, 2 M li, 1 M re (Vorderteil), 1 M re, 36 M Bündchen, 1 M li, 1 M re (Ärmel), 1 M re, 8 M Bündchen und 2 M li = (8+1)+(1+36+1+1)+(1+16+2+1)+(1+36+1+1)+(1+8+2)=118 M. Kann das Ihnen helfen?
31.08.2026 - 16:22
 Gonny wrote:
Goedemiddag, als ik mijn maten meet en vergelijk met de maten die het patroon aangeeft kom ik erachter dat mijn borstomvang groter is dan de maat die ik wil breien (m) de rest van de maten kloppen wel. Hoe kan ik maat M breien met een grotere borstomvang? Als ik maat L brei wordt de trui in zijn geheel te groot.
05.08.2026 - 19:53DROPS Design answered:
Dag Gonny,
Je zou voor de pas kunnen beginnen met maat L, of de hoeveelheid steken die voor de pas op het lijf (voorpand en achterpand) voor maat L zijn aangegeven aanhouden en nadat je met alleen het lijf verder gaat, in de zijkant minderen zodat je op de steken van maat M uitkomt. Op deze manier heb je de borstwijdte van maat L en de mouwen en het lijf voor maat M.
07.08.2026 - 11:26
 Àngels wrote:
Hola, tengo muchos problemas para entender como tejer la parte ranglán, es bastante lioso, porque en el canesú no explican como dividir la prenda y donde poner los marcadores, no tengo claro cuando hay que aumentar, solo pude llegar a la primera vuelta raglán y creo que la hice mal, lo siguiente no lo entiendo y en la explicación del canesú dice una cosa y en la de raglán otra, además el vídeo tampoco me soluciona las dudas. Hay alguna manera puedan explicármelo? Gracias y saludos
03.08.2026 - 15:57DROPS Design answered:
Hola Àngels, los marcapuntos se insertan en la sección de la cenefa del cuello y se colocan en la transición entre las mangas y el cuerpo. Trabajas el elástico y aumentas puntos repartidos en cada sección para tener el número de puntos correcto para el canesú. Después comienzas con los aumentos del raglán, que se trabajan solo en el delantero y la espalda; en las mangas se continúa con punto elástico sin aumentos. Trabajas de derecho desde el centro de las espalda hasta que queden 2 puntos antes del marcapuntos, 1 lazada, 1 derecho, 1 lazada, 1 derecho, el marcapuntos está aquí. Trabajar el elástico en la manga. Después del marcapuntos de la manga: 1 derecho, 1 lazada, 1 derecho, 1 lazada y continúas de derecho hasta que queden 2 puntos antes del marcapuntos, 1 lazada, 1 derecho, 1 lazada, 1 derecho, el marcapuntos está aquí. Trabajar el elástico en la 2ª manga. Después del marcapuntos de la manga: 1 derecho, 1 lazada, 1 derecho, 1 lazada y continúas de derecho hasta el final. Esto se trabaja cada 2ª vuelta 9-9-8-10-12-13 veces. Después se trabaja solo 1 lazada antes y después del marcapuntos, en los mismos sitios, cada 2ª vuelta 2-4-6-6-8-8 veces.
23.08.2026 - 22:48
Bobbie wrote:
I’ve been knitting for 30 yrs but having a difficult time with the raglan instructions on canyon clay. Instructions are confusing. Do I increase 2 stitches before each marker and none. I followed the instructions and it was incorrect so I’ve ripped it apart three times and started over.can I get more detail? Do I increase 2 st. Before each marker only? And none after? Hope this makes sense. Thanks.
02.08.2026 - 03:12DROPS Design answered:
Dear Bobbie, in this pattern you increase only on front/back pieces, not on sleeves; you will first increase 2 sts at the beginning + 2 sts at the end of front/back pieces then increase only 1 titch at the beginning + 1 stitch at the end of front/back piece - see the number of times mathing you size and read under RAGLAN how to work the increases. Happy knitting!
10.08.2026 - 11:19
 Berglind wrote:
Er hægt að fá þessar skýringar teiknaðar. Þegar ég eyk út fyrst á vinstri hl bakstykkisins prjóna ég þá yfir axlarhlutann og eyk út aftur þar? Þá yrði það í öfugri röð...EFTIR pm ekki fyrir það.
30.07.2026 - 14:11DROPS Design answered:
Blessuð Berglind. UMFERÐ 1:Prjónar slétt þar 2 lykkjur eru eftir að fyrsta merki, uppsláttur,1 lykkja slétt, uppsláttur, 1 lykkja slétt (laskalykkja), færir merkið, 1 lykkja slétt (laskalykkja), 2 lykkjur slétt og 2 lykkjur brugðið fram að næstu laskalykkju, 1 lykkja slétt (laskalykkja), færir merkið, 1 lykkja slétt (laskalykkja), uppsláttur, 1 lykkja slétt, uppsláttur, prjónar slétt þar til 2 lykkjur eru eftir að næsta merki, uppsláttur, 1 lykkja slétt, uppsláttur, 1 lykkja slétt (laskalykkja), færið merkið, 1 lykkja slétt (laskalykkja), 2 lykkjur slétt og 2 lykkjur brugðið fram að næstu laskalykkju, 1 lykkja slétt (= laskalykkja), færir merkið, 1 lykkja slétt (laskalykkja), uppsláttur, 1 lykkja slétt, uppsláttur, prjónar slétt út umferðina. UMFERÐ 2: Prjónar sléttar lykkjur yfir sléttar lykkjur og brugðnar lykkjur yfir brugðnar lykkjur. Gangi þér vel.
30.07.2026 - 20:09
|
|
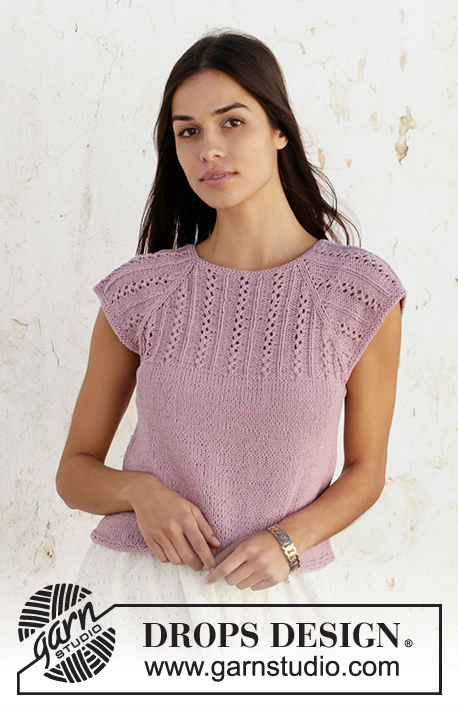
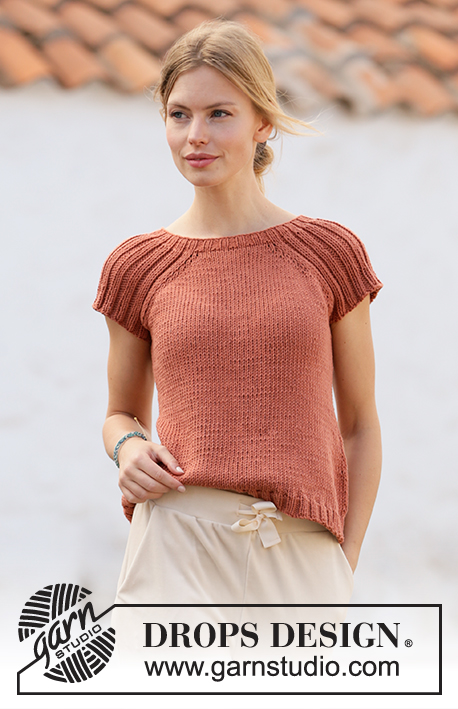
Canyon Clay#canyonclaytop |
|
 |
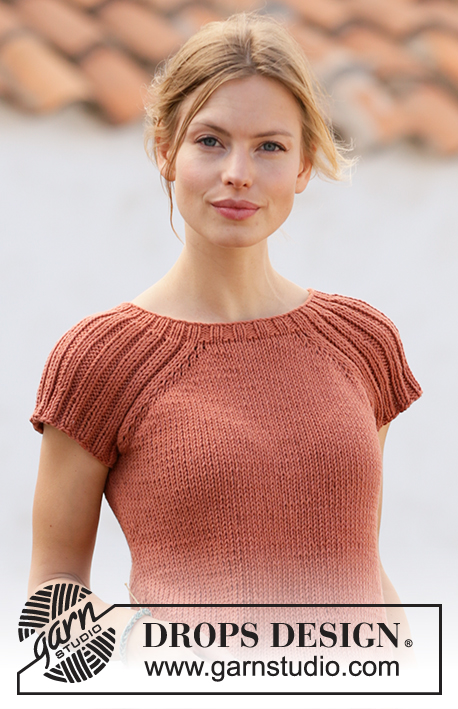 |
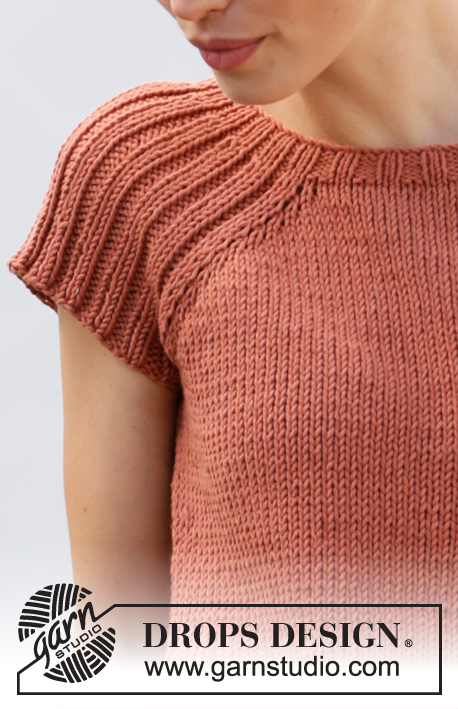
Knitted top with raglan in DROPS Paris. Piece is knitted top down with rib. Size: S - XXXL
DROPS 212-15 |
|
|
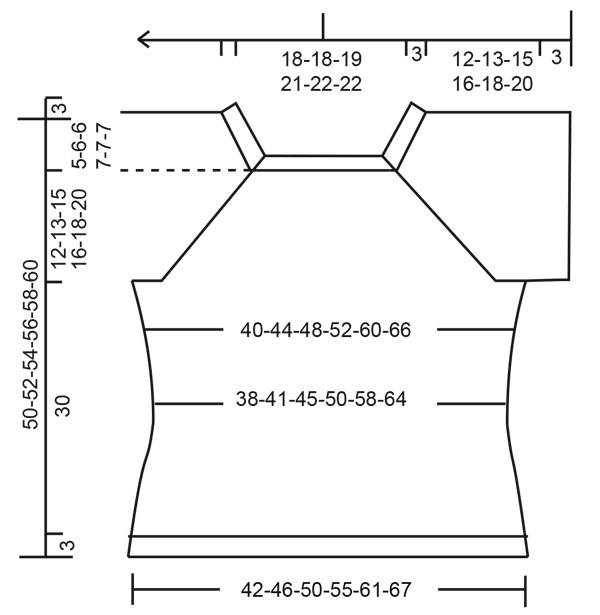
---------------------------------------------------------- EXPLANATION FOR THE PATTERN: ---------------------------------------------------------- INCREASE TIP-1 (evenly): To calculate how to increase evenly, count the stitches to be increased (e.g. 9 stitches) and divide by stitches of increases to be done (e.g. 2) = 4.5. In this example increase by making 1 yarn over after alternately every 4th and 5th stitch. On next row work yarn overs twisted to avoid holes. INCREASE TIP-2: Increase 1 stitch by making 1 yarn over. On next round purl yarn over twisted to avoid holes. Purl the new stitches. INCREASE TIP-3 (applies to sides of body): Work until 2 stitches remain before marker thread, 1 yarn over, knit 4 (marker thread is in the middle of these stitches), 1 yarn over. On next round knit yarn overs twisted to avoid holes. Then work the new stitches in stocking stitch. DECREASE TIP: Decrease 1 stitch on each side of marker thread as follows: Work until 3 stitches remain before marker thread and knit 2 together, knit 2 (marker thread is between these stitches), slip 1 stitch knitwise, knit 1, pass slipped stitch over stitch worked. RAGLAN: In the beginning increase 2 stitches towards each raglan on front and back piece (= 8 stitches increased on round), and thereafter increase 1 stitch towards each raglan on front and back piece (= 4 stitches increased on round). Increase 2 stitches before marker thread as follows: Work until 2 stitches remain before marker thread: 1 yarn over, knit 1, 1 yarn over, knit 1, marker thread is here. Increase 2 stitches after marker thread as follows: Knit 1, 1 yarn over, knit 1, 1 yarn over. Increase 1 stitch before marker thread as follows: Work until 1 stitch remains before marker thread: 1 yarn over, knit 1, marker thread is here. Increase 1 stitch after marker thread as follows: Knit 1, 1 yarn over. On next round knit yarn overs twisted to avoid holes. Then work the new stitches in stocking stitch. CAST-OFF TIP: To avoid a tight cast-off edge you may use a larger needle. If this also is too tight, make 1 yarn over after approx. every 4th stitch and cast off these as regular stitches. ---------------------------------------------------------- START THE PIECE HERE: ---------------------------------------------------------- TOP - SHORT OVERVIEW OF THE PIECE: Work neck edge and yoke in the round on circular needle from mid back, top down. Now divide yoke for body and sleeves. Work body in the round on circular needle. Work sleeves in the round on double pointed needles/short circular needle, top down. NECK EDGE: Cast on 112-118-126-138-144-144 stitches on circular needle size 3.5 mm with Paris. Knit 1 round. Work next round as follows: (Knit 2/purl 2) over the first 8-8-12-12-12-12 stitches, knit 1, insert a marker thread here (= in transition between back piece and right sleeve), knit 1, (purl 1/knit 2) over the next 33-36-36-42-45-45 stitches, purl 1, knit 1, insert a marker thread here (= in transition between right sleeve and front piece), knit 1, (purl 2/knit 2) over the next 16-16-20-20-20-20 stitches, purl 2, knit 1, insert a marker thread here (= in transition between front piece and left sleeve), knit 1, (purl 1/knit 2) over the next 33-36-36-42-45-45 stitches, purl 1, knit 1, insert a marker thread here (= in transition between left sleeve and back piece), knit 1, (purl 2/knit 2) over the next 8-8-8-8-8-8 stitches, purl 2. Continue in the round like this until rib measures 3 cm. When rib is done, work next round as follows: Knit until first marker thread and increase at the same time 2-3-3-3-3-4 stitches evenly – read INCREASE TIP-1, knit over knit and purl over purl until next marker thread and increase at the same time 1 stitch in every purl section – read INCREASE TIP-2, knit until next marker thread and increase at the same time 4-6-5-5-6-8 stitches evenly, knit over knit and purl over purl until next marker thread and increase at the same time 1 stitch in every purl section, knit the last 11-11-11-11-11-11 stitches and increase at the same time 2-3-2-2-3-4 stitches evenly = 144-156-162-178-188-192 stitches. Work 1 row with knit over knit and purl over purl (work the yarn overs twisted to avoid holes). Switch to circular needle size 5 mm. Insert 1 marker at the beginning of round (= approx. mid back), measure yoke from this marker! YOKE: Knit over knit and purl over purl. On first round start increase for RAGLAN – read explanation above. Only increase on front piece and back piece towards each raglan. Increase 2 stitches every other round 9-9-8-10-12-13 times in total, then increase 1 stitch every other round 2-4-6-6-8-8 times = 224-244-250-282-316-328 stitches. REMEMBER THE KNITTING TENSION! Continue with knit over knit and purl over purl until piece measures 12-13-15-16-18-20 cm from marker. The yoke is finished. Then work in the outermost stitch in each side of front piece and back piece in on sleeves. Work next round as follows: Work the first 30-33-37-41-47-50 stitches, slip the next 50-54-54-62-66-66 stitches on a stitch holder for sleeve and cast on 6-6-10-10-10-14 stitches on needle (= in the side under sleeve), work the next 62-68-71-79-92-98 stitches (= front piece), slip the next 50-54-54-62-66-66 stitches on a stitch holder for sleeve and cast on 6-6-10-10-10-14 stitches on needle (= in the side under sleeve), work the remaining 32-35-34-38-45-48 stitches on needle. Then finish body and sleeves separately. NOW MEASURE PIECE FROM HERE! BODY: = 136-148-162-178-204-224 stitches. Insert 1 marker thread in the in each side, in middle of the new stitches cast-on under the sleeves (= 3-3-5-5-5-7 new stitches on each side of marker thread). Move the marker threads upwards when working; they should be used for increase later in the sides. Work in stocking stitch in the round. When piece measures 4 cm from division, decrease 1 stitch on each side of marker threads - read DECREASE TIP. Decrease like this approx. every 8-7-6-5-4-3 cm 2 times in total = 128-140-154-170-196-216 stitches. When piece measures 20-18-16-14-12-10 cm from division, increase 1 stitch on each side of marker threads - read INCREASE TIP-3. Increase like this approx. every 3-4-4-5-6-6 cm 4-4-4-4-3-3 times in total = 144-156-170-186-208-228 stitches. When piece measures 30 cm from division (3 cm remain until finished measurements - work to desired length), knit 1 round while increasing 28-28-34-38-40-44 stitches = 172-184-204-224-248-272 stitches. Switch to circular needle size 3.5 mm. Work rib (knit 2/purl 2) in the round for 3 cm. Cast off with knit over knit and purl over purl - read CAST-OFF TIP. Top measures total 50-52-54-56-58-60 cm in total from shoulder and down. SLEEVE: Slip the 50-54-54-62-66-66 stitches from stitch holder in one side back on double pointed needles/circular needle size 5 mm, and pick up 1 stitch in each of the 6-6-10-10-10-14 stitches cast on under the sleeve = 56-60-64-72-76-80 stitches. Work rib (knit 2/purl 2) in the round. When sleeve measures 3 cm from division, cast off with knit over knit and purl over purl - remember CAST-OFF TIP. Work the other sleeve the same way. |
|
 |
|
Have you finished this pattern?Tag your pictures with #dropspattern #canyonclaytop or submit them to the #dropsfan gallery. Do you need help with this pattern?You'll find 16 tutorial videos, a Comments/Questions area and more by visiting the pattern on garnstudio.com. © 1982-2026 DROPS Design A/S. We reserve all rights. This document, including all its sub-sections, has copyrights. Read more about what you can do with our patterns at the bottom of each pattern on our site. |
|






With over 40 years in knitting and crochet design, DROPS Design offers one of the most extensive collections of free patterns on the internet - translated to 17 languages. As of today we count 333 catalogues and 12525 patterns translated into English (UK/cm). 12525
We work hard to bring you the best knitting and crochet have to offer, inspiration and advice as well as great quality yarns at incredible prices! Would you like to use our patterns for other than personal use? You can read what you are allowed to do in the Copyright text at the bottom of all our patterns. Happy crafting!
Post a comment to pattern DROPS 212-15
We would love to hear what you have to say about this pattern!
If you want to leave a question, please make sure you select the correct category in the form below, to speed up the answering process. Required fields are marked *.