
Popular categories
Looking for a yarn?


Comments / Questions (52)
![]() Saskia wrote:
Saskia wrote:
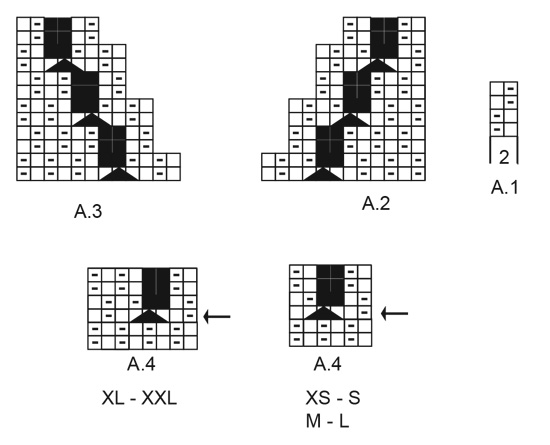
Hallo, het patroon is in 2020 gecorrigeerd en daarbij is een fout gemaakt. Bij het voorpand staat nu: "Als het werk 35-36-37-38-39-40 cm meet – pas aan zodat de volgende naald wordt gebreid aan de goede kant en overeenkomt met naald 1 in A.1 (dus de eerste steek na de kantsteek op het begin van de naald wordt recht gebreid)" Dit moet naald 3 zijn in plaats van naald 1. Alvast bedankt als u dit kunt aanpassen.
07.01.2023 - 10:50
![]() Lena wrote:
Lena wrote:
Hej, jag är på framstycket där det står "anpassa så att nästa varv stickas från rätsidan och är som 1:a varvet i A1". När jag sedan börjar sticka vänster framstycke och A2 så stämmer inte mosstickningen över de 12 sista maskorna på första varvet på A2. Vad gör jag för fel?
26.10.2022 - 22:47DROPS Design answered:
Hej Lena, det er svært at gætte sig til hvad som bliver fejl. Det kan være at du kan starte A.2 på næste pind istedet for, så selve perlestriksmønteret stemmer... ?
27.10.2022 - 10:20
![]() Justyna wrote:
Justyna wrote:
"Gdy schemat A.2 zostanie przerobiony 1 raz na wysokość, zostają zamknięte 3 razy 2 oczka. Dalej zamykać oczka na dekolt V jeszcze 3-3-3-4-4-4 razy w taki sam sposób (= w sumie zostanie zamkniętych 12-12-12-14-14-14 oczek na dekolt)" Tutaj również jest błąd w wyliczeniu - przejście przez A2 zamyka 6 oczek. Jeżeli zamkniemy jeszcze 3 razy to zamkniemy w sumie 24 oczka. Ile oczek powinno zostać w sumie zamkniętych?
24.02.2022 - 12:29DROPS Design answered:
Witaj Justyno, po przerobieniu schematu A.2 zamykasz 3 razy po 2 oczka. Dalej zamykasz 2 oczka jeszcze 3-3-3-4-4-4 razy (jak wcześniej). W sumie będzie zamkniętych 12-12-12-14-14-14 oczek na dekolt. Zostaje 23-25-27-29-29-31 oczek na ramię. Pozdrawiamy!
25.02.2022 - 11:21
![]() Justyna wrote:
Justyna wrote:
Hej, Schematy A2 i A3 zawierają błąd jeżeli dobrze je rozumiem. Rząd 2 i 3 po zamknięciu 2 oczek nie powinny mieć zaznaczonych 2 oczek na czarno - rząd jest już wizualnie zmniejszony o 2 oczka.
24.02.2022 - 12:25DROPS Design answered:
Witaj Justyno, te schematy mają pokazać sam brzeg robótki, jak będzie wyglądał po zamknięciu oczek, dlatego te brakujące oczka nie są uzupełnione po drugiej stronie schematu. Pozdrawiamy!
25.02.2022 - 11:31
![]() Hege Sommer wrote:
Hege Sommer wrote:
Hei, holder på å strikke Oats and honey genseren. Er kommet til v-halsen på venstre forstykket. Er ferdig med A2. Hva menes med «Fortsett felling til v-hals på samme måte 3 ganger til»? Skal A2 strikkes 3 ganger til? Vennlig hilsen Hege
25.04.2021 - 18:44DROPS Design answered:
Hei Hege, Dette betyr at du gjentar fellingen til v-hals 3 ganger til. A.2 strikkes bare 1 gang. God fornøyelse!
26.04.2021 - 08:16
![]() Heloise wrote:
Heloise wrote:
Bonjour, je suis en train de tricoter les manches . Dans l'explication : "Augmenter ainsi 3-3-3-5-3-5 fois au total tous les 13-13-8½-6-11½-5 cm", s'agit-il de centimètres ou de rangs ? Je suis bloquée, s'il s'agit de centimètres, ma dernière augmentation se situera à 52 cm, alors que la manche mesure au maximum 50 cm. Merci.
31.03.2021 - 16:11DROPS Design answered:
Bonjour Heloïse, il s'agit bien de cm, en S, vous augmenterez à 17 cm, puis à 17+13= 30 cm et enfin à 30+13=43 cm. En XXl-XXXL à 17 cm, à 17-17 cm puis à 28.5-22 cm, 40-27 cm (fini en XXL), et encore en XXXL à 27, 32 et 37 cm. Vous avez terminé les augmentations à 48-44-42 cm. Bon tricot!
06.04.2021 - 10:58
![]() Maja Baunsgaard wrote:
Maja Baunsgaard wrote:
Til forrige kommentar: jeg strikker btw en XL. :)
14.03.2021 - 13:43
![]() Maja Baunsgaard wrote:
Maja Baunsgaard wrote:
Hej! Jeg tror, der en mindre fejl under Højre forstykke :) Der står: “...taget ind til hals) = 23-25-27-26-26-31 masker til skulder”, men der skal vidst stå “23-25-27-29-29-31”. Ligeledes ser jeg ikke, hvordan man i mønster A.2 og A.3 kan ramme mønsteret for dobbelt perlestrik. Jeg har løst det ved at tilføje en ekstra firkant i mønstret mod halsen. Tak for en rigtig flot sweater! :)
14.03.2021 - 13:42
![]() MARTINE wrote:
MARTINE wrote:
Pb explication MANCHES : après les diminutions, il est indiqué :Continuer en allers et retours au point de blé avec 1 maille lisière au point mousse de chaque côté. Sur combien de rangs ? cm ? Je ne comprends pas...Faut-il commencer à augmenter tout de suite après les diminutions ? Je suis bloquée alors merci de votre aide la plus rapide !!
12.03.2021 - 21:47DROPS Design answered:
Bonjour Martine, vous commencez à augmenter au rang suivant sur l'endroit après avoir commencé à tricoter au point de blé, avec 1 m lis de chaque côté. Autrement dit, juste après avoir tricoté A.4. Bon tricot!
15.03.2021 - 08:14
![]() Heleen Gillesse wrote:
Heleen Gillesse wrote:
In het patroon staat het dakje (=3 av samen) daarboven de zwarte blokjes: overslaan. Dan krijg ik toch steeds minder steken? En moet ik de terugpen altijd averechts breien?
09.03.2021 - 14:15DROPS Design answered:
Dag Heleen,
Ja dat klopt, de zwarte hokjes zijn geen steken en je krijgt inderdaad minder steken. In de telpatronen zijn zowel de heengaande als de teruggaande naalden weergegeven. De eerste naald is aan de goede kant, de tweede naald aan de verkeerde kant, de derde naald weer aan de goede kant, enzovoorts. Bij de uitleg van de symbolen staat ook aangegeven hoe je de steken op de goede dan wel de verkeerde kant breit.
09.03.2021 - 21:17
|
||||||||||||||||
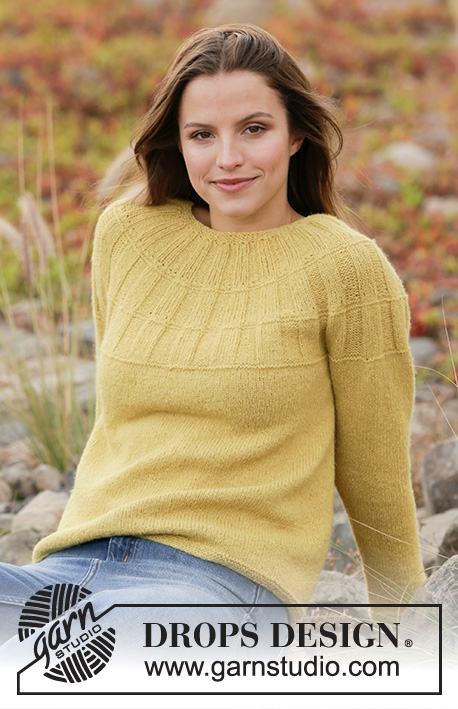
Oats and Honey#oatsandhoneysweater |
||||||||||||||||
 |
 |
|||||||||||||||
Knitted jumper with V-neck in DROPS Brushed Alpaca Silk. The piece is worked with double moss stitch and balloon sleeves. Sizes XS - XXL.
DROPS 213-20 |
||||||||||||||||
|
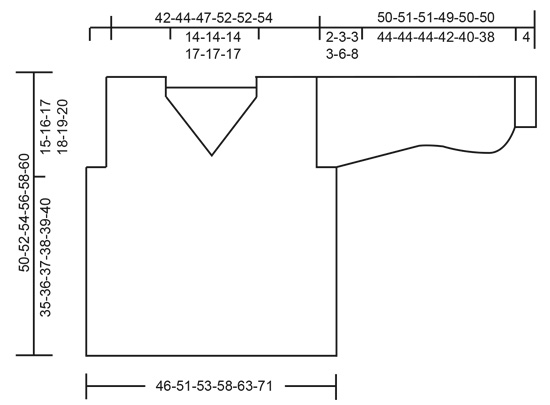
------------------------------------------------------- EXPLANATIONS FOR THE PATTERN: ------------------------------------------------------- RIDGE/GARTER STITCH (worked back and forth): Knit all rows. 1 ridge in height = Knit 2 rows. PATTERN: See diagrams A.1 to A.4. The diagrams show all the rows in the pattern seen from the right side. Choose diagram for your size (applies to A.4). INCREASE TIP-1 (evenly spaced): To work out how to increase evenly, count the total number of stitches on the needle (e.g. 42 stitches) minus the 2 edge stitches and divide by the number of increases to be made (e.g. 20) = 2. In this example, increase by making 1 yarn over after each 2nd stitch. On the next row work the yarn overs twisted to avoid holes. INCREASE TIP-2 (for sleeves): Increase by making 1 yarn over inside 1 edge stitch in each side, on next row knit the yarn over twisted to avoid making a hole. Thereafter the new stitches are worked into the pattern. ------------------------------------------------------- START THE PIECE HERE: ------------------------------------------------------- JUMPER – SHORT OVERVIEW OF THE PIECE: The piece is worked back and forth, in sections, which are sewn together to finish. The sleeves are worked back and forth with circular needle. BACK PIECE: Cast on 75-83-87-95-103-115 stitches with circular needle size 5.5 mm and Brushed Alpaca Silk. Purl 1 row (= wrong side). Then work pattern back and forth as follows: 1 edge stitch in GARTER STITCH – read description above, A.1 over the next 73-81-85-93-101-113 stitches, 1 edge stitch in garter stitch. Continue like this back and forth. REMEMBER THE KNITTING TENSION! When the piece measures 35-36-37-38-39-40 cm work as follows: Cast off the first 3-5-5-5-9-13 stitches at the beginning of the next 2 rows for the armholes = 69-73-77-85-85-89 stitches. Continue with double moss stitch and 1 edge stitch in garter stitch on each side. When the piece measures 48-50-52-54-56-58 cm, cast off the middle 21-21-21-25-25-25 stitches for the neck (cast off with knit over knit and purl over purl) and each shoulder is finished separately. On the next row from the neck cast off 1 stitch = 23-25-27-29-29-31 stitches left on the shoulder. When the piece measures 15-16-17-18-19-20 cm from where you cast off stitches for the armhole, cast off with knit over knit and purl over purl. The piece measures 50-52-54-56-58-60 cm from the shoulder down. Work the other shoulder in the same way. FRONT PIECE: Cast on 75-83-87-95-103-115 stitches with circular needle size 5.5 mm and Brushed Alpaca Silk. Purl 1 row (= wrong side). Then work pattern back and forth as follows: 1 edge stitch in garter stitch, A.1 over the next 73-81-85-93-101-113 stitches, 1 edge stitch in garter stitch. Continue back and forth like this. When the piece measures 35-36-37-38-39-40 cm – adjust so the next row is worked from the right side and matches row 3 in A.1 (i.e. the first stitch after the edge stitch at the beginning of the row is knitted), work as follows: Cast off the first 3-5-5-5-9-13 stitches for the armhole, work as before over the next 34-36-38-42-42-44 stitches, work 2 stitches in the next stitch (= mid-stitch), work the remaining stitches on the row. The next row is worked as follows: Cast off the first 3-5-5-5-9-13 stitches, work the next 35-37-39-43-43-45 stitches before placing them on a thread for the right front piece and work the remaining 35-37-39-43-43-45 stitches (= left front piece). LEFT FRONT PIECE: Continue back and forth with double moss stitch, 1 edge stitch in garter stitch towards the armhole and work A.2 over the 12 stitches towards the v-neck. When A.2 has been completed in height you have decreased 2 stitches 3 times. Continue to decrease for the v-neck in the same way 3-3-3-4-4-4 more times (= a total of 12-12-12-14-14-14 stitches decreased for the neck) = 23-25-27-29-29-31 stitches for the shoulder. Work double moss stitch and 1 edge stitch in garter stitch towards the armhole to finished length. When the piece measures 15-16-17-18-19-20 cm from where you cast off stitches for the armhole, cast off with knit over knit and purl over purl. The piece measures approx. 50-52-54-56-58-60 cm from the shoulder down. RIGHT FRONT PIECE: Place the stitches from the thread back on the needle = 35-37-39-39-43-45 stitches. Continue back and forth with double moss stitch, 1 edge stitch in garter stitch towards the armhole and work A.3 over the first 12 stitches towards the v-neck. When A.3 has been completed in height you have decreased 2 stitches 3 times. Continue to decrease for the v-neck in the same way 3-3-3-4-4-4 more times (= a total of 12-12-12-14-14-14 stitches decreased for the neck) = 23-25-27-29-29-31 stitches for the shoulder. Work double moss stitch and 1 edge stitch in garter stitch towards the armhole to finished length. When the piece measures 15-16-17-18-19-20 cm from where you cast off stitches for the armhole, cast off with knit over knit and purl over purl. The piece measures approx. 50-52-54-56-58-60 cm from the shoulder down. SLEEVE: Cast on 42-46-46-46-50-50 stitches with needle size 4.5 mm and Brushed Alpaca Silk. Purl 1 row (= wrong side). Then work rib as follows: 1 edge stitch in garter stitch, * knit 2, purl 2 *, work from *-* until there is 1 stitch left on the row, 1 edge stitch in garter stitch. When the rib measures 4 cm, knit 1 row and increase 20-20-22-22-22-22 stitches evenly spaced – read INCREASE TIP-1 = 62-66-68-68-72-72 stitches. Change to circular needle size 5.5 mm and purl 1 row back from the wrong side. Now work pattern as follows: 1 edge stitch in garter stitch, A.1 until there is 1 stitch left on the row, 1 edge stitch in garter stitch. Continue this pattern back and forth. When the piece measures 17 cm in all sizes decrease as follows from the right side: Work 4-6-7-7-4-4 stitches as before, A.4 (choose diagram for your size) over the next 54-54-54-54-64-64 stitches (= 9-9-9-9-8-8 repeats of 6-6-6-6-8-8 stitches), work the last 4-6-7-7-4-4 stitches = 44-48-50-50-56-56 stitches. Continue back and forth with double moss stitch and 1 edge stitch in garter stitch on each side. On the next row from the right side begin to increase mid under the sleeve – read INCREASE TIP-2. Increase like this every 13-13-8½-6-11½-5 cm a total of 3-3-3-5-3-5 times = 50-54-56-60-62-66 stitches. Continue working until the sleeve measures 48-48-48-46-44-42 cm. Insert 1 marker on each side of the sleeve – they mark where the bottom of the armhole begins. Continue working until the sleeve measures 50-51-51-49-50-50 cm. Cast off with knit over knit and purl over purl. Work the other sleeve in the same way. ASSEMBLY: Sew the shoulder seams inside the cast-off edge. Sew in the sleeves and sew the bottom of the armhole – the markers on the sleeve should match the sides of the body. Sew the sleeve seams and continue down the side seams. |
||||||||||||||||
Diagram explanations |
||||||||||||||||
|
||||||||||||||||
 |
||||||||||||||||
 |
||||||||||||||||
Have you finished this pattern?Tag your pictures with #dropspattern #oatsandhoneysweater or submit them to the #dropsfan gallery. Do you need help with this pattern?You'll find 20 tutorial videos, a Comments/Questions area and more by visiting the pattern on garnstudio.com. © 1982-2026 DROPS Design A/S. We reserve all rights. This document, including all its sub-sections, has copyrights. Read more about what you can do with our patterns at the bottom of each pattern on our site. |
||||||||||||||||


With over 40 years in knitting and crochet design, DROPS Design offers one of the most extensive collections of free patterns on the internet - translated to 17 languages. As of today we count 324 catalogues and 12290 patterns translated into English (UK/cm). 12290
We work hard to bring you the best knitting and crochet have to offer, inspiration and advice as well as great quality yarns at incredible prices! Would you like to use our patterns for other than personal use? You can read what you are allowed to do in the Copyright text at the bottom of all our patterns. Happy crafting!
Post a comment to pattern DROPS 213-20
We would love to hear what you have to say about this pattern!
If you want to leave a question, please make sure you select the correct category in the form below, to speed up the answering process. Required fields are marked *.